

k8s实现动态存储
NFS服务端安装
1.yum install nfs-utils -y
k8s所有节点都需要安装上面的nfs包
2.在NFS server上配置NFS

3.启动NFS服务
systemctl start nfs-server
4.验证服务的可用性
showmount -e 192.168.30.156

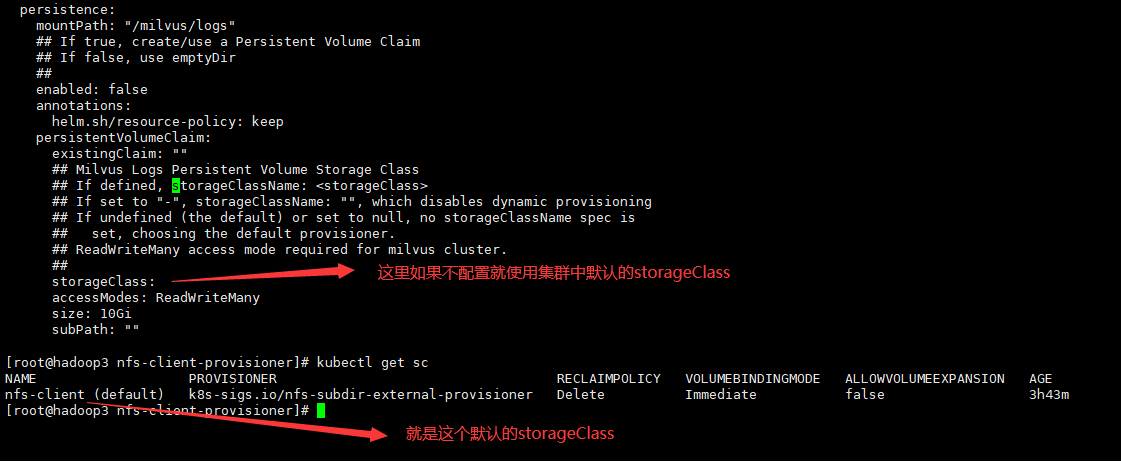
storageclass安装配置
1.创建storageclass资源


apiVersion: storage.k8s.io/v1
kind: StorageClass
metadata:
  name: nfs-client
provisioner: k8s-sigs.io/nfs-subdir-external-provisioner # or choose another name, must match deployment's env PROVISIONER_NAME'
parameters:
  archiveOnDelete: "false"
kubectl apply -f sc.yaml
kubectl patch storageclass nfs-client -p '{"metadata": {"annotations":{"storageclass.kubernetes.io/is-default-class":"true"}}}'

2.创建rbac资源 因为storage自动创建pv需要经过kube-apiserver,所以需要授权
apiVersion: v1
kind: ServiceAccount
metadata:
  name: nfs-client-provisioner
  # replace with namespace where provisioner is deployed
  namespace: default
---
kind: ClusterRole
apiVersion: rbac.authorization.k8s.io/v1
metadata:
  name: nfs-client-provisioner-runner
rules:
  - apiGroups: [""]
    resources: ["nodes"]
    verbs: ["get", "list", "watch"]
  - apiGroups: [""]
    resources: ["persistentvolumes"]
    verbs: ["get", "list", "watch", "create", "delete"]
  - apiGroups: [""]
    resources: ["persistentvolumeclaims"]
    verbs: ["get", "list", "watch", "update"]
  - apiGroups: ["storage.k8s.io"]
    resources: ["storageclasses"]
    verbs: ["get", "list", "watch"]
  - apiGroups: [""]
    resources: ["events"]
    verbs: ["create", "update", "patch"]
---
kind: ClusterRoleBinding
apiVersion: rbac.authorization.k8s.io/v1
metadata:
  name: run-nfs-client-provisioner
subjects:
  - kind: ServiceAccount
    name: nfs-client-provisioner
    # replace with namespace where provisioner is deployed
    namespace: default
roleRef:
  kind: ClusterRole
  name: nfs-client-provisioner-runner
  apiGroup: rbac.authorization.k8s.io
---
kind: Role
apiVersion: rbac.authorization.k8s.io/v1
metadata:
  name: leader-locking-nfs-client-provisioner
  # replace with namespace where provisioner is deployed
  namespace: default
rules:
  - apiGroups: [""]
    resources: ["endpoints"]
    verbs: ["get", "list", "watch", "create", "update", "patch"]
---
kind: RoleBinding
apiVersion: rbac.authorization.k8s.io/v1
metadata:
  name: leader-locking-nfs-client-provisioner
  # replace with namespace where provisioner is deployed
  namespace: default
subjects:
  - kind: ServiceAccount
    name: nfs-client-provisioner
    # replace with namespace where provisioner is deployed
    namespace: default
roleRef:
  kind: Role
  name: leader-locking-nfs-client-provisioner
  apiGroup: rbac.authorization.k8s.io
kubectl apply -f rbac.yaml
3.创建nfs deployment资源
需要一个deployment来专门实现pv与pvc的自动创建
apiVersion: apps/v1
kind: Deployment
metadata:
  name: nfs-client-provisioner
spec:
  replicas: 1
  strategy:
    type: Recreate
  selector:
    matchLabels:
      app: nfs-client-provisioner
  template:
    metadata:
      labels:
        app: nfs-client-provisioner
    spec:
      serviceAccount: nfs-client-provisioner
      containers:
        - name: nfs-client-provisioner
          image: registry.cn-beijing.aliyuncs.com/pylixm/nfs-subdir-external-provisioner:v4.0.0
          volumeMounts:
            - name: nfs-client-root
              mountPath: /persistentvolumes
          env:
            - name: PROVISIONER_NAME
              value: k8s-sigs.io/nfs-subdir-external-provisioner
            - name: NFS_SERVER
              value: 192.168.30.156
            - name: NFS_PATH
              value: /nfsdata
      volumes:
        - name: nfs-client-root
          nfs:
            server: 192.168.30.156
            path: /nfsdata

4.查看deployment

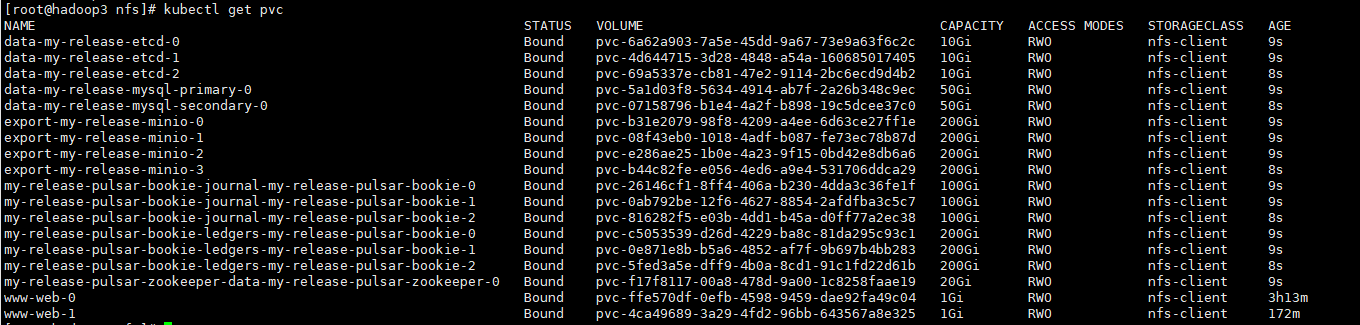
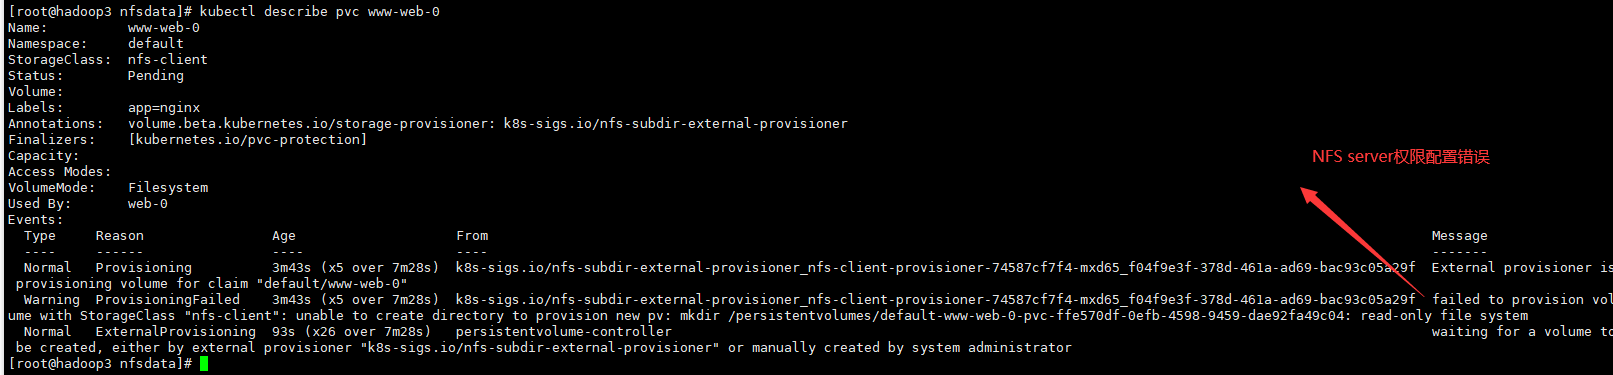
5.测试自动创建NFS PV
---
apiVersion: v1
kind: Service
metadata:
  name: nginx
  labels:
    app: nginx
spec:
  ports:
  - port: 80
    name: web
  clusterIP: None
  selector:
    app: nginx
---
apiVersion: apps/v1
kind: StatefulSet
metadata:
  name: web
spec:
  selector:
    matchLabels:
      app: nginx
  serviceName: "nginx"
  replicas: 2
  template:
    metadata:
      labels:
        app: nginx
    spec:
      imagePullSecrets:
      - name: huoban-harbor
      terminationGracePeriodSeconds: 10
      containers:
      - name: nginx
        image: nginx:latest
        ports:
        - containerPort: 80
          name: web
        volumeMounts:
        - name: www
          mountPath: /usr/share/nginx/html
  volumeClaimTemplates:
  - metadata:
      name: www
    spec:
      accessModes: [ "ReadWriteOnce" ]
      storageClassName: "nfs-client"
      resources:
        requests:
          storage: 1Gi
kubectl apply -f nginx.yaml


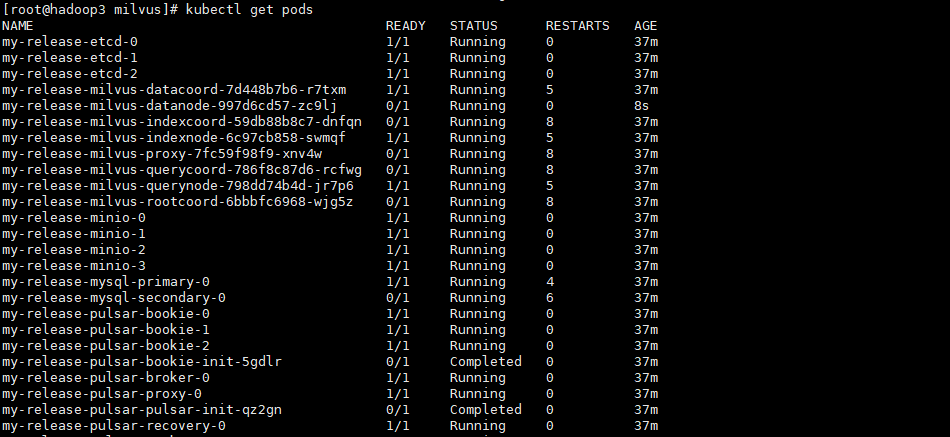
Helm安装数据库集群
在执行helm命令的时候必须先创建一个storageClass 否则创建的pod会一直处于pending状态
kubectl get pvc | grep Pending | awk '{print $1}' | xargs kubectl delete pvc 删除所有状态为pending的pvc
使用helm uninstall my-relase的时候不会自动删除pvc和pv资源 ,需要手动删除
cd /home/admin/db/milvus-helm-master/charts/milvus
helm install --set cluster.enabled=true --set persistence.enabled=true --set mysql.enabled=true my-release .

本文来自博客园,作者:不懂123,转载请注明原文链接:https://www.cnblogs.com/yxh168/p/17466559.html


【推荐】国内首个AI IDE,深度理解中文开发场景,立即下载体验Trae
【推荐】编程新体验,更懂你的AI,立即体验豆包MarsCode编程助手
【推荐】抖音旗下AI助手豆包,你的智能百科全书,全免费不限次数
【推荐】轻量又高性能的 SSH 工具 IShell:AI 加持,快人一步
· winform 绘制太阳,地球,月球 运作规律
· AI与.NET技术实操系列(五):向量存储与相似性搜索在 .NET 中的实现
· 超详细:普通电脑也行Windows部署deepseek R1训练数据并当服务器共享给他人
· 上周热点回顾(3.3-3.9)
· AI 智能体引爆开源社区「GitHub 热点速览」
2021-06-08 ansible安装服务实例