CDH搭建示例
准备工作
1.ntp时间同步
ntp管理节点
#默认的一个内部时钟数据,用在没有外部NTP服务器时,使用它为局域网用户提供服务
server 127.127.1.0
fudge 127.127.1.0 stratum 10

restrict 127.0.0.1
restrict ::1

# Hosts on local network are less restricted.
#restrict 192.168.1.0 mask 255.255.255.0 nomodify notrap

# Use public servers from the pool.ntp.org project.
# Please consider joining the pool (http://www.pool.ntp.org/join.html).
#server 0.centos.pool.ntp.org iburst
#server 1.centos.pool.ntp.org iburst
#server 2.centos.pool.ntp.org iburst
#server 3.centos.pool.ntp.org iburst


server 127.127.1.0
fudge  127.127.1.0 stratum 10

#broadcast 192.168.1.255 autokey        # broadcast server
#broadcastclient                        # broadcast client
#broadcast 224.0.1.1 autokey            # multicast server
#multicastclient 224.0.1.1              # multicast client
#manycastserver 239.255.254.254         # manycast server
#manycastclient 239.255.254.254 autokey # manycast client

#restrict 127.0.0.1
#restrict ::1

# Hosts on local network are less restricted.
#restrict 192.168.1.0 mask 255.255.255.0 nomodify notrap

# Use public servers from the pool.ntp.org project.
# Please consider joining the pool (http://www.pool.ntp.org/join.html).
#server 0.centos.pool.ntp.org iburst
#server 1.centos.pool.ntp.org iburst
#server 2.centos.pool.ntp.org iburst
#server 3.centos.pool.ntp.org iburst


server 192.168.30.170

#broadcast 192.168.1.255 autokey        # broadcast server
#broadcastclient                        # broadcast client
#broadcast 224.0.1.1 autokey            # multicast server
#multicastclient 224.0.1.1              # multicast client
#manycastserver 239.255.254.254         # manycast server
#manycastclient 239.255.254.254 autokey # manycast client
2.主机名设置并同步hosts文件

192.168.30.170 hadoop-node1
192.168.30.75  hadoop-node2
192.168.30.76  hadoop-node3
192.168.30.79  hadoop-node4
192.168.30.98  hadoop-node5
192.168.30.99  hadoop-node6
3.防火墙关闭
4.任意两个节点之间实现ssh免密登录
主节点搭建
1.yum源搭建


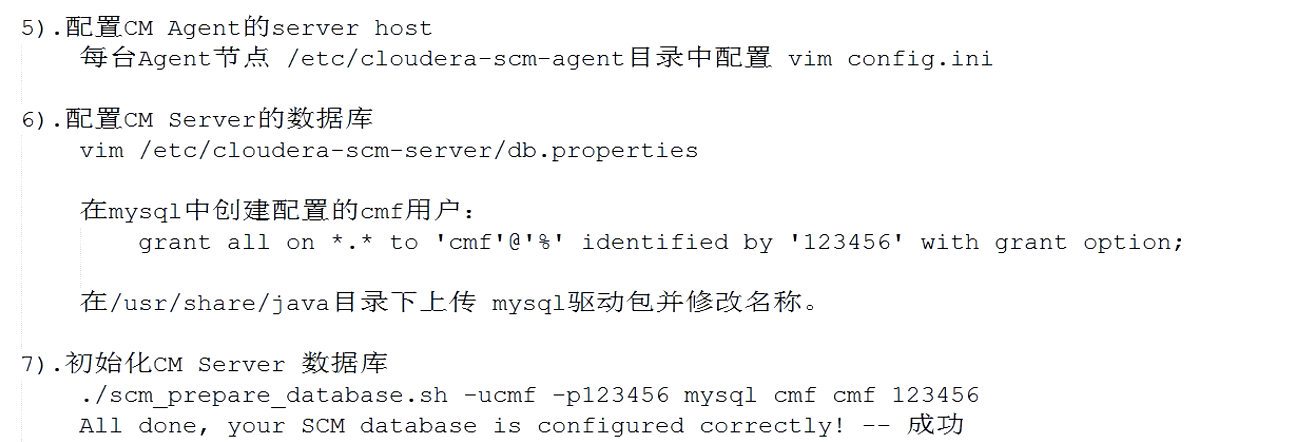

[udap]
name=udap
baseurl=http://192.168.30.170/udap
gpgcheck=0
enabled=1
yum clean all && yum makecache
2.安装包访问搭建


3.管理节点安装web管理系统
1.安装mysql
yum install mariadb* -y
systemctl start mariadb

mysql>create database UDAPf default character set utf8 collate utf8_general_ci;
mysql>grant all privileges on UDAPf.* to 'UDAPf'@'localhost' identified by 'UDAPf';
mysql>grant all privileges on UDAPf.* to 'UDAPf'@'%' identified by 'UDAPf';
mysql>flush privileges;
2.安装jdbc-mysql驱动
yum install mysql-connector-*
也可以把驱动jar包手动上传到/usr/share/java目录下

3.安装web管理系统
yum install cloudera-manager-server*
4.修改数据库配置文件信息

vi /etc/cloudera-scm-server/db.properties

com.cloudera.cmf.db.type=mysql
com.cloudera.cmf.db.host=localhost
com.cloudera.cmf.db.name=UDAPf
com.cloudera.cmf.db.user=UDAPf
com.cloudera.cmf.db.password=UDAPf
#com.cloudera.cmf.db.setupType=INIT 注意此项注释掉,否则CM启动报错
5.启动web系统
systemctl start cloudera-scm-server
chkconfig cloudera-scm-server on
6.访问web页面
admin/admin
通过web安装集群
1.填写parcel路径
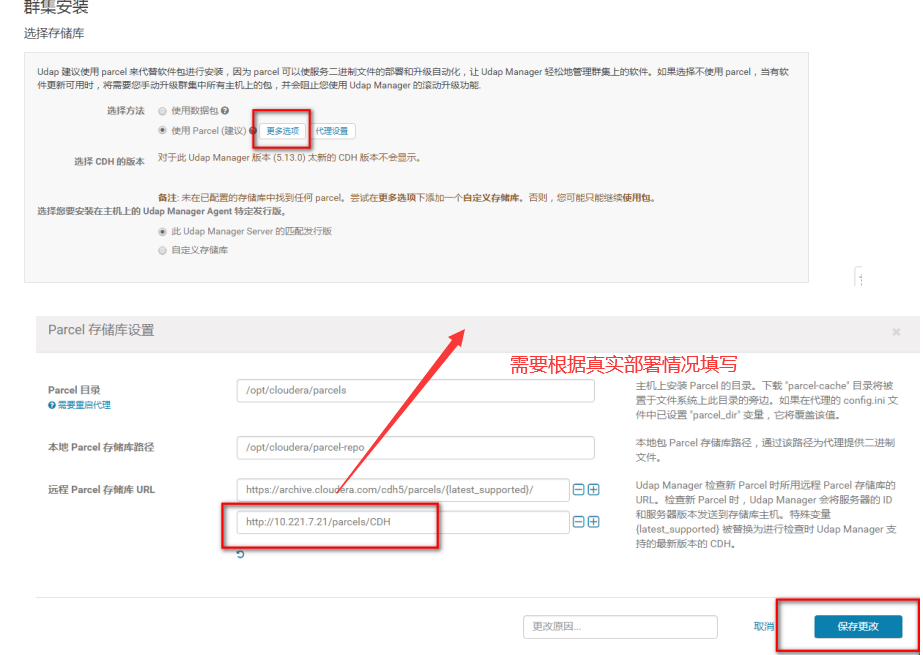
http://192.168.30.170/parcels/CDH5.13/
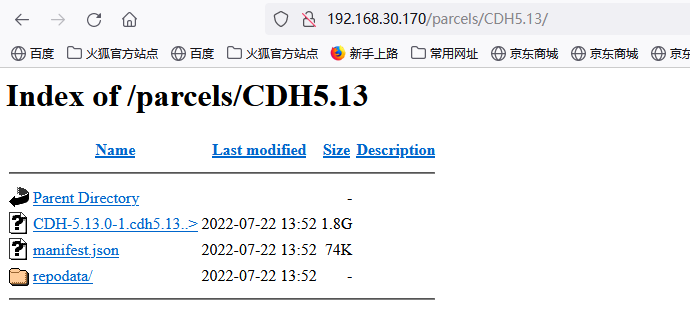
2.填写udap路径
http://192.168.30.170/udap/


3.配置服务的parcel路径

重装agent

找到相关的安装包,使用yum remove 命令来卸载相关包
yum remove cloudera-manager-agent
问题排查
1.页面上的图表监控不显示数据
Host Monitor和Service Monitor服务失效
去主节点中的/var/lib目录,然后删掉:cloudera-host-monitor, cloudera-service-monitor
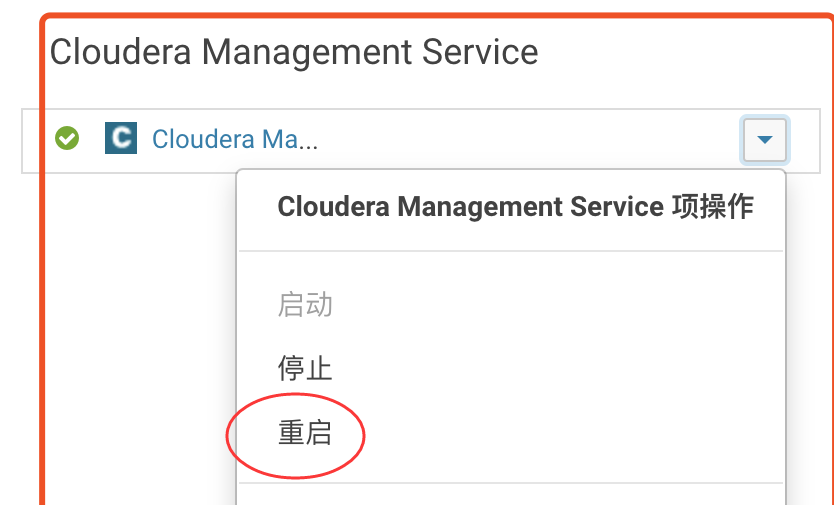
回到cdh的主页,重启cloudera management service

2.某些主机提示"无法找到主机的NTP服务"
先同步服务器时钟
service ntpd stop 停止ntp服务
ntpdate 主机ip 同步主机时钟
service ntpd start 启动ntp服务

本文来自博客园,作者:不懂123,转载请注明原文链接:https://www.cnblogs.com/yxh168/p/16508125.html


【推荐】国内首个AI IDE,深度理解中文开发场景,立即下载体验Trae
【推荐】编程新体验,更懂你的AI,立即体验豆包MarsCode编程助手
【推荐】抖音旗下AI助手豆包,你的智能百科全书,全免费不限次数
【推荐】轻量又高性能的 SSH 工具 IShell:AI 加持,快人一步
· 25岁的心里话
· 闲置电脑爆改个人服务器(超详细) #公网映射 #Vmware虚拟网络编辑器
· 基于 Docker 搭建 FRP 内网穿透开源项目(很简单哒)
· 零经验选手,Compose 一天开发一款小游戏!
· 一起来玩mcp_server_sqlite,让AI帮你做增删改查!!
2018-07-22 Redis基本管理