
Rancher搭建ES容器集群
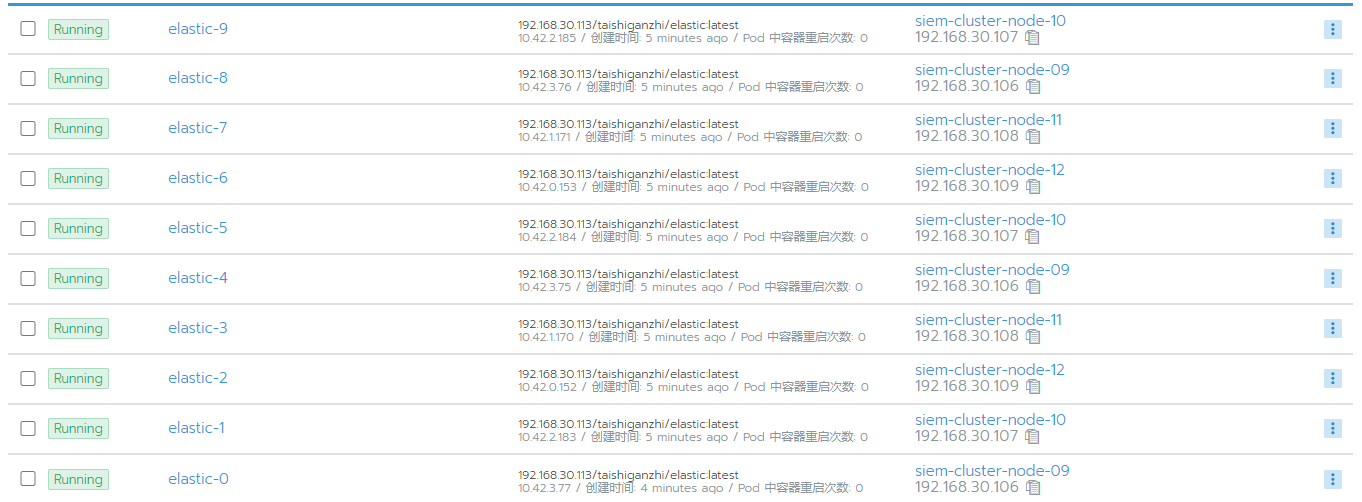
ES集群效果
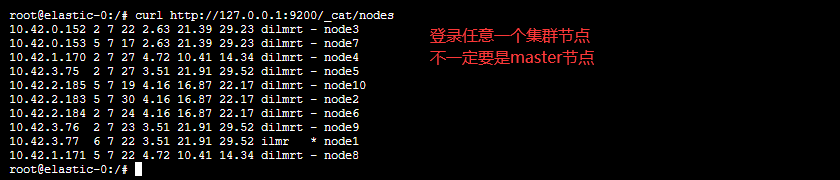
检查集群状况

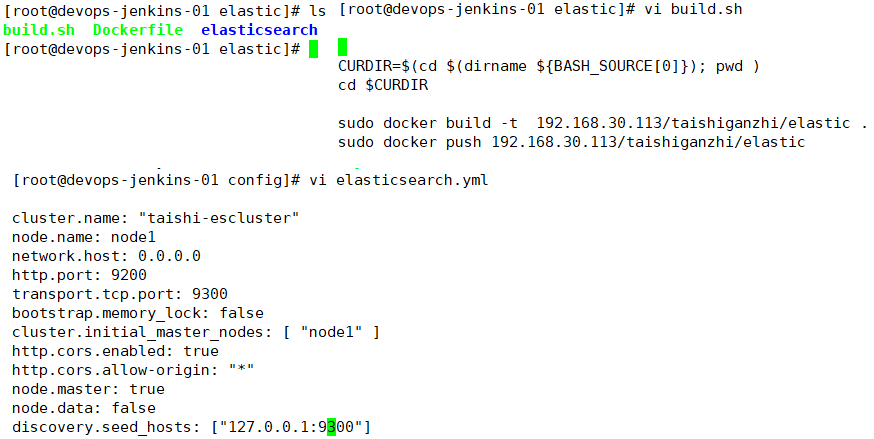
集群搭建步骤


FROM 192.168.30.113/library/java:latest
ENV TZ=Asia/Shanghai
RUN ln -snf /usr/share/zoneinfo/$TZ /etc/localtime && echo '$TZ' > /etc/timezone
COPY elasticsearch  /elasticsearch
RUN adduser elasticsearch
RUN chown -R elasticsearch:elasticsearch /elasticsearch
ENTRYPOINT ["/bin/bash","/elasticsearch/bin/start-escluster.sh"]
#!/bin/bash

#change es config
ordinal=`env | grep podname | cut -d"=" -f2 | cut -d"-" -f2`
hostip=`env | grep hostip | cut -d"=" -f2`
seed_hosts=`env | grep seed_hosts | cut -d"=" -f2`
let severid=$ordinal+1
let hport=9700+$ordinal
let tport=9800+$ordinal
#sed -i "s/network.publish_host:.*/network.publish_host: $hostip/g" /elasticsearch/config/elasticsearch.yml
sed -i "s/discovery.seed_hosts:.*/discovery.seed_hosts: $seed_hosts/g" /elasticsearch/config/elasticsearch.yml
if [ $ordinal -eq 0 ];
then
   sed -i "s/node.data:.*/node.data: false/g" /elasticsearch/config/elasticsearch.yml
else
   sed -i "s/node.name:.*/node.name: node$severid/g" /elasticsearch/config/elasticsearch.yml
   #sed -i "s/http.port:.*/http.port: $hport/g" /elasticsearch/config/elasticsearch.yml
   #sed -i "s/transport.tcp.port:.*/transport.tcp.port: $tport/g" /elasticsearch/config/elasticsearch.yml
   sed -i "s/node.data:.*/node.data: true/g" /elasticsearch/config/elasticsearch.yml
fi

# start es cluster
echo "start es cluster........"
su - elasticsearch -c /elasticsearch/bin/elasticsearch
启动pod的时候传递根据需要创建pod的数量传递对应的环境变量参数

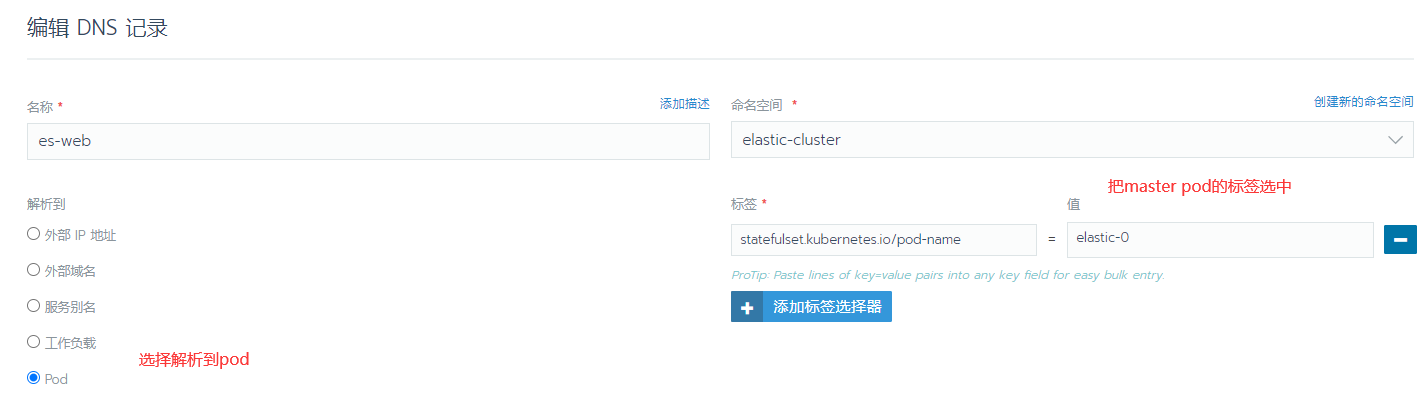
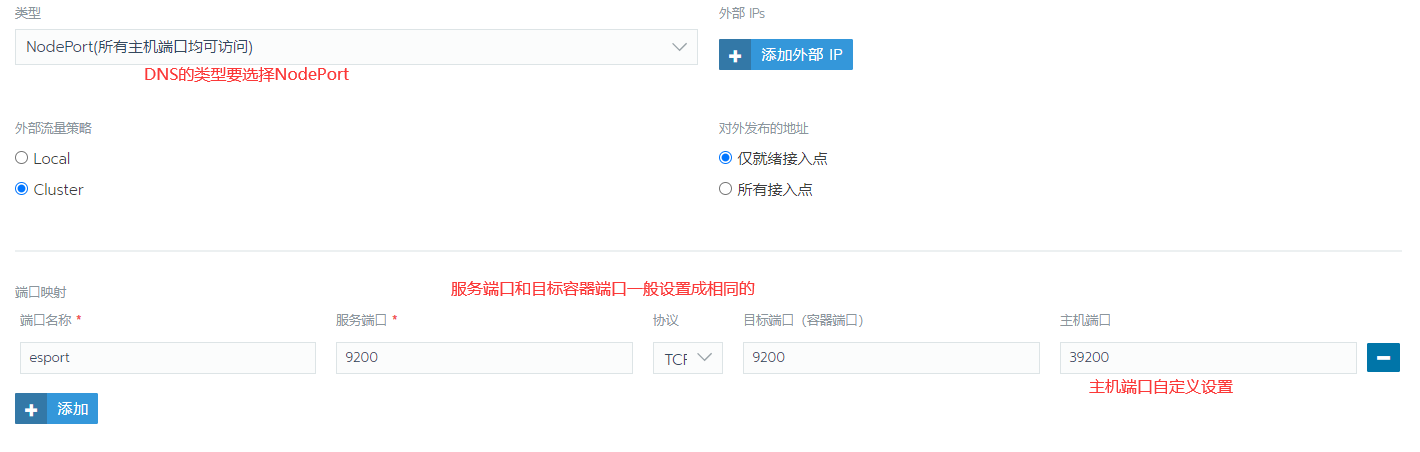
把master的pod映射到主机进行访问
1.创建一个DNS记录
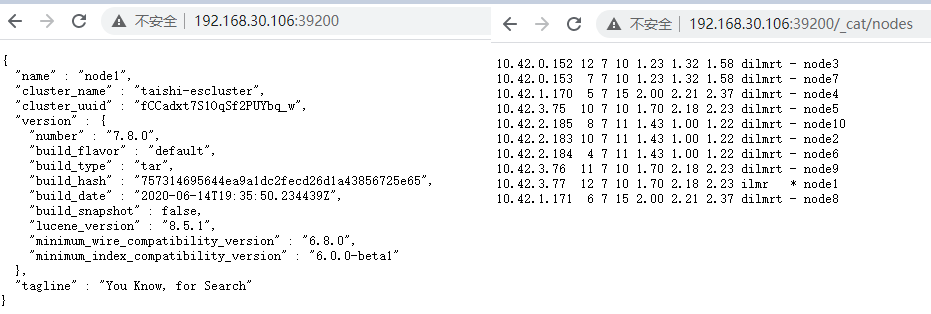
2.通过主机浏览器访问ES集群
ES集群证书生成
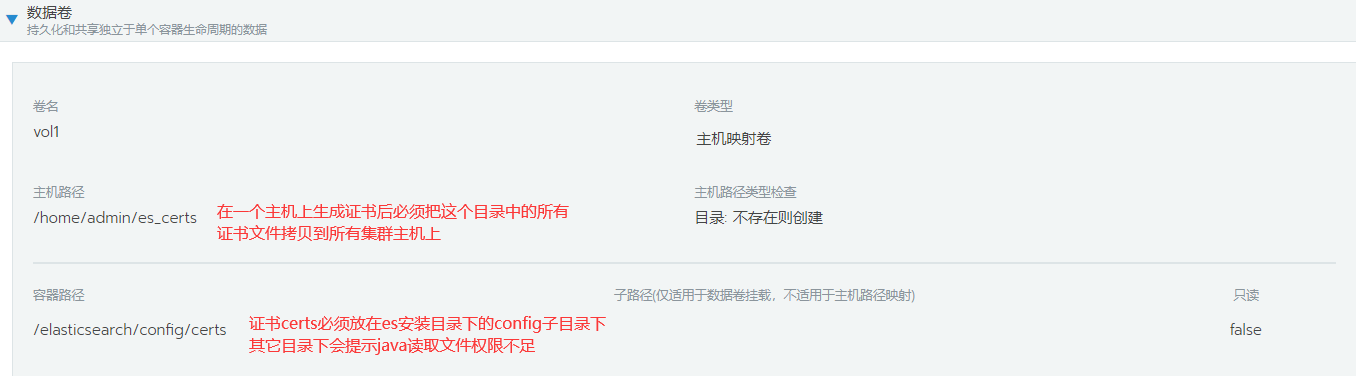
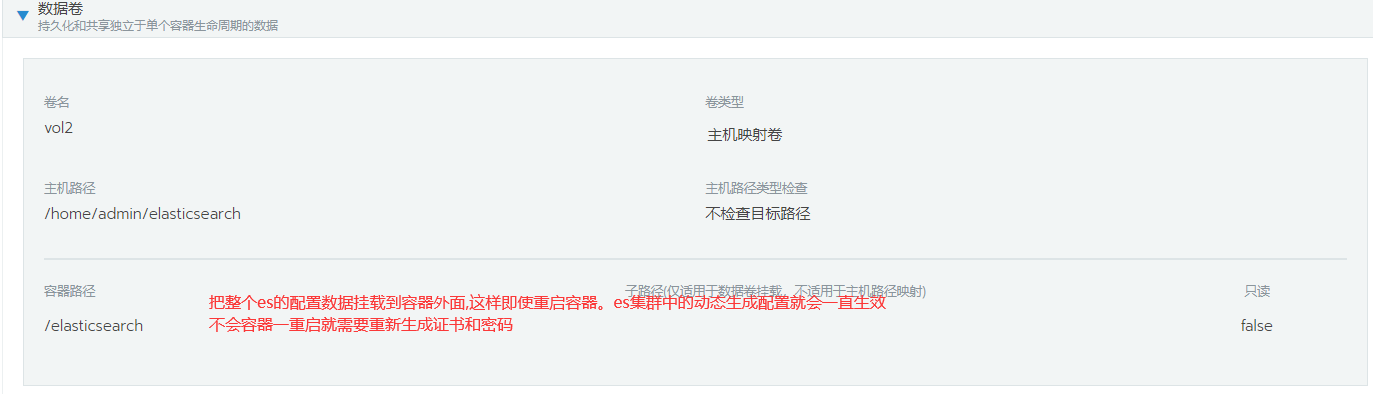
1.添加卷映射
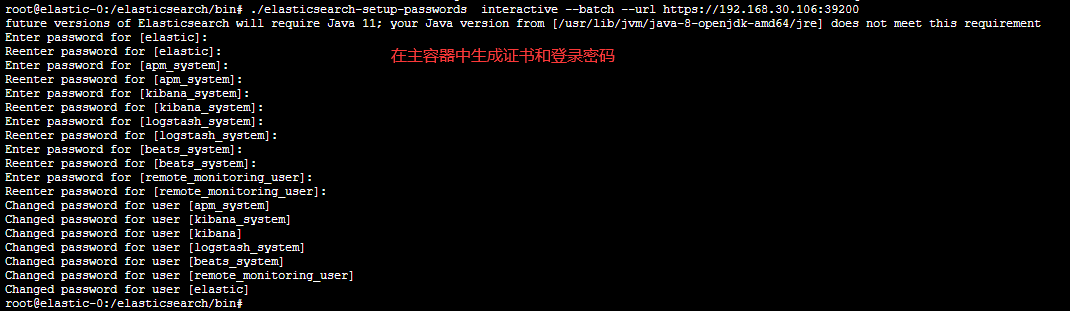
2.在pod中生成证书和密码
./elasticsearch-certutil cert --ip 192.168.30.106 --out /elasticsearch/config/certs/elastic-stack-ca.zip --pem
./elasticsearch-setup-passwords interactive --batch --url https://192.168.30.106:39200
3.修改elastic的配置yml文件,添加certs证书认证
cluster.name: "taishi-escluster"
node.name: node1
network.host: 0.0.0.0
http.port: 9200
transport.tcp.port: 9300
bootstrap.memory_lock: false
cluster.initial_master_nodes: [ "node1" ]
http.cors.enabled: true
http.cors.allow-origin: "*"
node.master: true
node.data: false
discovery.seed_hosts: ["127.0.0.1:9300"]
xpack.license.self_generated.type: basic
xpack.security.enabled: true
xpack.security.http.ssl.enabled: true
xpack.security.http.ssl.key: /elasticsearch/config/certs/instance/instance.key
xpack.security.http.ssl.certificate: /elasticsearch/config/certs/instance/instance.crt
xpack.security.http.ssl.certificate_authorities: /elasticsearch/config/certs/ca/ca.crt
xpack.security.transport.ssl.enabled: true
xpack.security.transport.ssl.verification_mode: certificate
xpack.security.transport.ssl.key: /elasticsearch/config/certs/instance/instance.key
xpack.security.transport.ssl.certificate: /elasticsearch/config/certs/instance/instance.crt
xpack.security.transport.ssl.certificate_authorities: /elasticsearch/config/certs/ca/ca.crt
4.验证https登录es
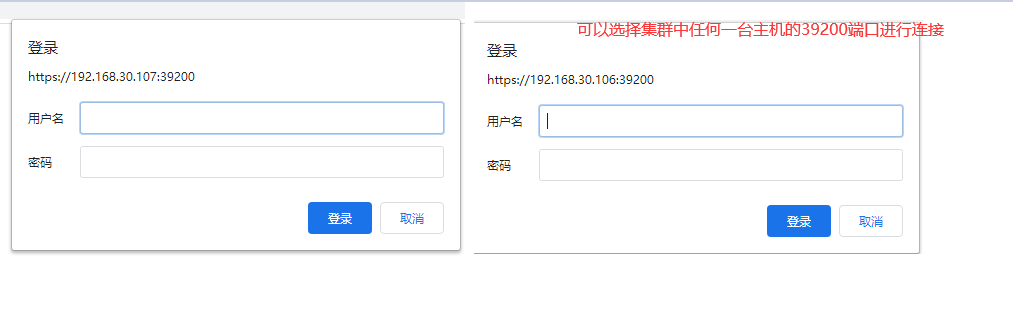
5.集群https访问成功

6.总结
1.需要手动执行命令生成证书和密码
2.需要手动传入所有pod的名称discovery.seed_hosts.示例 : ["elastic-0.elastic","elastic-1.elastic"]
3.需要手动把证书目录拷贝到集群的所有主机的映射卷上
7.程序访问es
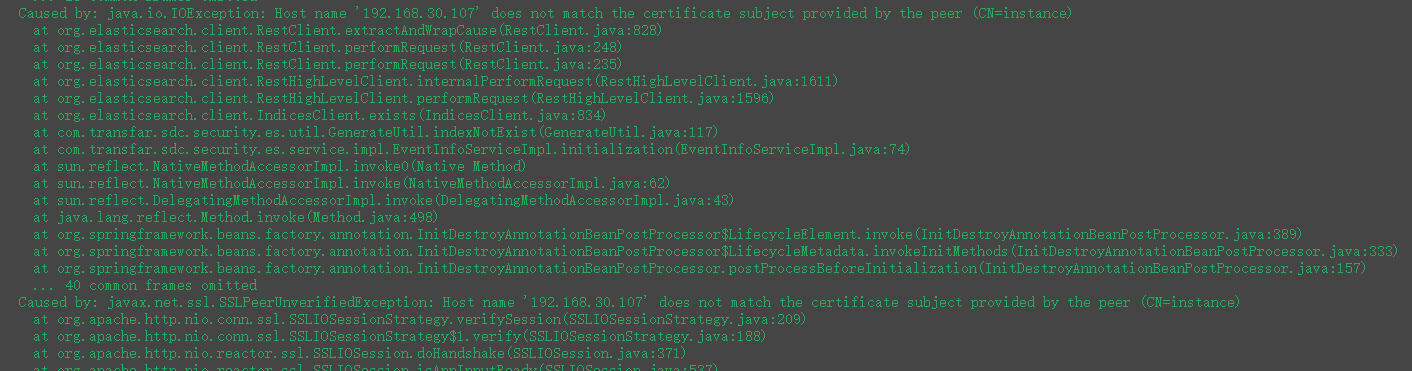
虽然在浏览器中可以通过集群中任何一个主机的39200端口访问es集群 但是通过程序访问的时候就必须设置在生成证书时候指定的IP地址 否则会出现下面的错误
在生成证书的时候指定的IP是30.106 那么在应用中配置es连接信息的时候就只能用30.106不能用集群中的其他IP地址
修改成在命令中指定的主机

缺点
同一个主机上如果被分配同一个类型的多个Pod,这些Pod挂载的卷是同一个主机目录.这种情况Pod中的数据存储是会发生异常的。
在集群的规划上.集群中的每个主机上只能运行一个类型相同的有状态的Pod.无状态的Pod可以运行多个
可以做个端口映射每次在主机上启动一个Pod,就监听主机上一个指定的端口。这样当主机上再启动另外一个Pod的时候由于主机端口被占用而无法成功运行

ES重启集群不需要重新生成证书
Kibana的安装
1.拉取一个kibana的镜像
2.映射pod中kibana应用的配置文件目录
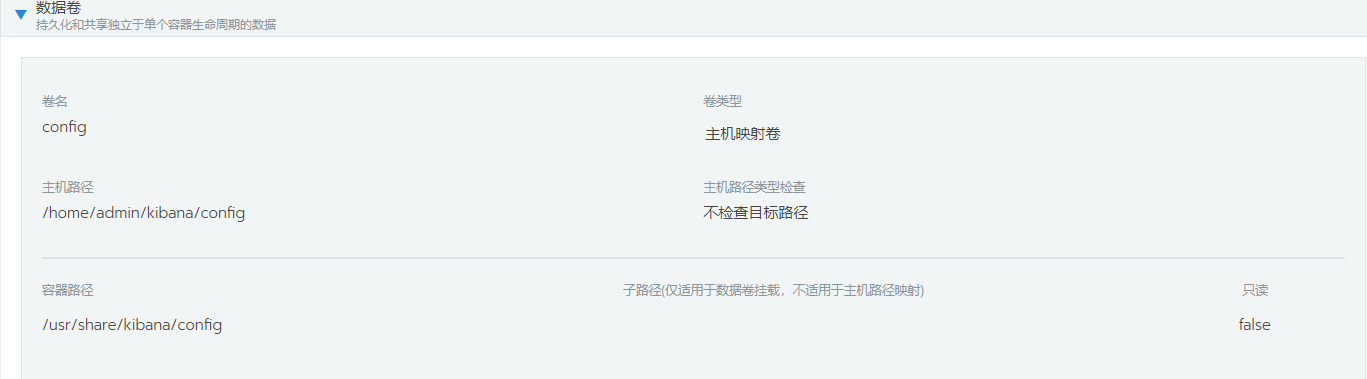

3.配置kibana.yml文件内容
server.name: kibana
server.host: "0"
#xpack.monitoring.ui.container.elasticsearch.enabled: true
##
#### X-Pack security credentials
##
elasticsearch.hosts: [ "https://192.168.30.106:39200/" ]
monitoring.ui.container.elasticsearch.enabled: true


elasticsearch.username: kibana_system
elasticsearch.password: Trar@123
elasticsearch.ssl.certificateAuthorities: /usr/share/kibana/config/ca.crt
elasticsearch.ssl.verificationMode: certificate
server.ssl.enabled: true
server.ssl.certificate: /usr/share/kibana/config/instance.crt
server.ssl.key: /usr/share/kibana/config/instance.key
4.创建kibana的service
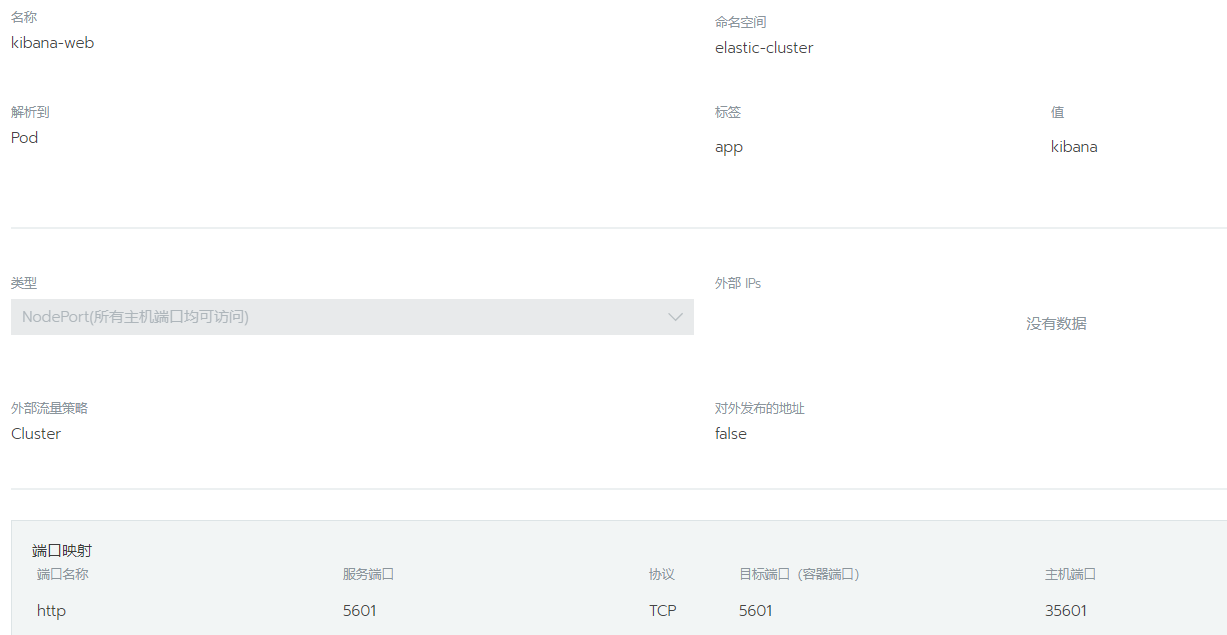
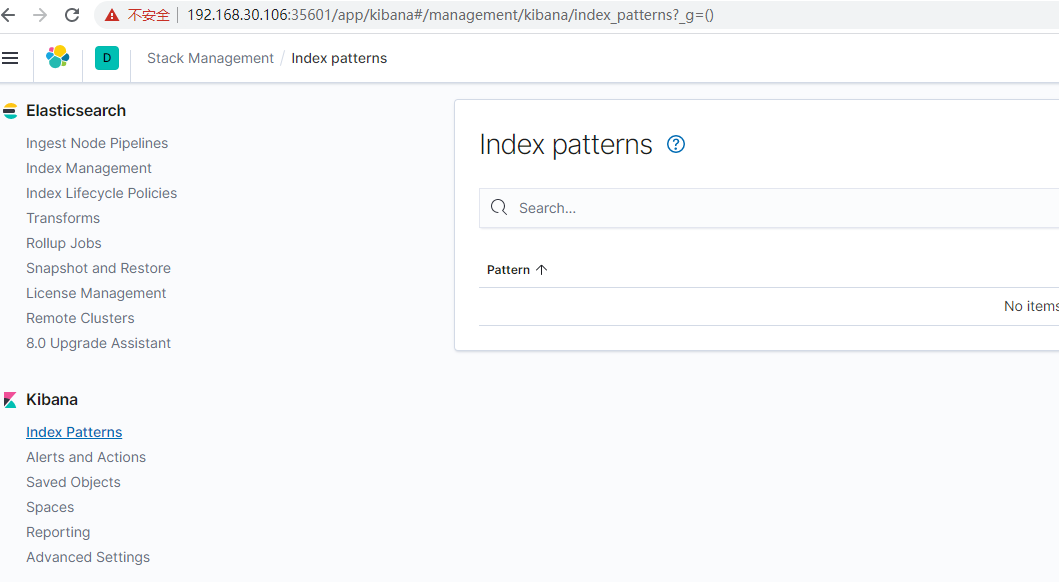
5.访问kibana页面
ES容器集群自动生成证书
1.使用sidecar模式来自动为es生成证书
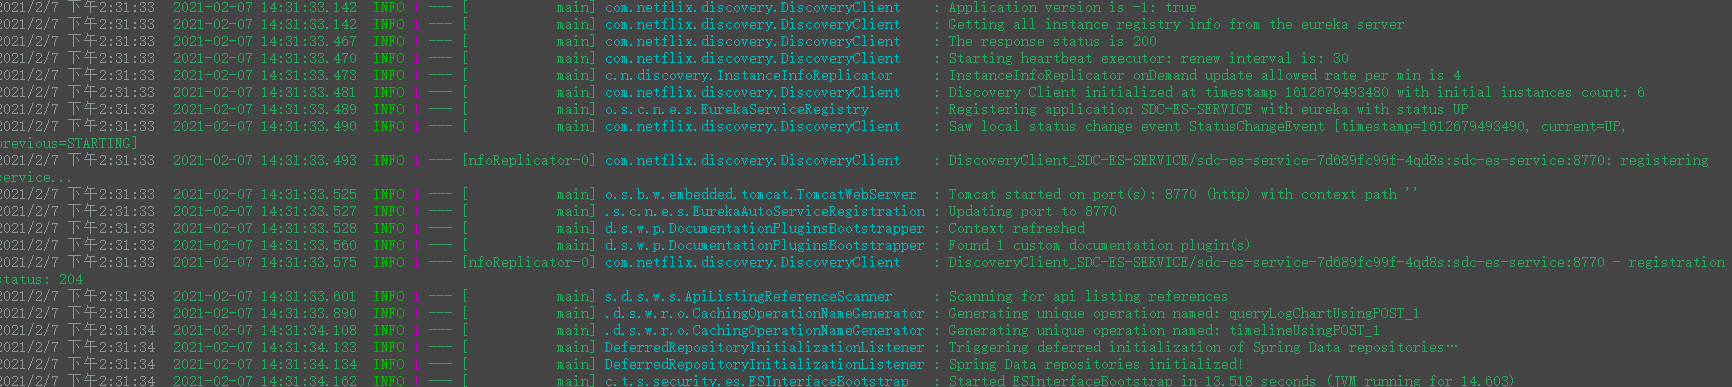
2.查看日志


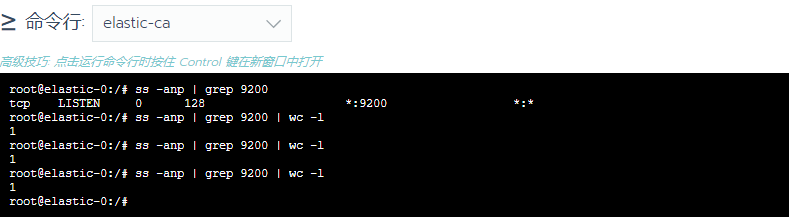
3.sidecar容器启动脚本
#!/bin/bash

ordinal=`env | grep podname | cut -d"=" -f2 | cut -d"-" -f2`
hostip=`env | grep hostip | cut -d"=" -f2`
passwd=`env | grep espassword | cut -d"=" -f2`
esport=9200
num=0
CAFile="/elasticsearch/config/certs/elastic-stack-ca.zip"
if [ $ordinal -eq 0 ];
then
   while [[ $num -le 0 ]]
   do
      num=`ss -anp | grep $esport | wc -l`
      echo "检测es服务未启动................"
   done
   if [ ! -f "$CAFile" ];
   then
      echo "开始创建es证书..............."
     /elasticsearch/bin/elasticsearch-certutil cert --ip $hostip --out /elasticsearch/config/certs/elastic-stack-ca.zip --pem
     echo "证书生成完毕.............."
     echo "开始解压CA证书.............."
     cd /elasticsearch/config/certs/ && unzip ./elastic-stack-ca.zip
     echo "解压CA证书完毕................"
   else
     echo "CA证书文件已经存在,不需要重新生成........."
   fi

     echo "开始生成用户名和密码"
     echo $passwd
     expect <<EOF
     spawn /elasticsearch/bin/elasticsearch-setup-passwords  interactive --batch --url https://$hostip:$esport
     expect {
             "elastic" { send "$passwd\n";exp_continue}
             "elastic" { send "$passwd\n";exp_continue}
             "apm_system" { send "$passwd\n";exp_continue}
             "apm_system" { send "$passwd\n";exp_continue}
             "kibana_system" { send "$passwd\n";exp_continue}
             "kibana_system" { send "$passwd\n";exp_continue}
             "logstash_system" { send "$passwd\n";exp_continue}
             "logstash_system" { send "$passwd\n";exp_continue}
             "beats_system" { send "$passwd\n";exp_continue}
             "beats_system" { send "$passwd\n";exp_continue}
             "remote_monitoring_user" { send "$passwd\n";exp_continue}
             "remote_monitoring_user" { send "$passwd\n"}

        }
 expect eof
EOF
  echo "用户名和密码生成完毕................."
fi
tail -f /dev/null
4.es主容器启动脚本
#!/bin/bash

#change es config
ordinal=`env | grep podname | cut -d"=" -f2 | cut -d"-" -f2`
hostip=`env | grep hostip | cut -d"=" -f2`
seed_hosts=`env | grep seed_hosts | cut -d"=" -f2`
let severid=$ordinal+1
let hport=9700+$ordinal
let tport=9800+$ordinal
#sed -i "s/network.publish_host:.*/network.publish_host: $hostip/g" /elasticsearch/config/elasticsearch.yml
sed -i "s/discovery.seed_hosts:.*/discovery.seed_hosts: $seed_hosts/g" /elasticsearch/config/elasticsearch.yml
if [ $ordinal -eq 0 ];
then
   sed -i "s/node.data:.*/node.data: false/g" /elasticsearch/config/elasticsearch.yml
else
   sed -i "s/node.name:.*/node.name: node$severid/g" /elasticsearch/config/elasticsearch.yml
   #sed -i "s/http.port:.*/http.port: $hport/g" /elasticsearch/config/elasticsearch.yml
   #sed -i "s/transport.tcp.port:.*/transport.tcp.port: $tport/g" /elasticsearch/config/elasticsearch.yml
   sed -i "s/node.data:.*/node.data: true/g" /elasticsearch/config/elasticsearch.yml
fi

# start es cluster
echo "start es cluster........"
su - elasticsearch -c /elasticsearch/bin/elasticsearch
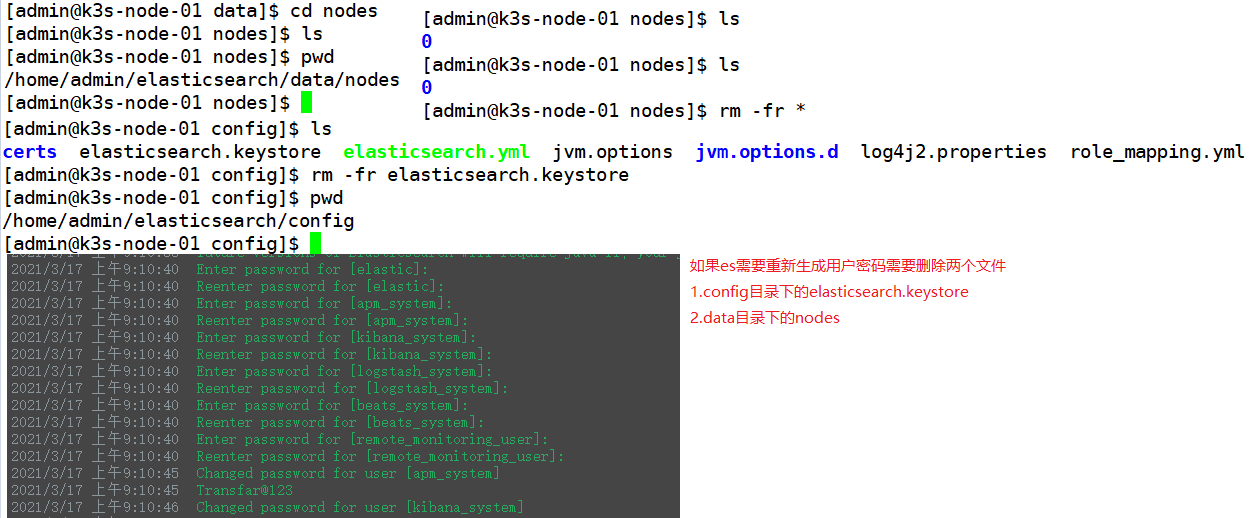
5. 重新生成es密码
1.删除elasticsearch目录下的data下的文件即可
2.删除elasticsearch目录下的config目录下的elasticsearch.keystore

命令行初始化ES数据
curl -XGET 192.168.30.75:9200/_cat/templates
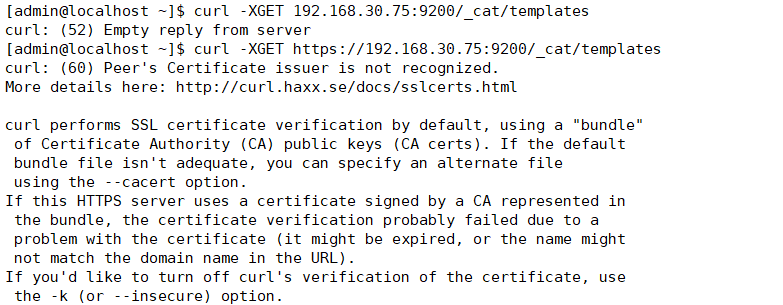
curl -XGET https://192.168.30.75:9200/_cat/templates --insecure

curl -XGET https://elastic:Transfar@123@192.168.30.75:9200/_cat/templates --insecure

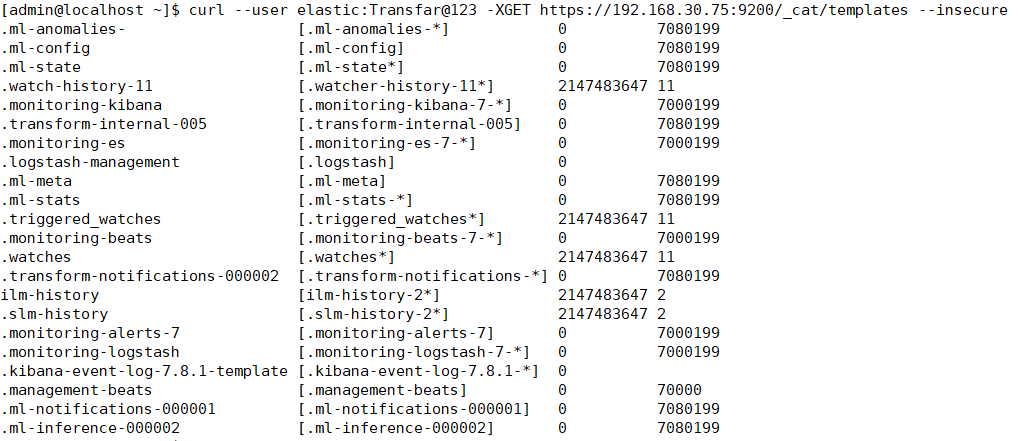
curl --user elastic:Transfar@123 -XGET https://192.168.30.75:9200/_cat/templates --insecure
初始化es的索引模板
curl --insecure --user elastic:Transfar@123 -XPUT https://192.168.30.75:9200/_template/event '{'
{"error":{"root_cause":[{"type":"parse_exception","reason":"request body is required"}],"type":"parse_exception","reason":"request body is required"},"status":400}

curl --insecure --user elastic:Transfar@123 -XPUT https://192.168.30.75:9200/_template/event -d'{
{"error":"Content-Type header [application/x-www-form-urlencoded] is not supported","status":406}

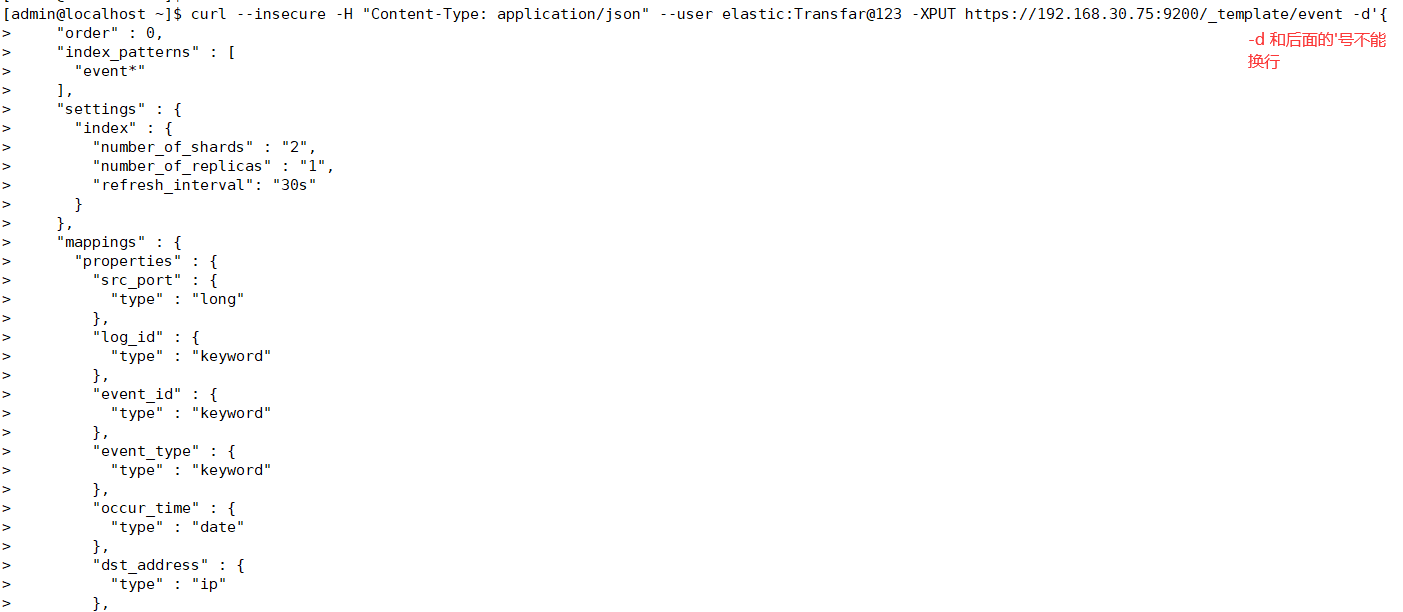
-H 表示提交消息的类型
curl --insecure -H "Content-Type: application/json" --user elastic:Transfar@123 -XPUT https://192.168.30.75:9200/_template/event -d'{
    "order" : 0,
    "index_patterns" : [
      "event*"
    ],
    "settings" : {
      "index" : {
        "number_of_shards" : "2",
        "number_of_replicas" : "1",
        "refresh_interval": "30s"
      }
    },
    "mappings" : {
      "properties" : {
        "src_port" : {
          "type" : "long"
        },
        "log_id" : {
          "type" : "keyword"
        },
        "event_id" : {
          "type" : "keyword"
        },
        "event_type" : {
          "type" : "keyword"
        },
        "occur_time" : {
          "type" : "date"
        },
        "dst_address" : {
          "type" : "ip"
        },
        "src_address" : {
          "type" : "ip"
        },
        "dst_port" : {
          "type" : "long"
        },
        "receive_time" : {
          "type" : "date"
        },
        "event_name" : {
          "type" : "keyword"
        },
        "dev_address" : {
          "type" : "keyword"
        },
        "event_type_name" : {
          "type" : "keyword"
        }
      }
    },
    "aliases" : { }
  }'

本文来自博客园,作者:不懂123,转载请注明原文链接:https://www.cnblogs.com/yxh168/p/14376291.html


【推荐】国内首个AI IDE,深度理解中文开发场景,立即下载体验Trae
【推荐】编程新体验,更懂你的AI,立即体验豆包MarsCode编程助手
【推荐】抖音旗下AI助手豆包,你的智能百科全书,全免费不限次数
【推荐】轻量又高性能的 SSH 工具 IShell:AI 加持,快人一步
· AI与.NET技术实操系列:向量存储与相似性搜索在 .NET 中的实现
· 基于Microsoft.Extensions.AI核心库实现RAG应用
· Linux系列:如何用heaptrack跟踪.NET程序的非托管内存泄露
· 开发者必知的日志记录最佳实践
· SQL Server 2025 AI相关能力初探
· 震惊!C++程序真的从main开始吗?99%的程序员都答错了
· 【硬核科普】Trae如何「偷看」你的代码?零基础破解AI编程运行原理
· 单元测试从入门到精通
· 上周热点回顾(3.3-3.9)
· winform 绘制太阳,地球,月球 运作规律