生成和配置ES的安全证书
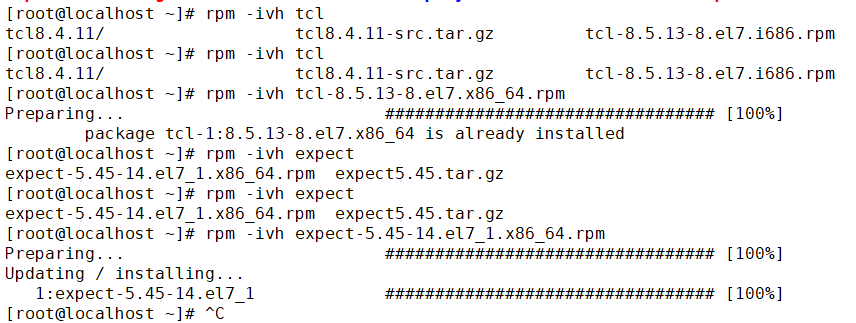
系统工具安装
1.下载离线的rpm包
yum -y install yum-utils
yumdownloader expect 把rpm包下载到本地
yumdownloader tcl


2.下载源码包需要首先编译安装 如果没有gcc的话就会编译失败.如果是下载的rpm包则不会出现依赖问题

3.rpm包自动包含了软件包所有的依赖的其它包
启动ES设置读取证书文件权限


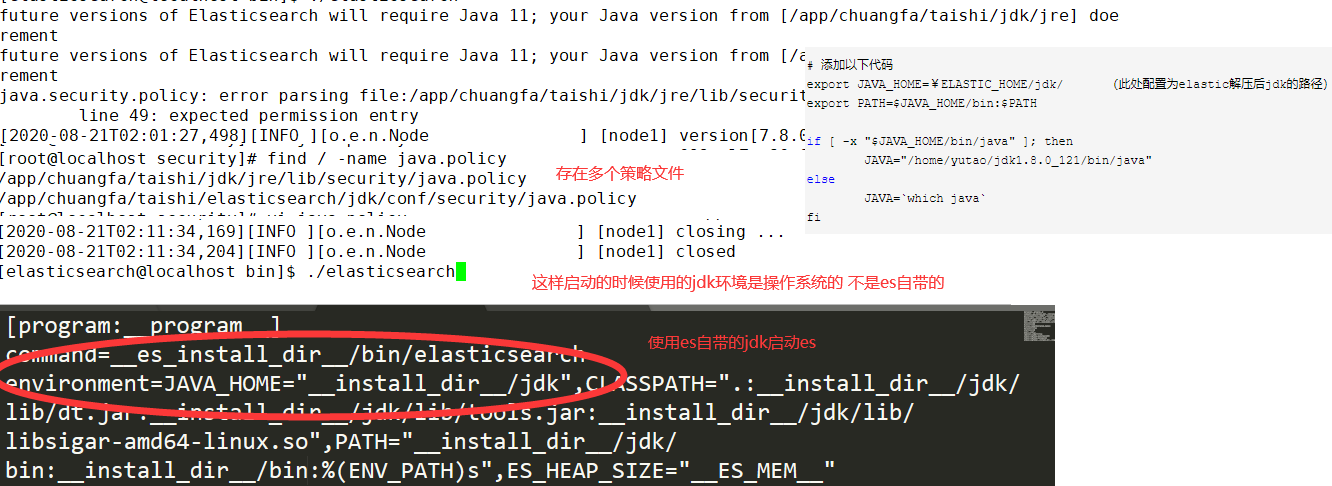
使用不同的jdk需要设置到对应的策略文件
自动创建证书

function create_certs()
{

 expect <<EOF
   spawn ${ES_INSTALL_DIR}/bin/elasticsearch-certutil cert --ip ${IP} --pem
   expect {
             #"Please enter the desired output file [certificate-bundle.zip]" { send "\n"}
             "Please enter the desired output file" { send "\n"}
          }
   expect eof
EOF
  echo "证书生成完毕${ES_INSTALL_DIR}/certificate-bundle.zip"
  rm -fr ${ES_INSTALL_DIR}/ca
  rm -fr ${ES_INSTALL_DIR}/instance
  unzip ${ES_INSTALL_DIR}/certificate-bundle.zip -d ${ES_INSTALL_DIR}
  #unzip ${ES_INSTALL_DIR}/certificate-bundle.zip
  chown -R ${ES_USER}:${ES_USER} ${ES_INSTALL_DIR}
}


function modify_elastichyml()
{

  ymlpath=${ES_INSTALL_DIR}/config
  cp ../../etc/elasticsearch/elasticsearch.yml ${ymlpath}/
  #cp  ../../etc/elasticsearch/elasticsearch.yml  ${ymlpath}/elasticsearch.yml
  sed -i "s#__ip__#${IP}#g" ${ymlpath}/elasticsearch.yml
  sed -i "s#__es_install_dir__#${ES_INSTALL_DIR}#g" ${ymlpath}/elasticsearch.yml

  javafile=${ES_INSTALL_DIR}/jdk/conf/security/java.policy
  javafile2=${INSTALL_DIR}/jdk/jre/lib/security/java.policy

  sed -i "/permission java.util.PropertyPermission \"java.vm.name\", \"read\";/a permission java.io.FilePermission  \"${ES_INSTALL_DIR}/ca/ca.crt\", \"read,write\";" ${javafile}
  sed -i "/permission java.util.PropertyPermission \"java.vm.name\", \"read\";/a permission java.io.FilePermission  \"${ES_INSTALL_DIR}/ca\", \"read,write\";" ${javafile}
  sed -i "/permission java.util.PropertyPermission \"java.vm.name\", \"read\";/a permission java.io.FilePermission  \"${ES_INSTALL_DIR}/instance/instance.key\", \"read,write\";" ${javafile}
  sed -i "/permission java.util.PropertyPermission \"java.vm.name\", \"read\";/a permission java.io.FilePermission  \"${ES_INSTALL_DIR}/instance/instance.crt\", \"read,write\";" ${javafile}
  sed -i "/permission java.util.PropertyPermission \"java.vm.name\", \"read\";/a permission java.io.FilePermission  \"${ES_INSTALL_DIR}/instance\", \"read,write\";" ${javafile}

  sed -i "/permission java.util.PropertyPermission \"java.vm.name\", \"read\";/a permission java.io.FilePermission  \"${ES_INSTALL_DIR}/ca/ca.crt\", \"read,write\";" ${javafile2}
  sed -i "/permission java.util.PropertyPermission \"java.vm.name\", \"read\";/a permission java.io.FilePermission  \"${ES_INSTALL_DIR}/ca\", \"read,write\";" ${javafile2}
  sed -i "/permission java.util.PropertyPermission \"java.vm.name\", \"read\";/a permission java.io.FilePermission  \"${ES_INSTALL_DIR}/instance/instance.key\", \"read,write\";" ${javafile2}
  sed -i "/permission java.util.PropertyPermission \"java.vm.name\", \"read\";/a permission java.io.FilePermission  \"${ES_INSTALL_DIR}/instance/instance.crt\", \"read,write\";" ${javafile2}
  sed -i "/permission java.util.PropertyPermission \"java.vm.name\", \"read\";/a permission java.io.FilePermission  \"${ES_INSTALL_DIR}/instance\", \"read,write\";" ${javafile2}

  sed -i "/# End of file/i * soft nofile 65536" /etc/security/limits.conf
  sed -i "/# End of file/i * hard nofile 65536" /etc/security/limits.conf
  sysctl -w vm.max_map_count=262144
}
创建证书并自定义主机名
bin/elasticsearch-certutil cert --ip ${IP} --pem
默认证书中包含的主机名称为instance 应用连接es集群的时候只能使用https://instance:9200进行登录
bin/elasticsearch-certutil cert --ip ${IP} --pem --dns myes-instance
这样通过证书连接登录的时候可以通过https://myes-instance:9200进行验证登录
自动创建密码
创建密码的时候必须要等待es服务正常启动后才能执行 而不能在安装后立即执行


passwd=123456
expect <<EOF
 spawn /app/chuangfa/taishi/elasticsearch/bin/elasticsearch-setup-passwords  interactive --batch --url https://192.168.19.135:9200
 expect {
             "elastic" { send "$passwd\n";exp_continue}
             "elastic" { send "$passwd\n";exp_continue}
             "apm_system" { send "$passwd\n";exp_continue}
             "apm_system" { send "$passwd\n";exp_continue}
             "kibana_system" { send "$passwd\n";exp_continue}
             "kibana_system" { send "$passwd\n";exp_continue}
             "logstash_system" { send "$passwd\n";exp_continue}
             "logstash_system" { send "$passwd\n";exp_continue}
             "beats_system" { send "$passwd\n";exp_continue}
             "beats_system" { send "$passwd\n";exp_continue}
             "remote_monitoring_user" { send "$passwd\n";exp_continue}
             "remote_monitoring_user" { send "$passwd\n"}

        }
 expect eof
EOF
echo "密码生成完毕"

function modify_conf()
{
    #ES supervisord启动配置
    mkdir -p ${INSTALL_DIR}/etc/supervisord
    elasticsearch_ini=${INSTALL_DIR}/etc/supervisord/elasticsearch.ini
    elasticsearch_program=elasticsearch

    cp ../../etc/supervisord/elasticsearch.ini ${elasticsearch_ini}
    sed -i "s#__es_install_dir__#${ES_INSTALL_DIR}#g" ${elasticsearch_ini}
    sed -i "s#__install_dir__#${INSTALL_DIR}#g" ${elasticsearch_ini}
    sed -i "s#__program__#${elasticsearch_program}#g" ${elasticsearch_ini}
    if [ ${USER} == "root" ];then
        sed -i "s#__user__#${ES_USER}#g" ${elasticsearch_ini}
        chown -R ${ES_USER}:${ES_USER} ${elasticsearch_ini}
    else
        sed -i "s#__user__#${USER}#g" ${elasticsearch_ini}
        chown -R ${USER}:${USER} ${elasticsearch_ini}
    fi

    #es配置
    mkdir -p ${INSTALL_DIR}/etc
    rm -f ${ES_INSTALL_DIR}/config/elasticsearch.yml
    # cp ../../etc/elasticsearch/elasticsearch.yml ${ES_INSTALL_DIR}/config/
    # sed -i "s#__es_install_dir__#${ES_INSTALL_DIR}#g" ${ES_INSTALL_DIR}/config/elasticsearch.yml
    # cp ../../etc/elasticsearch/jvm.options ${ES_INSTALL_DIR}/config/
    # cp ../../etc/elasticsearch/log4j2.properties ${ES_INSTALL_DIR}/config/

    if [ ${USER} == "root" ];then
       # shell中的:号表示pass 什么也不执行
       chown -R ${ES_USER}:${ES_USER} ${MODE_DIR}
       chown -R ${ES_USER}:${ES_USER} ${ES_INSTALL_DIR}
       # 直接修改目录的属主和属组即可 目录下的所有文件都可以被修改掉
       #chown -R ${ES_USER}:${ES_USER} ${ES_INSTALL_DIR}/config/elasticsearch.yml
       #chown -R ${ES_USER}:${ES_USER} ${ES_INSTALL_DIR}/config/jvm.options
       #chown -R ${ES_USER}:${ES_USER} ${ES_INSTALL_DIR}/config/log4j2.properties
    else
        :
    fi
}

function Install()
{
    #获取ES安装包
    getPackage=`ls -l ../../src/ | grep "elasticsearch-[0-9]" | awk '{print $9}'`
    echo "Obtain elasticsearch installation package ${getPackage}"

    #解压es安装包
    tar zxvf ../../src/${getPackage} -C ../../tmp/ 2>&1 >/dev/null
    #获取es解压目录
    getName=`ls -l ../../tmp/ | grep "elasticsearch" | awk '{print $9}'`
    echo "Get directory ${getName}"
    echo "${ES_INSTALL_DIR}"
    mv ../../tmp/${getName} ${ES_INSTALL_DIR}
}


function main()
{
    #默认es版本呢
    es_version_tmp=`ls -l ../../src/ | grep "elasticsearch-[0-9]" | awk '{print $9}' | grep -oE '[0-9]+\.[0-9\.]+'`
    es_version=${es_version_tmp%?}
    echo "es version ${es_version}"

    Install
    modify_conf
    create_certs
    modify_elastichyml
    create_passwd
}

function create_certs()
{

 expect <<EOF
   spawn ${ES_INSTALL_DIR}/bin/elasticsearch-certutil cert --ip ${IP} --pem
   expect {
             #"Please enter the desired output file [certificate-bundle.zip]" { send "\n"}
             "Please enter the desired output file" { send "\n"}
          }
   expect eof
EOF
  echo "证书生成完毕${ES_INSTALL_DIR}/certificate-bundle.zip"
  rm -fr ${ES_INSTALL_DIR}/ca
  rm -fr ${ES_INSTALL_DIR}/instance
  unzip ${ES_INSTALL_DIR}/certificate-bundle.zip -d ${ES_INSTALL_DIR}
  #unzip ${ES_INSTALL_DIR}/certificate-bundle.zip
  chown -R ${ES_USER}:${ES_USER} ${ES_INSTALL_DIR}
}


function modify_elastichyml()
{

  ymlpath=${ES_INSTALL_DIR}/config
  cp ../../etc/elasticsearch/elasticsearch.yml ${ymlpath}/
  #cp  ../../etc/elasticsearch/elasticsearch.yml  ${ymlpath}/elasticsearch.yml
  sed -i "s#__ip__#${IP}#g" ${ymlpath}/elasticsearch.yml
  sed -i "s#__es_install_dir__#${ES_INSTALL_DIR}#g" ${ymlpath}/elasticsearch.yml

  javafile=${ES_INSTALL_DIR}/jdk/conf/security/java.policy
  javafile2=${INSTALL_DIR}/jdk/jre/lib/security/java.policy

  sed -i "/permission java.util.PropertyPermission \"java.vm.name\", \"read\";/a permission java.io.FilePermission  \"${ES_INSTALL_DIR}/ca/ca.crt\", \"read,write\";" ${javafile}
  sed -i "/permission java.util.PropertyPermission \"java.vm.name\", \"read\";/a permission java.io.FilePermission  \"${ES_INSTALL_DIR}/ca\", \"read,write\";" ${javafile}
  sed -i "/permission java.util.PropertyPermission \"java.vm.name\", \"read\";/a permission java.io.FilePermission  \"${ES_INSTALL_DIR}/instance/instance.key\", \"read,write\";" ${javafile}
  sed -i "/permission java.util.PropertyPermission \"java.vm.name\", \"read\";/a permission java.io.FilePermission  \"${ES_INSTALL_DIR}/instance/instance.crt\", \"read,write\";" ${javafile}
  sed -i "/permission java.util.PropertyPermission \"java.vm.name\", \"read\";/a permission java.io.FilePermission  \"${ES_INSTALL_DIR}/instance\", \"read,write\";" ${javafile}

  sed -i "/permission java.util.PropertyPermission \"java.vm.name\", \"read\";/a permission java.io.FilePermission  \"${ES_INSTALL_DIR}/ca/ca.crt\", \"read,write\";" ${javafile2}
  sed -i "/permission java.util.PropertyPermission \"java.vm.name\", \"read\";/a permission java.io.FilePermission  \"${ES_INSTALL_DIR}/ca\", \"read,write\";" ${javafile2}
  sed -i "/permission java.util.PropertyPermission \"java.vm.name\", \"read\";/a permission java.io.FilePermission  \"${ES_INSTALL_DIR}/instance/instance.key\", \"read,write\";" ${javafile2}
  sed -i "/permission java.util.PropertyPermission \"java.vm.name\", \"read\";/a permission java.io.FilePermission  \"${ES_INSTALL_DIR}/instance/instance.crt\", \"read,write\";" ${javafile2}
  sed -i "/permission java.util.PropertyPermission \"java.vm.name\", \"read\";/a permission java.io.FilePermission  \"${ES_INSTALL_DIR}/instance\", \"read,write\";" ${javafile2}

  sed -i "/# End of file/i * soft nofile 65536" /etc/security/limits.conf
  sed -i "/# End of file/i * hard nofile 65536" /etc/security/limits.conf
  sysctl -w vm.max_map_count=262144
}

function setpasswd()
{
 passwd=${ES_PASSWD}
expect <<EOF
 spawn ${ES_INSTALL_DIR}/bin/elasticsearch-setup-passwords  interactive --batch --url https://${IP}:9200
 expect {
             "elastic" { send "$passwd\n";exp_continue}
             "elastic" { send "$passwd\n";exp_continue}
             "apm_system" { send "$passwd\n";exp_continue}
             "apm_system" { send "$passwd\n";exp_continue}
             "kibana_system" { send "$passwd\n";exp_continue}
             "kibana_system" { send "$passwd\n";exp_continue}
             "logstash_system" { send "$passwd\n";exp_continue}
             "logstash_system" { send "$passwd\n";exp_continue}
             "beats_system" { send "$passwd\n";exp_continue}
             "beats_system" { send "$passwd\n";exp_continue}
             "remote_monitoring_user" { send "$passwd\n";exp_continue}
             "remote_monitoring_user" { send "$passwd\n"}

        }
 expect eof
EOF

}

function create_passwd()
{
    su - ${ES_USER} -c  ${ES_INSTALL_DIR}/bin/elasticsearch & > /dev/null 2>&1
    local count=0
    for((i=1;i<=5;i++));
    do
       count=`netstat -antp | grep 9200  | wc -l`
       sleep 5
       if  [ "$count" -gt 0 ];then
        break
       fi
    done

    if  [ "$count" -gt 0 ];then
       echo "ES success to start. set user passwd"
       setpasswd
    else
       echo "ES failed to start in 5 minutes."
    fi
    sleep 3
}


if [ $# -eq 0 ]; then
     __ReadINI ../../conf/.config.ini
    main
else
    __Plugin_Deployment_Before $1
    main 2>&1 | tee -a ../../log/enterprise.log
    __Plugin_Deployment_After
fi
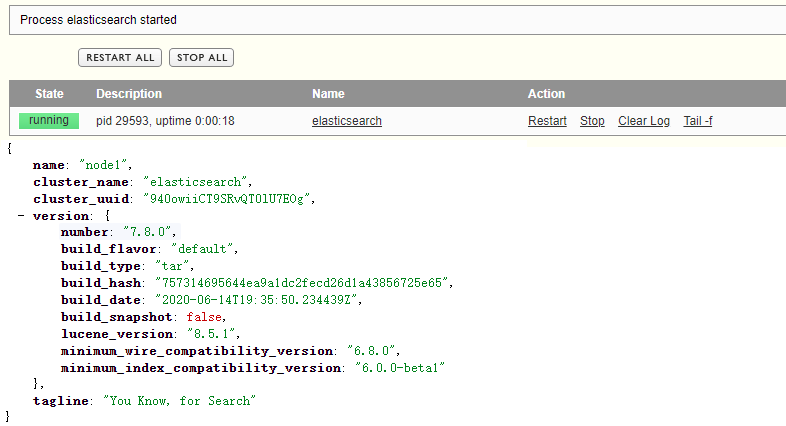
登录ES

shell执行几点区别
su - user -c program
其中user为用户名 program为要运行的程序, 如su - isoa -c /usr/isoa/bin/gtimer.sh

第一行指定解析器的话 启动执行的需要使用./start-cluster.sh的方式 使用 sh start-cluster.sh的方式可能会出现执行失败的情况
linux ./a.sh 命令与sh a.sh的区别为:可执行属性不同、执行方式不同、兼容性不同。
一、可执行属性不同
1、 ./a.sh 命令: ./a.sh 命令的文件必须具有可执行属性
2、 sh a.sh命令:sh a.sh命令的文件不必具有可执行属性
二、执行方式不同
1、 ./a.sh 命令:./a.sh 命令使用脚本中第一行所指定的命令来解释和执行文件
2、 sh a.sh命令:sh a.sh命令使用shell工具的SH脚本直接解释和执行文件
本文来自博客园,作者:不懂123,转载请注明原文链接:https://www.cnblogs.com/yxh168/p/13539231.html


