Windows环境下Zookeeper的安装及启动
2020-07-18 17:46 石吴玉 阅读(7743) 评论(0) 编辑 收藏 举报一、下载及安装配置 JDK (Kafka依赖于Zookeeper服务,而Zookeeper的运营依赖JDK)
1.地址:https://www.oracle.com/java/technologies/javase-jdk14-downloads.html
下载windows可执行文件,直接点击安装,默认下一步,直到完成安装。
2.配置JDK
我的电脑 --> 右键 ---> 属性 --> 高级系统设置 -- > 环境变量
添加 JAVA_HOME变量:C:\Program Files\Java\jdk-14.0.2
添加 CLASSPATH变量:%JAVA_HOME%\lib
在PATH变量中加入:%JAVA_HOME%\bin
打开CMD,验证JDK是否安装成功

二、下载安装配置 Zookeeper服务
1.地址:https://mirror-hk.koddos.net/apache/zookeeper/stable/
2.修改配置文件:conf 文件夹,在里面复制一份zoo_sample.cfg并重命名为zoo.cfg文件。
(这里我主要修改了日志存储地址:dataDir)
# The number of milliseconds of each tick
tickTime=2000
# The number of ticks that the initial
# synchronization phase can take
initLimit=10
# The number of ticks that can pass between
# sending a request and getting an acknowledgement
syncLimit=5
# the directory where the snapshot is stored.
# do not use /tmp for storage, /tmp here is just
# example sakes.
dataDir=D:\\AmandaSoft\\apache-zookeeper-3.5.8-bin\\data
# the port at which the clients will connect
clientPort=2181
# the maximum number of client connections.
# increase this if you need to handle more clients
#maxClientCnxns=60
#
# Be sure to read the maintenance section of the
# administrator guide before turning on autopurge.
#
# http://zookeeper.apache.org/doc/current/zookeeperAdmin.html#sc_maintenance
#
# The number of snapshots to retain in dataDir
#autopurge.snapRetainCount=3
# Purge task interval in hours
# Set to "0" to disable auto purge feature
#autopurge.purgeInterval=1
配置文件简单解析
1.tickTime:这个时间是作为 zookeeper 服务器之间或客户端与服务器之间维持心跳的时间间隔,也就是每个 tickTime 时间就会发送一个心跳。
2.dataDir:顾名思义就是 zookeeper 保存数据的目录,默认情况下,Zookeeper 将写数据的日志文件也保存在这个目录里。
3.clientPort:这个端口就是客户端连接 zookeeper 服务器的端口,Zookeeper 会监听这个端口,接受客户端的访问请求。
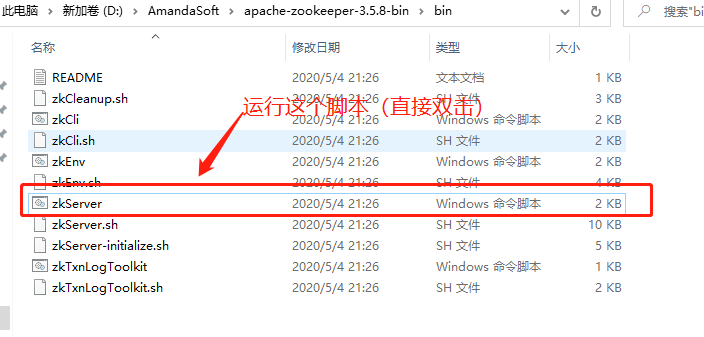
3.进入..\apache-zookeeper-3.5.8-bin\bin目录

会出现以下很长一段:可以看到QuorumPeerMain的进程

可通过双击 zkCli.cmd启动客户端


