

WPF 路由事件2
1什么是路由事件
简单说,路由事件可以沿着视觉树VisualTree进行传递,在这视觉树中的所有对象都可以收到这个事件。前提是添加了检测。
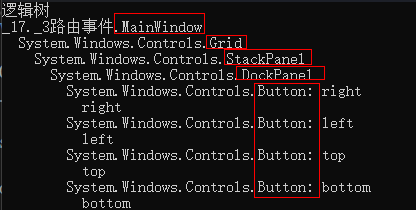
1.1什么是逻辑树LogicalTree
简单理解:逻辑树就是我们在xaml中写的布局逻辑
如xaml代码:

<Grid>
     <StackPanel Orientation="Vertical">
          <DockPanel ButtonBase.Click="Button_Click">
                <Button Click="Button_Click" Content="right" DockPanel.Dock="Right"/>
                <Button Content="left" DockPanel.Dock="Left"/>
                <Button Content="top" DockPanel.Dock="Top"/>
                <Button Content="bottom" DockPanel.Dock="Bottom"/>
            </DockPanel>
      </StackPanel>
</Grid>
逻辑就是Grid--StackPanel--CockPanel--Button
1.2什么是视觉树VisualTree
视觉树更复杂,在逻辑树上又添加了更详细的布局,包含看不见的对象,和控件模板内部的对象,如Button的控件模板内部有一个Border--ConentPresenter--TextBlock
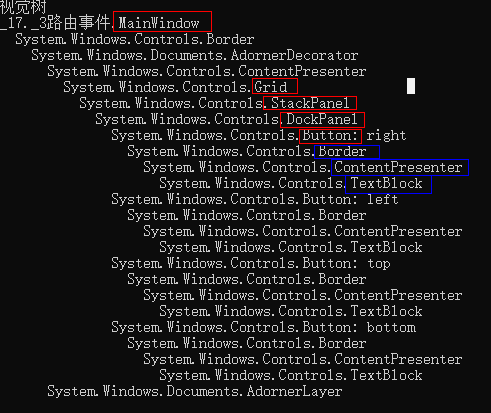
在视觉树上,红色框是逻辑树上有的,蓝色框是button内部的控件
在这个视觉树上,顶部元素是window(最外边),最内部是TextBlock,那就会有2个方向,从最外到最内,从最内到最外,
从内到外叫 冒泡。
从外到内叫 隧道
wpf中一个事件以Preview开头的都是隧道事件,如PreviewDrop是隧道事件,不带Preview的Drop事件是冒泡事件。
一个完整的路由事件的执行顺序是先隧道从window传递到内部,再冒泡从最内传递到最外
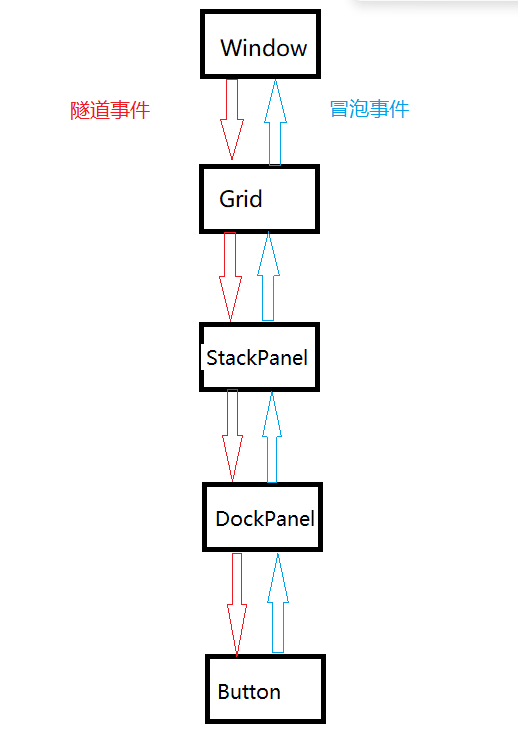
比如Button的Click事件,是先由窗体接收到鼠标的点击操作,先隧道传到Button,在冒泡传回窗体,在这个过程中,视觉树VisualTree中的任何对象都可以接收到Button的Click事件,前提是已添加了接收的操作
简单来说,逻辑树是在xaml中我们布局时的逻辑,视觉树是在逻辑树的基础上还包含了看不见的对象和控件模板内的对象
一个路由事件可以使用e.Handl=True,结束传递。
2.如何定义
还是上面的例子,让Grid、StackPanel、DockPanel都接收Button的Click事件。
xaml中:
 <Grid ButtonBase.Click="Button_Click" >
        <StackPanel ButtonBase.Click="Button_Click"  Orientation="Vertical"   >
            <DockPanel ButtonBase.Click="Button_Click" >
                <Button Click="Button_Click" Content="right" DockPanel.Dock="Right" />
                <Button Content="left" DockPanel.Dock="Left"/>
                <Button Content="top" DockPanel.Dock="Top"/>
                <Button Content="bottom" DockPanel.Dock="Bottom"/>
            </DockPanel>
        </StackPanel>
    </Grid>
Button_Click事件代码:
private void Button_Click(object sender, RoutedEventArgs e)
        {
            Console.WriteLine("Button_Click由 " + sender.ToString()+" 触发");
        }
输出结果:

或者在代码中添加:
public MainWindow()
        {
            InitializeComponent();
            this.AddHandler(Button.ClickEvent, new RoutedEventHandler(Button_Click));
            this.grid.AddHandler(Button.ClickEvent, new RoutedEventHandler(Button_Click));
            this.stackpanel.AddHandler(Button.ClickEvent, new RoutedEventHandler(Button_Click));
            this.dockpanel.AddHandler(Button.ClickEvent, new RoutedEventHandler(Button_Click));
            this.button.AddHandler(Button.ClickEvent, new RoutedEventHandler(Button_Click));
        }
输出结果:

3.代码例子
xaml:
<Grid Name="grid"  >
        <StackPanel Name="stackpanel"  Orientation="Vertical"   >
            <DockPanel Name="dockpanel" >
                <Button Name="button"  Content="right" DockPanel.Dock="Right" />
                <Button Content="left" DockPanel.Dock="Left"/>
                <Button Content="top" DockPanel.Dock="Top"/>
                <Button Content="bottom" DockPanel.Dock="Bottom"/>
            </DockPanel>
        </StackPanel>
    </Grid>
Mainwindow.xaml.cs
public MainWindow()
        {
            InitializeComponent();

            this.AddHandler(Button.PreviewMouseLeftButtonDownEvent, new RoutedEventHandler(PreMouseLeftButtonDown), true);
            this.grid.AddHandler(Button.PreviewMouseLeftButtonDownEvent, new RoutedEventHandler(PreMouseLeftButtonDown), true);
            this.stackpanel.AddHandler(Button.PreviewMouseLeftButtonDownEvent, new RoutedEventHandler(PreMouseLeftButtonDown), true);
            this.dockpanel.AddHandler(Button.PreviewMouseLeftButtonDownEvent, new RoutedEventHandler(PreMouseLeftButtonDown), true);
            this.button.AddHandler(Button.PreviewMouseLeftButtonDownEvent, new RoutedEventHandler(PreMouseLeftButtonDown), true);

            this.AddHandler(Button.MouseLeftButtonDownEvent, new RoutedEventHandler(MouseLeftButtonDown), true);
            this.grid.AddHandler(Button.MouseLeftButtonDownEvent, new RoutedEventHandler(MouseLeftButtonDown), true);
            this.stackpanel.AddHandler(Button.MouseLeftButtonDownEvent, new RoutedEventHandler(MouseLeftButtonDown), true);
            this.dockpanel.AddHandler(Button.MouseLeftButtonDownEvent, new RoutedEventHandler(MouseLeftButtonDown), true);
            this.button.AddHandler(Button.MouseLeftButtonDownEvent, new RoutedEventHandler(MouseLeftButtonDown), true);
        }
private new void PreMouseLeftButtonDown(object sender, RoutedEventArgs e)
{
Console.WriteLine("PreMouseLeftButtonDown由 " + sender.ToString() + " 触发");
}
private new void MouseLeftButtonDown(object sender, RoutedEventArgs e)
{
Console.WriteLine("MouseLeftButtonDownEvent由 " + sender.ToString() + " 触发");
}
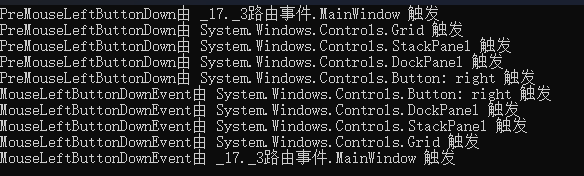
结果:先隧道后冒泡
这两句代码作用是一样的,当发生 PreviewMouseLeftButtonDown事件时执行PreMouseLeftButtonDown方法
Xmal中:
<Button Name="button" PreviewMouseLeftButtonDown="PreMouseLeftButtonDown" Content="right" DockPanel.Dock="Right" />
后台代码:
this.button.AddHandler(Button.PreviewMouseLeftButtonDownEvent, new RoutedEventHandler(PreMouseLeftButtonDown), true);
4.自定义路由事件
wpf已经有很多路由事件了,为什么还要自定义?作用是什么?
想一下已存在的事件有单击Click,双击DoubleClick,左键点击MouseLeftButtonDown,右键单击MouseRightButtonDown,那我们想实现这样一个事件,右键点击3次事件,是不是没有?这时候需要我们自己去定义完成此功能的路由事件,我们自定义的路由事件是和wpf中的其他事件是同一个级别的。
假如右键3次单击的事件 名叫ThreeRightClick,那么ThreeRightClick和MouseLeftButtonDown、MouseRightButtonDown、Click等是一个级别的,也可以是冒泡的隧道的。在调用时的形式和他们没有区别
调用方式1
<local:Mybutton ThreeRightClick="OnThreeRightClick" PreviewMouseLeftButtonDown="PreMouseLeftButtonDown" Height="30" Width="50" Content="右键3击" />
调用方式2
 this.AddHandler(Mybutton.ThreeRightClickEvent, new RoutedEventHandler(OnThreeRightClick));
4.1如何自定义?
public class Mybutton:Button
    {
        public Mybutton()
        {
            // 给Mybutton添加内置的MouseRightButtonDownEvent事件,用于触发自定义路由事件ThreeRightClick
            this.AddHandler(Button.MouseRightButtonDownEvent, new RoutedEventHandler(OnRightClick));
            // 给Mybutton添加内置的PreviewMouseRightButtonDownEvent事件,用于触发自定义路由事件PreviewThreeRightClick
            this.AddHandler(Button.PreviewMouseRightButtonDownEvent, new RoutedEventHandler(OnPreviewRightClick));
            // 给Mybutton添加自定义的ThreeRightClickEvent事件,
            //this.AddHandler(Mybutton.ThreeRightClickEvent, new RoutedEventHandler(OnThreeRightClick));

        }

        private int cnt1 = 0;
        //PreviewMouseRightButtonDownEvent的回调函数,在里面去触发自定义路由事件PreviewThreeRightClick
        private void OnPreviewRightClick(object sender, RoutedEventArgs e)
        {
            cnt1++;
            if (cnt1 == 3)
            {                                                                  //自定义路由事件PreviewThreeRightClick 隧道形式
                RoutedEventArgs routedEventArgs = new RoutedEventArgs(Mybutton.PreviewThreeRightClickEvent);
                this.RaiseEvent(routedEventArgs);
                cnt1 = 0;
            }
        }


         private int cnt = 0;
        //MouseRightButtonDownEvent的回调函数,在里面去触发自定义路由事件ThreeRightClick
        private void OnRightClick(object sender, RoutedEventArgs e)
        {
            cnt++;
            if(cnt==3)
            {                                                                //自定义路由事件PreviewThreeRightClick 冒泡形式
                RoutedEventArgs routedEventArgs = new RoutedEventArgs(Mybutton.ThreeRightClickEvent);
                this.RaiseEvent(routedEventArgs);
                cnt=0;
            }
        }
        //此自定义路由事件是冒泡的
        public static readonly RoutedEvent ThreeRightClickEvent = EventManager.RegisterRoutedEvent("ThreeRightClick", RoutingStrategy.Bubble, typeof(RoutedEventHandler), typeof(Mybutton));
        public event RoutedEventHandler ThreeRightClick
        {
            add { AddHandler(ThreeRightClickEvent, value); }
            remove
            {
                RemoveHandler(ThreeRightClickEvent, value);
            }
        }
        //此自定义路由事件是隧道的
        public static readonly RoutedEvent PreviewThreeRightClickEvent = EventManager.RegisterRoutedEvent("PreviewThreeRightClick", RoutingStrategy.Tunnel, typeof(RoutedEventHandler), typeof(Mybutton));
        public event RoutedEventHandler PreviewThreeRightClick
        {
            add { AddHandler(PreviewThreeRightClickEvent, value); }
            remove
            {
                RemoveHandler(PreviewThreeRightClickEvent, value);
            }
        }
    }
4.2如何使用自定义路由事件?
xaml中:
<Grid Name="grid" local:Mybutton.ThreeRightClick="OnThreeRightClick" local:Mybutton.PreviewThreeRightClick="OnPreviewThreeRightClick">
        <local:Mybutton x:Name="mybutton" ThreeRightClick="OnThreeRightClick" PreviewThreeRightClick="OnPreviewThreeRightClick" Height="30" Width="50" Content="右键3击"  />
    </Grid>
或者代码中:
public MainWindow()
        {
            InitializeComponent();

            this.AddHandler(Mybutton.ThreeRightClickEvent, new RoutedEventHandler(OnThreeRightClick));
            this.AddHandler(Mybutton.PreviewThreeRightClickEvent, new RoutedEventHandler(OnPreviewThreeRightClick));

            this.grid.AddHandler(Mybutton.ThreeRightClickEvent, new RoutedEventHandler(OnThreeRightClick));
            this.grid.AddHandler(Mybutton.PreviewThreeRightClickEvent, new RoutedEventHandler(OnPreviewThreeRightClick));

            this.mybutton.AddHandler(Mybutton.ThreeRightClickEvent, new RoutedEventHandler(OnThreeRightClick));
            this.mybutton.AddHandler(Mybutton.PreviewThreeRightClickEvent, new RoutedEventHandler(OnPreviewThreeRightClick));

        }
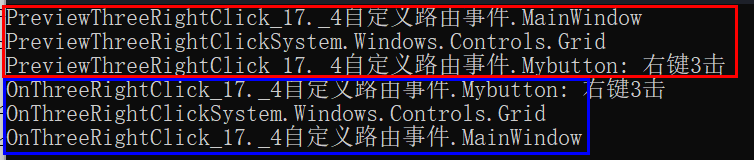
可以看到我们自定义的路由事件ThreeRightClick和PreviewThreeRightClick遵循冒泡和隧道顺序。
自定义的路由事件,再复杂的,也是由一个简单的事件引起的。这里是MouseRightButtonDown。需要注意简单事件的路由规则和自定义的路由事件的路由规则要对应。
画个图整理一下其中的逻辑是怎样的:
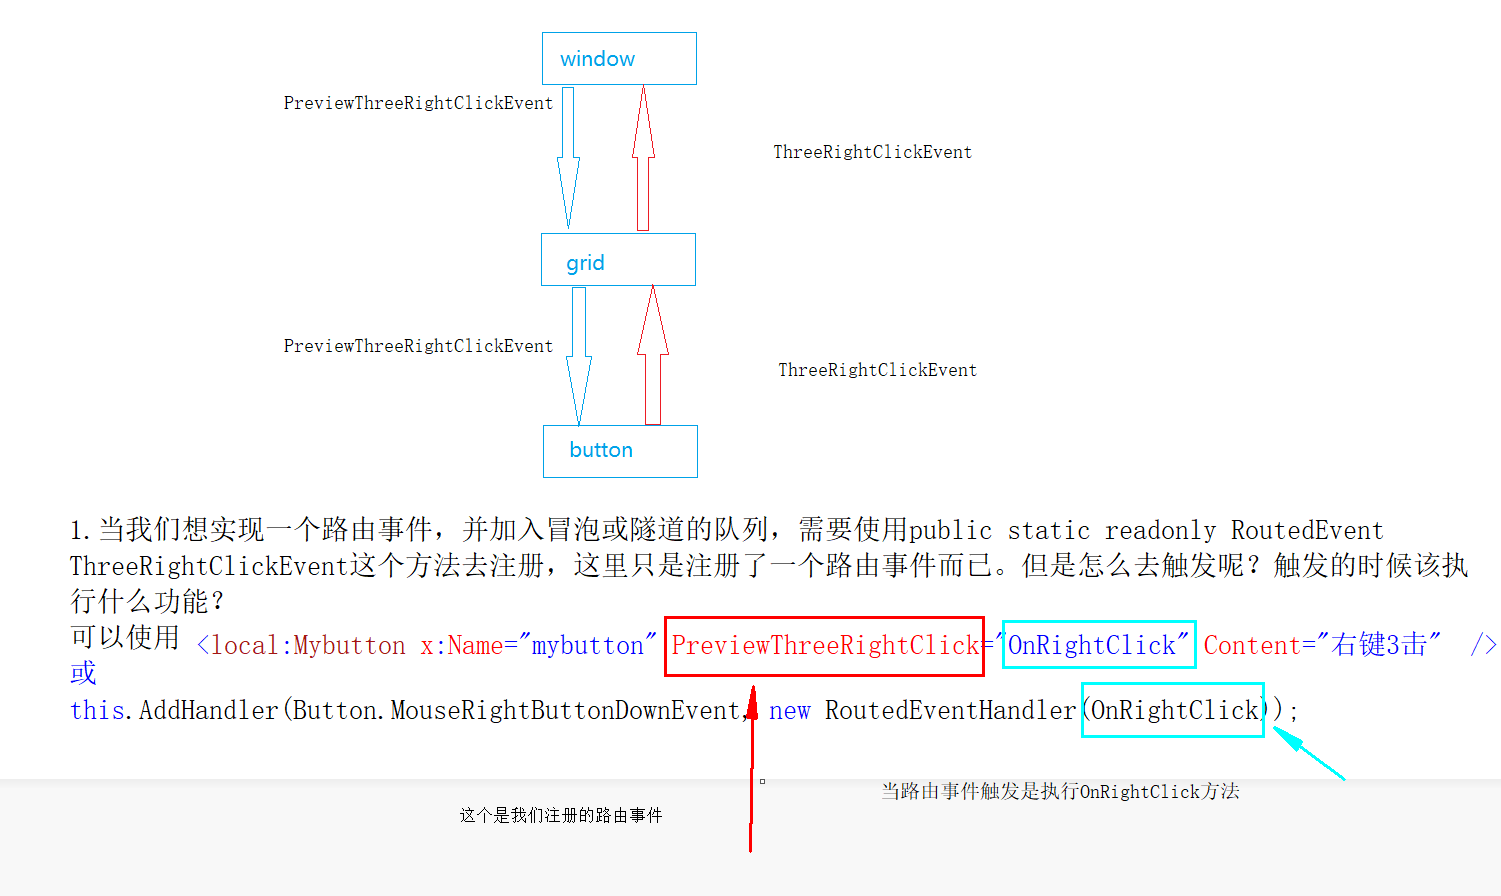
就是说,注册路由事件,和路由事件触发时执行什么操作不是同一个概念。注册路由事件是向wpf系统中注册,而路由事件被触发时执行的操作是开发者的逻辑代码。
就像click事件执行时,我们需要编写一个方法去执行开发者的逻辑。注册路由事件的含义就是开发者根据wpf的语法,去注册一个类似于click事件的路由事件
来源:https://www.cnblogs.com/1024E/p/15752713.html
