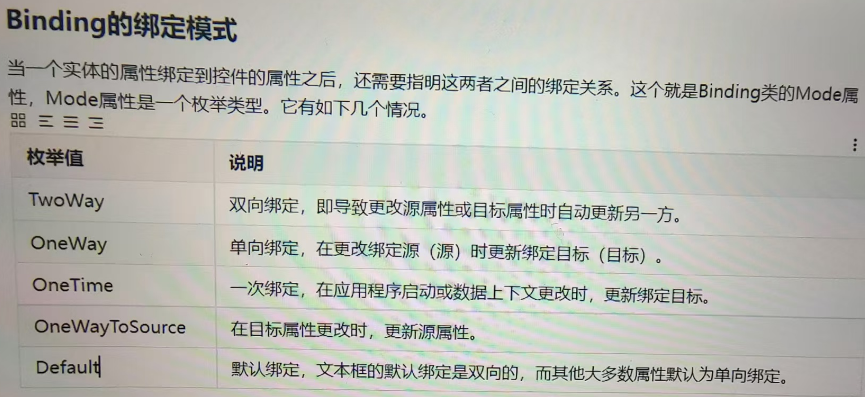
WPF 绑定
绑定就是Binding,是控件和数据之间交互的类。
source = {binding}
和
source = {binding RelativeSource={RelativeSource self},Path=DataContext}
效果相同。
例如:直接绑定数据源
前台xaml界面
    <Grid>
        <StackPanel Orientation="Vertical">
            <TextBlock Text="{Binding Number}" Width="50" Height="30" Background="WhiteSmoke" Foreground="Black"/>
            <TextBlock Text="{Binding Name}" Width="50" Height="30" Background="WhiteSmoke" Foreground="Black"/>
            <TextBlock Text="{Binding Class}" Width="50" Height="30" Background="WhiteSmoke" Foreground="Black"/>
        </StackPanel>
 </Grid>
    public partial class MainWindow : Window
    {
        public class StudentInfo
        {
            public int Number { get; set; }
            public string Name { get; set; }
            public string Class { get; set; }
        }
        public MainWindow()
        {
            InitializeComponent();
            List<StudentInfo> list = new List<StudentInfo>();
            for (int i = 0; i < 10; i++)
            {
                StudentInfo entity1 = new StudentInfo();
                entity1.Number = i;
                entity1.Name = "其他" + i;
                entity1.Class = "其他" + i + "其他";
                list.Add(entity1);
            }
            this.DataContext = list;
        }
    }
这里最重要的是this.DataContext = list; 不同的时候DataContext 是不一样的
其中RelativeSource有4种模式:
1.RelativeSource Mode=Self,绑定自身的值。
2.RelativeSource Mode=PreviousData,么看懂,反正就是最后一行数据少了(***),图如下
3.TemplatedParent模式,绑定一个模板。
4.FindAncestor模式,绑定特定的类型。
绑定有三种,Binding,PriorityBinding,MultiBinding。
第一种,Binding,单个值绑定
2个控件一旦进行绑定,那么2个控件是相互的,你变化,我也跟着变化。
1.当绑定写在第一个控件上
<StackPanel>
            <Slider x:Name="s" Value="{Binding ElementName=t, Path=Text}"></Slider>
            <TextBox x:Name="t" Text="0"></TextBox>

            <!--<Slider x:Name="s" Value="0"></Slider>
            <TextBox x:Name="t" Text="{Binding ElementName=s, Path=Value,UpdateSourceTrigger=PropertyChanged}"></TextBox>-->
        </StackPanel>
2.当绑定写在第二个控件上
 <StackPanel>
            <!--<Slider x:Name="s" Value="{Binding ElementName=t, Path=Text}"></Slider>
            <TextBox x:Name="t" Text="0"></TextBox>-->

            <Slider x:Name="s" Value="0"></Slider>
            <TextBox x:Name="t" Text="{Binding ElementName=s, Path=Value,UpdateSourceTrigger=PropertyChanged}"></TextBox>
        </StackPanel>


<Window x:Class="Dispatcher.MainWindow"
        xmlns="http://schemas.microsoft.com/winfx/2006/xaml/presentation"
        xmlns:x="http://schemas.microsoft.com/winfx/2006/xaml"
        xmlns:d="http://schemas.microsoft.com/expression/blend/2008"
        xmlns:mc="http://schemas.openxmlformats.org/markup-compatibility/2006"
        xmlns:local="clr-namespace:Dispatcher" xmlns:collection="clr-namespace:System.Collections;assembly=mscorlib" xmlns:sys="clr-namespace:System;assembly=mscorlib"
        mc:Ignorable="d"
        Title="MainWindow" Height="450" Width="800">
    <Window.Resources>
        <local:AsyncDataSource x:Key="AsyncDS" SlowestDP="最慢" SlowerDP="慢" FastDP="快"  />
    </Window.Resources>
    <Grid>
        <StackPanel HorizontalAlignment="Center" VerticalAlignment="Center" DataContext="{Binding Source={StaticResource AsyncDS}}">
            <TextBlock FontSize="18" FontWeight="Bold" Margin="10" HorizontalAlignment="Center">Priority Binding</TextBlock>
            <TextBlock Background="Honeydew" Width="100" HorizontalAlignment="Center">
                <TextBlock.Text>
                    <PriorityBinding FallbackValue="defaultvalue">
                        <Binding Path="SlowestDP" IsAsync="True"/>
                        <Binding Path="SlowerDP" IsAsync="True"/>
                        <Binding Path="FastDP" />
                    </PriorityBinding>
                </TextBlock.Text>
            </TextBlock>
        </StackPanel>
    </Grid>
</Window>
using System;
using System.Collections.Generic;
using System.Linq;
using System.Text;
using System.Threading;
using System.Threading.Tasks;

namespace Dispatcher
{
    public class AsyncDataSource
    {
        private string _fastDP;
        private string _slowerDP;
        private string _slowestDP;

        public AsyncDataSource()
        {
        }

        public string FastDP
        {
            get { return _fastDP; }
            set { _fastDP = value; }
        }

        public string SlowerDP
        {
            get
            {
                Thread.Sleep(3000); //模拟耗时
                return _slowerDP;
            }
            set { _slowerDP = value; }
        }

        public string SlowestDP
        {
            get
            {
                Thread.Sleep(5000); //模拟耗时
                return _slowestDP;
            }
            set { _slowestDP = value; }
        }
    }
}
第三种,MultiBinding
值转换分为单值转换IValueConverter和多值转换IMultiValueConverter。
使用值转化类可以简单轻松的解决前台界面显示数据的变化,解决同一种数据多种表示的难题。
一、单值转换IValueConverter
1.首先建立一个转换类,引用using System.Windows.Data;,然后继承IValueConverter,点击实现接口
    class YesNoToConverter : IValueConverter
    {
        public object Convert(object value, Type targetType, object parameter, CultureInfo culture)
        {
            //value就是前台传递过来的值
            switch (value.ToString().ToLower())
            {
                case "y":
                case "ye":
                case "yes":
                    return true;
                case "n":
                case "no":
                case "non":
                    return false;
            }
            return false;
        }

        public object ConvertBack(object value, Type targetType, object parameter, CultureInfo culture)
        {
            if (value is bool)
            {
                if ((bool)value == true)
                    return "yes";
                else
                    return "no";
            }
            return "no";
        }
    }
<Window x:Class="WpfApp2.MainWindow"
        xmlns="http://schemas.microsoft.com/winfx/2006/xaml/presentation"
        xmlns:x="http://schemas.microsoft.com/winfx/2006/xaml"
        xmlns:d="http://schemas.microsoft.com/expression/blend/2008"
        xmlns:mc="http://schemas.openxmlformats.org/markup-compatibility/2006"
        xmlns:local="clr-namespace:WpfApp2"
        mc:Ignorable="d"
        Title="MainWindow" Height="450" Width="800">
    <Window.Resources>
        <local:YesNoToConverter x:Key="yn"/>
    </Window.Resources>
    <StackPanel Margin="10">
        <TextBox Name="txtValue" />
        <WrapPanel Margin="0,10">
            <TextBlock Text="Current value is: " />
            <TextBlock Name="YN" Text="{Binding ElementName=txtValue, Path=Text, Converter={StaticResource yn}}"></TextBlock>
        </WrapPanel>
        <CheckBox IsChecked="{Binding ElementName=txtValue, Path=Text, Converter={StaticResource yn}}" Content="{Binding ElementName=YN,Path=Text}" />
    </StackPanel>
</Window>
二、多值转换IMultiValueConverter
1.首先建立一个转换类,引用using System.Windows.Data;
   class YesNoToConverter2 : IMultiValueConverter
    {
        public object Convert(object[] values, Type targetType, object parameter, CultureInfo culture)
        {
            //这里的values就是多个值,与前台绑定的数据有关,有几个值,就判断几个值
            if (values == null || values.Length < 2)
                return DependencyProperty.UnsetValue;
            double verValue = (double)values[0];
            double horValue = (double)values[1];
            if (verValue > horValue)
                return new SolidColorBrush(Colors.Green);
            else if (verValue < horValue)
                return new SolidColorBrush(Colors.Red);
            return new SolidColorBrush(Colors.Yellow);
        }

        public object[] ConvertBack(object value, Type[] targetTypes, object parameter, CultureInfo culture)
        {
            return null;
        }
    }
<Window x:Class="WpfApp2.MainWindow"
        xmlns="http://schemas.microsoft.com/winfx/2006/xaml/presentation"
        xmlns:x="http://schemas.microsoft.com/winfx/2006/xaml"
        xmlns:d="http://schemas.microsoft.com/expression/blend/2008"
        xmlns:mc="http://schemas.openxmlformats.org/markup-compatibility/2006"
        xmlns:local="clr-namespace:WpfApp2"
        mc:Ignorable="d"
        Title="MainWindow" Height="450" Width="800">
    <Window.Resources>
        <local:YesNoToConverter2 x:Key="cvtColor"/>
    </Window.Resources>
    <Grid>
        <Label x:Name="label" Content="纵向值:" HorizontalAlignment="Left" Margin="10,40,0,0" VerticalAlignment="Top"/>
        <Label x:Name="label1" Content="横向值:" HorizontalAlignment="Left" Margin="10,80,0,0" VerticalAlignment="Top"/>
        <Slider x:Name="sliderVer" HorizontalAlignment="Left" Margin="75,43,0,0" VerticalAlignment="Top" Width="192"/>
        <Slider x:Name="sliderHor" HorizontalAlignment="Left" Margin="75,81,0,0" VerticalAlignment="Top" Width="192"/>
        <Ellipse   HorizontalAlignment="Left" Height="100" Margin="75,120,0,0" Stroke="Black" VerticalAlignment="Top" Width="100">
            <Ellipse.Fill>
                <MultiBinding Converter="{StaticResource cvtColor}">
                    <Binding Path="Value" ElementName="sliderVer"/>
                    <Binding Path="Value" ElementName="sliderHor"/>
                </MultiBinding>
            </Ellipse.Fill>
        </Ellipse>
    </Grid>
</Window>
拓展:
多值绑定,根据Select下拉框的值来改变Name中背景颜色。
其中,Name和Select都要有属性通知,多值绑定
Select下拉框需要进行事件绑定数据
 <TextBox Style="{StaticResource dgTextBox}"
                                     Text="{Binding Name,UpdateSourceTrigger=PropertyChanged}">
                                <TextBox.Background>
                                    <MultiBinding  Converter="{StaticResource relayIPColorConverter}">
                                        <Binding Path="Name" />
                                        <Binding Path="Select"  />
                                    </MultiBinding>
                                </TextBox.Background>
                            </TextBox>

 private void ComboBox_SelectionChanged_2(object sender, SelectionChangedEventArgs e)
        {
            var current = ((sender as ComboBox).DataContext) as StudentInfo;
            switch (((ContentControl)e.AddedItems[0]).Content)
            {
                case "a": current.Type = 1; break;
                case "b": current.Type = 2; break;
                case "c": current.Type = 3; break;
            }
        }
来源:https://blog.csdn.net/u012563853/article/details/124874725


【推荐】国内首个AI IDE,深度理解中文开发场景,立即下载体验Trae
【推荐】编程新体验,更懂你的AI,立即体验豆包MarsCode编程助手
【推荐】抖音旗下AI助手豆包,你的智能百科全书,全免费不限次数
【推荐】轻量又高性能的 SSH 工具 IShell:AI 加持,快人一步
· 阿里最新开源QwQ-32B,效果媲美deepseek-r1满血版,部署成本又又又降低了!
· AI编程工具终极对决:字节Trae VS Cursor,谁才是开发者新宠?
· Manus重磅发布:全球首款通用AI代理技术深度解析与实战指南
· 开源Multi-agent AI智能体框架aevatar.ai,欢迎大家贡献代码
· 被坑几百块钱后,我竟然真的恢复了删除的微信聊天记录!
2023-08-16 C#实现用正则表达式替换JSON中大字段的内容