FPN在faster_rcnn中实现细节代码说明
代码参考自:https://github.com/DetectionTeamUCAS/FPN_Tensorflow
主要分析fpn多层金字塔结构的输出如何进行预测。
FPN金字塔结构插入在faster_rcnn的特征图获取之后,在rpn结构之前。
具体代码如下所示:
代码结构追溯至FPN部分:
train.py(line 46 :build_whole_detection_network函数)
build_whole_network(line 372: build_whole_detection_network函数)
按照注释分别查看7个步骤:
    1. build base network

    2. build rpn

    3. generate_anchors
4. postprocess rpn proposals. such as: decode, clip, NMS(所得第一次框处理)
5. build Fast-RCNN(5,roipooling 6,inference rois to obtain fc 7,cls reg)
    6. postprocess_fastrcnn(最后框处理)
    FPN部分在build base network中,得到的plist即为金字塔特征图的集合
        build_base_network一步一步回溯找到原函数resnet_base(fpn操作在这里,如下代码)
  1 def resnet_base(img_batch, scope_name, is_training=True):
  2     '''
  3     this code is derived from light-head rcnn.
  4     https://github.com/zengarden/light_head_rcnn
  5
  6     It is convenient to freeze blocks. So we adapt this mode.
  7     '''
  8     if scope_name == 'resnet_v1_50':
  9         middle_num_units = 6
 10     elif scope_name == 'resnet_v1_101':
 11         middle_num_units = 23
 12     else:
 13         raise NotImplementedError('We only support resnet_v1_50 or resnet_v1_101. Check your network name....yjr')
 14
 15     blocks = [resnet_v1_block('block1', base_depth=64, num_units=3, stride=2),
 16               resnet_v1_block('block2', base_depth=128, num_units=4, stride=2),
 17               resnet_v1_block('block3', base_depth=256, num_units=middle_num_units, stride=2),
 18               resnet_v1_block('block4', base_depth=512, num_units=3, stride=1)]
 19     # when use fpn . stride list is [1, 2, 2]
 20
 21     with slim.arg_scope(resnet_arg_scope(is_training=False)):
 22         with tf.variable_scope(scope_name, scope_name):
 23             # Do the first few layers manually, because 'SAME' padding can behave inconsistently
 24             # for images of different sizes: sometimes 0, sometimes 1
 25             net = resnet_utils.conv2d_same(
 26                 img_batch, 64, 7, stride=2, scope='conv1')
 27             net = tf.pad(net, [[0, 0], [1, 1], [1, 1], [0, 0]])
 28             net = slim.max_pool2d(
 29                 net, [3, 3], stride=2, padding='VALID', scope='pool1')
 30
 31     not_freezed = [False] * cfgs.FIXED_BLOCKS + (4-cfgs.FIXED_BLOCKS)*[True]
 32     # Fixed_Blocks can be 1~3
 33
 34     with slim.arg_scope(resnet_arg_scope(is_training=(is_training and not_freezed[0]))):
 35         C2, end_points_C2 = resnet_v1.resnet_v1(net,
 36                                                 blocks[0:1],
 37                                                 global_pool=False,
 38                                                 include_root_block=False,
 39                                                 scope=scope_name)
 40
 41     # C2 = tf.Print(C2, [tf.shape(C2)], summarize=10, message='C2_shape')
 42     add_heatmap(C2, name='Layer2/C2_heat')
 43
 44     with slim.arg_scope(resnet_arg_scope(is_training=(is_training and not_freezed[1]))):
 45         C3, end_points_C3 = resnet_v1.resnet_v1(C2,
 46                                                 blocks[1:2],
 47                                                 global_pool=False,
 48                                                 include_root_block=False,
 49                                                 scope=scope_name)
 50
 51     # C3 = tf.Print(C3, [tf.shape(C3)], summarize=10, message='C3_shape')
 52     add_heatmap(C3, name='Layer3/C3_heat')
 53     with slim.arg_scope(resnet_arg_scope(is_training=(is_training and not_freezed[2]))):
 54         C4, end_points_C4 = resnet_v1.resnet_v1(C3,
 55                                                 blocks[2:3],
 56                                                 global_pool=False,
 57                                                 include_root_block=False,
 58                                                 scope=scope_name)
 59
 60     add_heatmap(C4, name='Layer4/C4_heat')
 61
 62     # C4 = tf.Print(C4, [tf.shape(C4)], summarize=10, message='C4_shape')
 63     with slim.arg_scope(resnet_arg_scope(is_training=is_training)):
 64         C5, end_points_C5 = resnet_v1.resnet_v1(C4,
 65                                                 blocks[3:4],
 66                                                 global_pool=False,
 67                                                 include_root_block=False,
 68                                                 scope=scope_name)
 69     # C5 = tf.Print(C5, [tf.shape(C5)], summarize=10, message='C5_shape')
 70     add_heatmap(C5, name='Layer5/C5_heat')
 71
 72     feature_dict = {'C2': end_points_C2['{}/block1/unit_2/bottleneck_v1'.format(scope_name)],
 73                     'C3': end_points_C3['{}/block2/unit_3/bottleneck_v1'.format(scope_name)],
 74                     'C4': end_points_C4['{}/block3/unit_{}/bottleneck_v1'.format(scope_name, middle_num_units - 1)],
 75                     'C5': end_points_C5['{}/block4/unit_3/bottleneck_v1'.format(scope_name)],
 76                     # 'C5': end_points_C5['{}/block4'.format(scope_name)],
 77                     }
 78
 79     # feature_dict = {'C2': C2,
 80     #                 'C3': C3,
 81     #                 'C4': C4,
 82     #                 'C5': C5}
 83
 84     pyramid_dict = {}
 85     with tf.variable_scope('build_pyramid'):
 86         with slim.arg_scope([slim.conv2d], weights_regularizer=slim.l2_regularizer(cfgs.WEIGHT_DECAY),
 87                             activation_fn=None, normalizer_fn=None):
 88
 89             P5 = slim.conv2d(C5,
 90                              num_outputs=256,
 91                              kernel_size=[1, 1],
 92                              stride=1, scope='build_P5')
 93             if "P6" in cfgs.LEVLES:
 94                 P6 = slim.max_pool2d(P5, kernel_size=[1, 1], stride=2, scope='build_P6')
 95                 pyramid_dict['P6'] = P6
 96
 97             pyramid_dict['P5'] = P5
 98
 99             for level in range(4, 1, -1):  # build [P4, P3, P2]
100
101                 pyramid_dict['P%d' % level] = fusion_two_layer(C_i=feature_dict["C%d" % level],
102                                                                P_j=pyramid_dict["P%d" % (level+1)],
103                                                                scope='build_P%d' % level)
104             for level in range(4, 1, -1):
105                 pyramid_dict['P%d' % level] = slim.conv2d(pyramid_dict['P%d' % level],
106                                                           num_outputs=256, kernel_size=[3, 3], padding="SAME",
107                                                           stride=1, scope="fuse_P%d" % level)
108     for level in range(5, 1, -1):
109         add_heatmap(pyramid_dict['P%d' % level], name='Layer%d/P%d_heat' % (level, level))
110
111     # return [P2, P3, P4, P5, P6]
112     print("we are in Pyramid::-======>>>>")
113     print(cfgs.LEVLES)
114     print("base_anchor_size are: ", cfgs.BASE_ANCHOR_SIZE_LIST)
115     print(20 * "__")
116     return [pyramid_dict[level_name] for level_name in cfgs.LEVLES]
117     # return pyramid_dict  # return the dict. And get each level by key. But ensure the levels are consitant
118     # return list rather than dict, to avoid dict is unordered
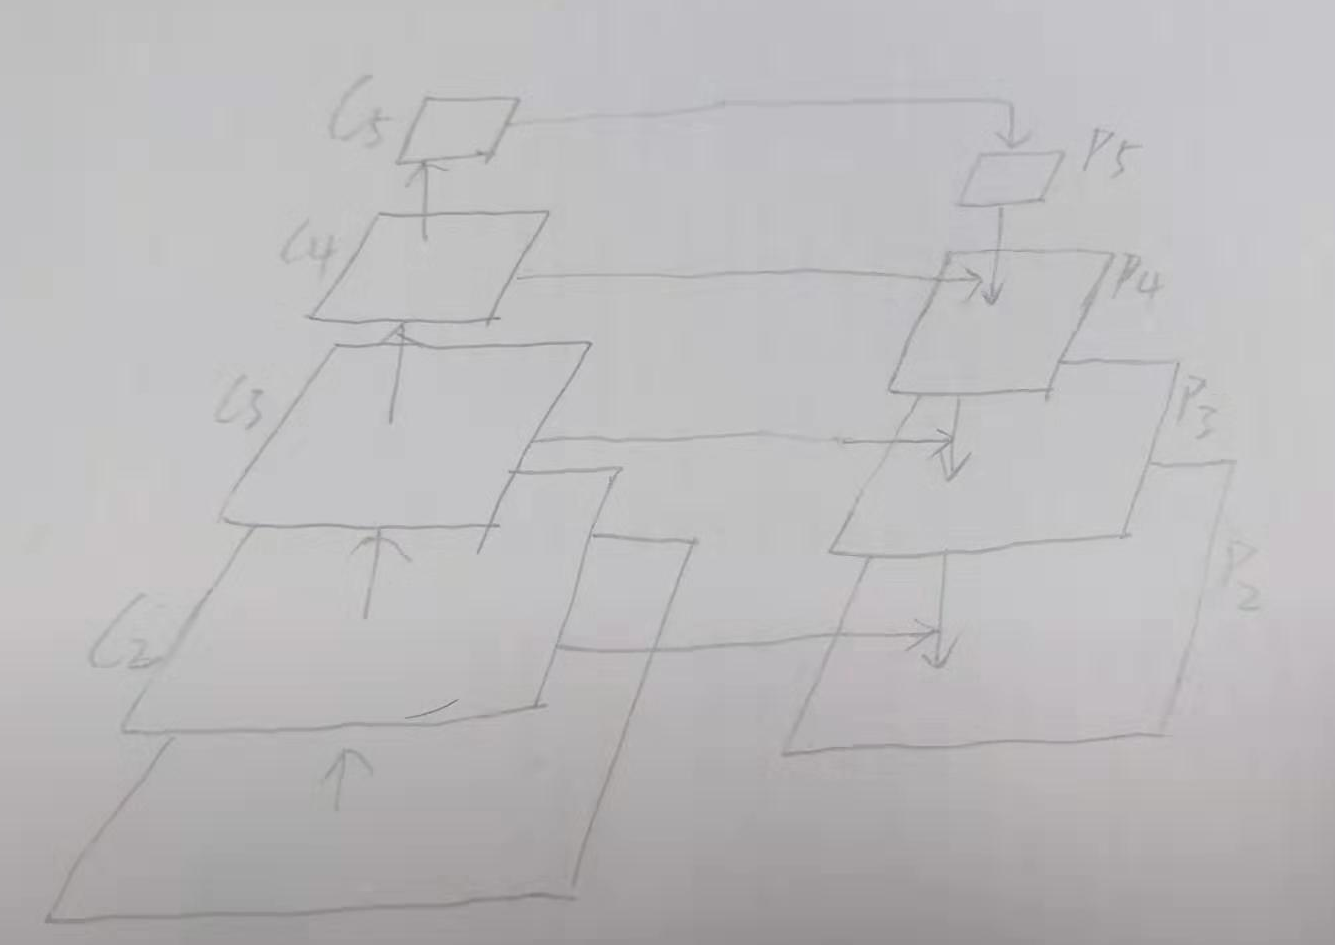
观察原特征图的结构C2,C3,C4,C5, 以及特征金字塔的结构P5,P4,P3,P2,为5层的特征金字塔结构 。
操作如图:

金字塔结构的总层数为(p5,p6,p4,p3,p2)
P5 = conv2d(C5) (因金字塔特征图每层的构造是 上面一层的2x upsaming 和左边的1*1conv后的结果相加)
P6 = max_pool(P5)
核心的融合部分在下面代码中显示:
P4 = C4 + P5
P3 = C3 + P4
P2 = C2 + P3
1             for level in range(4, 1, -1):  # build [P4, P3, P2]
2
3                 pyramid_dict['P%d' % level] = fusion_two_layer(C_i=feature_dict["C%d" % level],
4                                                                P_j=pyramid_dict["P%d" % (level+1)],
5                                                                scope='build_P%d' % level)
最后的P_LIST共有: LEVLES = ['P2', 'P3', 'P4', 'P5', 'P6']层级
对应每层特征图设置不同大小的anchors
Instead, we assign anchors of a single scale to each level. Formally, we define the anchors to have areas of {32,64,128,256,512} pixels on {P2,P3,P4,P5,P6} respectively.
As in [29] we also use anchors of multiple aspect ratios{1:2, 1:1, 2:1}at each level. So in total there are 15 anchors over the pyramid
后面得到全部金字塔特征图的roi,下一步是要把roi对应到各自层的特征图上取roi特征,不同大小的roi对应不同的特征图,较大的roi对应深层的特征图,按照公式

确定对应的层,然后送入roi pooling,统一特征图尺寸。
在roipooling之后的处理过程都基本一样了;
原来是一个map进行predict产生一些proposals;经过处理之后,送入全连接层之后进行cls and reg;
FPN现在是多个map进行predict产生更多不同尺度(更加鲁棒)的proposals,经过处理之后,也是送入全连接层之后进行cls and reg。


