MHA-Atlas-MySQL高可用(上)
MHA-Atlas-MySQL高可用(上)
链接:https://pan.baidu.com/s/17Av92KQnJ81Gc0EmxSO7gA
提取码:a8mq
复制这段内容后打开百度网盘手机App,操作更方便哦
1. MySQL的-MHA环境准备
1.1 实验环境:
| 主机名 | IP地址 | 网卡模式 | 描述 |
|---|---|---|---|
| Mysql-Master | 192.168.200.123 | NAT8 | 系统:CentOS6.5(6.x都可以)安装:mysql5.6 |
| Mysql-Slave01 | 192.168.200.124 | NAT8 | 系统:CentOS6.5(6.x都可以)安装:mysql5.6 |
| Mysql-Slave02 | 192.168.200.125 | NAT8 | 系统:CentOS6.5(6.x都可以)安装:mysql5.6 |
1.2 软件包
1.2.1 mha管理节点安装包:
- mha4mysql-manager-0.56-0.el6.noarch.rpm
- mha4mysql-manager-0.56.tar.gz
1.2.2 mha node节点安装包:
- mha4mysql-node-0.56-0.el6.noarch.rpm
- mha4mysql-node-0.56.tar.gz
1.2.3 mysql中间件:
Atlas-2.2.1.el6.x86_64.rpm
1.2.4 mysql源码安装包
mysql-5.6.17-linux-glibc2.5-x86_64.tar
1.3 修改主机名并主机名映射
[root@Mysql-Master ~]# hostname Mysql-Master && bash
[root@Mysql-Slave01 ~]# hostname Mysql-Slave01 && bash
[root@Mysql-Slave01 ~]# hostname Mysql-Slave02 && bash
[root@Mysql-Master ~]# tail -3 /etc/hosts
192.168.200.123 MySQL-Master
192.168.200.124 MySQL-Slave01
192.168.200.125 MySQL-Slave02
1.4 关闭selinux和iptables
[root@Mysql-Master ~]# setenforce 0
[root@Mysql-Master ~]# service iptables stop
iptables: Setting chains to policy ACCEPT: filter          [  OK  ]
iptables: Flushing firewall rules:                         [  OK  ]
iptables: Unloading modules:                               [  OK  ]
[root@Mysql-Master ~]# chkconfig iptables off
2. 简介
2.1 软件简介
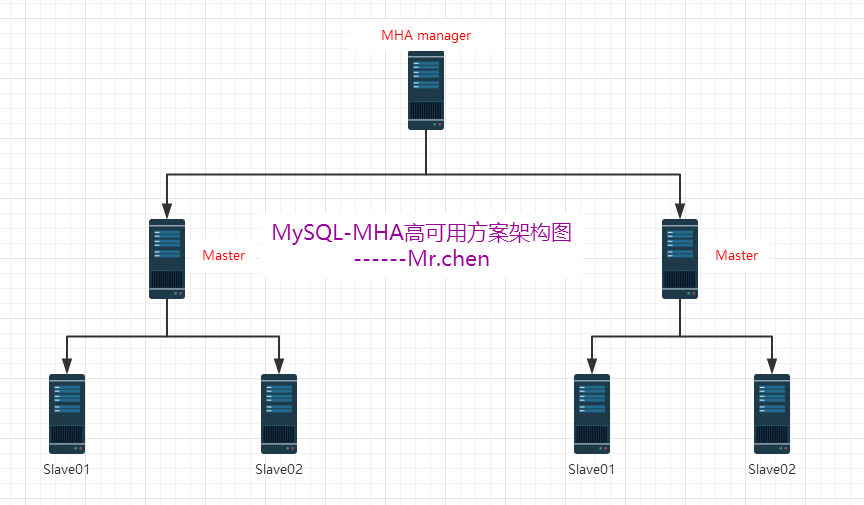
- MHA(Master High Availability)目前在MySQL高可用方面是一个相对成熟的解决方案,是一套优秀的作为MySQL高可用性环境下故障切换和主从提升的高可用软件。在MySQL故障切换过程中,MHA能做到0〜30秒之内自动完成数据库的故障切换操作,并且在进行故障切换过程中,MHA能最大程度上保证数据库的一致性,以达到真正意义上的高可用。
- MHA由两部分组成:MHA Manager(管理节点)和MHA Node(数据节点).MHA Manager可以独立部署在一台独立的机器上管理多个Master-Slave集群,也可以部署在一台Slave上。当法师出现故障时,它可以自动将最新数据的奴隶提升为新的主,然后将所有其他的奴隶重新指向新的主。整个故障转移过程对应程序是完全透明的。
2.2 工作流程
- 从宕机崩溃的master保存二进制日志事件(binlog events);
- 识别含有最新更新的从属;
- 应用差异的中继日志(relay log)到其他的奴隶;
- 应用从主保存的二进制日志事件(binlog events);
- 提升一个从属为新的主人;
- 使其他的从属连接新的进行复制主;
2.3 MHA架构图
2.4 MHA工具介绍
MHA软件由两部分组成,管理工具包和节点工具包,具体的说明如下:
#Manager工具包主要包括以下几个工具:
masterha_check_ssh          #检查MHA的SSH配置状况
masterha_check_repl         #检查MySQL复制状况
masterha_check_status       #检测当前MHA运行状态
masterha_master_monitor     #检测master是否宕机
masterha_manger             #启动MHA
masterha_master_switch      #控制故障转移(自动或者手动)
masterha_conf_host          #添加或删除配置的server信息
masterha_secondary_check    #试图建立TCP连接从远程服务器
masterha_stop               #停止MHA
#Node工具包主要包括以下几个工具:
save_binary_logs            #保存和复制master的二进制日志
apply_diff_relay_logs       #识别差异的中继日志事件
filter_mysqlbinlog          #去除不必要的ROLLBACK事件
purge_relay_logs            #清除中继日志
3. mysql的环境准备
3.1 环境检查
#Mysql-Master系统版本
[root@Mysql-Master ~]# cat /etc/redhat-release
CentOS release 6.5 (Final)
[root@Mysql-Master ~]# uname -r
2.6.32-431.el6.x86_64
[root@Mysql-Master ~]# hostname -I
192.168.200.123
#Mysql-Slave01系统版本
[root@Mysql-Slave01 ~]# cat /etc/redhat-release
CentOS release 6.5 (Final)
[root@Mysql-Slave01 ~]# uname -r
2.6.32-431.el6.x86_64
[root@Mysql-Slave01 ~]# hostname -I
192.168.200.124
#Mysql-Slave02系统版本
[root@Mysql-Slave02 ~]# cat /etc/redhat-release
CentOS release 6.5 (Final)
[root@Mysql-Slave02 ~]# uname -r
2.6.32-431.el6.x86_64
[root@Mysql-Slave02 ~]# hostname -I
192.168.200.125
3.2 安装mysql
3.2.1 安装必备依赖包
[root@Mysql-Master ~]# yum -y install ncurses-devel libaio
[root@Mysql-Master ~]# rpm -qa ncurses-devel libaio
ncurses-devel-5.7-3.20090208.el6.x86_64
libaio-0.3.107-10.el6.x86_64
3.2.2 安装(3台都装)
[root@Mysql-Master yuanmabao]# pwd
/root/yuanmabao
[root@Mysql-Master yuanmabao]# tar xf mysql-5.6.17-linux-glibc2.5-x86_64.tar.gz -C /usr/local/
[root@Mysql-Master yuanmabao]# ln -s /usr/local/mysql-5.6.17-linux-glibc2.5-x86_64 /usr/local/mysql
[root@Mysql-Master yuanmabao]# useradd mysql -s /sbin/nologin -M
[root@Mysql-Master yuanmabao]# /usr/local/mysql/scripts/mysql_install_db --user=mysql --basedir=/usr/local/mysql --datadir=/usr/local/mysql/data/
#以下省略。。。
[root@Mysql-Master yuanmabao]# /bin/cp /usr/local/mysql/support-files/my-default.cnf /etc/my.cnf
[root@Mysql-Master yuanmabao]# /bin/cp /usr/local/mysql/support-files/mysql.server /etc/init.d/mysqld
[root@Mysql-Master yuanmabao]# ln -s /usr/local/mysql/bin/* /usr/local/bin/
[root@Mysql-Master yuanmabao]# which mysqladmin
/usr/local/bin/mysqladmin
3.2.3 加入开机自启动并启动mysql
[root@Mysql-Master ~]# chkconfig mysqld on
[root@Mysql-Master ~]# chkconfig mysqld --list
mysqld         	0:off	1:off	2:on	3:on	4:on	5:on	6:off
[root@Mysql-Master ~]# /etc/init.d/mysqld start
Starting MySQL.. SUCCESS!
3.2.4 配置密码
[root@Mysql-Master ~]# mysqladmin -uroot password '971108'
4. 配置基于GTID的主从复制
4.1 先决条件
- 主库和从库都要开启binlog
- 主库和从库server-id不同
- 要有主从复制用户
4.2 主库操作(Mysql-Master)
4.2.1 修改配置文件
[root@Mysql-Master ~]# cat /etc/my.cnf
[client]
socket          = /usr/local/mysql/data/mysql.sock
[mysqld]
lower_case_table_names  = 1
default-storage-engine  = InnoDB
port            = 3306
datadir         = /usr/local/mysql/data
character-set-server    = utf8
socket          = /usr/local/mysql/data/mysql.sock

log_bin         = mysql-bin      #开启binlog日志
server_id       = 1              #设置server_id

innodb_buffer_pool_size = 200M
slave-parallel-workers  = 8
thread_cache_size   = 600
back_log        = 600
slave_net_timeout   = 60
max_binlog_size     = 512M
key_buffer_size     = 8M
query_cache_size    = 64M
join_buffer_size    = 2M
sort_buffer_size    = 2M
query_cache_type    = 1
thread_stack        = 192K
#重启动MySQL服务
[root@Mysql-Master ~]# /etc/init.d/mysqld restart
Shutting down MySQL.. SUCCESS!
Starting MySQL.. SUCCESS!
4.2.2 登陆MySQL删除不必要的用户并创建主从复制用户
(1)删除不必要的用户
[root@Mysql-Master ~]# mysql -uroot -p971108
mysql> select user,host from mysql.user;
+------+--------------+
| user | host         |
+------+--------------+
| root | 127.0.0.1    |
| root | ::1          |
|      | localhost    |
| root | localhost    |
|      | mysql-master |
| root | mysql-master |
+------+--------------+
6 rows in set (0.00 sec)

mysql> drop user root@'127.0.0.1';
Query OK, 0 rows affected (0.08 sec)

mysql> drop user root@'::1';
Query OK, 0 rows affected (0.00 sec)

mysql> drop user ' '@'localhost';
Query OK, 0 rows affected (0.00 sec)

mysql> drop user ' '@'mysql-master';
Query OK, 0 rows affected (0.00 sec)

mysql> select user,host from mysql.user;
+------+--------------+
| user | host         |
+------+--------------+
| root | localhost    |
| root | mysql-master |
+------+--------------+
2 rows in set (0.00 sec)
(2)创建主从复制用户
mysql> grant replication slave on *.* to rep@'192.168.200.%' identified by '971108';
Query OK, 0 rows affected (0.00 sec)

mysql> select user,host from mysql.user;
+------+---------------+
| user | host          |
+------+---------------+
| rep  | 192.168.200.% |
| root | localhost     |
| root | mysql-master  |
+------+---------------+
3 rows in set (0.00 sec)

mysql> show grants for rep@'192.168.200.%';
+----------------------------------------------------------------------------------------------------------------------------+
| Grants for rep@192.168.200.%                                                                                               |
+----------------------------------------------------------------------------------------------------------------------------+
| GRANT REPLICATION SLAVE ON *.* TO 'rep'@'192.168.200.%' IDENTIFIED BY PASSWORD '*2E086B4AB841306370F090F3973AC88BDAA569D3' |
+----------------------------------------------------------------------------------------------------------------------------+
1 row in set (0.00 sec)
4.3 从库操作(Mysql-Slave01和Mysql-Slave02)
4.3.1 修改配置文件
#修改Mysql-Slave01配置文件(和Mysql-Master配置文件一致)
#只需要修改server-id = 5选项
[root@Mysql-Slave01 ~]# cat /etc/my.cnf
[client]
socket          = /usr/local/mysql/data/mysql.sock
[mysqld]
lower_case_table_names  = 1
default-storage-engine  = InnoDB
port            = 3306
datadir         = /usr/local/mysql/data
character-set-server    = utf8
socket          = /usr/local/mysql/data/mysql.sock

log_bin         = mysql-bin        #从binlog也要打开
server_id       = 5                #只需修改此项

innodb_buffer_pool_size = 200M
slave-parallel-workers  = 8
thread_cache_size   = 600
back_log        = 600
slave_net_timeout   = 60
max_binlog_size     = 512M
key_buffer_size     = 8M
query_cache_size    = 64M
join_buffer_size    = 2M
sort_buffer_size    = 2M
query_cache_type    = 1
thread_stack        = 192K

#重启动MySQL服务
[root@Mysql-Slave01 ~]# /etc/init.d/mysqld restart
Shutting down MySQL.. SUCCESS!
Starting MySQL. SUCCESS!
#修改Mysql-Slave02配置文件(和Mysql-Master配置文件一致)
#只需要修改server-id = 10选项
[root@Mysql-Slave02 ~]# cat /etc/my.cnf
[client]
socket          = /usr/local/mysql/data/mysql.sock
[mysqld]
lower_case_table_names  = 1
default-storage-engine  = InnoDB
port            = 3306
datadir         = /usr/local/mysql/data
character-set-server    = utf8
socket          = /usr/local/mysql/data/mysql.sock

log_bin         = mysql-bin     #从binlog也要打开
server_id       = 10            #只需修改此项

innodb_buffer_pool_size = 200M
slave-parallel-workers  = 8
thread_cache_size   = 600
back_log        = 600
slave_net_timeout   = 60
max_binlog_size     = 512M
key_buffer_size     = 8M
query_cache_size    = 64M
join_buffer_size    = 2M
sort_buffer_size    = 2M
query_cache_type    = 1
thread_stack        = 192K

#重启动MySQL服务
[root@Mysql-Slave02 ~]# /etc/init.d/mysqld restart
Shutting down MySQL.. SUCCESS!
Starting MySQL. SUCCESS!
特别提示:
在以往如果是基于binlog日志的主从复制,则必须要记住主库的master状态信息。
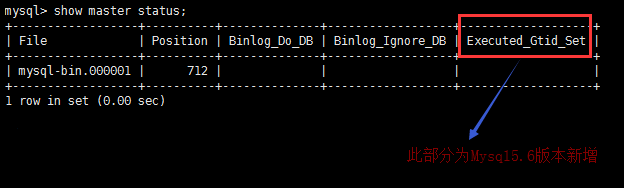
但是在MySQL5.6版本里多了一个Gtid的功能,可以自动记录主从复制位置点的信息,并在日志中输出出来。
4.4 开启GTID
4.4.1 没开启之前先看一下GTID状态
mysql> show global variables like '%gtid%';
+--------------------------+-------+
| Variable_name            | Value |
+--------------------------+-------+
| enforce_gtid_consistency | OFF   |
| gtid_executed            |       |
| gtid_mode                | OFF   |
| gtid_owned               |       |
| gtid_purged              |       |
+--------------------------+-------+
5 rows in set (0.00 sec)
4.4.2 编辑mysql配置文件(主库从库都需要修改)
[root@Mysql-Master ~]# cat /etc/my.cnf
[client]
socket          = /usr/local/mysql/data/mysql.sock
[mysqld]

gtid_mode       = ON         #在[mysqld]标签下,加入这三行代码
log_slave_updates            #在[mysqld]标签下,加入这三行代码
enforce_gtid_consistency     #在[mysqld]标签下,加入这三行代码

lower_case_table_names  = 1
default-storage-engine  = InnoDB
port            = 3306
datadir         = /usr/local/mysql/data
character-set-server    = utf8
socket          = /usr/local/mysql/data/mysql.sock

log_bin         = mysql-bin
server_id       = 1

innodb_buffer_pool_size = 200M
slave-parallel-workers  = 8
thread_cache_size   = 600
back_log        = 600
slave_net_timeout   = 60
max_binlog_size     = 512M
key_buffer_size     = 8M
query_cache_size    = 64M
join_buffer_size    = 2M
sort_buffer_size    = 2M
query_cache_type    = 1
thread_stack        = 192K
4.4.3 修改完配置文件以后重启动数据库
[root@Mysql-Master ~]# /etc/init.d/mysqld restart
Shutting down MySQL.. SUCCESS!
Starting MySQL.. SUCCESS!

[root@Mysql-Slave01 ~]# /etc/init.d/mysqld restart
Shutting down MySQL.. SUCCESS!
Starting MySQL. SUCCESS!

[root@Mysql-Slave02 ~]# /etc/init.d/mysqld restart
Shutting down MySQL.. SUCCESS!
Starting MySQL. SUCCESS!
4.4.4 再次查看GTID状态
mysql> show global variables like '%gtid%';
+--------------------------+-------+
| Variable_name            | Value |
+--------------------------+-------+
| enforce_gtid_consistency | ON    |    #执行GTID一致
| gtid_executed            |       |
| gtid_mode                | ON    |    #开启GTID模块
| gtid_owned               |       |
| gtid_purged              |       |
+--------------------------+-------+
5 rows in set (0.00 sec)
再次提示: 主库从库都必须要开启GTID,否则在做主从复制的时候就会报错.
4.5 配置主从复制(Mysql-Slave01,Mysql-Slave02)
mysql> change master to master_host='192.168.200.123',master_user='rep',master_password='971108',master_auto_position=1;
Query OK, 0 rows affected, 2 warnings (0.17 sec)
#以上命令详解
change master to
master_host='192.168.200.123',     #主库IP
master_user='rep',              #主库复制用户
master_password='971108',       #主库复制用密码
master_auto_position=1;         #GTID位置点(自动追踪需要同步的position)
4.6 开启从库的主从复制功能(Mysql-Slave01,Mysql-Slave02)
mysql> start slave;         #开启主从同步功能
Query OK, 0 rows affected, 1 warning (0.01 sec)

mysql> show slave status\G
*************************** 1. row ***************************
               Slave_IO_State: Waiting for master to send event
                  Master_Host: 192.168.200.123
                  Master_User: rep
                  Master_Port: 3306
                Connect_Retry: 60
              Master_Log_File: mysql-bin.000003
          Read_Master_Log_Pos: 151
               Relay_Log_File: Mysql-Slave01-relay-bin.000002
                Relay_Log_Pos: 361
        Relay_Master_Log_File: mysql-bin.000003
             Slave_IO_Running: Yes      #此项yes代表成功
            Slave_SQL_Running: Yes      #此项yes代表成功
              Replicate_Do_DB:
          Replicate_Ignore_DB:
           Replicate_Do_Table:
       Replicate_Ignore_Table:
        #....以下省略若干行....
两个从库Mysql-Slave01和Mysql-Slave02都执行以上步骤。
4.7 什么是GTID
- GTID(Global Transaction)全局事务标识符:是一个唯一的标识符,它创建并与源服务器(主)上提交的每个事务相关联。此标识符不仅对其发起的服务器是唯一的,而且在给定复制设置中的所有服务器上都是唯一的。所有交易和所有GTID之间都有1对1的映射。
- GTID实际上是由UUID+TID组成的。其中UUID是一个MySQL实例的唯一标识。TID代表了该实例上已经提交的事务数量,并且随着事务提交单调递增。
- 这是一个GTID的具体形式:3E11FA47-71CA-11E1-9E33-C80AA9429562:23
4.8 GTID的新特性
- 支持多线程复制:事实上是针对每个database开启相应的独立线程,即每个库有一个单独的(sql thread)
- 支持启用GTID,在配置主从复制,传统的方式里,你需要找到binlog和POS点,然后change master to 指向。在mysql5.6里,无须再知道binlog和POS点,只需要知道master的IP/端口/账号密码即可,因为同步复制是自动的,MySQL通过内部机制GTID自动找点同步。
- 基于Row复制只保存改变的列,大大节省磁盘空间,网络,内存等
- 支持把Master和Slave的相关信息记录在Table中;原来是记录在文件里,现在则记录在表里,增强可用性
- 支持延迟复制
4.9 开启方法
#mysql配置文件:
[mysqld]
gtid_mode=ON
enforce_gtid_consistency

#查看
show global variables like ‘%gtid%’;
4.10 从库设置(Mysql-Slave01,Mysql-Slave02)
#登陆从库
[root@Mysql-Slave01 ~]# mysql -uroot -p971108

#临时禁用自动删除relay log功能
mysql> set global relay_log_purge = 0;
Query OK, 0 rows affected (0.00 sec)

#设置只读
mysql> set global read_only=1;
Query OK, 0 rows affected (0.00 sec)
4.11 编辑配置文件/etc/my.cnf(Mysql-Slave01,Mysql-Slave02)
[root@Mysql-Slave01 ~]# cat /etc/my.cnf
[client]
socket          = /usr/local/mysql/data/mysql.sock
[mysqld]

relay_log_purge = 0    #在[mysqld]标签下增加本行代码,永久禁用自动删除relay log功能

gtid_mode       =ON
log_slave_updates
enforce_gtid_consistency

lower_case_table_names  = 1
default-storage-engine  = InnoDB
port            = 3306
datadir         = /usr/local/mysql/data
character-set-server    = utf8
socket          = /usr/local/mysql/data/mysql.sock

log_bin         = mysql-bin
server_id       = 5

innodb_buffer_pool_size = 200M
slave-parallel-workers  = 8
thread_cache_size   = 600
back_log        = 600
slave_net_timeout   = 60
max_binlog_size     = 512M
key_buffer_size     = 8M
query_cache_size    = 64M
join_buffer_size    = 2M
sort_buffer_size    = 2M
query_cache_type    = 1
thread_stack        = 192K
#重启动mysql服务
[root@Mysql-Slave01 ~]# /etc/init.d/mysqld restart
Shutting down MySQL.. SUCCESS!
Starting MySQL. SUCCESS!

[root@Mysql-Slave02 ~]# /etc/init.d/mysqld restart
Shutting down MySQL.. SUCCESS!
Starting MySQL. SUCCESS!
5. 部署MHA
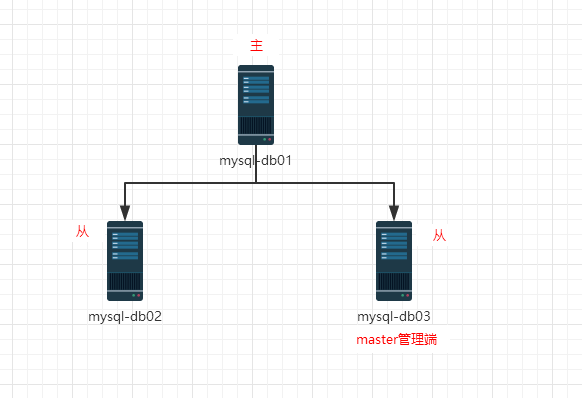
5.1 环境准备(所有节点Mysql-Master,Mysql-Slave01,Mysql-Slave02)
#光盘安装依赖包
[root@Mysql-Master ~]# yum -y install perl-DBD-MySQL
[root@Mysql-Master ~]# rpm -qa perl-DBD-MySQL
perl-DBD-MySQL-4.013-3.el6.x86_64

#安装mha4mysql-node-0.56-0.el6.noarch.rpm
[root@Mysql-Master rpm]# pwd
/root/rpm
[root@Mysql-Master rpm]# rpm -ivh mha4mysql-node-0.56-0.el6.noarch.rpm
Preparing...                ########################################### [100%]
   1:mha4mysql-node         ########################################### [100%]
#主库上创建从库会自动复制
mysql> grant all privileges on *.* to mha@'192.168.200.%' identified by '971108';
Query OK, 0 rows affected (0.14 sec)

mysql> select user,host from mysql.user where user='mha';
+------+---------------+
| user | host          |
+------+---------------+
| mha  | 192.168.200.% |
+------+---------------+
1 row in set (0.10 sec)
#特别提示:3台MySQL都需要安装mha4mysql-node-0.56-0.el6.noarch.rpm
5.2 部署管理节点(mha-manager)
5.2.1 在Mysql-Slave02上部署管理节点
#使用阿里云源+epel源
[root@Mysql-Slave02 ~]# yum -y install wget
[root@Mysql-Slave02 ~]# which wget
/usr/bin/wget
[root@Mysql-Slave02 ~]# cd /etc/yum.repos.d/
[root@Mysql-Slave02 yum.repos.d]# wget -O /etc/yum.repos.d/CentOS-Base.repo http://mirrors.aliyun.com/repo/Centos-6.repo
[root@Mysql-Slave02 yum.repos.d]# wget -O /etc/yum.repos.d/epel-6.repo http://mirrors.aliyun.com/repo/epel-6.repo
[root@Mysql-Slave02 yum.repos.d]# ls
bak  CentOS-Base.repo  CentOS-Media.repo  epel-6.repo

[root@Mysql-Slave02 yum.repos.d]# yum -y clean all
[root@Mysql-Slave02 yum.repos.d]# yum makecache
#安装manager依赖包(需要公网源)
[root@Mysql-Slave02 ~]# yum -y install perl-Config-Tiny epel-release perl-Log-Dispatch perl-Parallel-ForkManager perl-Time-HiRes
[root@Mysql-Slave02 ~]# rpm -qa perl-Config-Tiny epel-release perl-Log-Dispatch perl-Parallel-ForkManager perl-Time-HiRes
perl-Log-Dispatch-2.27-1.el6.noarch
perl-Parallel-ForkManager-1.20-1.el6.noarch
perl-Time-HiRes-1.9721-144.el6.x86_64
perl-Config-Tiny-2.12-7.1.el6.noarch
epel-release-6-8.noarch
#安装manager包
[root@Mysql-Slave02 rpm]# pwd
/root/rpm
[root@Mysql-Slave02 rpm]# rpm -ivh mha4mysql-manager-0.56-0.el6.noarch.rpm
Preparing...                ########################################### [100%]
   1:mha4mysql-manager      ########################################### [100%]
5.2.2 编辑配置文件
#创建配置文件目录
[root@Mysql-Slave02 ~]# mkdir -p /etc/mha
#创建日志目录
[root@Mysql-Slave02 ~]# mkdir -p /var/log/mha/mha1
#创建配置文件(默认没有)
[root@Mysql-Slave02 ~]# cd /etc/mha/
[root@Mysql-Slave02 mha]# vim /etc/mha/mha1.cnf
[root@Mysql-Slave02 mha]# cat /etc/mha/mha1.cnf
[server default]
manager_log=/var/log/mha/mha1/manager #manager管理日志存放路径
manager_workdir=/var/log/mha/mha1 #manager管理日志的目录路径
master_binlog_dir=/usr/local/mysql/data #binlog日志的存放路径
user=mha #管理账户
password=971108 #管理账户密码
ping_interval=2 #存活检查的间隔时间
repl_user=rep #主从复制的授权账户
repl_password=971108 #主从复制的授权账户密码
ssh_user=root #用于ssh连接的账户
[server1]
hostname=192.168.200.123
port=3306
[server2]
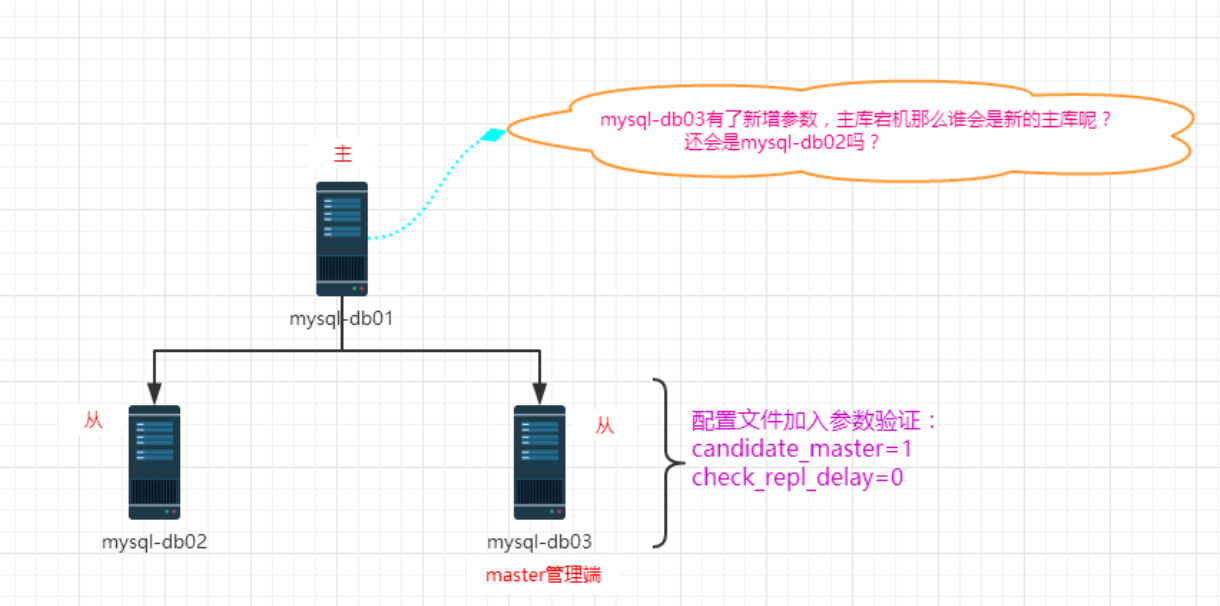
#candidate_master=1 #此条暂时注释掉(后面解释)
#check_repl_delay=0 #此条暂时注释掉(后面解释)
hostname=192.168.200.124
port=3306
[server3]
hostname=192.168.200.125
port=3306
特别说明:
参数:candidate_master = 1
解释:设置为候选主,如果设置该参数以后,发生主从切换以后会将此从库提升为主库,即使这个主库不是集群中事件最新的从属
参数:check_repl_delay
MHA将不会选择该奴隶作为一个新的主,因为对于这个奴隶的恢复需要花费很长时间,通过设置check_repl_delay = 0,MHA = 0 解释:默认情况下如果一个触发切换在选择一个新的主的时候将会忽略复制延时,这个参数对于设置了candidate_master = 1的主机非常有用,因为这个候选主在切换的过程中一定是新的主
5.3 配置ssh信任(所有节点Mysql-Master,Mysql-Slave01,Mysql-Slave02)
#本地yum安装ssh依赖包
[root@Mysql-Master ~]# yum -y install openssh-client*

#创建密钥对
[root@Mysql-Master ~]# ssh-keygen -t dsa -P "" -f ~/.ssh/id_dsa
Generating public/private dsa key pair.
Created directory '/root/.ssh'.
Your identification has been saved in /root/.ssh/id_dsa.
Your public key has been saved in /root/.ssh/id_dsa.pub.
The key fingerprint is:
08:63:67:54:df:8c:98:5a:46:67:b1:68:7b:d8:0c:1a root@Mysql-Master
The key's randomart image is:
+--[ DSA 1024]----+
|      ..o +.     |
|     . . B =     |
|    + E O + o    |
|   . = O *       |
|      + S +      |
|         .       |
|                 |
|                 |
|                 |
+-----------------+

#发送Mysql-Master公钥,包括自己
[root@Mysql-Master ~]# ssh-copy-id -i /root/.ssh/id_dsa.pub root@192.168.200.123
[root@Mysql-Master ~]# ssh-copy-id -i /root/.ssh/id_dsa.pub root@192.168.200.124
[root@Mysql-Master ~]# ssh-copy-id -i /root/.ssh/id_dsa.pub root@192.168.200.125
#本地yum安装ssh依赖包
[root@Mysql-Slave01 ~]# yum -y install openssh-client*

#创建密钥对
[root@Mysql-Slave01 ~]# ssh-keygen -t dsa -P "" -f ~/.ssh/id_dsa
Generating public/private dsa key pair.
Created directory '/root/.ssh'.
Your identification has been saved in /root/.ssh/id_dsa.
Your public key has been saved in /root/.ssh/id_dsa.pub.
The key fingerprint is:
69:18:9c:ac:da:9e:0d:af:19:57:40:4d:90:a7:54:81 root@Mysql-Slave01
The key's randomart image is:
+--[ DSA 1024]----+
|      oB+.       |
|     +E.o        |
|     .*o         |
|     ..+ .       |
|    . . S        |
|   o   o         |
|  . + .          |
|   . O           |
|    =.o          |
+-----------------+

#发送Mysql-Slave01公钥,包括自己
[root@Mysql-Slave01 ~]# ssh-copy-id -i /root/.ssh/id_dsa.pub root@192.168.200.123
[root@Mysql-Slave01 ~]# ssh-copy-id -i /root/.ssh/id_dsa.pub root@192.168.200.124
[root@Mysql-Slave01 ~]# ssh-copy-id -i /root/.ssh/id_dsa.pub root@192.168.200.125
#本地yum安装ssh依赖包
[root@Mysql-Slave02 ~]# yum -y install openssh-client*

#创建密钥对
[root@Mysql-Slave02 ~]# ssh-keygen -t dsa -P "" -f ~/.ssh/id_dsa
Generating public/private dsa key pair.
Created directory '/root/.ssh'.
Your identification has been saved in /root/.ssh/id_dsa.
Your public key has been saved in /root/.ssh/id_dsa.pub.
The key fingerprint is:
4b:e9:f4:82:a8:7c:e5:9f:5f:79:c2:35:bb:1b:77:75 root@Mysql-Slave02
The key's randomart image is:
+--[ DSA 1024]----+
|                 |
|                 |
|                 |
|         .       |
|        S     o E|
|     ..= o . o oo|
|    .o. + . = + o|
| . .. .  o . o +.|
|  o.   .o..   o. |
+-----------------+

#发送Mysql-Slave02公钥,包括自己
[root@Mysql-Slave02 ~]# ssh-copy-id -i /root/.ssh/id_dsa.pub root@192.168.200.123
[root@Mysql-Slave02 ~]# ssh-copy-id -i /root/.ssh/id_dsa.pub root@192.168.200.124
[root@Mysql-Slave02 ~]# ssh-copy-id -i /root/.ssh/id_dsa.pub root@192.168.200.125
5.4启动测试
5.4.1 ssh检查检测(Mysql-Slave02)
[root@Mysql-Slave02 ~]# masterha_check_ssh --conf=/etc/mha/mha1.cnf
Fri Oct  5 21:32:20 2018 - [warning] Global configuration file /etc/masterha_default.cnf not found. Skipping.
Fri Oct  5 21:32:20 2018 - [info] Reading application default configuration from /etc/mha/mha1.cnf..
Fri Oct  5 21:32:20 2018 - [info] Reading server configuration from /etc/mha/mha1.cnf..
#中间省略。。。
root@192.168.200.125(192.168.200.125:22) to root@192.168.200.123(192.168.200.123:22)..
Fri Oct  5 21:32:22 2018 - [debug]   ok.
Fri Oct  5 21:32:22 2018 - [debug]  Connecting via SSH from root@192.168.200.125(192.168.200.125:22) to root@192.168.200.124(192.168.200.124:22)..
Fri Oct  5 21:32:23 2018 - [debug]   ok.
Fri Oct  5 21:32:23 2018 - [info] All SSH connection tests passed successfully.     #出现这个就表示成功
5.4.2主从复制检测
(1)错误的主从复制检测
[root@Mysql-Slave02 ~]# masterha_check_repl --conf=/etc/mha/mha1.cnf
如果不出意外检测结果都会是下面的样子
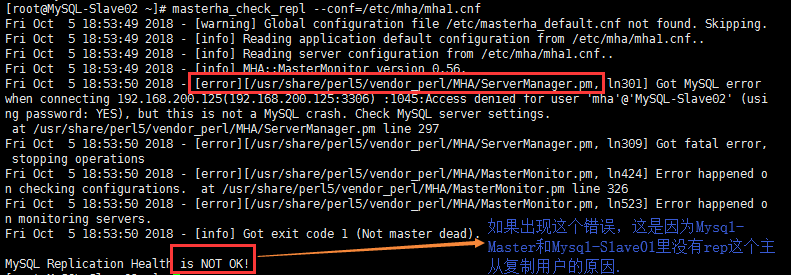
#因此在MySQL的Slave01和mysql的Slave02上添加主从复制的用户即可。
mysql> select user,host from mysql.user;
+------+---------------+
| user | host          |
+------+---------------+
| root | 127.0.0.1     |
| mha  | 192.168.200.% |
| root | ::1           |
|      | localhost     |
| root | localhost     |
|      | mysql-slave01 |
| root | mysql-slave01 |
+------+---------------+
7 rows in set (0.12 sec)

mysql> drop user root@'127.0.0.1';
Query OK, 0 rows affected (0.13 sec)

mysql> drop user root@'::1';
Query OK, 0 rows affected (0.00 sec)

mysql> drop user ' '@'localhost';
Query OK, 0 rows affected (0.00 sec)

mysql> drop user ' '@'mysql-slave01';
Query OK, 0 rows affected (0.00 sec)

mysql> select user,host from mysql.user;
+------+---------------+
| user | host          |
+------+---------------+
| mha  | 192.168.200.% |
| root | localhost     |
| root | mysql-slave01 |
+------+---------------+
3 rows in set (0.00 sec)

mysql> grant replication slave on *.* to rep@'192.168.200.%' identified by '971108';
Query OK, 0 rows affected (0.09 sec)

mysql> select user,host from mysql.user;
+------+---------------+
| user | host          |
+------+---------------+
| mha  | 192.168.200.% |
| rep  | 192.168.200.% |
| root | localhost     |
| root | mysql-slave01 |
+------+---------------+
4 rows in set (0.00 sec)
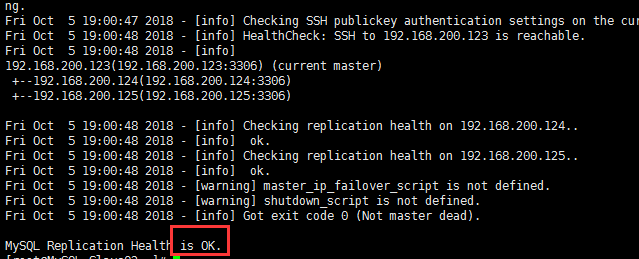
再次检查如下图所示:
[root@Mysql-Slave02 ~]# masterha_check_repl --conf=/etc/mha/mha1.cnf
5.5启动MHA
#启动
[root@Mysql-Slave02 ~]# nohup masterha_manager --conf=/etc/mha/mha1.cnf --remove_dead_master_conf --ignore_last_failover < /dev/null > /var/log/mha/mha1/manager.log 2>&1 &
[1] 4472
[root@Mysql-Slave02 ~]# ps -ef | grep perl | grep -v grep
root       4472   4444  2 02:20 pts/3    00:00:00 perl /usr/bin/masterha_manager --conf=/etc/mha/mha1.cnf --remove_dead_master_conf --ignore_last_failover

#说明:
nohup:启动命令
--conf:指定配置文件位置
--remove_dead_master_conf:如果有master down了,就去掉配置文件里该master的部分。
5.6进行mha自动切换master的测试
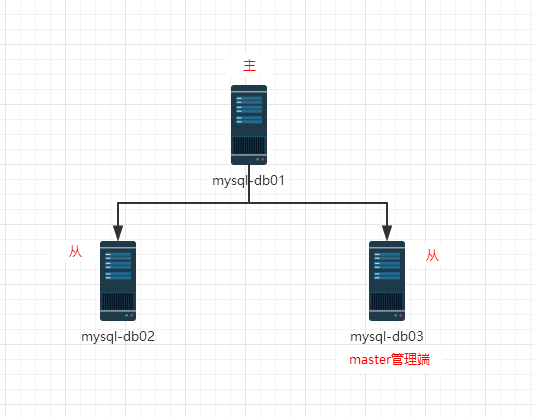
初始状态:
5.6.1 登陆的Mysql-Slave02(192.168.200.125)查看信息状态
[root@Mysql-Slave02 ~]# mysql -uroot -p971108

mysql> show slave status\G
*************************** 1. row ***************************
               Slave_IO_State: Waiting for master to send event
                  Master_Host: 192.168.200.123   #这是主库IP地址
                  Master_User: rep
                  Master_Port: 3306
                Connect_Retry: 60
              Master_Log_File: mysql-bin.000003
          Read_Master_Log_Pos: 405
               Relay_Log_File: Mysql-Slave02-relay-bin.000005
                Relay_Log_Pos: 448
        Relay_Master_Log_File: mysql-bin.000003
             Slave_IO_Running: Yes
            Slave_SQL_Running: Yes
            #以下省略。。。
5.6.2 停掉的Mysql-Master(192.168.200.123)上的MySQL的服务
[root@Mysql-Master ~]# /etc/init.d/mysqld stop
Shutting down MySQL...... SUCCESS!
5.6.3 查看的MySQL-DB03上的MySQL的从库同步状态
[root@Mysql-Slave02 ~]# mysql -uroot -p971108 -e 'show slave status\G'
Warning: Using a password on the command line interface can be insecure.
*************************** 1. row ***************************
               Slave_IO_State: Waiting for master to send event
                  Master_Host: 192.168.200.124   #现在的主库IP
                  Master_User: rep
                  Master_Port: 3306
                Connect_Retry: 60
              Master_Log_File: mysql-bin.000004    #binlog日志
          Read_Master_Log_Pos: 1238                #binlog日志位置
               Relay_Log_File: Mysql-Slave02-relay-bin.000002
                Relay_Log_Pos: 408
        Relay_Master_Log_File: mysql-bin.000004
             Slave_IO_Running: Yes
            Slave_SQL_Running: Yes
            #以下省略。。。
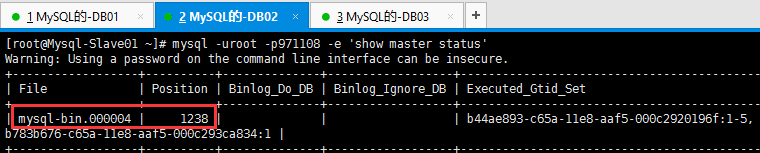
5.6.4 查看的MySQL-DB02上的MySQL中,主库同步状态。
5.6.5 查看的Mysql-Slave02上的MHA进程状态
[root@Mysql-Slave02 ~]#  ps -ef | grep perl | grep -v grep   #查询发现mha进程已经没了
[root@Mysql-Slave02 ~]#
5.6.6 查看MHA配置文件信息
说明:
当作为主库的的Mysql-Master上的MySQL的宕机以后,MHA通过检测发现的Mysql-Master宕机,那么会将二进制日志日志最全的从库立刻提升为主库,而其他的从库会指向新的主库进行再次同步。
此处需要进行简单的MHA日志记录的讲解:在/ var /日志/ MHA / mha1 /经理
5.7 进行mha的故障还原测试
由于MySQL的-Master的MySQL的服务宕机,因此MHA将MySQL的-Slave01提升为了主库。因此,我们需要将宕机的的mysql-Master的MySQL的服务启动,然后作为主库的mysql-Slave01的从库。
初始状态:
5.7.1 将故障宕机的MySQL的-Master的MySQL的服务启动并授权进行从同步
[root@Mysql-Slave02 ~]# cat /var/log/mha/mha1/manager
#以上省略。。。
CHANGE MASTER TO MASTER_HOST='192.168.200.124', MASTER_PORT=3306, MASTER_AUTO_POSITION=1, MASTER_USER='rep', MASTER_PASSWORD='xxx';
#以下省略。。。
[root@Mysql-Master ~]# /etc/init.d/mysqld start
Starting MySQL. SUCCESS!
[root@Mysql-Master ~]# mysql -uroot -p971108
mysql> CHANGE MASTER TO MASTER_HOST='192.168.200.124', MASTER_PORT=3306, MASTER_AUTO_POSITION=1, MASTER_USER=''rep', MASTER_PASSWORD='971108';
Query OK, 0 rows affected, 2 warnings (0.17 sec)

mysql> start slave;
Query OK, 0 rows affected, 1 warning (0.04 sec)

mysql> show slave status\G    #查看从同步状态
*************************** 1. row ***************************
               Slave_IO_State:
                  Master_Host: 192.168.200.123
                  Master_User: rep
                  Master_Port: 3306
                Connect_Retry: 60
              Master_Log_File:
          Read_Master_Log_Pos: 4
               Relay_Log_File: Mysql-Master-relay-bin.000001
                Relay_Log_Pos: 4
        Relay_Master_Log_File:
             Slave_IO_Running: Yes
            Slave_SQL_Running: Yes
            #以下省略。。。
5.7.2 将MHA配置文件里缺失的部分补全
[root@Mysql-Slave02 ~]# cat /etc/mha/mha1.cnf
[server default]
manager_log=/var/log/mha/mha1/manager
manager_workdir=/var/log/mha/mha1
master_binlog_dir=/usr/local/mysql/data
user=mha
password=971108
ping_interval=2
repl_user=rep
repl_password=971108
ssh_user=root

[server1]
hostname=192.168.200.123
port=3306

[server2]
#candidate_master=1
#check_repl_delay=0
hostname=192.168.200.124
port=3306

[server3]
hostname=192.168.200.125
port=3306
5.7.3 启动MHA进程
[root@Mysql-Slave02 ~]# nohup masterha_manager --conf=/etc/mha/mha1.cnf --remove_dead_master_conf --ignore_last_failover < /dev/null > /var/log/mha/mha1/manager.log 2>&1 &
[1] 4547

[root@Mysql-Slave02 ~]# ps -ef | grep perl | grep -v grep
[1]+  Exit 1                  nohup masterha_manager --conf=/etc/mha/mha1.cnf --remove_dead_master_conf --ignore_last_failover < /dev/null > /var/log/mha/mha1/manager.log 2>&1
5.7.4 停掉的Mysql-Slave01上的MySQL的服务
[root@Mysql-Slave01 ~]# /etc/init.d/mysqld stop
Shutting down MySQL..... SUCCESS!
5.7.5 查看的Mysql-Slave02上的主从同步状态:
[root@Mysql-Slave02 ~]# mysql -uroot -p971108 -e 'show slave status\G'
Warning: Using a password on the command line interface can be insecure.
*************************** 1. row ***************************
               Slave_IO_State: Waiting for master to send event
                  Master_Host: 192.168.200.123
                  Master_User: rep
                  Master_Port: 3306
                Connect_Retry: 60
              Master_Log_File: mysql-bin.000003
          Read_Master_Log_Pos: 191
               Relay_Log_File: Mysql-Slave02-relay-bin.000002
                Relay_Log_Pos: 361
        Relay_Master_Log_File: mysql-bin.000003
             Slave_IO_Running: Yes
            Slave_SQL_Running: Yes
            #以下省略。。。
5.7.6 启动的Mysql-Slave01上的MySQL的服务
[root@Mysql-Slave01 ~]# /etc/init.d/mysqld start
Starting MySQL.. SUCCESS!

[root@Mysql-Slave01 ~]# mysql -uroot -p971108
mysql> stop slave;
Query OK, 0 rows affected (0.01 sec)

mysql> change master to master_host='192.168.200.123',master_user='rep',master_password='971108',master_auto_position=1;
Query OK, 0 rows affected, 2 warnings (0.10 sec)

mysql> start slave;
Query OK, 0 rows affected, 1 warning (0.06 sec)

mysql> show slave status\G
*************************** 1. row ***************************
               Slave_IO_State: Waiting for master to send event
                  Master_Host: 192.168.200.123
                  Master_User: rep
                  Master_Port: 3306
                Connect_Retry: 60
              Master_Log_File: mysql-bin.000003
          Read_Master_Log_Pos: 191
               Relay_Log_File: Mysql-Slave01-relay-bin.000002
                Relay_Log_Pos: 361
        Relay_Master_Log_File: mysql-bin.000003
             Slave_IO_Running: Yes
            Slave_SQL_Running: Yes
            #以下省略。。。
5.7.7 再次补全MHA配置文件后,启动MHA进程
[root@Mysql-Slave02 ~]# cat /etc/mha/mha1.cnf
[server default]
manager_log=/var/log/mha/mha1/manager
manager_workdir=/var/log/mha/mha1
master_binlog_dir=/usr/local/mysql/data
user=mha
password=971108
ping_interval=2
repl_user=rep
repl_password=971108
ssh_user=root

[server1]
hostname=192.168.200.123
port=3306

[server2]
#candidate_master=1
#check_repl_delay=0
hostname=192.168.200.124
port=3306

[server3]
hostname=192.168.200.125
port=3306

[root@Mysql-Slave02 ~]# nohup masterha_manager --conf=/etc/mha/mha1.cnf --remove_dead_master_conf --ignore_last_failover < /dev/null > /var/log/mha/mha1/manager.log 2>&1 &
[1] 3419
[root@Mysql-Slave02 ~]# ps -ef | grep perl | grep -v grep
[1]+  Exit 1                  nohup masterha_manager --conf=/etc/mha/mha1.cnf --remove_dead_master_conf --ignore_last_failover < /dev/null > /var/log/mha/mha1/manager.log 2>&1
此时的初始状态还原为下图: