Spring MVC 的概念1
---恢复内容开始---
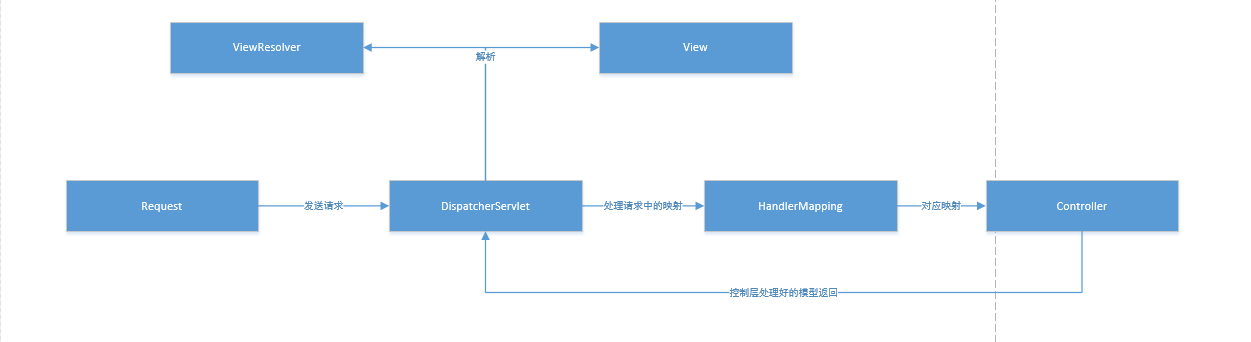
SpringMVC是一个采用模型----视图------控制器(MVC)的WEb框架建立在中央前端控制器的
Servlet(DispatcherServlet),他负责发送每个请求到合适的处理程序,使用视图来最终返回响应结果的概念。
拥有Spring IOC容器紧密结合Spring松耦合等特点
配置SpringMVC时,
1.引入7个jar包和Spring 的日志包
spring-aop-4.3.5.RELEASE.jar
spring-beans-4.3.5.RELEASE.jar
spring-context-4.3.5.RELEASE.jar
spring-core-4.3.5.RELEASE.jar
spring-expression-4.3.5.RELEASE.jar
spring-web-4.3.5.RELEASE.jar
spring-webmvc-4.3.5.RELEASE.jar
commons-logging.jar
2.在WEB.XML上必须有如下配置:
<!--配置DispatcherServlet -->
<servlet>
<servlet-name>springmvc</servlet-name>
<servlet-class>org.springframework.web.servlet.DispatcherServlet</servlet-class>
<!-- 实际上 可以不用配置SpringMVC 配置文件的位置和名称,直接使用默认的
默认的的在/WEB-INF/<servlet-name>-servlet.xml
<servlet-name>是指WEB.xml<Servlet>下的<servlet-name>
-->
<!-- 配置一个DispatcherServlet 的一个初始化参数:配置SpringMVC 配置文件的位置和名称 -->
<init-param>
<param-name>contextConfigLocation</param-name>
<!-- SpringMVC配置文件的位置 -->
<param-value>classpath:springmvc.xml</param-value>
</init-param>
<load-on-startup>1</load-on-startup>
</servlet>
<!-- Map all requests to the DispatcherServlet for handling -->
<servlet-mapping>
<servlet-name>springmvc</servlet-name>
<url-pattern>/</url-pattern>
</servlet-mapping>
3.在SRC下边新增加一个springmvc.xml
内容如下:
<?xml version="1.0" encoding="UTF-8"?>
<beans xmlns="http://www.springframework.org/schema/beans"
xmlns:xsi="http://www.w3.org/2001/XMLSchema-instance"
xmlns:aop="http://www.springframework.org/schema/aop"
xmlns:context="http://www.springframework.org/schema/context"
xmlns:mvc="http://www.springframework.org/schema/mvc"
xsi:schemaLocation="http://www.springframework.org/schema/beans http://www.springframework.org/schema/beans/spring-beans.xsd
http://www.springframework.org/schema/aop http://www.springframework.org/schema/aop/spring-aop-4.0.xsd
http://www.springframework.org/schema/context http://www.springframework.org/schema/context/spring-context-4.0.xsd
http://www.springframework.org/schema/mvc http://www.springframework.org/schema/mvc/spring-mvc-4.0.xsd">
<!--配置自动扫描包-->
<context:component-scan base-package="com.yvan.test"></context:component-scan>
<!-- 配置视图解释器: -->
<!-- 把handler方法返回值解析为实际物理视图 -->
<bean class="org.springframework.web.servlet.view.InternalResourceViewResolver">
<property name="prefix" value="/WEB-INF/views/"></property>
<property name="suffix" value=".jsp"></property>
</bean>
</beans>
4.创建一个测试类,标注是控制器
AS:
package com.yvan.test;
import org.springframework.stereotype.Controller;
import org.springframework.web.bind.annotation.RequestMapping;
@Controller
public class HelloWolrd {
/**
* @RequestMapping注解来映射请求的URL
* 返回值通过视图解析器解析为实际的物理视图
* 对于InternalResourceViewResolver通过prefix+returnVal+后缀
* 这样的方式得到实际的物理视图,然后做转发操作
*
* /WEB-INF/views/success.jsp
* @return
*/
@RequestMapping("/hellowrd")
public String hello(){
System.out.println("hello world");
return "suceess";
}
}
5.在index.jsp中写超链接访问:<a href="hellowrd">我是hellowrd</a>
6.找到视图层,返回渲染的页面!
7.@RequestMapping可以修饰方法也可以修饰类!当访问该类的方法时,类的映射路径加上方法的映射路径
周永发

 浙公网安备 33010602011771号