Deep Learning based Human Pose Estimation using OpenCV-github
1 姿态估计
- 在本文中,我们将重点关注人体姿态估计,其中需要检测和定位身体的主要部位/关节(例如肩膀、脚踝、膝盖、手腕等)。
1.1 Keypoint Detection Datasets
MPII Human Pose Dataset 多人 15
COCO Keypoints challenge 多人 18
2 多人姿态估计模型
本教程中使用的模型基于卡内基梅隆大学感知计算实验室的题为Multi-Person Pose Estimation的论文的论文。该论文的作者为这项任务训练了一个非常深的神经网络。在解释如何使用预训练模型之前,让我们简要回顾一下架构。
2.1 架构概述
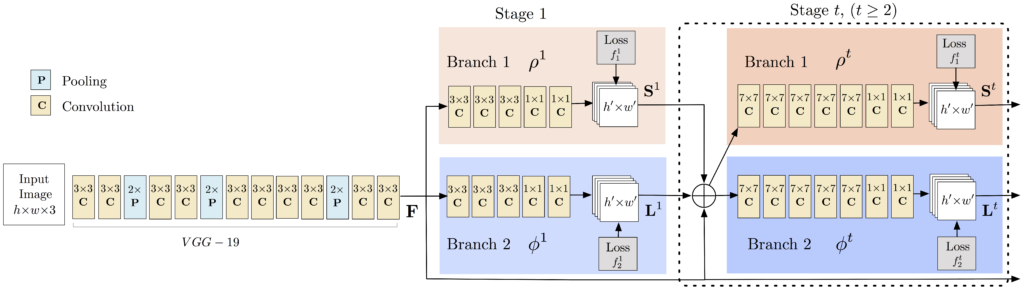
该模型将大小为 w × h 的彩色图像作为输入,并生成图像中每个人的关键点的 2D 位置作为输出。检测分三个阶段进行:
- 阶段 0:VGGNet 的前 10 层用于为输入图像创建特征图。
- 阶段 1:使用 2 分支多阶段 CNN,其中第一个分支预测一组身体部位位置(例如肘部、膝盖等)的 2D 置信度图 (S)。下面给出了关键点——左肩的置信度图和亲和度图。

第二个分支预测一组二维向量场 (L) 的部分相似性,它编码了部分之间的关联程度。下图中显示了颈部和左肩之间的部分亲和力。( Part Affinity maps)

- 第 2 阶段:通过贪心推理解析置信度和亲和力图,为图像中的所有人生成 2D 关键点。
2.2 人体姿态估计的与训练模型
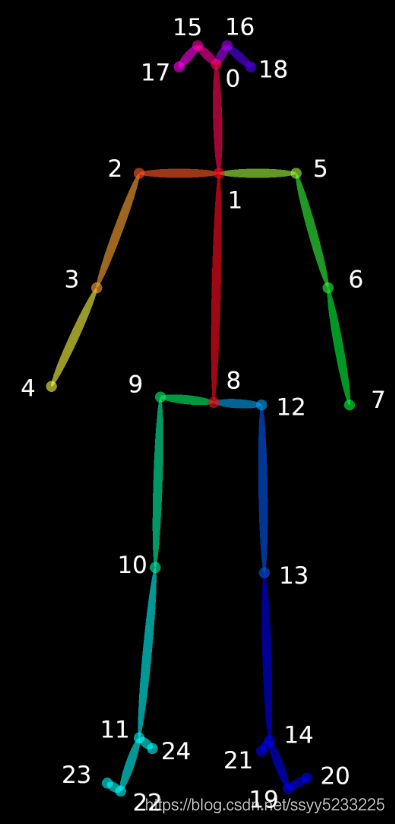
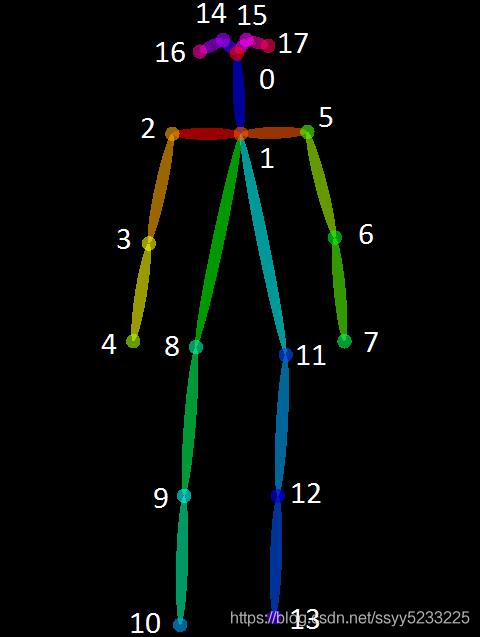
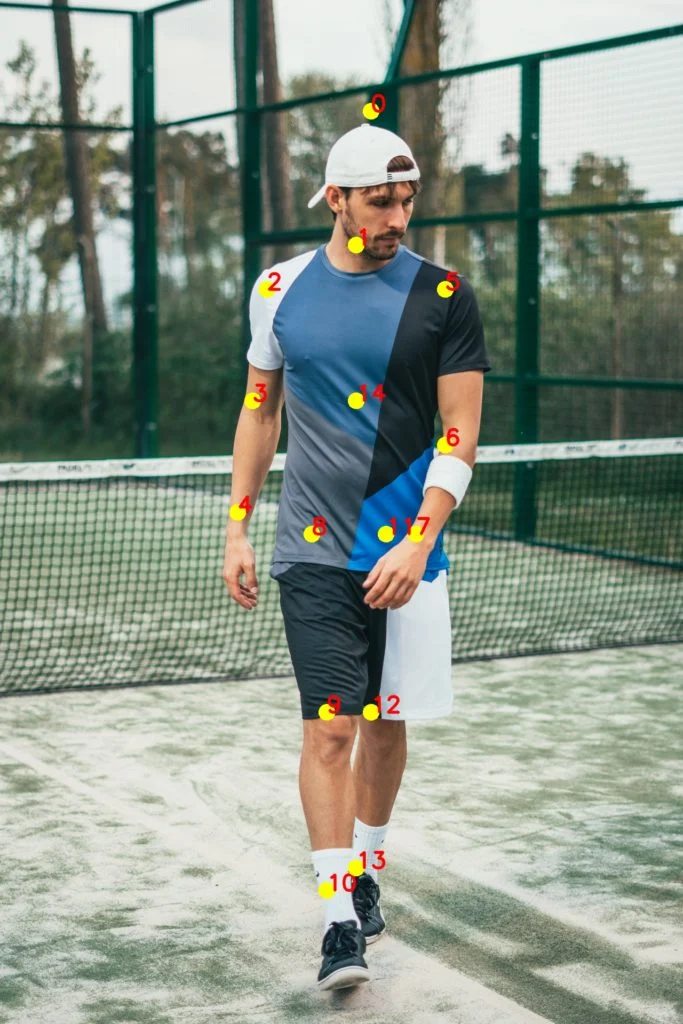
该论文的作者共享了两个模型——一个是在多人数据集 (MPII) 上训练的,另一个是在 COCO 数据集上训练的。COCO 模型产生 18 个点,而 MPII 模型输出 15 个点。绘制在一个人身上的输出如下图所示。
图像显示了使用两种不同模型检测到的关键点 - COCO 和 MPI 模型。
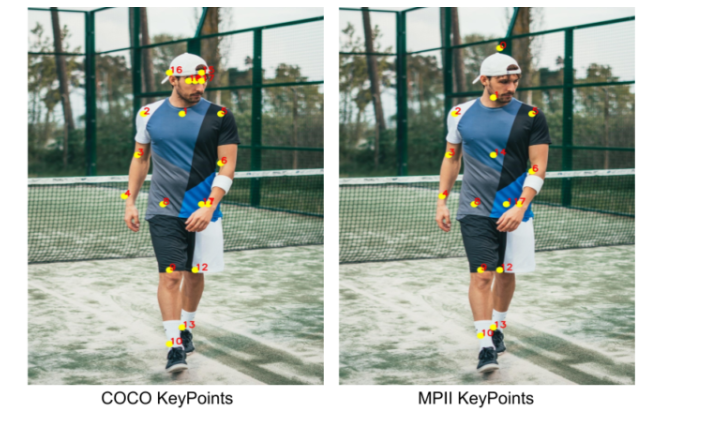
COCO 输出格式 鼻子 - 0,颈部 - 1,右肩 - 2,右肘 - 3,右手腕 - 4,左肩 - 5,左肘 - 6,左手腕 - 7,右臀部 - 8,右膝盖 - 9 , 右脚踝 – 10, 左臀部 – 11, 左膝 – 12, 踝关节 – 13, 右眼 – 14, 左眼 – 15, 右耳 – 16, 左耳 – 17, 背景 – 18 MPII 输出格式 头 – 0,颈部 - 1,右肩 - 2,右肘 - 3,右腕 - 4,左肩 - 5,左肘 - 6,左腕 - 7,右臀部 - 8,右膝 - 9,右脚踝 - 10,左臀部 - 11,左膝盖 - 12,左脚踝 - 13,胸部 - 14,背景 - 15
您可以使用此位置提供的脚本下载模型weight文件。
3 OpenCV中人体姿态估计的代码
在本节中,我们将了解如何在 OpenCV 中加载经过训练的模型并检查输出。我们将讨论仅用于单人姿势估计的代码以保持简单。正如我们在上一节中看到的,输出由置信度图和亲和度图组成。如果存在多人,这些输出可用于查找帧中每个人的姿势。
首先,从下面下载代码和模型文件。图像和视频输入有单独的文件。
3.1 第 1 步:下载模型权重
使用随代码提供的 getModels.sh 文件将所有模型权重下载到相应的文件夹中。请注意,配置 proto 文件已经存在于文件夹中。
在命令行中,从下载的文件夹中执行以下操作。
sudo chmod a+x getModels.sh
./getModels.sh
检查文件夹以确保模型二进制文件(.caffemodel 文件)已下载。如果您无法运行上述脚本,则可以通过单击此处下载MPII 模型和此处下载COCO 模型。
师兄源码中有三个数据集的模型
第二步:加载网络
我们正在使用在 Caffe 深度学习框架上训练的模型。Caffe 模型有 2 个文件— —
1>.prototxt 文件,它指定了神经网络的架构——不同层的排列方式等。
2>.caffemodel 文件,用于存储训练模型的权重
我们将使用这两个文件将网络加载到内存中。
python
# Specify the paths for the 2 files
protoFile = "pose/mpi/pose_deploy_linevec_faster_4_stages.prototxt"
weightsFile = "pose/mpi/pose_iter_160000.caffemodel"

# Read the network into Memory
net = cv2.dnn.readNetFromCaffe(protoFile, weightsFile)
第 3 步:读取图像并准备网络输入
我们使用 OpenCV 读取的输入帧应转换为输入 blob(如 Caffe),以便可以将其馈送到网络。这是使用 blobFromImage 函数完成的,该函数将图像从 OpenCV 格式转换为 Caffe blob 格式。参数将在 blobFromImage 函数中提供。首先,我们将像素值归一化为 (0,1)。然后我们指定图像的尺寸。接下来是要减去的平均值,即 (0,0,0)。由于 OpenCV 和 Caffe 都使用 BGR 格式,因此无需交换 R 和 B 通道。
# Read image
frame = cv2.imread("single.jpg")

# Specify the input image dimensions
inWidth = 368
inHeight = 368

# Prepare the frame to be fed to the network
inpBlob = cv2.dnn.blobFromImage(frame, 1.0 / 255, (inWidth, inHeight), (0, 0, 0), swapRB=False, crop=False)

# Set the prepared object as the input blob of the network
net.setInput(inpBlob)
3.4 第 4 步:进行预测并解析关键点
将图像传递给模型后,可以使用一行代码进行预测。OpenCV 中 DNN 类的前向方法通过网络进行前向传递,这只是另一种说法,它正在进行预测。
Python
output = net.forward()
输出是一个 4D 矩阵:
1.第一个维度是图像 ID(如果您将多个图像传递到网络)。
2.第二个维度表示关键点的索引。该模型生成所有连接的置信度图和部分亲和度图。对于 COCO 模型,它由 57 个部分组成——18 个关键点置信度图 + 1 个背景 + 19*2 部分亲和图。同样,对于 MPI,它产生 44 个点。我们将只使用与关键点相对应的前几个点。
3.第三个维度是输出图的高度。
4.第四个维度是输出图的宽度。
我们检查每个关键点是否存在于图像中。我们通过找到该关键点的置信度图的最大值来获得关键点的位置。我们还使用阈值来减少错误检测。
一旦检测到关键点,我们只需将它们绘制在图像上。
Python
H = out.shape[2]
W = out.shape[3]
# Empty list to store the detected keypoints
points = []
for i in range(len()):
    # confidence map of corresponding body's part.
    probMap = output[0, i, :, :]

    # Find global maxima of the probMap.
    minVal, prob, minLoc, point = cv2.minMaxLoc(probMap)

    # Scale the point to fit on the original image
    x = (frameWidth * point[0]) / W
    y = (frameHeight * point[1]) / H

    if prob > threshold :
        cv2.circle(frame, (int(x), int(y)), 15, (0, 255, 255), thickness=-1, lineType=cv.FILLED)
        cv2.putText(frame, "{}".format(i), (int(x), int(y)), cv2.FONT_HERSHEY_SIMPLEX, 1.4, (0, 0, 255), 3, lineType=cv2.LINE_AA)

        # Add the point to the list if the probability is greater than the threshold
        points.append((int(x), int(y)))
    else :
        points.append(None)

cv2.imshow("Output-Keypoints",frame)
cv2.waitKey(0)
cv2.destroyAllWindows()
使用绘制的 MPI 模型检测到的关键点的图像。
3.5 第五步:画骨架
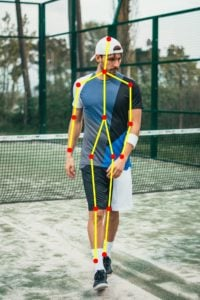
因为我们事先知道点的索引,所以当我们有关键点时,我们可以通过加入对来绘制骨架。这是使用下面给出的代码完成的。
Python
for pair in POSE_PAIRS:
    partA = pair[0]
    partB = pair[1]

    if points[partA] and points[partB]:
        cv2.line(frameCopy, points[partA], points[partB], (0, 255, 0), 3)
使用代码的视频版本检查视频演示。我们发现 COCO 模型比 MPI 模型慢 1.5 倍。这是意料之中的,因为我们使用的是具有 4 个阶段的精简版本。
4 案例实现
- 图片检测
点击查看代码
import cv2
import time
import numpy as np
import argparse
# 1argparse.ArgumentParser 此模块用来解析命令行参数
# 1.1声明一个parser
parser = argparse.ArgumentParser(description='Run keypoint detection')
# 1.2添加参数
parser.add_argument("--device", default="cpu", help="Device to inference on")  #通过 --device xxx声明的参数,default 表示默认值
parser.add_argument("--image_file", default="single.jpeg", help="Input image")

# 1.3读取命令行参数
args = parser.parse_args()


MODE = "MPI" #选用的模型
# 2加载模型和权重
'''
1>.prototxt 文件,它指定了神经网络的架构——不同层的排列方式等。
2>.caffemodel 文件,用于存储训练模型的权重
'''
if MODE == "COCO":
    protoFile = "pose/coco/pose_deploy_linevec.prototxt"
    weightsFile = "pose/coco/pose_iter_440000.caffemodel"
    nPoints = 18 #关键点个数
    POSE_PAIRS = [ [1,0],[1,2],[1,5],[2,3],[3,4],[5,6],[6,7],[1,8],[8,9],[9,10],[1,11],[11,12],[12,13],[0,14],[0,15],[14,16],[15,17]]

elif MODE == "MPI" :
    protoFile = "pose/mpi/pose_deploy_linevec_faster_4_stages.prototxt"
    weightsFile = "pose/mpi/pose_iter_160000.caffemodel"
    nPoints = 15
    POSE_PAIRS = [[0,1], [1,2], [2,3], [3,4], [1,5], [5,6], [6,7], [1,14], [14,8], [8,9], [9,10], [14,11], [11,12], [12,13] ]

elif MODE == "BODY25" :
    protoFile = "pose/body_25/pose_deploy.prototxt"
    weightsFile = "pose/body_25/pose_iter_584000.caffemodel"
    nPoints = 25
    POSE_PAIRS = [[0,1], [1,2], [2,3], [3,4], [1,5], [5,6], [6,7],[1,8],[8,9],[9,10],[10,11],[11,22],[11,24],[22,23],[8,12],[12,13],[13,14],[14,19],[19,20],[14,21],[0,15],[15,17],[0,16],[16,18]]

# 3读取图像
frame = cv2.imread(args.image_file)
frameCopy = np.copy(frame)
frameWidth = frame.shape[1]
frameHeight = frame.shape[0]
# 4准备网络输入
# 4.1设置阈值
threshold = 0.1
# 4.2读取网络
net = cv2.dnn.readNetFromCaffe(protoFile, weightsFile)
# 1.4调用argparse的参数,判断使用CPU还是GPU跑神经网络
if args.device == "cpu":
    net.setPreferableBackend(cv2.dnn.DNN_TARGET_CPU)
    print("Using CPU device")
elif args.device == "gpu":
    net.setPreferableBackend(cv2.dnn.DNN_BACKEND_CUDA)
    net.setPreferableTarget(cv2.dnn.DNN_TARGET_CUDA)
    print("Using GPU device")

#4.3 记录初始时间
t = time.time()
# 4.4设置网络中输入图片的维度 input image dimensions for the network
inWidth = 368
inHeight = 368
#4.5准备输入到网络的图片帧,将图像从 OpenCV 格式转换为 Caffe blob 格式
inpBlob = cv2.dnn.blobFromImage(frame, 1.0 / 255, (inWidth, inHeight),
                          (0, 0, 0), swapRB=False, crop=False)
#4.6 把准备好的对象设置为网络的输入
net.setInput(inpBlob)

#5.根据网络进行预测
output = net.forward()
print("time taken by network : {:.3f}".format(time.time() - t))
#输出是四个维度
'''
1.第一个维度是图像 ID(如果您将多个图像传递到网络)。
2.第二个维度表示关键点的索引。该模型生成所有连接的置信度图和部分亲和度图。对于 COCO 模型,它由 57 个部分组成——18 个关键点置信度图 + 1 个背景 + 19*2 部分亲和图。同样,对于 MPI,它产生 44 个点。我们将只使用与关键点相对应的前几个点。
3.第三个维度是输出图的高度。
4.第四个维度是输出图的宽度。
'''
H = output.shape[2]
W = output.shape[3]

# 6.空列表去存储检测的关键点 Empty list to store the detected keypoints
points = []

for i in range(nPoints):
    # 6.1对应身体部位置信度图 confidence map of corresponding body's part.
    probMap = output[0, i, :, :]

    # 6.2找到probMap的全局最大值 Find global maxima of the probMap.
    minVal, prob, minLoc, point = cv2.minMaxLoc(probMap)

    # 6.3缩放点以适合原始图像 Scale the point to fit on the original image
    x = (frameWidth * point[0]) / W
    y = (frameHeight * point[1]) / H

    #6.4判断阈值
    if prob > threshold :
        cv2.circle(frameCopy, (int(x), int(y)), 8, (0, 255, 255), thickness=-1, lineType=cv2.FILLED)
        cv2.putText(frameCopy, "{}".format(i), (int(x), int(y)), cv2.FONT_HERSHEY_SIMPLEX, 1, (0, 0, 255), 2, lineType=cv2.LINE_AA)

        # 6.5如果概率大于阈值,则将该点添加到列表中 Add the point to the list if the probability is greater than the threshold
        points.append((int(x), int(y)))
    else :
        points.append(None)

# 7画骨骼点 Draw Skeleton
for pair in POSE_PAIRS:
    partA = pair[0]
    partB = pair[1]

    if points[partA] and points[partB]:
        cv2.line(frame, points[partA], points[partB], (0, 255, 255), 2)
        cv2.circle(frame, points[partA], 8, (0, 0, 255), thickness=-1, lineType=cv2.FILLED)


cv2.imshow('Output-Keypoints', frameCopy)
cv2.imshow('Output-Skeleton', frame)


cv2.imwrite('Output-Keypoints.jpg', frameCopy)
cv2.imwrite('Output-Skeleton.jpg', frame)

print("Total time taken : {:.3f}".format(time.time() - t))

cv2.waitKey(0)
- 视频检测
点击查看代码
import cv2
import time
import numpy as np
import argparse
# 1.argparse.ArgumentParser 此模块用来解析命令行参数
# 1.1声明一个parser
parser = argparse.ArgumentParser(description='Run keypoint detection')
# 1.2添加参数
parser.add_argument("--device", default="cpu", help="Device to inference on")#通过 --device xxx声明的参数,default 表示默认值 (已经设定好了参数)
parser.add_argument("--video_file", default="sample_video.mp4", help="Input Video")
# 1.3读取命令行参数
args = parser.parse_args()

# 2指定模型
MODE = "MPI"
# 每个模型的细节
# 2.1加载模型和权重
'''
1>.prototxt 文件,它指定了神经网络的架构——不同层的排列方式等。
2>.caffemodel 文件,用于存储训练模型的权重
'''
if MODE == "COCO":
    protoFile = "pose/coco/pose_deploy_linevec.prototxt"
    weightsFile = "pose/coco/pose_iter_440000.caffemodel"
    nPoints = 18
    POSE_PAIRS = [ [1,0],[1,2],[1,5],[2,3],[3,4],[5,6],[6,7],[1,8],[8,9],[9,10],[1,11],[11,12],[12,13],[0,14],[0,15],[14,16],[15,17]]

elif MODE == "MPI" :
    protoFile = "pose/mpi/pose_deploy_linevec_faster_4_stages.prototxt"
    weightsFile = "pose/mpi/pose_iter_160000.caffemodel"
    nPoints = 15
    POSE_PAIRS = [[0,1], [1,2], [2,3], [3,4], [1,5], [5,6], [6,7], [1,14], [14,8], [8,9], [9,10], [14,11], [11,12], [12,13] ]

elif MODE == "BODY25" :
    protoFile = "pose/body_25/pose_deploy.prototxt"
    weightsFile = "pose/body_25/pose_iter_584000.caffemodel"
    nPoints = 25
    POSE_PAIRS = [[0,1], [1,2], [2,3], [3,4], [1,5], [5,6], [6,7],[1,8],[8,9],[9,10],[10,11],[11,22],[11,24],[22,23],[8,12],[12,13],[13,14],[14,19],[19,20],[14,21],[0,15],[15,17],[0,16],[16,18]]


#3.视频地址 获取图像
input_source = args.video_file
cap = cv2.VideoCapture(input_source)
hasFrame, frame = cap.read()

# 4.输入图像宽度和高度以及阈值
inWidth = 368
inHeight = 368
threshold = 0.1

vid_writer = cv2.VideoWriter('output.avi',cv2.VideoWriter_fourcc('M','J','P','G'), 10, (frame.shape[1],frame.shape[0]))
#4.1 创建网络
net = cv2.dnn.readNetFromCaffe(protoFile, weightsFile)

#1.4args参数 判断cpu还是gpu
if args.device == "cpu":
    net.setPreferableBackend(cv2.dnn.DNN_TARGET_CPU)
    print("Using CPU device")
elif args.device == "gpu":
    net.setPreferableBackend(cv2.dnn.DNN_BACKEND_CUDA)
    net.setPreferableTarget(cv2.dnn.DNN_TARGET_CUDA)
    print("Using GPU device")
#4.2将视频准备,按图片进行输入
while cv2.waitKey(1) < 0:#cv2.waitKey(1) 1为参数,单位毫秒,表示间隔时间
    #记录初始时间
    t = time.time()
    hasFrame, frame = cap.read()
    frameCopy = np.copy(frame)
    #没有图像输入,就终止
    if not hasFrame:
        cv2.waitKey()
        break

    frameWidth = frame.shape[1]
    frameHeight = frame.shape[0]
    #4.3准备输入到网络的图片帧,将图像从 OpenCV 格式转换为 Caffe blob 格式
    inpBlob = cv2.dnn.blobFromImage(frame, 1.0 / 255, (inWidth, inHeight),
                              (0, 0, 0), swapRB=False, crop=False)
    #4.4输入网络
    net.setInput(inpBlob)
    #5. 网络预测
    output = net.forward()

    H = output.shape[2]
    W = output.shape[3]

    #6. 空列表来存储检测到的关键点 Empty list to store the detected keypoints
    points = []

    for i in range(nPoints):
        # 6.1对应身体部位的置信图。confidence map of corresponding body's part.
        probMap = output[0, i, :, :]

        # 6.2求probMap的全局极大值。Find global maxima of the probMap.
        minVal, prob, minLoc, point = cv2.minMaxLoc(probMap)

        # 6.3缩放点以适应原始图像 Scale the point to fit on the original image
        x = (frameWidth * point[0]) / W
        y = (frameHeight * point[1]) / H

        # 6.4如果概率大于阈值,则将该点添加到列表中
        if prob > threshold :
            '''
            用法: cv2.circle(image, center_coordinates, radius, color, thickness)
            参数:
            image:它是要在其上绘制圆的图像。
            center_coordinates:它是圆的中心坐标。坐标表示为两个值的元组,即(X坐标值,Y坐标值)。
            radius:它是圆的半径。
            color:它是要绘制的圆的边界线的颜色。对于BGR,我们通过一个元组。例如:(255,0,0)为蓝色。
            thickness:它是圆边界线的粗细像素。厚度-1像素将以指定的颜色填充矩形形状。
            返回值:它返回一个图像。
            '''
            cv2.circle(frameCopy, (int(x), int(y)), 8, (0, 255, 255), thickness=-1, lineType=cv2.FILLED)
            cv2.putText(frameCopy, "{}".format(i), (int(x), int(y)), cv2.FONT_HERSHEY_SIMPLEX, 1, (0, 0, 255), 2, lineType=cv2.LINE_AA)

            # 如果概率大于阈值,则将该点添加到列表中 Add the point to the list if the probability is greater than the threshold
            points.append((int(x), int(y)))
        else :
            points.append(None)

    # 7 绘制骨架 Draw Skeleton
    for pair in POSE_PAIRS:
        partA = pair[0]
        partB = pair[1]

        if points[partA] and points[partB]:
            cv2.line(frame, points[partA], points[partB], (0, 255, 255), 3, lineType=cv2.LINE_AA)
            cv2.circle(frame, points[partA], 8, (0, 0, 255), thickness=-1, lineType=cv2.FILLED)
            #cv2.circle(frame, points[partB], 8, (0, 0, 255), thickness=-1, lineType=cv2.FILLED)

    cv2.putText(frame, "time taken = {:.2f} sec".format(time.time() - t), (50, 50), cv2.FONT_HERSHEY_COMPLEX, .8, (255, 50, 0), 2, lineType=cv2.LINE_AA)
    # cv2.putText(frame, "OpenPose using OpenCV", (50, 50), cv2.FONT_HERSHEY_COMPLEX, 1, (255, 50, 0), 2, lineType=cv2.LINE_AA)
    # cv2.imshow('Output-Keypoints', frameCopy)
    cv2.imshow('Output-Skeleton', frame)

    vid_writer.write(frame)
#读完视频就释放
vid_writer.release()

 浙公网安备 33010602011771号