微信小程序客户端文件上传到服务器以及Java代码
效果图:

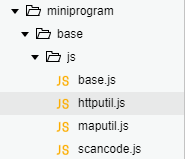
目录结构:

单独定义文件上传方法,在你需要的地方引入就可以了
httputil.js
function send_photo(data, successfun) {
  var that = this
  for (let i = 0; i < data.length; i++) {
    console.log("data长度=" + data.length)
    console.log(data)
    wx.uploadFile({
      url: BASE_Server + "/FileUpLoadController/upload.action", //仅为示例,非真实的接口地址 自己写映射你Java接口的路径
      filePath: data[i] + "",
      name: 'file',
      success: function(res) {
        successfun(res)
      }
    })
  }
}
module.exports = {
  send_photo: send_photo
}
引用:
.js
 1 var app = getApp();
 2 const httputil = require("../../base/js/httputil.js")   //一定要引入,根据你自己写的上传文件路径
 3
 4 Page({
 5   data: {
 6     photos: "/images/photo.png",
 7     photos2: "/images/photo.png",
 8     photos3: "/images/photo.png"
 9   },
10   formSubmit: function(e) {
11         var photo = [this.data.photos, this.data.photos2, this.data.photos3]
12         httputil.send_photo(photo, function(res) {
13            //成功回调函数  你随便做操作
17       }
18     },
19   touchphoto: function(e) {
20     var that = this
21     var no = e.currentTarget.id;
22     if (no == "1") {
23       wx.chooseImage({
24         count: 1, // 默认9
25         sizeType: ['original', 'compressed'], // 可以指定是原图还是压缩图,默认二者都有
26         sourceType: ['album', 'camera'], // 可以指定来源是相册还是相机,默认二者都有
27         success: function(res) {
28           // 返回选定照片的本地文件路径列表,tempFilePath可以作为img标签的src属性显示图片
29           var tempFilePaths = res.tempFilePaths
30           that.setData({
31             photos: tempFilePaths
32           })
33           console.log(that.data.photos)
34         }
35       })
36     } else if (no == "2") {
37       wx.chooseImage({
38         count: 1, // 默认9
39         sizeType: ['original', 'compressed'], // 可以指定是原图还是压缩图,默认二者都有
40         sourceType: ['album', 'camera'], // 可以指定来源是相册还是相机,默认二者都有
41         success: function(res) {
42           // 返回选定照片的本地文件路径列表,tempFilePath可以作为img标签的src属性显示图片
43           var tempFilePaths = res.tempFilePaths
44           that.setData({
45             photos2: tempFilePaths
46           })
47           console.log(that.data.photos)
48         }
49       })
50     } else if (no == "3") {
51       wx.chooseImage({
52         count: 1, // 默认9
53         sizeType: ['original', 'compressed'], // 可以指定是原图还是压缩图,默认二者都有
54         sourceType: ['album', 'camera'], // 可以指定来源是相册还是相机,默认二者都有
55         success: function(res) {
56           // 返回选定照片的本地文件路径列表,tempFilePath可以作为img标签的src属性显示图片
57           var tempFilePaths = res.tempFilePaths
58           that.setData({
59             photos3: tempFilePaths
60           })
61           console.log(that.data.photos)
62         }
63       })
64     }
65   }
66 })
wxml
<text class='textp'>身份证照片</text>
          <text class='textpp'>驾驶证照片</text>
          <view class='photo'>
          <image class='ph' src='{{photos}}'id="1" bindtap='touchphoto' mode='aspectFit'></image>
          <image class='ph' src='{{photos2}}' id="2" bindtap='touchphoto' mode='aspectFit'></image>
          <image class='phright' src='{{photos3}}' id="3" bindtap='touchphoto' mode='aspectFit'></image>
          </view>
          <text class='text'>正面</text><text class='text2'>反面</text><text class='text3'>人像面</text>
wxss
.photo {
  display: flex;
 margin-top: 10px;
 height: 100px;
}

.ph {
  border: 1px    dashed #909090;
  margin-right: 30px;
  width: 80px;
  height: 60px;
}
.phzz {
  border: 1px    dashed #909090;
  margin-right: 70px;
  margin-left: 70px;
  width: 100px;
  height: 60px;
}
.phright{

  border: 1px dashed #909090;
  margin-left: 20px;
   width: 80px;
  height: 60px;
}
.textp{
  margin-left: 70px;
  font-size: 14px;
}
.text{
   margin-left: 25px;
  font-size: 14px;
}
.text2{
   margin-left: 80px;
  font-size: 14px;
}
.text3{
   margin-left: 98px;
  font-size: 14px;
}
java代码:
import com.alibaba.fastjson.JSON;
import org.apache.commons.fileupload.FileItem;
import org.apache.commons.fileupload.FileUploadException;
import org.apache.commons.fileupload.disk.DiskFileItemFactory;
import org.apache.commons.fileupload.servlet.ServletFileUpload;
import org.slf4j.Logger;
import org.slf4j.LoggerFactory;
import org.springframework.beans.factory.annotation.Value;
import org.springframework.stereotype.Controller;
import org.springframework.web.bind.annotation.RequestMapping;
import org.springframework.web.bind.annotation.RequestParam;
import org.springframework.web.multipart.MultipartFile;

import javax.servlet.http.HttpServletRequest;
import javax.servlet.http.HttpServletResponse;
import java.io.*;
import java.util.HashMap;
import java.util.List;

/**
 * Created by majl on 2017/9/1.
 */
@Controller
@RequestMapping("/upload")
public class UploadController {
    private static final Logger logger = LoggerFactory.getLogger(UploadController.class);

    @RequestMapping("/picture")
    public void uploadPicture(HttpServletRequest request, HttpServletResponse response) throws Exception {
        //获取文件需要上传到的路径
        String path = request.getRealPath("/upload") + "/";
        File dir = new File(path);
        if (!dir.exists()) {
            dir.mkdir();
        }
        logger.debug("path=" + path);

        request.setCharacterEncoding("utf-8");  //设置编码
        //获得磁盘文件条目工厂
        DiskFileItemFactory factory = new DiskFileItemFactory();

        //如果没以下两行设置的话,上传大的文件会占用很多内存,
        //设置暂时存放的存储室,这个存储室可以和最终存储文件的目录不同
        /**
         * 原理: 它是先存到暂时存储室,然后再真正写到对应目录的硬盘上,
         * 按理来说当上传一个文件时,其实是上传了两份,第一个是以 .tem 格式的
         * 然后再将其真正写到对应目录的硬盘上
         */
        factory.setRepository(dir);
        //设置缓存的大小,当上传文件的容量超过该缓存时,直接放到暂时存储室
        factory.setSizeThreshold(1024 * 1024);
        //高水平的API文件上传处理
        ServletFileUpload upload = new ServletFileUpload(factory);
        try {
            List<FileItem> list = upload.parseRequest(request);
            FileItem picture = null;
            for (FileItem item : list) {
                //获取表单的属性名字
                String name = item.getFieldName();
                //如果获取的表单信息是普通的 文本 信息
                if (item.isFormField()) {
                    //获取用户具体输入的字符串
                    String value = item.getString();
                    request.setAttribute(name, value);
                    logger.debug("name=" + name + ",value=" + value);
                } else {
                    picture = item;
                }
            }

            //自定义上传图片的名字为userId.jpg
            String fileName = request.getAttribute("userId") + ".jpg";
            String destPath = path + fileName;
            logger.debug("destPath=" + destPath);

            //真正写到磁盘上
            File file = new File(destPath);
            OutputStream out = new FileOutputStream(file);
            InputStream in = picture.getInputStream();
            int length = 0;
            byte[] buf = new byte[1024];
            // in.read(buf) 每次读到的数据存放在buf 数组中
            while ((length = in.read(buf)) != -1) {
                //在buf数组中取出数据写到(输出流)磁盘上
                out.write(buf, 0, length);
            }
            in.close();
            out.close();
        } catch (FileUploadException e1) {
            logger.error("", e1);
        } catch (Exception e) {
            logger.error("", e);
        }


        PrintWriter printWriter = response.getWriter();
        response.setContentType("application/json");
        response.setCharacterEncoding("utf-8");
        HashMap<String, Object> res = new HashMap<String, Object>();
        res.put("success", true);
        printWriter.write(JSON.toJSONString(res));
        printWriter.flush();
    }
---------------------
作者:庭然
来源:CSDN
这段代码我在网上找的最简单好用的,我本地写的接口封装类过多,就不写了


 浙公网安备 33010602011771号