srs+webrtc实现浏览器直播(仿b站页面,纯前端)
关于srs请看我之前的博客,SRS实现网页和手机端简单直播。
与之不同的是,浏览器推流需要使用werbrtc,因此只需要按srs官网配置即可,WebRTC | SRS (ossrs.net)。回到正题...
一.页面搭建
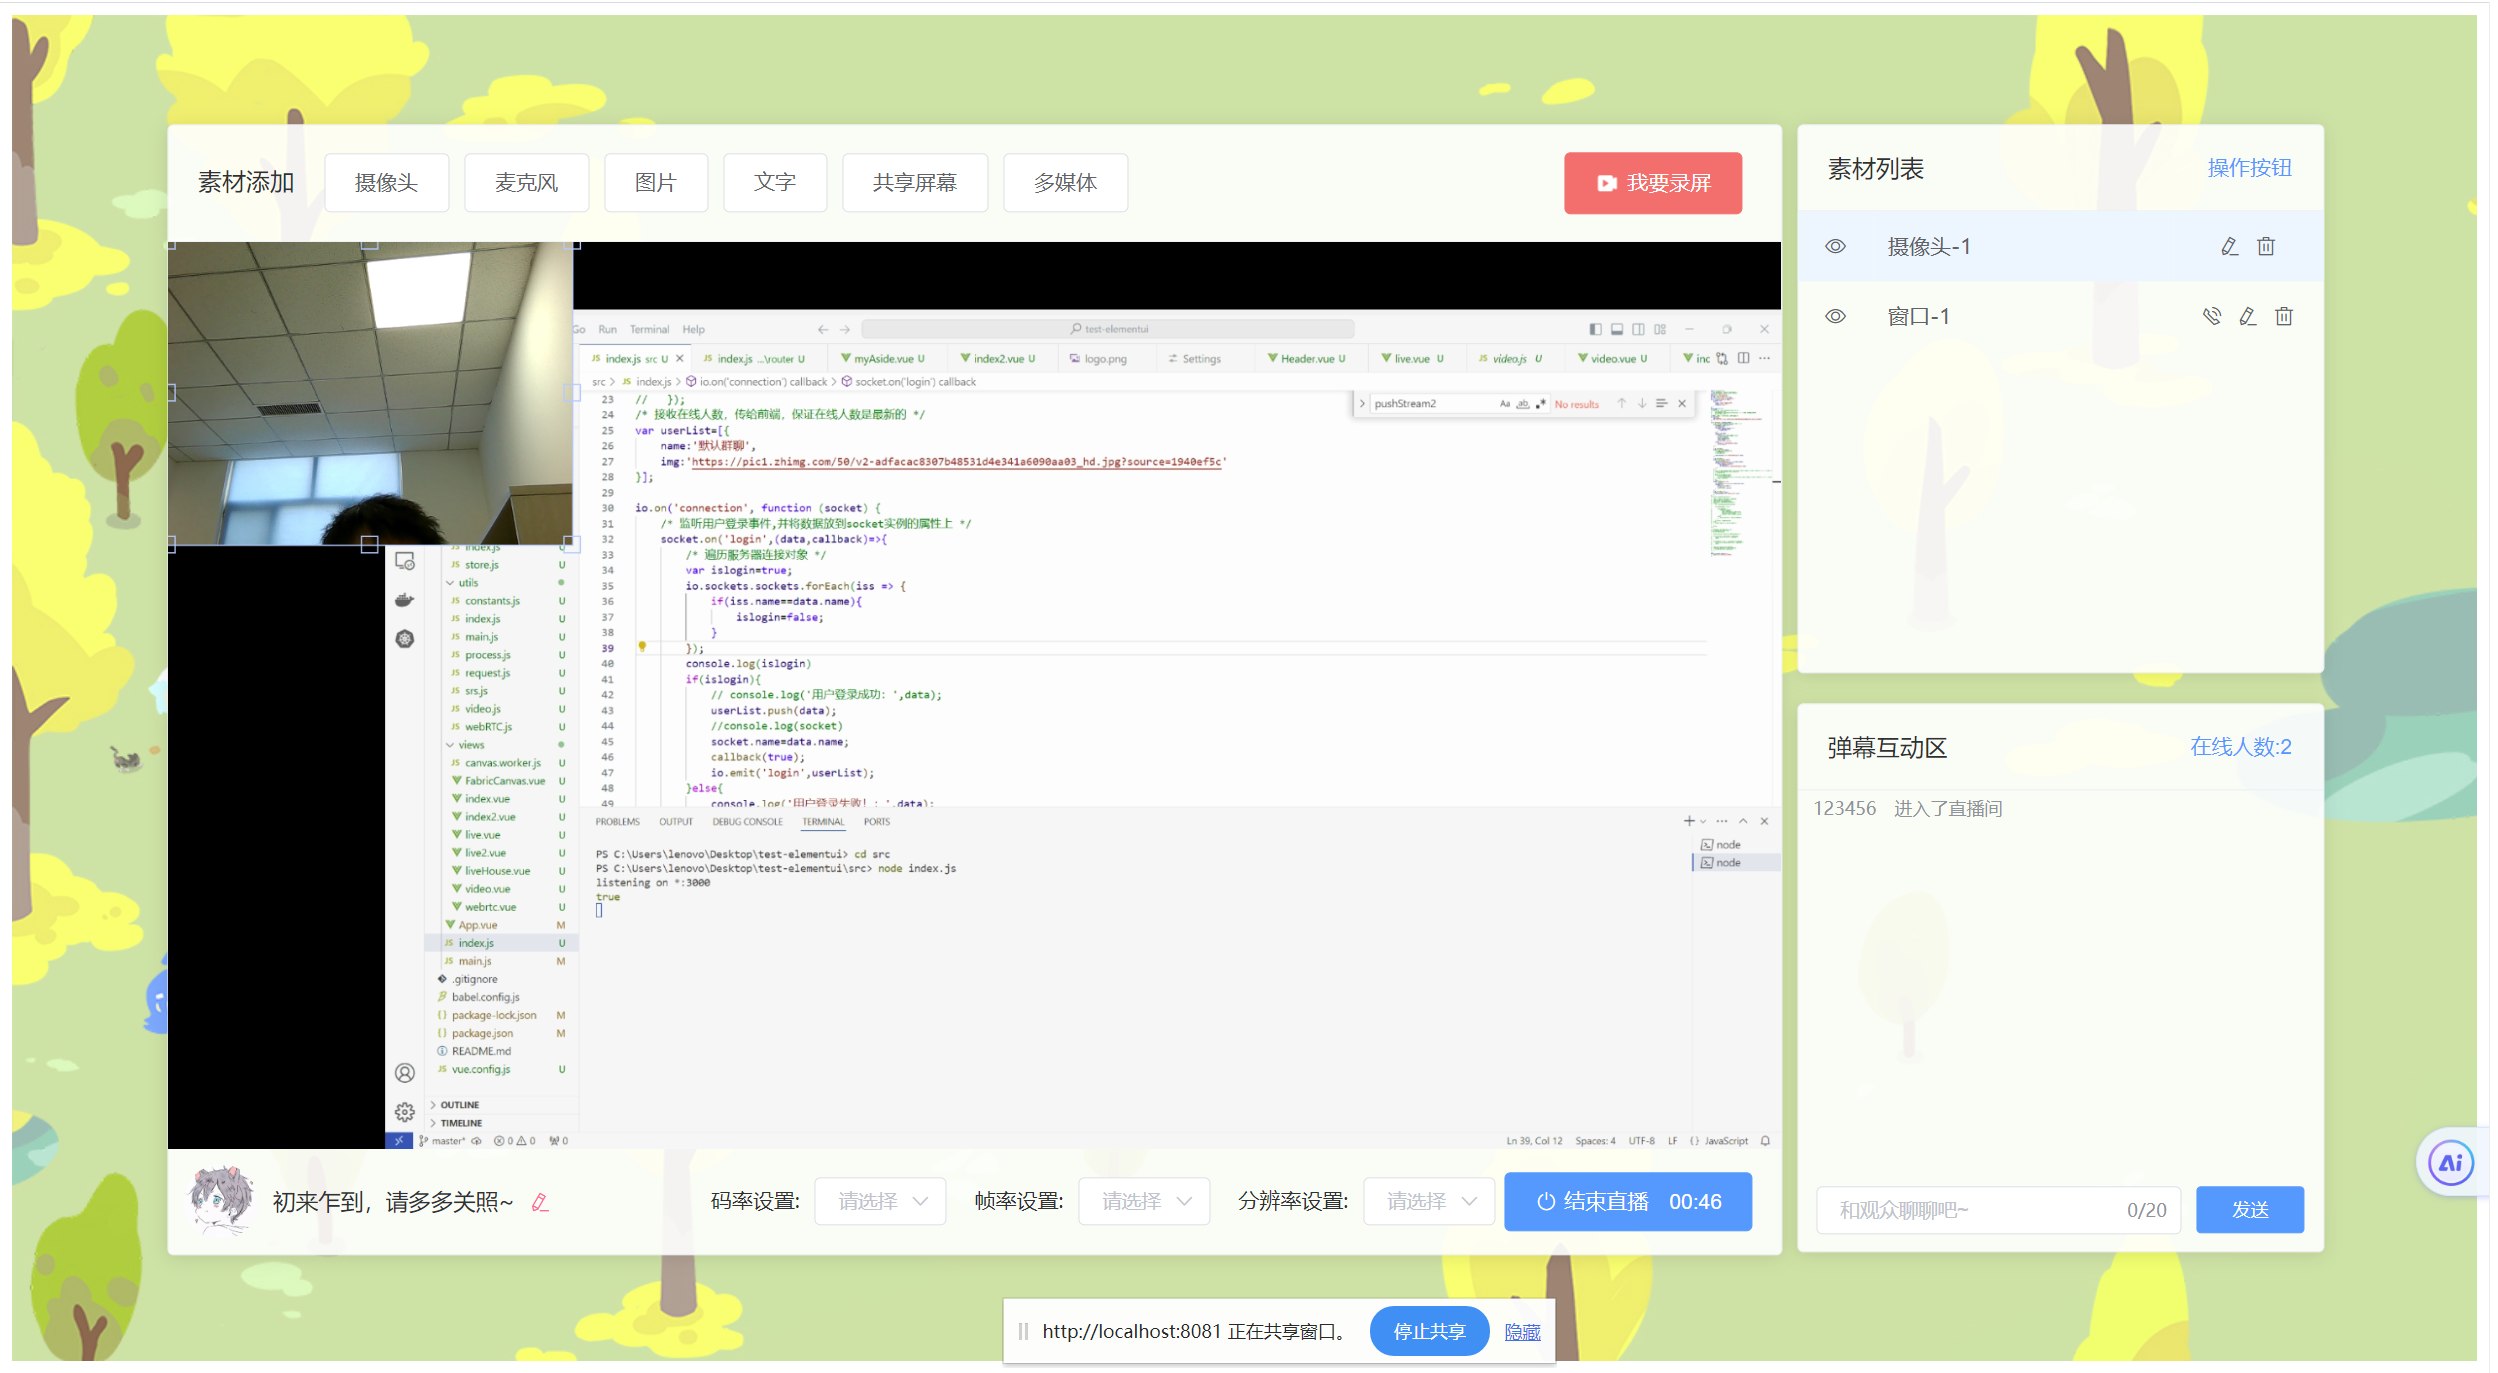
b站web直播页面是通过video标签元素实现,但是video并不能同时将摄像头、麦克风、屏幕共享等同时呈现出来,所以猜测是用的canvas,将不同素材通过画布呈现,同时把canvas的流放到video上。
1.我们要实现这个画布,首先需要使用webrtc(没有接触过的去看官网WebRTC API),在webrtc中,MediaDevices接口提供访问连接媒体输入的设备,如照相机和麦克风,以及屏幕共享等。它可以使你取得任何硬件资源的媒体数据。
enumerateDevices() 请求一个可用的媒体输入和输出设备的列表。
getDisplayMedia() 方法提供授权捕获展示的内容或部分内容(如一个窗口)。
getUserMedia() 会提示用户使用媒体输入的许可,媒体输入会产生一个MediaStream,里面包含了请求的媒体类型的轨道。此流可以包含一个视频轨道、一个音频轨道,也可能是其他轨道类型。
2.使用canvas标签,npm下载Fabric.js,Fabric.js 简化了很多 Canvas 里的概念,Fabric.js 语法更加简单易用,而且还提供了很多交互类的 api,更重要的是fabric.js操作canvas自带拖拽拉伸旋转效果。
首先通过fabric.canvas生成一个画布,但由于屏幕共享和摄像头都是视频类,所以可以通过document.createElement('video')创建video元素,并将获取到的MediaStream赋给video.srcObject,之后通过fabric.Image(video),将video中每一帧画面生成,同时还可以设置生成好的画面的宽高以及在哪个位置出现。(其他属性请到Fabric.js官网查看)之后通过fabric.canvas.add即可添加到画布中观看。
var canvasDom = new fabric.Image(videoEl, {
   top: 0,
   left: 0,
    width,
    height,
    objectCaching: false
});
以此类推,实现以下素材的添加,同时在画布中显示(示例图片中包含摄像头、窗口、图片)


3.生成好画面后,需要将这添加的素材保存起来,并且可以删改。关于这个问题,可以新建数据类型tracks:[],存放素材数据。如下(要根据实际情况更改):
const mediaVideoTrack = {
       id: id,
       audio: 1,//是否开启音频流
       video: 1,//是否开启视频流
       mediaName: that.mediaName,//素材名称
       type: 'Media',//素材类型(有media、text等)
       track: undefined,//轨道
       trackid: undefined,//轨道id
       stream: undefined,//媒体流
       streamid: undefined,//媒体流id
       canvasDom:canvasDom,//fabric.Image元素
       videoEl:videoEl,//video元素
       volume:80,//音量
       hidden: false,//是否隐藏
       muted: false,//是否静音播放
        scaleInfo: {},//缩放比例
  };
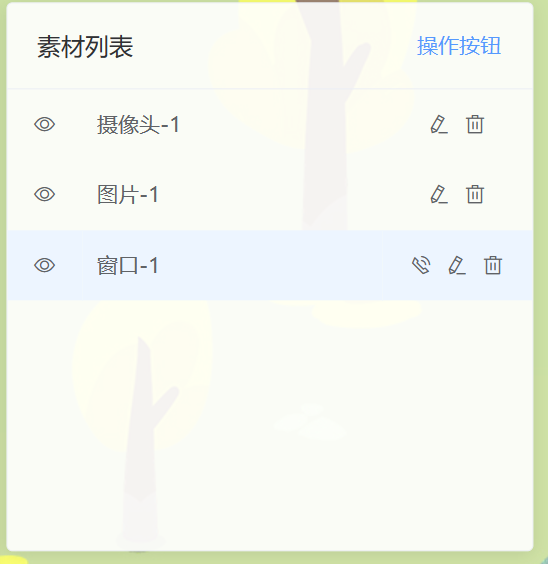
实现如下,可以隐藏或呈现某个素材,修改仅限修改名称,不可修改内容,删除需要把fabric.canvas中与tracks中相同的删除。

二.推流和拉流功能
推拉流功能是使用WebRTC+SRS实现的,webrtc和srs具体原理不在这里赘述,详情请查百度。
由于SRS中自带简单的信令服务器,所以在使用WebRTC中的RTCPeerConnection时只需交换sdp,设置setLocalDescription和setRemoteDescription,之后按照srs提供的api进行sdp交换来实现媒体流的推送。

代码示例(该代码借鉴csdn某大佬(忘记是哪个了🤦),其中包括推流和拉流):

<template>
    <div id="box">
        <!-- 设置自动播放,否则不会显示视频流画面 -->
        <video id="video" ref="video" autoplay></video>
        <canvas style="display: contents;"></canvas>
        <div id="btn" >
            <button ref="button_one" @click="publish">开始直播</button>
            <button ref="button_two" @click="close" >停止直播</button>
            <button ref="button_three" @click="stopAudio" >关闭声音</button>
            <button ref="button_four" @click="startAudio" >开启声音</button>
            <button ref="button_five" @click="play" >播放直播</button>
        </div>
        <video id="video2" ref="video2" autoplay></video>
    </div>
</template>

<script>
 export default {
    name: 'webrtc2',
    data() {
        return {
            videoStream:null,
            videoElement:null,
            pc:null,
            audioTrack:null,
            audioSender:null,
        }
      },
    mounted() {
        this.$refs.button_one.disabled=false;
        this.$refs.button_two.disabled=true;
        this.$refs.button_three.disabled=true;
        this.$refs.button_four.disabled=true;
        this.$refs.button_five.disabled=true;
    },
    methods:{
        async publish(){
            if(this.pc!==null&& this.pc!==undefined){
                console.log("已开始推流");
                return;
            }
            var httpURL = "http://localhost:1985/rtc/v1/publish/";
            var webRTCURL = "webRTC://localhost/live/10";
            var constraints = {
                    audio: {
                        echoCancellation : true,    // 回声消除
                        noiseSuppression : true,    // 降噪
                        autoGainControl  : true     // 自动增益
                    },
                    video: {
                        frameRate   : { min : 30 },                // 最小帧率
                        width       : { min : 640, ideal : 1080}, // 宽度
                        height      : { min : 360, ideal : 720},  // 高度
                        aspectRadio : 16/9                        // 宽高比
                    }
    }
            // 通过摄像头、麦克风获取音视频流
            this.videoStream = await navigator.mediaDevices.getUserMedia(constraints);
            // 获取video元素
            this.videoElement = document.querySelector("#video")
            //video播放流数据
            this.videoElement.srcObject = this.videoStream;
            // 静音
            this.videoElement.volume=0;
            // 创建RTC连接对象
            this.pc = new RTCPeerConnection();

            // RTCPeerConnection方法addTransceiver()创建一个新的RTCRtpTransceiver,并将其添加到与RTCPeerConnection关联的收发器集中。
            // 每个收发器代表一个双向流,RTCRtpSender和RTCRtpReceiver都与之相关联。
            // 注意添加顺序为audio、video,后续RTCPeerConnection创建offer时SDP的m线顺序遵循此顺序创建,SRS自带的信令服务器响应的SDP中m线总是先audio后video。
            // 若本端SDP和远端SDP中的m线顺序不一直,则设置远端描述时会异常,显示offer中的m线与answer中的m线顺序不匹配
            this.pc.addTransceiver("audio", {direction: "recvonly"});
            this.pc.addTransceiver("video", {direction: "recvonly"});
            // 遍历getUserMedia()获取到的流数据,拿到其中的音频轨道和视频轨道,加入到RTCPeerConnection连接的音频轨道和视频轨道中
            this.videoStream.getTracks().forEach((track)=>{
                this.pc.addTrack(track);
            });
            // 创建本端offer
            var offer = await this.pc.createOffer();
            let that = this
            // 设置本端
            await that.pc.setLocalDescription(offer);
            var data = {
                "api": httpURL,
                "streamurl":webRTCURL,
                "sdp":offer.sdp
            }
            var pc2 = new RTCPeerConnection()

                    // pcBob.onicecandidate=(event)=>{
                    //     if(event.candidate){
                    //         pcAmy.addIceCandidate(event.candidate);
                    //     }
                    //     console.log("pcBob.onicecandidate",event.candidate)
                    // }
            // SDP交换,请求SRS自带的信令服务器
            this.httpApi(httpURL,data).then(async(data)=>{
                console.log("answer",data);
                // 设置远端描述,开始连接
                await that.pc.setRemoteDescription(new RTCSessionDescription({type: 'answer', sdp: data.sdp}));
                // let pc2 = new RTCSessionDescription({type: 'answer', sdp: data.sdp})
                this.$refs.button_one.disabled=true;
                this.$refs.button_two.disabled=false;
                this.$refs.button_three.disabled=false;
                this.$refs.button_five.disabled=false;
                // that.pc.onicecandidate=(event)=>{
                //         if(event.candidate){
                //             //that.
                //             pc2.addIceCandidate(event.candidate);
                //         }
                //         console.log("pcAmy.onicecandidate",event.candidate)
                // }

            }).catch((data)=>{
                if(data.code===400){
                    console.log("SDP交换失败");
                }
            });
        },
async play(){
    let that = this
    var httpURL = "http://localhost:1985/rtc/v1/play/";
    var webRTCURL = "webRTC://localhost/live/10";
    // 创建RTCPeerConnection连接对象
    var pc = new RTCPeerConnection();
    // 创建媒体流对象
    var stream = new MediaStream();
    // 获取播放流的容器video
    var videoElement2 = document.querySelector("#video2");
    // 监听流
    pc.ontrack = (event)=>{
        // 监听到的流加入MediaStream对象中让video播放
        stream.addTrack(event.track);
        console.log(event.track)
        videoElement2.srcObject = stream;
    }
    // RTCPeerConnection方法addTransceiver()创建一个新的RTCRtpTransceiver,并将其添加到与RTCPeerConnection关联的收发器集中。
    // 每个收发器代表一个双向流,RTCRtpSender和RTCRtpReceiver都与之相关联。
    // 注意添加顺序为audio、video,后续RTCPeerConnection创建offer时SDP的m线顺序遵循此顺序创建,SRS自带的信令服务器响应的SDP中m线总是先audio后video。
    // 若本端SDP和远端SDP中的m线顺序不一直,则设置远端描述时会异常,显示offer中的m线与answer中的m线顺序不匹配
    pc.addTransceiver("audio", {direction: "recvonly"});
    pc.addTransceiver("video", {direction: "recvonly"});

    var offer =await pc.createOffer();
    await pc.setLocalDescription(offer)
    var data = {
            "api": httpURL,
            "streamurl":webRTCURL,
            "sdp":offer.sdp
    }
    // SDP交换,请求SRS自带的信令服务器
    this.httpApi(httpURL,data).then(async(data)=>{
            console.log("answer",data);
            // 设置远端描述,开始连接
            await pc.setRemoteDescription(new RTCSessionDescription({type: 'answer', sdp: data.sdp}));
            that.$refs.button_five.disabled=true;
            // pc.onicecandidate=(event)=>{
            //             if(event.candidate){
            //                 //that.
            //                 that.pc.addIceCandidate(event.candidate);
            //             }
            //             console.log("pcAmy.onicecandidate",event.candidate)


    }).catch((data)=>{
            if(data.code===400){
                console.log("SDP交换失败");
            }
    });
},

// 关闭连接
close(){
    if(this.pc!==null&&this.pc!==undefined){
        this.pc.close();
        this.pc = null;
        this.$refs.button_one.disabled=false;
        this.$refs.button_two.disabled=true;
        this.$refs.button_three.disabled=true;
        this.$refs.button_four.disabled=true;
        this.$refs.button_five.disabled=true;
    }
},
// 关闭音频
stopAudio(){
    if(this.pc!==null&&this.pc!==undefined){
        // RTCPeerConnection方法getSenders()返回RTCRtpSender对象的数组,
        // 每个对象代表负责传输一个轨道的数据的RTP发送器。
        // sender对象提供了检查和控制音轨数据的编码和传输的方法和属性。
        this.pc.getSenders().forEach((sender)=>{
            if(sender.track!==null&&sender.track.kind==="audio"){
                // 拿到音频轨道
                this.audioTrack = sender.track;
                // 拿到音频轨道发送者对象RTCRtpSender
                this.audioSender = sender;
                // RTCRtpSender的replaceTrack()可以在无需重新媒体协商的情况下用另一个媒体轨道更换当前正在发送轨道
                // 参数为空则将当前正在发送的轨道停止,比如关闭音频,再次开启时将音频轨道作为参数传入
                this.audioSender.replaceTrack(null);
                this.$refs.button_three.disabled=true;
                this.$refs.button_four.disabled=false;
            }
        });
    }
},
// 开启音频
startAudio(){
    console.log(audioSender);
    if(this.pc!==null&&this.pc!==undefined){
       if(this.audioSender.track===null){
        this.audioSender.replaceTrack(audioTrack);
        this.$refs.button_three.disabled=false;
        this.$refs.button_four.disabled=true;
       }
    }
},

httpApi(httpURL,data){
    var promise = new Promise((resolve,reject)=>{
        var xhr = new XMLHttpRequest();
        xhr.open('POST', httpURL, true);
        xhr.setRequestHeader('Content-type', 'application/json');
        xhr.send(JSON.stringify(data));
        xhr.onload = ()=>{
                if (xhr.readyState !== xhr.DONE) reject(xhr);
                if (xhr.status !== 200 && xhr.status !== 201) reject(xhr) ;
                var data = JSON.parse(xhr.responseText);
                if(data.code===0){
                    resolve(data);
                }else{
                    reject(data)
                }
            }
    });
    return promise;
}

    }
  };
</script>
<style>
*{
    margin: 0;
    padding: 0;
    border: 0;
    box-sizing: border-box;
}
#box{
    width: 100%;
    text-align: center;
}
video{
    background-color: black;
    width: 500px;
    height: 400px;
    object-fit: cover;
}
#btn{
    width: 80%;
    height: 100px;
    display: flex;
    margin:10px 10%;
}
button{
    flex:1;
    height: 100px;
    background-color: aqua;
    border-radius: 20px;
    margin-left: 10px;
}
button:nth-child(1){
    margin-left: 0;
}
</style>
在本系统中,需要将上述代码中的摄像头stream换成画布的流canvas.captureStream()即可实现。
三.效果展示


四.需要改进的地方
1.添加帧率、分辨率、码率的调整
2.该项目为纯前端,后期加入后端实现多个直播间
3.音量调控不合理,需优化
4.实现送礼物功能
五.项目源码
总结:若有问题或者有其他想法,期待一起交流,后期会更新聊天室功能
由于原项目使用vue2,所以二开用vue2


【推荐】国内首个AI IDE,深度理解中文开发场景,立即下载体验Trae
【推荐】编程新体验,更懂你的AI,立即体验豆包MarsCode编程助手
【推荐】抖音旗下AI助手豆包,你的智能百科全书,全免费不限次数
【推荐】轻量又高性能的 SSH 工具 IShell:AI 加持,快人一步
· 物流快递公司核心技术能力-地址解析分单基础技术分享
· .NET 10首个预览版发布:重大改进与新特性概览!
· 单线程的Redis速度为什么快?
· 展开说说关于C#中ORM框架的用法!
· Pantheons:用 TypeScript 打造主流大模型对话的一站式集成库
2022-04-09 python执行shell命令并获取执行后的数据
2022-04-09 shell脚本获取java程序(jar)的输出值