使用 Helm 在 Kubernetes 上安装 Consul
Consul Sync 部署
官方文档部署:https://developer.hashicorp.com/consul/docs/k8s/installation/install
部署consul版本 1.14.1
安装consul
-
添加 HashiCorp Helm 存储库:
$ helm repo add hashicorp https://helm.releases.hashicorp.com "hashicorp" has been added to your repositories -
验证您是否有权访问领事图表:
$ helm search repo hashicorp/consul NAME CHART VERSION APP VERSION DESCRIPTION hashicorp/consul 1.0.1 1.14.1 Official HashiCorp Consul Chart -
在使用 Helm 在 Kubernetes 上安装 Consul 之前,请确保
consulKubernetes 命名空间不存在。我们建议在专用命名空间上安装 Consul。$ kubectl get namespace NAME STATUS AGE default Active 18h kube-node-lease Active 18h kube-public Active 18h kube-system Active 18h -
使用 Helm 在 Kubernetes 上安装 Consul。Helm 图表会完成设置部署的所有操作:安装后,代理会自动形成集群、选举领导者并运行必要的代理。
-
运行以下命令以使用默认配置在 Kubernetes 上安装最新版本的 Consul。
$ helm install consul hashicorp/consul --set global.name=consul --create-namespace --namespace consul-n您还可以通过修改Helm 安装标志的值将 Consul 安装在您选择的专用命名空间上。 -
要在 Kubernetes 上安装特定版本的 Consul,请发出以下带
--version标志的命令:$ export VERSION=1.0.1 $ helm install consul hashicorp/consul --set global.name=consul --version ${VERSION} --create-namespace --namespace consul
填坑部分
发现server和connect没起来了
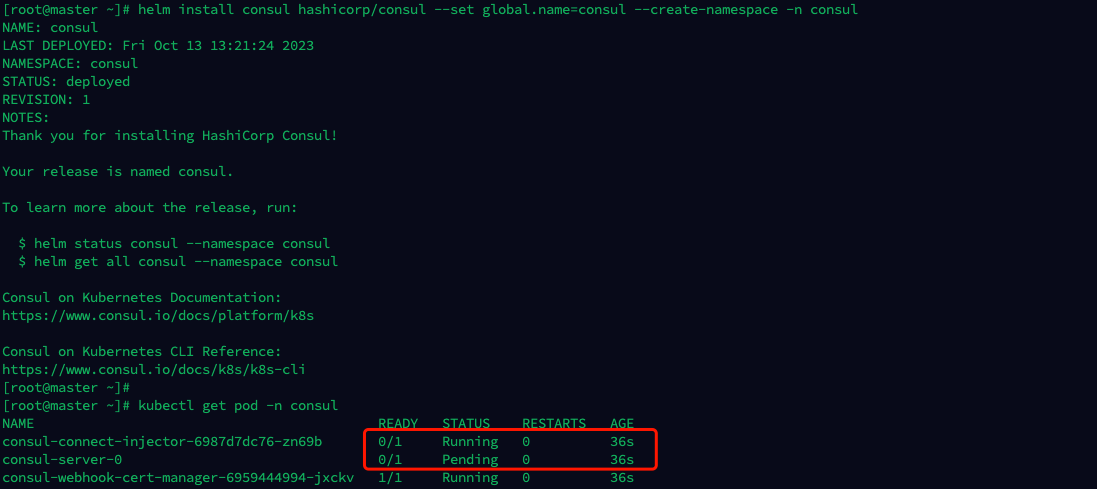
kubectl describe pod -n consul-server-0 发现pvc调度失败

kubectl describe pod -n consul
探针失败了没起来

查看pvc果然没有给我们创建pv,直接创建pvc了能不包错吗

手动创建一个pv
创建之前需要看一下pvc的大小根据大小创建pvc
[root@master /home/test-hu]# kubectl describe pvc -n consul data-consul-consul-server-0
Name:          data-consul-consul-server-0
Namespace:     consul
StorageClass:
Status:        Bound
Volume:        consul-nfs-pv
Labels:        app=consul
               chart=consul-helm
               component=server
               hasDNS=true
               release=consul
Annotations:   pv.kubernetes.io/bind-completed: yes
               pv.kubernetes.io/bound-by-controller: yes
Finalizers:    [kubernetes.io/pvc-protection]
Capacity:      10Gi
Access Modes:  RWO
VolumeMode:    Filesystem
Used By:       consul-server-0
Events:        <none>
创建pv
[root@master /home/test-hu]# cat pv-2.yaml
apiVersion: v1
kind: PersistentVolume
metadata:
  name: consul-nfs-pv
spec:
  capacity:
    storage: 10Gi
  volumeMode: Filesystem
  accessModes:
    - ReadWriteOnce
  persistentVolumeReclaimPolicy: Retain  # 根据需求设置持续卷回收策略
  nfs:
    server: 172.17.64.32
    path: /consul
创建pv,pvc会匹配到可用的pv,自动绑定
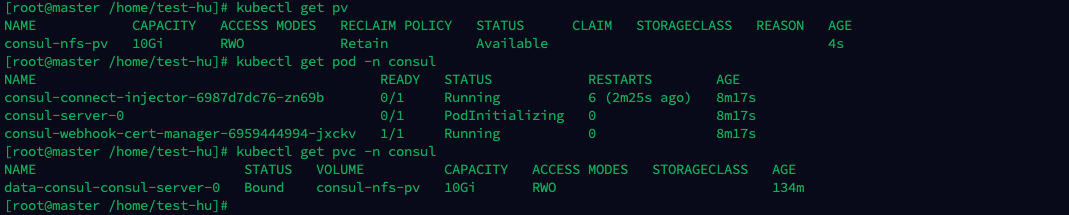
等待一会,pod就运行成功了

本文来自博客园,作者:xiao智,转载请注明原文链接:https://www.cnblogs.com/yuwen01/p/17762136.html

 浙公网安备 33010602011771号