Git使用
1.Git 安装配置
在使用Git前我们需要先安装 Git。Git 目前支持 Linux/Unix、Solaris、Mac和 Windows 平台上运行。
Git 各平台安装包下载地址为:http://git-scm.com/downloads
windows上安装一路next加可以了,别的平台参考https://www.runoob.com/git/git-install-setup.html
2.Git 配置
Git 提供了一个叫做 git config 的工具,专门用来配置或读取相应的工作环境变量。
这些环境变量,决定了 Git 在各个环节的具体工作方式和行为。这些变量可以存放在以下三个不同的地方:
/etc/gitconfig文件:系统中对所有用户都普遍适用的配置。若使用git config时用--system选项,读写的就是这个文件。~/.gitconfig文件:用户目录下的配置文件只适用于该用户。若使用git config时用--global选项,读写的就是这个文件。- 当前项目的 Git 目录中的配置文件(也就是工作目录中的
.git/config文件):这里的配置仅仅针对当前项目有效。每一个级别的配置都会覆盖上层的相同配置,所以.git/config里的配置会覆盖/etc/gitconfig中的同名变量。
在 Windows 系统上,Git 会找寻用户主目录下的 .gitconfig 文件。主目录即 $HOME 变量指定的目录,一般都是 C:\Documents and Settings\$USER。
此外,Git 还会尝试找寻 /etc/gitconfig 文件,只不过看当初 Git 装在什么目录,就以此作为根目录来定位。
2.1 用户信息
配置个人的用户名称和电子邮件地址:
$ git config --global user.name "runoob"
$ git config --global user.email test@runoob.com
如果用了 --global 选项,那么更改的配置文件就是位于你用户主目录下的那个,以后你所有的项目都会默认使用这里配置的用户信息。
如果要在某个特定的项目中使用其他名字或者电邮,只要去掉 --global 选项重新配置即可,新的设定保存在当前项目的 .git/config 文件里。
2.2 文本编辑器
设置Git默认使用的文本编辑器, 一般可能会是 Vi 或者 Vim。如果你有其他偏好,比如 Emacs 的话,可以重新设置::
$ git config --global core.editor emacs
2.3 差异分析工具
还有一个比较常用的是,在解决合并冲突时使用哪种差异分析工具。比如要改用 vimdiff 的话:
$ git config --global merge.tool vimdiff
Git 可以理解 kdiff3,tkdiff,meld,xxdiff,emerge,vimdiff,gvimdiff,ecmerge,和 opendiff 等合并工具的输出信息。
当然,你也可以指定使用自己开发的工具,具体怎么做可以参阅第七章。
2.4 查看配置信息
要检查已有的配置信息,可以使用 git config --list 命令:
$ git config --list
http.postbuffer=2M
user.name=runoob
user.email=test@runoob.com
有时候会看到重复的变量名,那就说明它们来自不同的配置文件(比如 /etc/gitconfig 和 ~/.gitconfig),不过最终 Git 实际采用的是最后一个。
这些配置我们也可以在 ~/.gitconfig 或 /etc/gitconfig 看到,如下所示:
vim ~/.gitconfig
显示内容如下所示:
[http]
    postBuffer = 2M
[user]
    name = runoob
    email = test@runoob.com
也可以直接查阅某个环境变量的设定,只要把特定的名字跟在后面即可,像这样:
$ git config user.name
runoob
3. Git 工作流程
你的本地仓库由 git 维护的三棵“树”组成。第一个是你的 工作目录,它持有实际文件;第二个是 缓存区(Index),它像个缓存区域,临时保存你的改动;最后是 HEAD,指向你最近一次提交后的结果。

4.Git 工作区、暂存区和版本库
基本概念
我们先来理解下 Git 工作区、暂存区和版本库概念:
- 工作区:就是你在电脑里能看到的目录。
- 暂存区:英文叫 stage 或 index。一般存放在 .git 目录下的 index 文件(.git/index)中,所以我们把暂存区有时也叫作索引(index)。
- 版本库:工作区有一个隐藏目录 .git,这个不算工作区,而是 Git 的版本库。
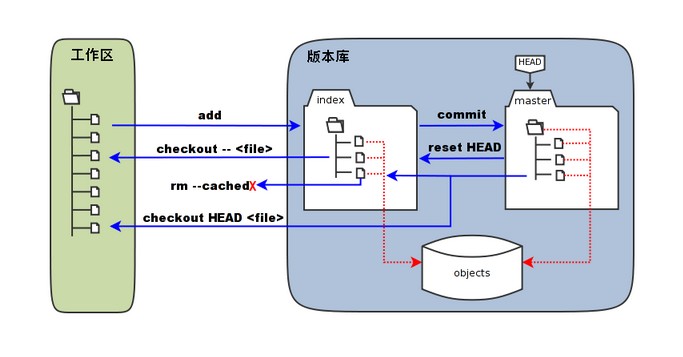
下面这个图展示了工作区、版本库中的暂存区和版本库之间的关系:
-
图中左侧为工作区,右侧为版本库。在版本库中标记为 "index" 的区域是暂存区(stage/index),标记为 "master" 的是 master 分支所代表的目录树。
-
图中我们可以看出此时 "HEAD" 实际是指向 master 分支的一个"游标"。所以图示的命令中出现 HEAD 的地方可以用 master 来替换。
-
图中的 objects 标识的区域为 Git 的对象库,实际位于 ".git/objects" 目录下,里面包含了创建的各种对象及内容。
-
当对工作区修改(或新增)的文件执行 git add 命令时,暂存区的目录树被更新,同时工作区修改(或新增)的文件内容被写入到对象库中的一个新的对象中,而该对象的ID被记录在暂存区的文件索引中。
-
当执行提交操作(git commit)时,暂存区的目录树写到版本库(对象库)中,master 分支会做相应的更新。即 master 指向的目录树就是提交时暂存区的目录树。
-
当执行 git reset HEAD 命令时,暂存区的目录树会被重写,被 master 分支指向的目录树所替换,但是工作区不受影响。
-
当执行 git rm --cached <file> 命令时,会直接从暂存区删除文件,工作区则不做出改变。
-
当执行 git checkout . 或者 git checkout -- <file> 命令时,会用暂存区全部或指定的文件替换工作区的文件。这个操作很危险,会清除工作区中未添加到暂存区的改动。
-
当执行 git checkout HEAD . 或者 git checkout HEAD <file> 命令时,会用 HEAD 指向的 master 分支中的全部或者部分文件替换暂存区和以及工作区中的文件。这个命令也是极具危险性的,因为不但会清除工作区中未提交的改动,也会清除暂存区中未提交的改动
5. Git 创建仓库
本章节我们将为大家介绍如何创建一个 Git 仓库。
你可以使用一个已经存在的目录作为Git仓库。
git init
Git 使用 git init 命令来初始化一个 Git 仓库,Git 的很多命令都需要在 Git 的仓库中运行,所以 git init 是使用 Git 的第一个命令。
在执行完成 git init 命令后,Git 仓库会生成一个 .git 目录,该目录包含了资源的所有元数据,其他的项目目录保持不变。
使用方法
使用当前目录作为Git仓库,我们只需使它初始化。
git init
该命令执行完后会在当前目录生成一个 .git 目录。
使用我们指定目录作为Git仓库。
git init newrepo
初始化后,会在 newrepo 目录下会出现一个名为 .git 的目录,所有 Git 需要的数据和资源都存放在这个目录中。
如果当前目录下有几个文件想要纳入版本控制,需要先用 git add 命令告诉 Git 开始对这些文件进行跟踪,然后提交:
$ git add *.c
$ git add README
$ git commit -m '初始化项目版本'
以上命令将目录下以 .c 结尾及 README 文件提交到仓库中。
git clone
我们使用 git clone 从现有 Git 仓库中拷贝项目(类似 svn checkout)。
克隆仓库的命令格式为:
git clone <repo>
如果我们需要克隆到指定的目录,可以使用以下命令格式:
git clone <repo> <directory>
参数说明:
- repo:Git 仓库。
- directory:本地目录。
比如,要克隆 Ruby 语言的 Git 代码仓库 Grit,可以用下面的命令:
$ git clone git://github.com/schacon/grit.git
执行该命令后,会在当前目录下创建一个名为grit的目录,其中包含一个 .git 的目录,用于保存下载下来的所有版本记录。
如果要自己定义要新建的项目目录名称,可以在上面的命令末尾指定新的名字:
$ git clone git://github.com/schacon/grit.git mygrit
配置
git 的设置使用 git config 命令。
显示当前的 git 配置信息:
$ git config --list
credential.helper=osxkeychain
core.repositoryformatversion=0
core.filemode=true
core.bare=false
core.logallrefupdates=true
core.ignorecase=true
core.precomposeunicode=true
编辑 git 配置文件:
$ git config -e # 针对当前仓库
或者:
$ git config -e --global # 针对系统上所有仓库
设置提交代码时的用户信息:
$ git config --global user.name "runoob"
$ git config --global user.email test@runoob.com
如果去掉 --global 参数只对当前仓库有效。
6. Git 基本操作
Git 的工作就是创建和保存你项目的快照及与之后的快照进行对比。
本章将对有关创建与提交你的项目快照的命令作介绍。
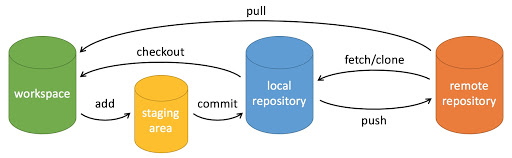
Git 常用的是以下 6 个命令:git clone、git push、git add 、git commit、git checkout、git pull,后面我们会详细介绍。
说明:
- workspace:工作区
- staging area:暂存区/缓存区
- local repository:版本库或本地仓库
- remote repository:远程仓库
一个简单的操作步骤:
$ git init
$ git add .
$ git commit
- git init - 初始化仓库。
- git add . - 添加文件到暂存区。
- git commit - 将暂存区内容添加到仓库中。
创建仓库命令
下表列出了 git 创建仓库的命令:
| 命令 | 说明 |
|---|---|
git init |
初始化仓库 |
git clone |
拷贝一份远程仓库,也就是下载一个项目。 |
提交与修改
Git 的工作就是创建和保存你的项目的快照及与之后的快照进行对比。
下表列出了有关创建与提交你的项目的快照的命令:
| 命令 | 说明 |
|---|---|
git add |
添加文件到仓库 |
git status |
查看仓库当前的状态,显示有变更的文件。 |
git diff |
比较文件的不同,即暂存区和工作区的差异。 |
git commit |
提交暂存区到本地仓库。 |
git reset |
回退版本。 |
git rm |
删除工作区文件。 |
git mv |
移动或重命名工作区文件。 |
提交日志
| 命令 | 说明 |
|---|---|
git log |
查看历史提交记录 |
git blame <file> |
以列表形式查看指定文件的历史修改记录 |
远程操作
| 命令 | 说明 |
|---|---|
git remote |
远程仓库操作 |
git fetch |
从远程获取代码库 |
git pull |
下载远程代码并合并 |
git push |
上传远程代码并合并 |
7. Git 查看提交历史
Git 提交历史一般常用两个命令:
- git log - 查看历史提交记录。
- git blame <file> - 以列表形式查看指定文件的历史修改记录。
git log
在使用 Git 提交了若干更新之后,又或者克隆了某个项目,想回顾下提交历史,我们可以使用 git log 命令查看。
针对我们前一章节的操作,使用 git log 命令列出历史提交记录如下:
$ git log
commit d5e9fc2c811e0ca2b2d28506ef7dc14171a207d9 (HEAD -> master)
Merge: c68142b 7774248
Author: runoob <test@runoob.com>
Date:   Fri May 3 15:55:58 2019 +0800

    Merge branch 'change_site'

commit c68142b562c260c3071754623b08e2657b4c6d5b
Author: runoob <test@runoob.com>
Date:   Fri May 3 15:52:12 2019 +0800

    修改代码

commit 777424832e714cf65d3be79b50a4717aea51ab69 (change_site)
Author: runoob <test@runoob.com>
Date:   Fri May 3 15:49:26 2019 +0800

    changed the runoob.php

commit c1501a244676ff55e7cccac1ecac0e18cbf6cb00
Author: runoob <test@runoob.com>
Date:   Fri May 3 15:35:32 2019 +0800
我们可以用 --oneline 选项来查看历史记录的简洁的版本。
$ git log --oneline
$ git log --oneline
d5e9fc2 (HEAD -> master) Merge branch 'change_site'
c68142b 修改代码
7774248 (change_site) changed the runoob.php
c1501a2 removed test.txt、add runoob.php
3e92c19 add test.txt
3b58100 第一次版本提交
这告诉我们的是,此项目的开发历史。
我们还可以用 --graph 选项,查看历史中什么时候出现了分支、合并。以下为相同的命令,开启了拓扑图选项:
*   d5e9fc2 (HEAD -> master) Merge branch 'change_site'
|\
| * 7774248 (change_site) changed the runoob.php
* | c68142b 修改代码
|/
* c1501a2 removed test.txt、add runoob.php
* 3e92c19 add test.txt
* 3b58100 第一次版本提交
现在我们可以更清楚明了地看到何时工作分叉、又何时归并。
你也可以用 --reverse 参数来逆向显示所有日志。
$ git log --reverse --oneline
3b58100 第一次版本提交
3e92c19 add test.txt
c1501a2 removed test.txt、add runoob.php
7774248 (change_site) changed the runoob.php
c68142b 修改代码
d5e9fc2 (HEAD -> master) Merge branch 'change_site'
如果只想查找指定用户的提交日志可以使用命令:git log --author , 例如,比方说我们要找 Git 源码中 Linus 提交的部分:
$ git log --author=Linus --oneline -5
81b50f3 Move 'builtin-*' into a 'builtin/' subdirectory
3bb7256 make "index-pack" a built-in
377d027 make "git pack-redundant" a built-in
b532581 make "git unpack-file" a built-in
112dd51 make "mktag" a built-in
如果你要指定日期,可以执行几个选项:--since 和 --before,但是你也可以用 --until 和 --after。
例如,如果我要看 Git 项目中三周前且在四月十八日之后的所有提交,我可以执行这个(我还用了 --no-merges 选项以隐藏合并提交):
$ git log --oneline --before={3.weeks.ago} --after={2010-04-18} --no-merges
5469e2d Git 1.7.1-rc2
d43427d Documentation/remote-helpers: Fix typos and improve language
272a36b Fixup: Second argument may be any arbitrary string
b6c8d2d Documentation/remote-helpers: Add invocation section
5ce4f4e Documentation/urls: Rewrite to accomodate transport::address
00b84e9 Documentation/remote-helpers: Rewrite description
03aa87e Documentation: Describe other situations where -z affects git diff
77bc694 rebase-interactive: silence warning when no commits rewritten
636db2c t3301: add tests to use --format="%N"
更多 git log 命令可查看:http://git-scm.com/docs/git-log
git blame
如果要查看指定文件的修改记录可以使用 git blame 命令,格式如下:
git blame <file>
git blame 命令是以列表形式显示修改记录,如下实例:
$ git blame README
^d2097aa (tianqixin 2020-08-25 14:59:25 +0800 1) # Runoob Git 测试
db9315b0 (runoob    2020-08-25 16:00:23 +0800 2) # 菜鸟教程
8. Git 标签
如果你达到一个重要的阶段,并希望永远记住那个特别的提交快照,你可以使用 git tag 给它打上标签。
比如说,我们想为我们的 runoob 项目发布一个"1.0"版本。 我们可以用 git tag -a v1.0 命令给最新一次提交打上(HEAD)"v1.0"的标签。
-a 选项意为"创建一个带注解的标签"。 不用 -a 选项也可以执行的,但它不会记录这标签是啥时候打的,谁打的,也不会让你添加个标签的注解。 我推荐一直创建带注解的标签。
$ git tag -a v1.0
当你执行 git tag -a 命令时,Git 会打开你的编辑器,让你写一句标签注解,就像你给提交写注解一样。
现在,注意当我们执行 git log --decorate 时,我们可以看到我们的标签了:
*   d5e9fc2 (HEAD -> master) Merge branch 'change_site'
|\
| * 7774248 (change_site) changed the runoob.php
* | c68142b 修改代码
|/
* c1501a2 removed test.txt、add runoob.php
* 3e92c19 add test.txt
* 3b58100 第一次版本提交
如果我们忘了给某个提交打标签,又将它发布了,我们可以给它追加标签。
例如,假设我们发布了提交 85fc7e7(上面实例最后一行),但是那时候忘了给它打标签。 我们现在也可以:
$ git tag -a v0.9 85fc7e7
$ git log --oneline --decorate --graph
*   d5e9fc2 (HEAD -> master) Merge branch 'change_site'
|\
| * 7774248 (change_site) changed the runoob.php
* | c68142b 修改代码
|/
* c1501a2 removed test.txt、add runoob.php
* 3e92c19 add test.txt
* 3b58100 (tag: v0.9) 第一次版本提交
如果我们要查看所有标签可以使用以下命令:
$ git tag
v0.9
v1.0
指定标签信息命令:
git tag -a <tagname> -m "runoob.com标签"
PGP签名标签命令:
git tag -s <tagname> -m "runoob.com标签"
9.Git 分支管理
几乎每一种版本控制系统都以某种形式支持分支。使用分支意味着你可以从开发主线上分离开来,然后在不影响主线的同时继续工作。
有人把 Git 的分支模型称为必杀技特性,而正是因为它,将 Git 从版本控制系统家族里区分出来。
创建分支命令:
git branch (branchname)
切换分支命令:
git checkout (branchname)
当你切换分支的时候,Git 会用该分支的最后提交的快照替换你的工作目录的内容, 所以多个分支不需要多个目录。
合并分支命令:
git merge
你可以多次合并到统一分支, 也可以选择在合并之后直接删除被并入的分支。
开始前我们先创建一个测试目录:
$ mkdir gitdemo
$ cd gitdemo/
$ git init
Initialized empty Git repository...
$ touch README
$ git add README
$ git commit -m '第一次版本提交'
[master (root-commit) 3b58100] 第一次版本提交
 1 file changed, 0 insertions(+), 0 deletions(-)
 create mode 100644 README
Git 分支管理
列出分支
列出分支基本命令:
git branch
没有参数时,git branch 会列出你在本地的分支。
$ git branch
* master
此例的意思就是,我们有一个叫做 master 的分支,并且该分支是当前分支。
当你执行 git init 的时候,默认情况下 Git 就会为你创建 master 分支。
如果我们要手动创建一个分支。执行 git branch (branchname) 即可。
$ git branch testing
$ git branch
* master
  testing
现在我们可以看到,有了一个新分支 testing。
当你以此方式在上次提交更新之后创建了新分支,如果后来又有更新提交, 然后又切换到了 testing 分支,Git 将还原你的工作目录到你创建分支时候的样子。
接下来我们将演示如何切换分支,我们用 git checkout (branch) 切换到我们要修改的分支。
$ ls
README
$ echo 'runoob.com' > test.txt
$ git add .
$ git commit -m 'add test.txt'
[master 3e92c19] add test.txt
 1 file changed, 1 insertion(+)
 create mode 100644 test.txt
$ ls
README        test.txt
$ git checkout testing
Switched to branch 'testing'
$ ls
README
当我们切换到 testing 分支的时候,我们添加的新文件 test.txt 被移除了。切换回 master 分支的时候,它们有重新出现了。
$ git checkout master
Switched to branch 'master'
$ ls
README        test.txt
我们也可以使用 git checkout -b (branchname) 命令来创建新分支并立即切换到该分支下,从而在该分支中操作。
$ git checkout -b newtest
Switched to a new branch 'newtest'
$ git rm test.txt
rm 'test.txt'
$ ls
README
$ touch runoob.php
$ git add .
$ git commit -am 'removed test.txt、add runoob.php'
[newtest c1501a2] removed test.txt、add runoob.php
 2 files changed, 1 deletion(-)
 create mode 100644 runoob.php
 delete mode 100644 test.txt
$ ls
README        runoob.php
$ git checkout master
Switched to branch 'master'
$ ls
README        test.txt
如你所见,我们创建了一个分支,在该分支的上移除了一些文件 test.txt,并添加了 runoob.php 文件,然后切换回我们的主分支,删除的 test.txt 文件又回来了,且新增加的 runoob.php 不存在主分支中。
使用分支将工作切分开来,从而让我们能够在不同开发环境中做事,并来回切换。
删除分支
删除分支命令:
git branch -d (branchname)
例如我们要删除 testing 分支:
$ git branch
* master
  testing
$ git branch -d testing
Deleted branch testing (was 85fc7e7).
$ git branch
* master
分支合并
一旦某分支有了独立内容,你终究会希望将它合并回到你的主分支。 你可以使用以下命令将任何分支合并到当前分支中去:
git merge
$ git branch
* master
  newtest
$ ls
README        test.txt
$ git merge newtest
Updating 3e92c19..c1501a2
Fast-forward
 runoob.php | 0
 test.txt   | 1 -
 2 files changed, 1 deletion(-)
 create mode 100644 runoob.php
 delete mode 100644 test.txt
$ ls
README        runoob.php
以上实例中我们将 newtest 分支合并到主分支去,test.txt 文件被删除。
合并完后就可以删除分支:
$ git branch -d newtest
Deleted branch newtest (was c1501a2).
删除后, 就只剩下 master 分支了:
$ git branch
* master
合并冲突
合并并不仅仅是简单的文件添加、移除的操作,Git 也会合并修改。
$ git branch
* master
$ cat runoob.php
首先,我们创建一个叫做 change_site 的分支,切换过去,我们将 runoob.php 内容改为:
<?php
echo 'runoob';
?>
创建 change_site 分支:
$ git checkout -b change_site
Switched to a new branch 'change_site'
$ vim runoob.php
$ head -3 runoob.php
<?php
echo 'runoob';
?>
$ git commit -am 'changed the runoob.php'
[change_site 7774248] changed the runoob.php
 1 file changed, 3 insertions(+)
将修改的内容提交到 change_site 分支中。 现在,假如切换回 master 分支我们可以看内容恢复到我们修改前的(空文件,没有代码),我们再次修改 runoob.php 文件。
$ git checkout master
Switched to branch 'master'
$ cat runoob.php
$ vim runoob.php    # 修改内容如下
$ cat runoob.php
<?php
echo 1;
?>
$ git diff
diff --git a/runoob.php b/runoob.php
index e69de29..ac60739 100644
--- a/runoob.php
+++ b/runoob.php
@@ -0,0 +1,3 @@
+<?php
+echo 1;
+?>
$ git commit -am '修改代码'
[master c68142b] 修改代码
 1 file changed, 3 insertions(+)
现在这些改变已经记录到我的 "master" 分支了。接下来我们将 "change_site" 分支合并过来。
$ git merge change_site
Auto-merging runoob.php
CONFLICT (content): Merge conflict in runoob.php
Automatic merge failed; fix conflicts and then commit the result.

$ cat runoob.php     # 代开文件,看到冲突内容
<?php
<<<<<<< HEAD
echo 1;
=======
echo 'runoob';
>>>>>>> change_site
?>
我们将前一个分支合并到 master 分支,一个合并冲突就出现了,接下来我们需要手动去修改它。
$ vim runoob.php
$ cat runoob.php
<?php
echo 1;
echo 'runoob';
?>
$ git diff
diff --cc runoob.php
index ac60739,b63d7d7..0000000
--- a/runoob.php
+++ b/runoob.php
@@@ -1,3 -1,3 +1,4 @@@
  <?php
 +echo 1;
+ echo 'runoob';
  ?>
在 Git 中,我们可以用 git add 要告诉 Git 文件冲突已经解决
$ git status -s
UU runoob.php
$ git add runoob.php
$ git status -s
M  runoob.php
$ git commit
[master 88afe0e] Merge branch 'change_site'
现在我们成功解决了合并中的冲突,并提交了结果。
10.Git 远程仓库(Github)
https://www.runoob.com/git/git-remote-repo.html
11.Git Gitee
如果你希望体验到 Git 飞一般的速度,可以使用国内的 Git 托管服务——Gitee(gitee.com)。
具体参看https://www.runoob.com/git/git-gitee.html
12.Git 服务器搭建
上一章节中我们远程仓库使用了 Github,Github 公开的项目是免费的,2019 年开始 Github 私有存储库也可以无限制使用。
这当然我们也可以自己搭建一台 Git 服务器作为私有仓库使用。
接下来我们将以 Centos 为例搭建 Git 服务器。
12.1、安装Git
$ yum install curl-devel expat-devel gettext-devel openssl-devel zlib-devel perl-devel
$ yum install git
接下来我们 创建一个git用户组和用户,用来运行git服务:
$ groupadd git
$ useradd git -g git
12.2、创建证书登录
收集所有需要登录的用户的公钥,公钥位于id_rsa.pub文件中,把我们的公钥导入到/home/git/.ssh/authorized_keys文件里,一行一个。
如果没有该文件创建它:
$ cd /home/git/
$ mkdir .ssh
$ chmod 755 .ssh
$ touch .ssh/authorized_keys
$ chmod 644 .ssh/authorized_keys
12.3、初始化Git仓库
首先我们选定一个目录作为Git仓库,假定是/home/gitrepo/runoob.git,在/home/gitrepo目录下输入命令:
$ cd /home
$ mkdir gitrepo
$ chown git:git gitrepo/
$ cd gitrepo

$ git init --bare runoob.git
Initialized empty Git repository in /home/gitrepo/runoob.git/
以上命令Git创建一个空仓库,服务器上的Git仓库通常都以.git结尾。然后,把仓库所属用户改为git:
$ chown -R git:git runoob.git
12.4、克隆仓库
$ git clone git@192.168.45.4:/home/gitrepo/runoob.git
Cloning into 'runoob'...
warning: You appear to have cloned an empty repository.
Checking connectivity... done.
192.168.45.4 为 Git 所在服务器 ip ,你需要将其修改为你自己的 Git 服务 ip。
这样我们的 Git 服务器安装就完成。
参考下:https://www.bootcss.com/p/git-guide/
ps:同事写的
| git init | 新建一个git仓库 |
| git status 查看当前工作区文件的状态(待提交到暂存区或版本库) | |
| git add file | 提交工作区文件到暂存区,新增或修改文件都可 |
| git rm file | 从暂存区中删除文件 |
| git checkout --file 放弃当前工作区的修改 恢复到最新版本(最近一次git add或git | |
| commit的状态) git commit -m "msg" |
|
| 提交暂存区内容到当前版本库 | |
| git log | 查看当前版本以前的历史版本库 |
| git reflog 查看所有历史的版本库 | |
| git reset --hard HEAD | 退回到上一个commit版本(head指向当前版本)或把暂存区的提 |
| 交退回到工作区 | |
| git reset --hard commit_id | 退回到版本commit_id |
| git remote add origin git@github.com:guannanw/firstgit.git | 关联远程库 |
| git remote -v 查看所有远程库 git push -u origin master |
|
| 把当前的master分支推送到远程库origin并关联 | |
| git push origin master 把当前master分支推送到origin git clone git@github.com:guannanw/firstgit.git 克隆远程仓库 git checkout -b dev-guannan 创建新分支dev-guannan |
|
| git branch | 查看当前分支 |
| git checkout master/git switch master | 切换到主分支 |
| git merge dev-guannan 把dev-guannan分支合并到当前分支上 | |
| git branch -d dev-guannan | 删除分支 |
git branch -D dev-guannan 强行删除没有被合并的分支
当git无法自动merge冲突时,需要手动解决conflict然后提交
| git merge --no-ff -m "msg" dev git stash 存储现有的工作现场内容 |
禁用fast-forward 合并同时创建一个新的commit |
| git stash list | 列出工作现场 |
| git stash pop 恢复工作现场并删除stash内容 | |
| git cherry-pick <commit> | 复制该commit到当前分支(一般用于解决bug) |
修复bug时,我们会通过创建新的bug分支进行修复,然后合并,最后删除;
git checkout b dev origin/dev 拷贝远程dev分支 创建本地dev分支
git push origin dev 推送本地dev分支到远程origin
推送失败说明远程的分支新于本地分支,使用git pull拉取最新代码
如果有conflict,解决冲突后再commit, 然后再push
本地新建的分支如果不推送到远程,对其他人就是不可见的
| git tag | 查看所有标签 |
| git tag a <tagname> <commit_id> m "msg" | |
| git tag d <tagname> | 删除标签 |
git show tagname 查看此标签详细信息
git push origin <tagname>
git commit时避免填写Commit Message:git commit --allow-empty-message -m ''

 浙公网安备 33010602011771号