Tkinter 组件
1.什么是Tkinter?
Tkinter 是 Python 的标准 GUI 库。Python 使用 Tkinter 可以快速的创建 GUI 应用程序。
由于 Tkinter 是内置到 python 的安装包中、只要安装好 Python 之后就能 import Tkinter 库、而且 IDLE 也是用 Tkinter 编写而成、对于简单的图形界面 Tkinter 还是能应付自如。
导入
import tkinter
注意:Python3.x 版本使用的库名为 tkinter,即首写字母 T 为小写。
2.创建一个GUI程序
- 1、导入 Tkinter 模块
- 2、创建控件
- 3、指定这个控件的 master, 即这个控件属于哪一个
- 4、告诉 GM(geometry manager) 有一个控件产生了。
#!/usr/bin/python3

import tkinter
top = tkinter.Tk()
# 进入消息循环
top.mainloop()

2.1向窗口中添加组件
前面创建的窗口只是一个容器,在这个容器中还可以添加其他元素。在Python程序中,使用Tkinter创建窗口后,可以向窗口中添加组件元素。
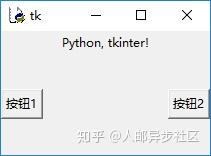
组件与窗口一样,也是通过Tkinter模块中相应的组件函数生成的。在生成组件以后,就可以使用pack、grid或place等方法将它添加到窗口中。实例文件zu.py演示了使用Tkinter向窗体中添加组件的过程。
import tkinter #导入Tkinter模块
root = tkinter.Tk()#生成一个主窗口对象
#实例化标签组件
label= tkinter.Label(root, text="Python, tkinter!")
label.pack()#将标签添加到窗口中
button1 = tkinter.Button(root, text="按钮1")#创建按钮1
button1.pack(side=tkinter.LEFT)#将按钮1添加到窗口中
button2 = tkinter.Button(root, text="按钮2")#创建按钮2
button2.pack(side=tkinter.RIGHT)#将按钮2添加到窗口中
root.mainloop()#进入消息循环
在上述实例代码中,分别实例化了Tkinter模块中的一个标签组件和两个按钮组件,然后调用pack()方法将这3个组件添加到主窗口中。执行文件zu.py后的效果如图所示。

3.Tkinter 组件
Tkinter的提供各种控件,如按钮,标签和文本框,一个GUI应用程序中使用。这些控件通常被称为控件或者部件。
目前有15种Tkinter的部件。我们提出这些部件以及一个简短的介绍,在下面的表:
| 控件 | 描述 |
|---|---|
| Button | 按钮控件;在程序中显示按钮。 |
| Canvas | 画布控件;显示图形元素如线条或文本 |
| Checkbutton | 多选框控件;用于在程序中提供多项选择框 |
| Entry | 输入控件;用于显示简单的文本内容 |
| Frame | 框架控件;在屏幕上显示一个矩形区域,多用来作为容器 |
| Label | 标签控件;可以显示文本和位图 |
| Listbox | 列表框控件;在Listbox窗口小部件是用来显示一个字符串列表给用户 |
| Menubutton | 菜单按钮控件,用于显示菜单项。 |
| Menu | 菜单控件;显示菜单栏,下拉菜单和弹出菜单 |
| Message | 消息控件;用来显示多行文本,与label比较类似 |
| Radiobutton | 单选按钮控件;显示一个单选的按钮状态 |
| Scale | 范围控件;显示一个数值刻度,为输出限定范围的数字区间 |
| Scrollbar | 滚动条控件,当内容超过可视化区域时使用,如列表框。. |
| Text | 文本控件;用于显示多行文本 |
| Toplevel | 容器控件;用来提供一个单独的对话框,和Frame比较类似 |
| Spinbox | 输入控件;与Entry类似,但是可以指定输入范围值 |
| PanedWindow | PanedWindow是一个窗口布局管理的插件,可以包含一个或者多个子控件。 |
| LabelFrame | labelframe 是一个简单的容器控件。常用与复杂的窗口布局。 |
| tkMessageBox | 用于显示你应用程序的消息框。 |
3.2 加强版模块tkinter.ttk中新增的Widget:
- Combobox;
- Notebook;
- Progressbat;
- Separator;
- Sizegrip;
- Treeview。
3.3 Widget的共同方法:
- Configuration
- config(option=value):Widget属性可以在建立时设置,也可以在程序执行时使用config()重新设置;
- cget("option"):取得option参数值;
- keys():可以用此方法获得所有该Widget的参数。
- Event Processing
- mainloop():让程序继续执行,同时进入等待与处理窗口事件;
- quit():Python Shell窗口结束,但是所建立的窗口继续执行;
- update():更新窗口画面。
- Event callbacks
- bind(event,callback):事件绑定;
- unbind(event):接触绑定。
- Alarm handlers
- after(time,callback):间隔指定时间后调用callback()方法。
3.4 标准属性
标准属性也就是所有控件的共同属性,如大小,字体和颜色等等。
| 属性 | 描述 |
| Dimension | 控件大小; |
| Color | 控件颜色; |
| Font | 控件字体; |
| Anchor | 锚点; |
| Relief | 控件样式; |
| Bitmap | 位图; |
| Cursor | 光标; |
4. 几何管理
Tkinter控件有特定的几何状态管理方法,管理整个控件区域组织,以下是Tkinter公开的几何管理类:包、网格、位置
| 几何方法 | 描述 |
| pack() | 包装; |
| grid() | 网格; |
| place() | 位置; |

3.5 组件部分共同方法
1. keys()
Widget的共同方法。
可以以列表的形式传回Widget的所有参数。
root = Tk()
root.title("Ex")
label = Label(root, text = "tkinter")
label.pack()
print(label.keys())
['activebackground', 'activeforeground', 'anchor', 'background', 'bd', 'bg', 'bitmap', 'borderwidth', 'compound', 'cursor', 'disabledforeground', 'fg', 'font', 'foreground', 'height', 'highlightbackground', 'highlightcolor', 'highlightthickness', 'image', 'justify', 'padx', 'pady', 'relief', 'state', 'takefocus', 'text', 'textvariable', 'underline', 'width', 'wraplength']
2. config()
Widget的共同方法。
Widget控件在建立时可以直接设置对象属性,若是部分属性未建立,未来在程序执行时可以使用config()方法建立或更改属性。此方法内属性设置的参数用法与建立时相同。
计数器:
from tkinter import *

counter = 0
def run_counter(digit):
    def counting():
        global counter
        counter += 1
        digit.config(text=str(counter))
        digit.after(1000,counting)
    counting()

root = Tk()
root.title("Ex")

digit = Label(root, bg = "yellow", \
              height = 3, width = 10, \
              font = "Helvetic 20 bold")
digit.pack()
run_counter(digit)
root.mainloop()
3. Separator
用于添加分隔线。
Separator(父对象,options)
options为HORIZONTAL表示建立水平分隔线,VERTICAL表示建立垂直分隔线。
from tkinter import *
from tkinter.ttk import Separator
root = Tk()
root.title("Ex")

myTitle = "我喜欢Tkinter"
myContent = """今天,我开始学习Tkinter。
Tkinter 是 Python 的标准 GUI 库,
Python 使用 Tkinter 可以快速的创建 GUI 应用程序。"""
label1 = Label(root, text = myTitle, font = "Helvetic 20 bold")
label1.pack(padx = 10, pady = 10)
sep = Separator(root, orient = HORIZONTAL)
sep.pack(fill = X, padx = 5)
label2 = Label(root, text = myContent)
label2.pack(padx = 10, pady = 10)
root.mainloop()
3.6组件属性(部分)
1. Color、Dimensions
Widget的共同属性。
bg、fg设置背景、前景色。
width、height的单位是字符。
root = Tk()
root.title("Ex")
root.geometry("200x80")
label = Label(root, text = "I like tkinter", \
              bg = "#EF72AA", fg = "white", \
              height = 3, width = 20)
label.pack() #包装与定位组件
root.mainloop()
2 Anchor
Widget的共同属性。
Anchor是指标签文字在标签区域的输出位置。
比如nw效果如下:
anchor的参数设置也可以使用NW、N、NE、W等大写常数,同时省略字符串的双引号。
3 Wraplength
wraplength = 35
效果如下:
4 Font
Widget的共同属性。
用于设置文字字形。
- family:字形,如Helvetica、Times等;
- size:字号,单位是像素;
- weight:如bold、normal;
- slant:如italic、roman;
- underline:True、False;
- overstrike:True、False。
root = Tk()
root.title("Ex")
label = Label(root, text = "I like tkinter", \
              bg = "#EF72AA", fg = "white", \
              height = 3, width = 20, \
              font = "Helnetic 20 bold italic")
#             font = ("Helnetic", 20, "bold", "italic"))
label.pack() #包装与定位组件
root.mainloop()
height和width都是字号联动的。
5 Justify
justify = "right"
6 Bitmaps
Widget的共同属性。
在标签位置放置内建位图。
error、hourglass、info、questhead、question、warning、gray12、gray25、gray50、gray75
label = Label(root, bitmap = "question")
7 Compound
图像与文字共存时,使用此参数定义文字与图像的位置关系。
- left:图像在左;
- right:图像在右;
- top:图像在上;
- bottom:图像在下;
- center:文字覆盖在图像上方。
label = Label(root, bitmap = "question", text = "Question", \
compound = "left")
8 Relief
Widget的共同属性。
用于建立Widget的边框。
label = Label(root, text = "raised", \
relief = "raised")
9 Padx/Pady
padx用于设置标签文字左右边界与标签区间的x轴间距,pady用于设置文字上下边界与标签取件单y轴间距。
与width和height作用相似,可以互相替代。
root.geometry("300x100")
label = Label(root, text = "raised", \
bg = "lightyellow", relief = "raised", \
padx = 5, pady = 10)
10 Image
图片可以应用在许多地方,例如标签、功能按钮、选项按钮文字区域等。在使用前可以使用PhotoImage()方法建立图像对象,然后再将此对象应用在其他窗口组件上。
imageobj = PhotoImage(file = "xxx.gif")
png也可。
image_obj = PhotoImage(file = "mystar.png")
label = Label(root, image = image_obj)
jpg无法直接解析:
需要借助PIL模块。
from tkinter import *
from PIL import Image, ImageTk
root = Tk()
root.title("Ex")
image_obj = Image.open("scenery.jpg")
jpg_obj = ImageTk.PhotoImage(image_obj)
label = Label(root, image = jpg_obj)
label.pack() #包装与定位组件
root.mainloop()
注意:bitmap和image不能共存。
11 Cursors
Widget的共同属性。
表示光标形状,实际形状可能会因操作系统不同而有所差异。
参考:https://blog.csdn.net/qq_41556318/article/details/85079411
https://blog.csdn.net/qq_42778168/article/details/97137618
https://blog.csdn.net/qq_41556318/category_9283243.html
https://www.cnblogs.com/pywjh/p/9527828.html#cykj
https://www.cnblogs.com/dingdangsunny/p/12629393.html#_label2_12 (这个蛮好的)
本文作者:云龙
本文链接:https://www.cnblogs.com/yunlong-study/p/14452066.html
版权声明:本作品采用知识共享署名-非商业性使用-禁止演绎 2.5 中国大陆许可协议进行许可。


【推荐】国内首个AI IDE,深度理解中文开发场景,立即下载体验Trae
【推荐】编程新体验,更懂你的AI,立即体验豆包MarsCode编程助手
【推荐】抖音旗下AI助手豆包,你的智能百科全书,全免费不限次数
【推荐】轻量又高性能的 SSH 工具 IShell:AI 加持,快人一步