Java项目轻松搞定Docker部署
原文链接:https://blog.csdn.net/IT_faquir/article/details/88094764
该篇文章主要解决项目到Docker的繁琐部署过程,尽可能解放双手。
上篇文章 从Docker部署Springboot项目中学习Docker 中讲解了,Springboot项目到jar包最终在Docker中运行起来的详细部署过程,有兴趣可以看看。
如果让Springboot项目在打包的时候直接构建成镜像并上传到docker上,那就轻松多了.
手动构建镜像过程:
project -> jar -> Dockerfile -> jar+Dockerfile同一目录 -> docker build构建镜像 -> docker镜像
这种方式略有点麻烦,那么可以使用Maven插件一步到位.
Maven有个插件叫dockerfile-maven-plugin(https://github.com/spotify/dockerfile-maven)
它可以连接远程Docker,只要一个命令就能把本地的jar包打成Docker镜像,命令执行完毕后,服务器上就会有刚打包好的镜像,此时再执行该镜像即可.
project -> maven -> docker镜像
Maven插件构建镜像可以使用以下两种方式:
- 第一种是在POM 中指定构建信息,
- 第二种是使用 Dockerfile 中的信息构建。
第一种方式,支持将 FROM, ENTRYPOINT, CMD, MAINTAINER 以及 ADD 信息配置在 POM 中,不需要使用 Dockerfile 配置。如果使用 VOLUME 或其他 Dockerfile 中的命令的时候,需要使用第二种方式,创建一个 Dockerfile,并在 POM 中配置 dockerDirectory 来指定路径即可,默认情况下Dockerfile放在更路径下,不需要显示指定。
1.下面以Dockerfile的方式进行实现.
具体实现:
1.1 在工程的pom.xml中添加dockerfile-maven-plugin插件
            <plugin>
                <groupId>com.spotify</groupId>
                <artifactId>dockerfile-maven-plugin</artifactId>
                <version>${dockerfile-maven-version}</version>
                <executions>
                    <execution>
                        <id>default</id>
                        <goals>
                            <goal>build</goal>
                            <goal>push</goal>
                        </goals>
                    </execution>
                </executions>
                <configuration>
            <!-- 设置镜像名 -->
                    <repository>eureka-server</repository>
                    <tag>${project.version}</tag>
                    <buildArgs>
                        <JAR_FILE>${project.build.finalName}.jar</JAR_FILE>
                    </buildArgs>
                </configuration>
            </plugin>
配置插件版本号
   <properties>
        <dockerfile-maven-version>1.4.9</dockerfile-maven-version>
    </properties>
      p


      r


      o


      j


      e


      c


      t


      .


      b


      u


      i


      l


      d


      .


      f


      i


      n


      a


      l


      N


      a


      m


      e


     默


     认


     为


    {project.build.finalName}默认为


 </span><span class="katex-html"><span class="base"><span class="strut" style="height: 0.88888em; vertical-align: -0.19444em;"></span><span class="mord"><span class="mord mathit">p</span><span class="mord mathit" style="margin-right: 0.02778em;">r</span><span class="mord mathit">o</span><span class="mord mathit" style="margin-right: 0.05724em;">j</span><span class="mord mathit">e</span><span class="mord mathit">c</span><span class="mord mathit">t</span><span class="mord">.</span><span class="mord mathit">b</span><span class="mord mathit">u</span><span class="mord mathit">i</span><span class="mord mathit" style="margin-right: 0.01968em;">l</span><span class="mord mathit">d</span><span class="mord">.</span><span class="mord mathit" style="margin-right: 0.10764em;">f</span><span class="mord mathit">i</span><span class="mord mathit">n</span><span class="mord mathit">a</span><span class="mord mathit" style="margin-right: 0.01968em;">l</span><span class="mord mathit" style="margin-right: 0.10903em;">N</span><span class="mord mathit">a</span><span class="mord mathit">m</span><span class="mord mathit">e</span></span><span class="mord cjk_fallback">默</span><span class="mord cjk_fallback">认</span><span class="mord cjk_fallback">为</span></span></span></span></span>{project.artifactId}-${project.version}的组合,这里就不做修改.</p>
1.2 在项目根目录下添加Dockerfile文件
这里依然使用的Eureka-server为示例
Dockerfile的配置基本上和上一篇文章eureka-server的配置一致,只需要修改部分配置
FROM java:alpine
ARG JAR_FILE
ADD target/${JAR_FILE} eureka_server.jar
EXPOSE 9990
ENTRYPOINT ["java","-jar","/eureka_server.jar","--spring.profiles.active=prod"]
- 1
- 2
- 3
- 4
- 5

1.3 项目打包成镜像
通过以下命令进行打包:
mvn package -DskipTests
- 1
或者
mvn dockerfile:build
- 1
前者为maven自带的打包方式,插件会对maven的部分命令进行绑定处理;后者为插件提供的打包方式;
在控制台可以看到如下编译过程:
[INFO] Image will be built as eureka_server:0.0.1
[INFO]
[INFO] Step 1/5 : FROM java:alpine
[INFO]
[INFO] Pulling from library/java
[INFO] Digest: sha256:d49bf8c44670834d3dade17f8b84d709e7db47f1887f671a0e098bafa9bae49f
[INFO] Status: Image is up to date for java:alpine
[INFO] ---> 3fd9dd82815c
[INFO] Step 2/5 : ARG JAR_FILE
[INFO]
[INFO] ---> Running in 41c578f75aed
[INFO] Removing intermediate container 41c578f75aed
[INFO] ---> 6c086f6e46b7
[INFO] Step 3/5 : ADD target/${JAR_FILE} eureka_server.jar
[INFO]
[INFO] ---> 91e3b865def6
[INFO] Step 4/5 : EXPOSE 9990
[INFO]
[INFO] ---> Running in b5bfb7b84db2
[INFO] Removing intermediate container b5bfb7b84db2
[INFO] ---> 9bbb925f43ba
[INFO] Step 5/5 : ENTRYPOINT ["java","-jar","/eureka_server.jar","--spring.profiles.active=prod"]
[INFO]
[INFO] ---> Running in efcabf60de60
[INFO] Removing intermediate container efcabf60de60
[INFO] ---> de2b5c91d917
[INFO] Successfully built de2b5c91d917
[INFO] Successfully tagged eureka_server:0.0.1
[INFO]
[INFO] Detected build of image with id de2b5c91d917
[INFO] Building jar: /Users/hgspiece/work/java/BootProject/server_zero/target/eureka_server-0.0.1-docker-info.jar
[INFO] Successfully built eureka_server:0.0.1
以上日志基本上和我们通过build命令执行日志一摸一样.
如果本地没有安装docker将会报如下错误:
HttpHostConnectException: Connect to localhost:2375 [localhost/127.0.0.1] failed: Connection refused: connect
但执行完成后,我们可以进入项目目录看看build过程产生了什么,如下目录:

可见在target目录下多出了一个docker文件和一个xxx-docker-info的jar包,其中docker文件夹下每一个文件都是镜像的一些信息,打开文件一看便知,jar包便是用于打包成镜像的jar包,我们可以从上面build日志中看出.
进入本地执行的Docker,查看镜像是否存在
命令:docker images

运行eureka_server镜像
docker run -p 9990:9990 --name eureka eureka_server:0.0.1
启动该镜像看看好不好使用,正常情况一切顺利,不在多说.
1.4 更多插件说明
插件还提供了以下命令:
# 将镜像push到私有仓库
mvn deploy  相当于 mvn dockerfile:push
- 1
- 2
如果不想让插件绑定maven原有的命令,只需要将executions代码块注释即可
<executions>
    <execution>
        <id>default</id>
        <goals>
              <goal>build</goal>
              <goal>push</goal>
        </goals>
    </execution>
 </executions>
- 1
- 2
- 3
- 4
- 5
- 6
- 7
- 8
- 9
2. 将镜像发布到远程服务器的docker上
上面成功的将项目通过maven插件的方式构建成本地镜像.可服务器在远程,那我该怎么办?
2.1 远程服务器配置
开放远程Docker远程访问端口
# vim /lib/systemd/system/docker.service
ExecStart=/usr/bin/dockerd -H tcp://0.0.0.0:2377 -H unix:///var/run/docker.sock
- 1
- 2

在配置项中修改该属性,该方式会直接暴露可以操控docker进程的端口,需要注意安全,修改完后重启docker服务
sudo service docker restart
- 1
2.2 本地配置
让本地Docker访问到远程docker有两种方式(推荐方法1)
2.2.1 方法1:
docker-maven-plugin 插件默认连接本地 Docker 地址为:localhost:2375,所以我们需要先设置下环境变量
DOCKER_HOST=tcp://<host>:2375
- 1
注意:如果没有设置 DOCKER_HOST 环境变量,可以命令行显示指定 DOCKER_HOST 来执行,如我本机指定 DOCKER_HOST:DOCKER_HOST=unix:///var/run/docker.sock mvn clean install docker:build。
2.2.2 方法2:
非Dockerfile文件的方式,直接在pom中进行配置
 <configuration>
	<imageName>${project.name}:${project.version}</imageName>
	<baseImage>java</baseImage>
	<entryPoint>["java","-jar","/${project.build.finalName}.jar}"]</entryPoint>
	<!--注意 修改成远程服务器地址-->
	<dockerHost> http://<host>:2375</dockerHost>
	<!-- 设置镜像名 -->
	<repository>${project.artifactId}</repository>
	<tag>${project.version}</tag>
	<resources>
		<resource>
			<targetPath>/</targetPath>
			<directory>${project.build.directory}</directory>
			<include>${project.build.finalName}.jar</include>
		</resource>
	</resources>
	<buildArgs>
	   	<JAR_FILE>${project.build.finalName}.jar</JAR_FILE>
	</buildArgs>
 </configuration>
- 1
- 2
- 3
- 4
- 5
- 6
- 7
- 8
- 9
- 10
- 11
- 12
- 13
- 14
- 15
- 16
- 17
- 18
- 19
- 20
- imageName:用于指定镜像名称,
      p


      r


      o


      j


      e


      c


      t


      .


      n


      a


      m


      e


     指


     定


     镜


     像


     名


     称


     ,


    {project.name}指定镜像名称,


 </span><span class="katex-html"><span class="base"><span class="strut" style="height: 0.85396em; vertical-align: -0.19444em;"></span><span class="mord"><span class="mord mathit">p</span><span class="mord mathit" style="margin-right: 0.02778em;">r</span><span class="mord mathit">o</span><span class="mord mathit" style="margin-right: 0.05724em;">j</span><span class="mord mathit">e</span><span class="mord mathit">c</span><span class="mord mathit">t</span><span class="mord">.</span><span class="mord mathit">n</span><span class="mord mathit">a</span><span class="mord mathit">m</span><span class="mord mathit">e</span></span><span class="mord cjk_fallback">指</span><span class="mord cjk_fallback">定</span><span class="mord cjk_fallback">镜</span><span class="mord cjk_fallback">像</span><span class="mord cjk_fallback">名</span><span class="mord cjk_fallback">称</span><span class="mord cjk_fallback">,</span></span></span></span></span>{project.version}镜像版本。</li><li>baseImage:用于指定基础镜像,类似于Dockerfile中的FROM指令。</li><li>entrypoint:类似于Dockerfile的ENTRYPOINT指令。</li><li>resources.resource.directory:用于指定需要复制的根目录,${project.build.directory}表示target目录。</li><li>resources.resource.include:用于指定需要复制的文件。${project.build.finalName}.jar指的是打包后的jar包文件。</li><li>buildArgs:定义构建时需要的参数。</li></ul>
并使用命令
mvn clean package docker:build -DskipTests进行构建,顺利的话即可成功发布镜像。
到此Maven项目添加Docker相关插件告一段落,继续
紧接着也可以将ServerA和ServerB通过Maven插件方式打包成镜像.3. idea插件工具Docker integration
有事你可能不想在maven上做配置,闲麻烦,同时也想降低项目与Docker的耦合性。这里推荐一个idea上的Docker插件。
http://plugins.jetbrains.com/plugin/7724-docker-integration
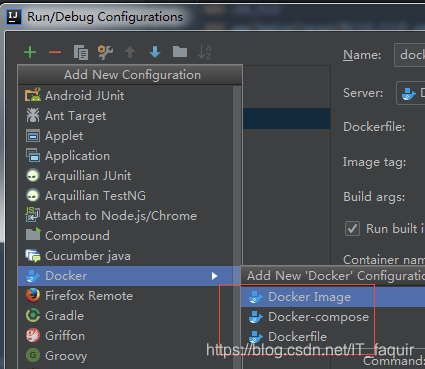
idea安装插件的具体操作这里不细说了,插件操作直接看图吧- 配置插件,链接docker

- 添加一个执行配置

- 具体配置如下示例

- 插件提供的功能操作区

其中包含了Docker已有容器及镜像,可以通过右键进行功能选择操作,是不是更加方便了。
快去试一试吧!
注意以上方式只试用于我们开发与测试,不太建议用于生产。
4. 下一篇预告
构建镜像的繁琐步骤变的简单来不少,但服务一多依然要写一大堆的link来启动我们的应用
针对改痛点,这里引出一个编排工具的概念。先来认识一下:
Docker-compose: 是一个基于Docker的编排工具,所谓编排个人理解就是将不同的镜像通过配置,组成一个新的运行环境,官方定义是:Compose is a tool for defining and running multi-container Docker applications. - 配置插件,链接docker


