
部署 Nginx +uwsgi+centos7+django+supervisor 项目
部署CRM项目
前言
-
使用软件
-
nginx
- 使用nginx是为了它的反向代理功能,项目会通过Django+uWSGI+Nginx进行服务器线上部署。
-
uWSGI
-
python web服务器开发使用WSGI协议(Web Server Gateway Interface)
python web项目默认会生成一个wsgi.py文件,确定好应用模块。
生产环境中使用的是uWSGI,实现了WSGI所有接口,C语言编写,效率很高的web服务器。
uWSGI是一个全功能的HTTP服务器,实现了WSGI协议、uwsgi协议、http协议等。它要做的就是把HTTP协议转化成语言支持的网络协议。比如把HTTP协议转化成WSGI协议,让Python可以直接使用。
-
-
centos7
- 打包项目CRM文件夹,压缩文件
- 通过xftp、scp、lrzsz等上传文件至Centos服务器
-
CRM项目文件
-
virtualenv
- 构建一个干净,隔离的python解释器环境,防止软件依赖,冲突等问题,建议使用。
-
supervisor
-
项目部署
准备工作
1 将项目上传到服务器上
-
方法一:使用xftp工具,进项上传文件夹,将项目代码,传到linux服务器当中
- 这个页面操作,实在不会百度
-
方式2: 使用scp从本地将文件上传到linux服务器中
scp -r 本地文件夹 远程用户名@远程ip:远程文件夹/
2 将mysql数据迁移到服务器数据库
-
服务器端安装mysql(mariadb)数据库链接:https://www.cnblogs.com/yuncong/p/10253215.html
-
数据导入导出
在linux服务端,mysql,导入knight的数据 1.mysql数据的导出,与导入 这个命令是在linux/windows中敲的 mysqldump -u root -p --all-databases > knight.dump 2.上传这个数据文件到linux数据库中 3.在linux的mysql,导入这个数据文件 mysql -uroot -p < /opt/knight.dump -
注意:linux的数据库,需要对root用户设置远程链接的权限
grant all privileges on *.* to root@'%' identified by 'redhat'; # 授权所有的权限,在所有库,所有表 对 root用户在所有的主机上, 权限密码为redhat, 注意是自己设置的密码 # 刷新授权表 flush privileges; -
注意2:linux的防火墙要给关闭,否则windows去链接linux的3306端口可能被拒绝
centos7默认已经使用firewall作为防火墙了
1.关闭防火墙
systemctl status firewalld #查看防火墙状态
systemctl stop firewalld    #关闭防火墙
systemctl disable firewalld#关闭防火墙开机启动
systemctl is-enabled firewalld.service#检查防火墙是否启动
1. 激活虚拟python环境
-
这里使用的是virtualenv进行管理
-
安装virualenvwrapper工具链接:https://www.cnblogs.com/yuncong/p/10251899.html
# 创建虚拟环境
mkvirtualenv my_django
# 激活该虚拟环境
workon my_diango
-
激活环境后,cd到项目目录下
-
可以使用pip freeze模块迁移
-
生成项目依赖模块
# 在本地 pip freeze >requirements.txt -
在虚拟环境中
pip install -r C:\Users\Administrator\requirements.txt
# pip install -r 路径
-
-
启动django项目
python3 manage.py runserver 0.0.0.0:8000启动项目注意的问题,根据报错进行下载相应的模块,
项目中settings.py中俩个关键位置记得更改:
# 这个参数 ALLOWED_HOSTS = ['*'] # 数据库连接参数 DATABASES = { 'default': { 'ENGINE': 'django.db.backends.mysql', 'NAME': "crm", "HOST": "127.0.0.1", "PORT": 3306, "USER": 'root', "PASSWORD": '123' } } -
启动成功之后退出, 这里只是为了测试项目
-
2 安装uwsgi
-
安装
pip3 install uwsgi -
1 通过uwsgi启动django项目(注意这里要在项目目录下)
uwsgi --http :8000 --module knight.wsgi -
2 使用uwsgi.ini配置文件来启动项目,这个文件要自己创建,随意放在哪,我这里是放在项目目录中的
# 新建uwsgi.ini touch uwsgi.ini # 查看 ls uwsgi.ini编辑uwsgi.ini,注意编辑中的路径之类的数据要进行更改
[uwsgi]
	# Django-related settings
	# the base directory (full path)
	#写上项目的绝对路径
	chdir           = /opt/knight
	# Django's wsgi file

	#填写找到django的wsgi文件,填写相对路径,以chdir参数为相对路径
	module          = knight.wsgi
	# the virtualenv (full path)
	#填写虚拟环境的绝对路径
	home            = /root/Envs/knight/
	# process-related settings
	# master
	#启动uwsgi主进程
	master          = true
	# maximum number of worker processes
	processes       = 5

	#如果你使用了nginx,做反向代理,必须填写socket链接,而不是http参数
	# the socket (use the full path to be safe
	#socket          = 0.0.0.0:8000

	#如果你不用nginx,直接使用uwsgi,运行一个http服务端,就用这个http参数
	http = 0.0.0.0:8000


	# ... with appropriate permissions - may be needed
	# chmod-socket    = 664
	# clear environment on exit
	vacuum          = true
指定配置文件启动uwsgi
uwsgi --ini uwsgi.ini启动之后可以通过网址进行访问了
3 配置nginx
- 作用: 使用ngixn处理django的静态文件
-
设置django的静态文件目录,收集一下
修改项目中settings.py,写下如下参数
STATIC_ROOT= '/opt/static' #该路径根据实际放置 -
使用命令收集django的静态文件
python manage.py collectstatic -
查看django的静态文件收集目录
ls /opt/static -
配置nginx,进行反向代理,找到uwsgi项目,且配置nginx处理uwsgi的静态文件
编辑nginx.conf
	    server {
        listen       80;
        #域名qishijd.com
        server_name  qishijd.com;
        #只要用户访问qishijd.com:80/  就走这个location匹配>,反向代理给uwsgi:
        location / {
			include    uwsgi_params;
			uwsgi_pass  0.0.0.0:8000;
					}
			#当用户请求是qishijd.com/static/的时候
			#就会进入这个location匹配
			#通过alias参数进行路径别名,让nginx去/opt/static底下去找静>态资源
			location  /static  {
			alias  /opt/static;
}
    }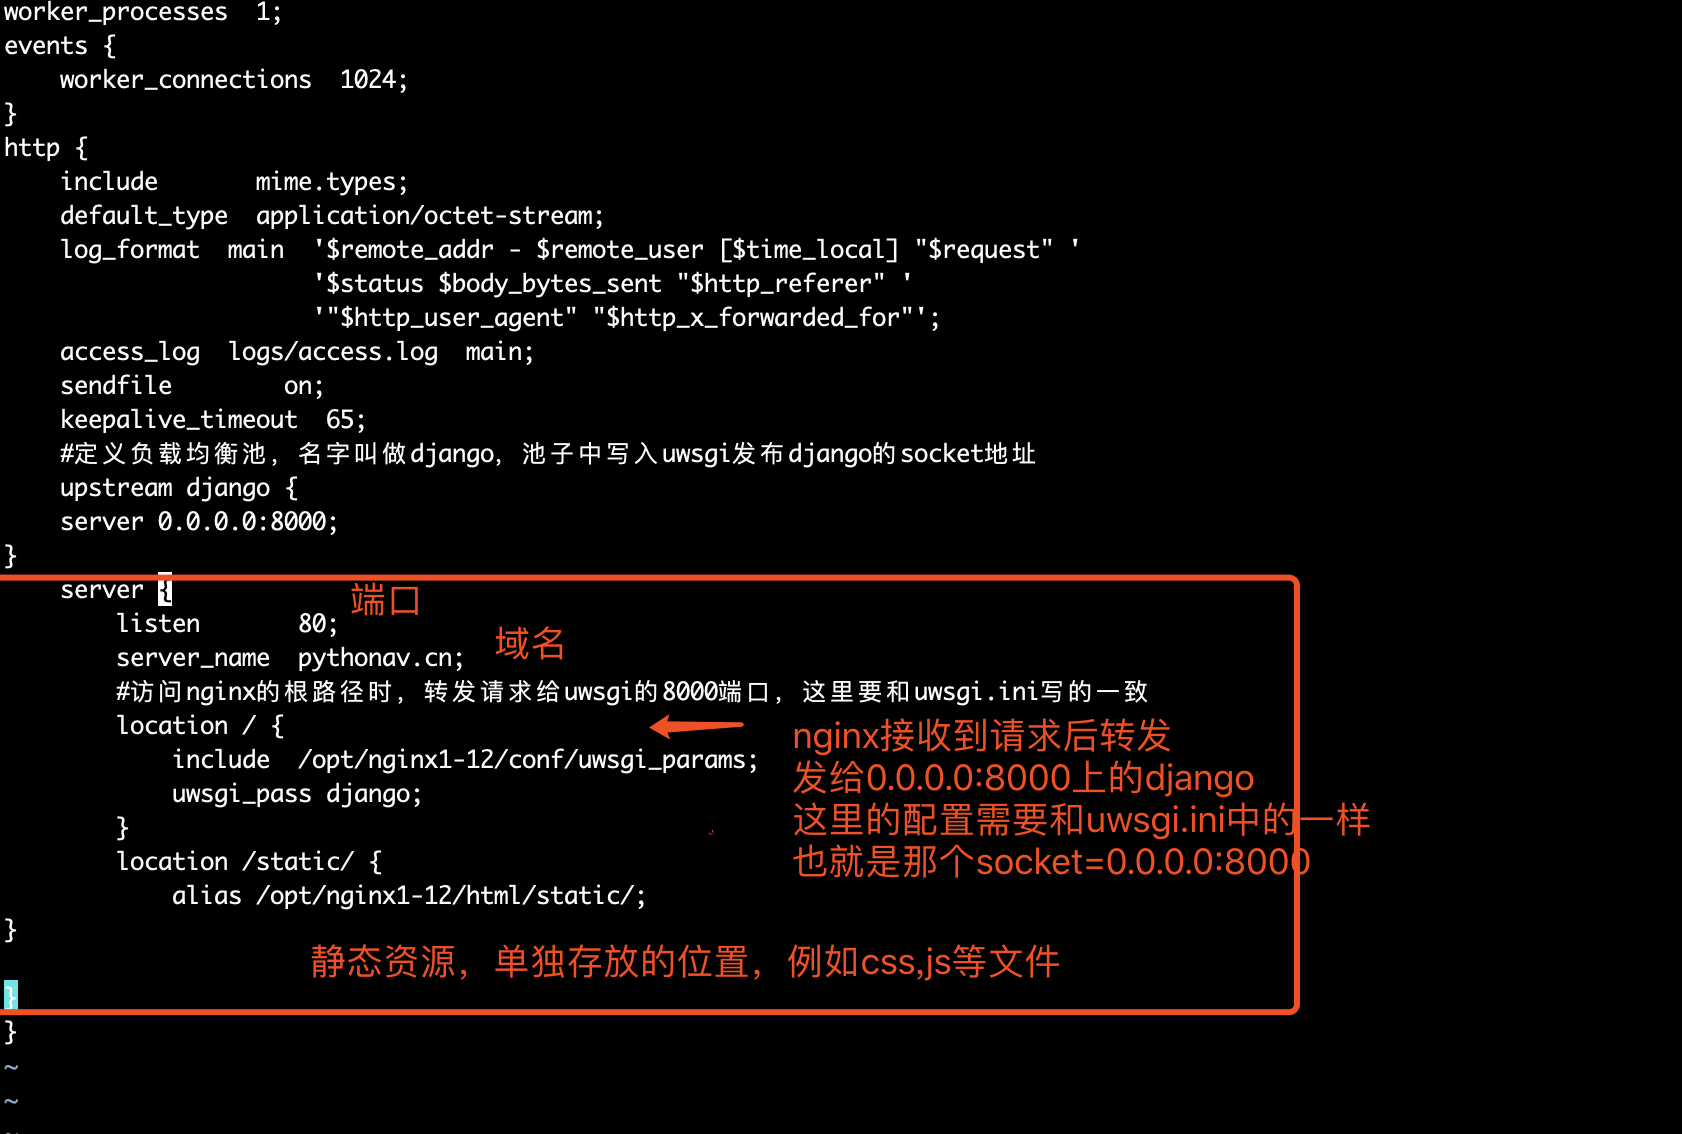
-
配置完成后启动uwsgi,重启nginx,
注意问题
-
在浏览器上输入网址后,数据不加载,可能原因
	#如果你使用了nginx,做反向代理,必须填写socket链接,而不是http参数
	# the socket (use the full path to be safe
	#socket          = 0.0.0.0:8000

	#如果你不用nginx,直接使用uwsgi,运行一个http服务端,就用这个http参数
	http = 0.0.0.0:8000
这俩只选一个
-
本地域名添加
在本地编辑
vim /etc/hosts
# 加载你nginx.conf中这个参数对应的域名
# server_name  qishijd.com;  格式为


192.168.11.11 qishijd.com

# 保存退出
进程管理工具superviosr
-
注意
使用python2的模块管理工具,去下载supervisor ,注意此时,退出虚拟环境
使用python2的模块管理工具,去下载supervisor ,注意此时,退出虚拟环境
使用python2的模块管理工具,去下载supervisor ,注意此时,退出虚拟环境
使用python2的模块管理工具,去下载supervisor ,注意此时,退出虚拟环境
使用python2的模块管理工具,去下载supervisor ,注意此时,退出虚拟环境 -
安装supervisor
yum install python-setuptools -
安装
easy_install supervisor -
使用supervisor命令,生配置文件
echo_supervisord_conf > /etc/supervisor.conf -
在这个配置文件中加入我们想要管理的任务
vim /etc/supervisor.conf # 在底部写入如下配置 #定义一个任务,名字自定义 #commnad=参数,定义我们启动项目的命令 [program:crm_knight] command=/root/Envs/knight/bin/uwsgi /opt/knight/uwsgi.ini stopasgroup=true ;默认为false,进程被杀死时,是否向这个进程组发送stop信号,包括子进程 killasgroup=true ;默认为false,向进程组发送kill信号,包括子进程 -
通过配置文件启动supervisor服务
supervisord -c /etc/supervisor.conf -
启动了supervisor服务端后,管理任务
supervisorctl -c /etc/supervisor.conf -
任务管理命令如下:有两种,一个是交互式,一个是参数形式
-
参数形式
supervisorctl -c /etc/supervisor.conf stop/start/restart all supervisorctl -c /etc/supervisor.conf start crm_knight -
交互式形式
supervisorctl -c /etc/supervisor.conf
-
