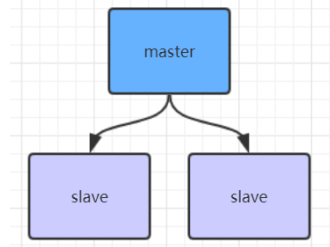
Redis 的主从、哨兵架构
一、主从架构

1、Redis的主从架构搭建
Redis的主从架构搭建,主节点的配置文件和单机版本的Redis的配置文件一样,我们看一下从节点的配置:
(1)复制一份 redis.conf 文件为 redis_6380.conf; cp -f redis.conf redis_6380.conf;
将主节点的配置文件 redis.conf 文件中: bind 127.0.0.1 删除了,或者修改为 bind 0.0.0.0 ;
(2)配置文件中修改以下配置:
port 6380
pidfile /var/run/redis_6380.pid6
logfile "6380.log"
dir /usr1/redis/redis-5.0.3/data/6380

#======== 配置主从复制 ========
# 从本机6379的redis实例复制数据
replicaof 192.168.172.20 6379
# 从节点只允许读数据
replica‐read‐only yes
(3)创建目录:mkdir /usr1/redis/redis-5.0.3/data/6380
(4)启动从节点6380:src/redis‐server redis_6380.conf
(5)连接从节点:src/redis‐cli ‐p 6380
(6)停止节点: src/redis‐cli ‐p 6380 shutdown
注:从节点设置了只读(replica‐read‐only yes),所以不能进行数据的写入;
参照上面的搭建,可以搭建一个 6381 的redis从节点;
2、Redis 的主从工作原理
如果你为master配置了一个slave,不管这个slave是否是第一次连接上Master,slave都会发送一个SYNC命令(redis2.8版本之前的命令)给master请求复制数据。
master收到SYNC命令后,会在后台进行数据持久化通过bgsave生成最新的rdb快照文件,持久化期间,master会继续接收客户端的请求,它会把这些可能修改数据集的请求缓存在内存中。
当持久化进行完毕以后,master会把这份rdb文件数据集发送给slave,slave会把接收到的数据保存到磁盘上,然后再加载到内存中。
然后,master再将之前缓存在内存中的命令发送给slave。
可以通过 telnet 自己尝试一下。在Redis服务器工作时连接到Redis端口,发送SYNC命令,会看到一个批量的传输,并且主服务器接收的每一个命令都会通过telnet会话重新发送一遍。
当master与slave之间的连接由于某些原因而断开时,slave能够自动重连Master。如果master收到了多个slave并发连接请求,它只会进行一次持久化,而不是一个连接一次,然后再把这一份持久化的数据发送给多个并发连接的slave。
当master和slave断开重连后,一般都会对整份数据进行复制。但从redis2.8版本开始,master和slave断开重连后支持部分复制。
数据的全量复制
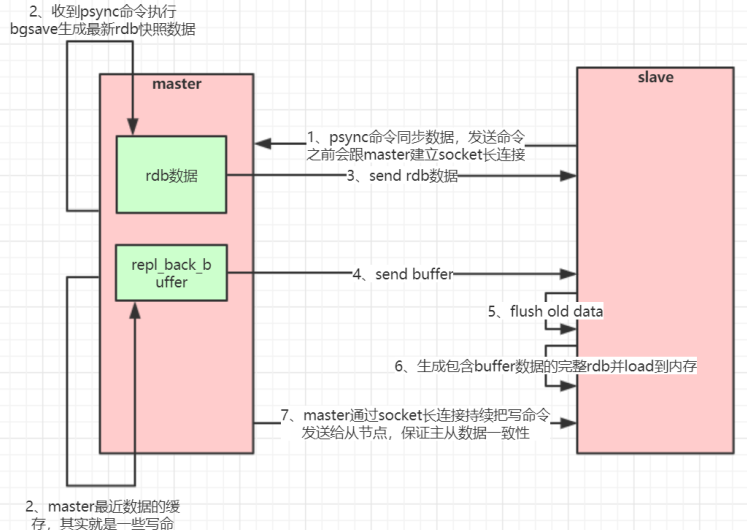
Redis通过psync命令进行全量复制的过程如下:
(1)从节点判断无法进行部分复制,向主节点发送全量复制的请求;或从节点发送部分复制的请求,但主节点判断无法进行部分复制;具体判断过程需要在讲述了部分复制原理后再介绍。
(2)主节点收到全量复制的命令后,执行 bgsave,在后台生成RDB文件,并使用一个缓冲区(称为复制缓冲区)记录从现在开始执行的所有写命令;
(3)主节点的 bgsave 执行完成后,将RDB文件发送给从节点;
(4)主节点将前述复制缓冲区中的所有写命令发送给从节点;
(5)从节点首先清除自己的旧数据;
(6)生成含有复制缓冲区数据的完整 RDB文件,并将数据加载到内存中;
(7)如果从节点开启了AOF,则会触发bgrewriteaof的执行,从而保证AOF文件更新至主节点的最新状态;

数据的部分复制:
从2.8版本开始,slave与master能够在网络连接断开重连后只进行部分数据复制。master会在其内存中创建一个复制数据用的缓存队列(默认大小为1M),缓存最近一段时间的数据,master和它所有的slave都维护了复制的数据的偏移量offset和master的进程id,因此,当网络连接断开后,slave会请求master继续进行未完成的复制,从所记录的数据下标开始。如果master进程id变化了,或者从节点数据下标offset太旧,已经不在master的缓存队列里了,那么将会进行一次全量数据的复制。
Redis通过psync命令进行部分复制的过程如下:
(1)slave会向 master发送 psync命名,并将最新数据的偏移量 offset 发送给 master;
(2)master 将接收的 slave的offset 和 master的缓存队列的数据比较:
- 若 slave的offset 偏移量在master的缓冲队列中,则 master会将缓存队列中从 slave的offset 之后的数据一次性同步给 slave;
- 若 slave的offset偏移量不在master的缓冲队列中了,则会去全量同步数据;

3、Jedis连接代码
3.1 maven坐标
<dependency>
    <groupId>redis.clients</groupId>
    <artifactId>jedis</artifactId>
    <version>2.9.0</version>
 </dependency>
3.2 java代码
public class JedisSingleTest {

    public static void main(String[] args) {

        JedisPoolConfig jedisPoolConfig = new JedisPoolConfig();
        jedisPoolConfig.setMaxTotal(20);
        jedisPoolConfig.setMaxIdle(10);
        jedisPoolConfig.setMinIdle(5);

        //建立连接; timeout,这里既是连接超时又是读写超时,从Jedis 2.8开始有区分connectionTimeout和soTimeout的构造函数
        JedisPool jedisPool = new JedisPool(jedisPoolConfig, "192.168.172.20", 6379,
                3000, null);

        //从redis连接池里拿出一个连接执行命令
        Jedis jedis = jedisPool.getResource();
        System.out.println(jedis.set("single", "zhangsan-s"));  // OK
        System.out.println(jedis.get("single"));                // zhangsan-s
    }
}
问题1:
(1)描述:客户端连接 redis 的时候报错
Exception in thread "main" redis.clients.jedis.exceptions.JedisDataException: DENIED Redis is running in protected mode because protected mode is enabled, no bind address was specified, no authentication password is requested to clients. In this mode connections are only accepted from the loopback interface. If you want to connect from external computers to Redis you may adopt one of the following solutions: 1) Just disable protected mode sending the command 'CONFIG SET protected-mode no' from the loopback interface by connecting to Redis from the same host the server is running, however MAKE SURE Redis is not publicly accessible from internet if you do so. Use CONFIG REWRITE to make this change permanent. 2) Alternatively you can just disable the protected mode by editing the Redis configuration file, and setting the protected mode option to 'no', and then restarting the server. 3) If you started the server manually just for testing, restart it with the '--protected-mode no' option. 4) Setup a bind address or an authentication password. NOTE: You only need to do one of the above things in order for the server to start accepting connections from the outside.
    at redis.clients.jedis.Protocol.processError(Protocol.java:127)
    at redis.clients.jedis.Protocol.process(Protocol.java:161)
    at redis.clients.jedis.Protocol.read(Protocol.java:215)
    at redis.clients.jedis.Connection.readProtocolWithCheckingBroken(Connection.java:340)
    at redis.clients.jedis.Connection.getStatusCodeReply(Connection.java:239)
    at redis.clients.jedis.Jedis.set(Jedis.java:121)
    at com.yufeng.JedisSingleTest.main(JedisSingleTest.java:22)
(2)解决方法:
(1)修改redis服务器的配置文件; vim redis.conf
<a> 注释以下绑定的主机地址; # bind 127.0.0.1
<b> 修改 protected-mode 为 no; protected-mode no
(2)重启redis服务:
src/redis-cli shutdown
src/redis-server redis.conf
二、Redis哨兵高可用架构

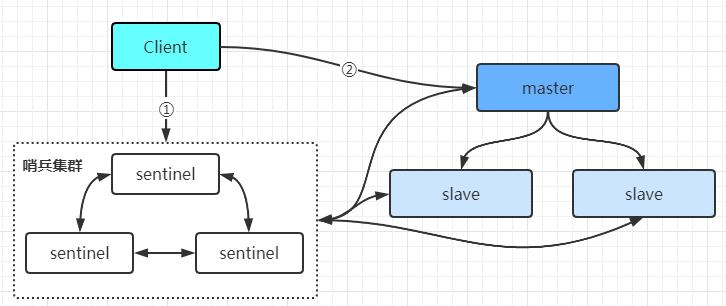
sentinel哨兵是特殊的redis服务,不提供读写服务,主要用来监控redis实例节点。
哨兵架构下client端第一次从哨兵找出redis的主节点,后续就直接访问redis的主节点,不会每次都通过sentinel代理访问redis的主节点,当redis的主节点发生变化,哨兵会第一时间感知到,并且将新的redis主节点通知给client端(这里面redis的client端一般都实现了订阅功能,订阅sentinel发布的节点变动消息)
Redis哨兵架构搭建
1、复制一份复制一份sentinel.conf文件;cp sentinel.conf sentinel-26379.conf
2、修改复制的配置文件; vim sentinel-26379.conf
port 26379
daemonize yes
pidfile "/var/run/redis-sentinel-26379.pid"
logfile "26379.log"
dir /usr1/redis/redis-5.0.3/data

# sentinel monitor <master‐name> <ip> <redis‐port> <quorum>
# quorum是一个数字,指明当有多少个sentinel认为一个master失效时(值一般为:sentinel总数/2 +1),master才算真正失效
sentinel monitor mymaster 192.168.0.60 6379 2
3、启动 sentinel 哨兵实例:src/redis-sentinel sentinel-26379.conf
4、查看 sentinel 的 info 信息
src/redis-cli -p 26379
127.0.0.1:26379>info sentinel
可以看到Sentinel的info里已经识别出了redis的主从。
5、再配置两个sentinel,端口 26380 和 26381,注意上述配置文件里的对应数字都要修改 (都从sentinel.conf 文件复制)。

Redis的哨兵架构作用
1、若redis的主节点挂了,客户端会重新连接新的主节点吗?
在Redis的主节点挂了之后,sentinel 会选举某个新的 slave 节点作为 master 节点;新的master选举出来后,哨兵会把消息发布出去,客户端实际上是实现了一个消息监听机制,客户端会自动感知到新的master,就会连接新的主节点;
哨兵选举出新的master节点之后,sentinel 会将对应的节点的配置文件也做修改; 删除掉 replicaof 的同步数据的配置;
哨兵的Jedis连接代码
public class JedisSentinelTest {

    public static void main(String[] args) {
        JedisPoolConfig jedisPoolConfig = new JedisPoolConfig();
        jedisPoolConfig.setMaxTotal(20);
        jedisPoolConfig.setMaxIdle(10);
        jedisPoolConfig.setMinIdle(5);

        Set<String> sentinels = new HashSet<>();
        sentinels.add(new HostAndPort("192.168.172.20", 26379).toString());
        sentinels.add(new HostAndPort("192.168.172.20", 26380).toString());
        sentinels.add(new HostAndPort("192.168.172.20", 26381).toString());

        String masterName = "mymaster";
        JedisSentinelPool jedisSentinelPool = new JedisSentinelPool(masterName, sentinels,
                jedisPoolConfig, 3000, null);

        Jedis jedis = jedisSentinelPool.getResource();
        jedis.set("zhangsan-sen", "sentinel-1");
        System.out.println(jedis.get("zhangsan-sen"));
        if(null != jedis) {
            jedis.close();
        }
    }
}


 浙公网安备 33010602011771号