
vue之组件
目录
一:组件化开发基础
1.组件是什么?有什么用?
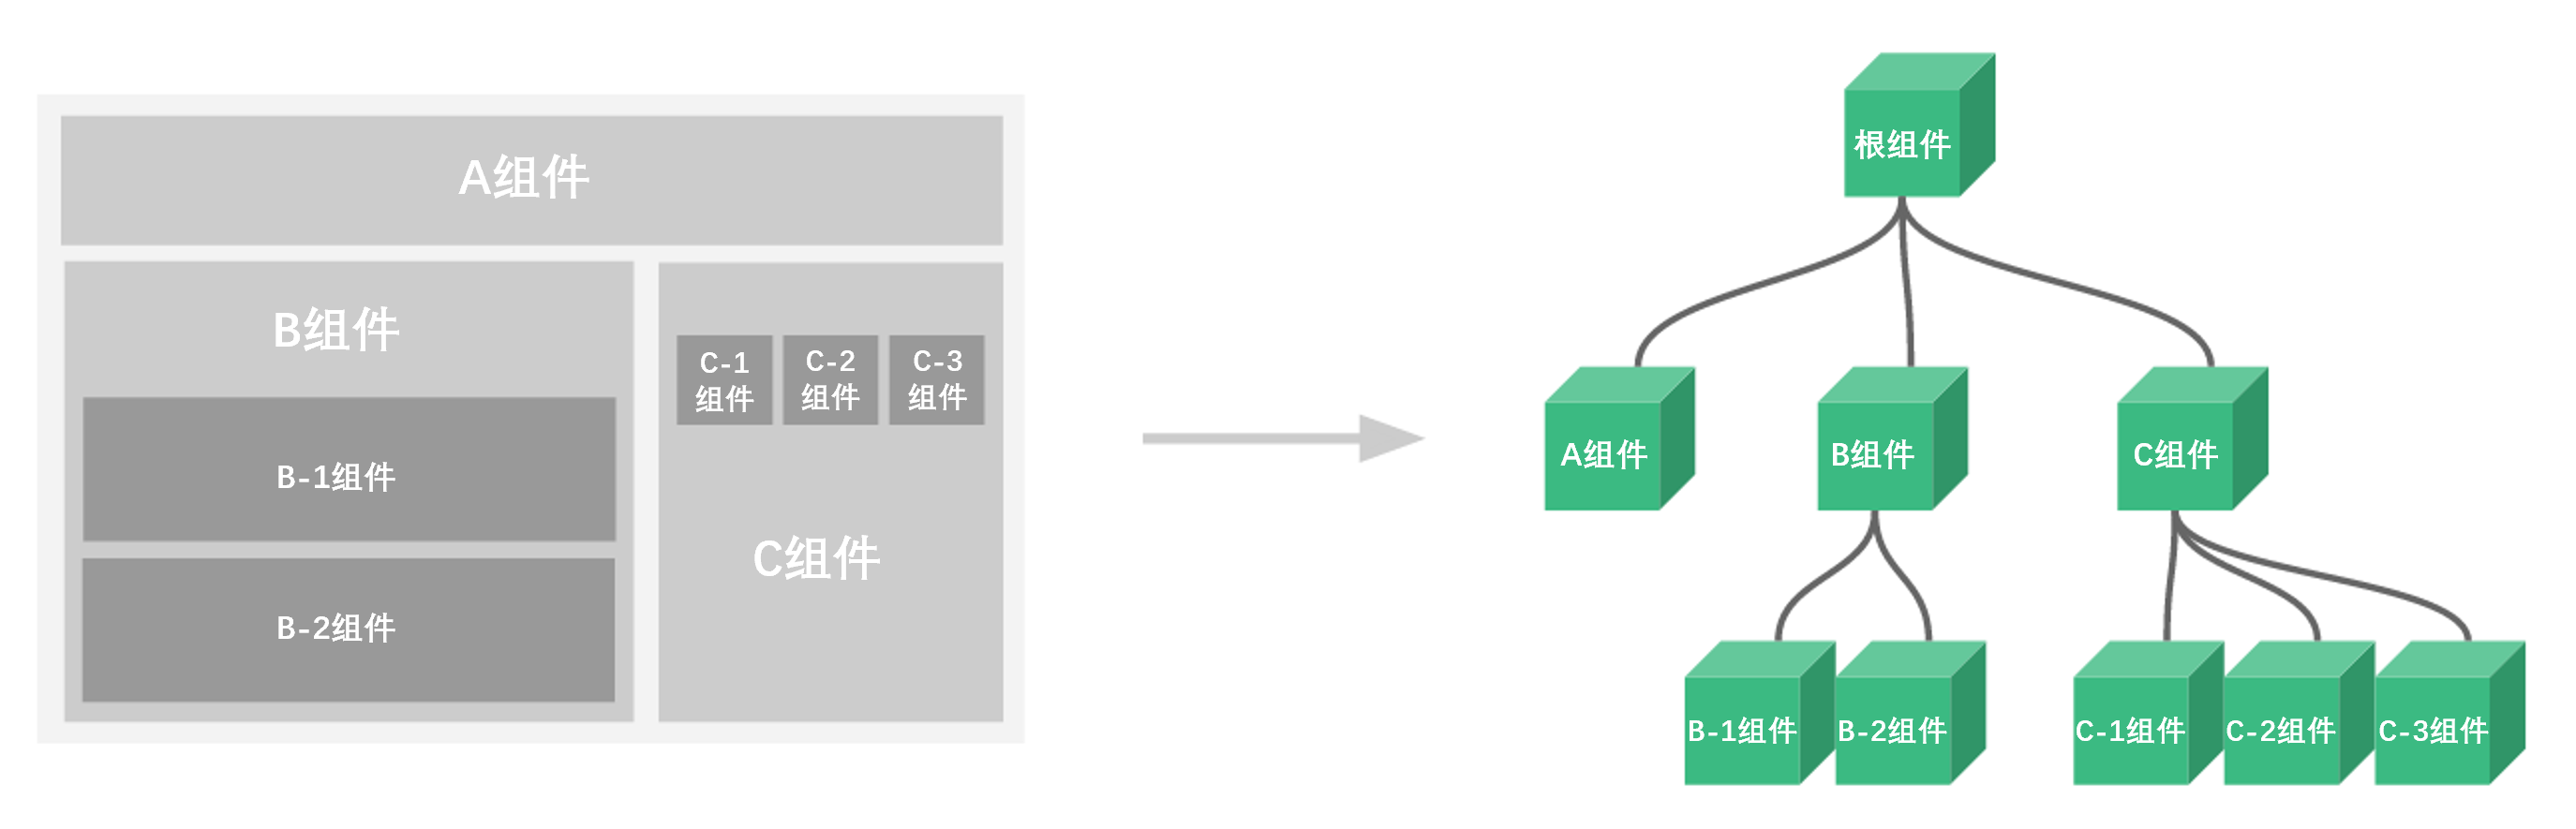
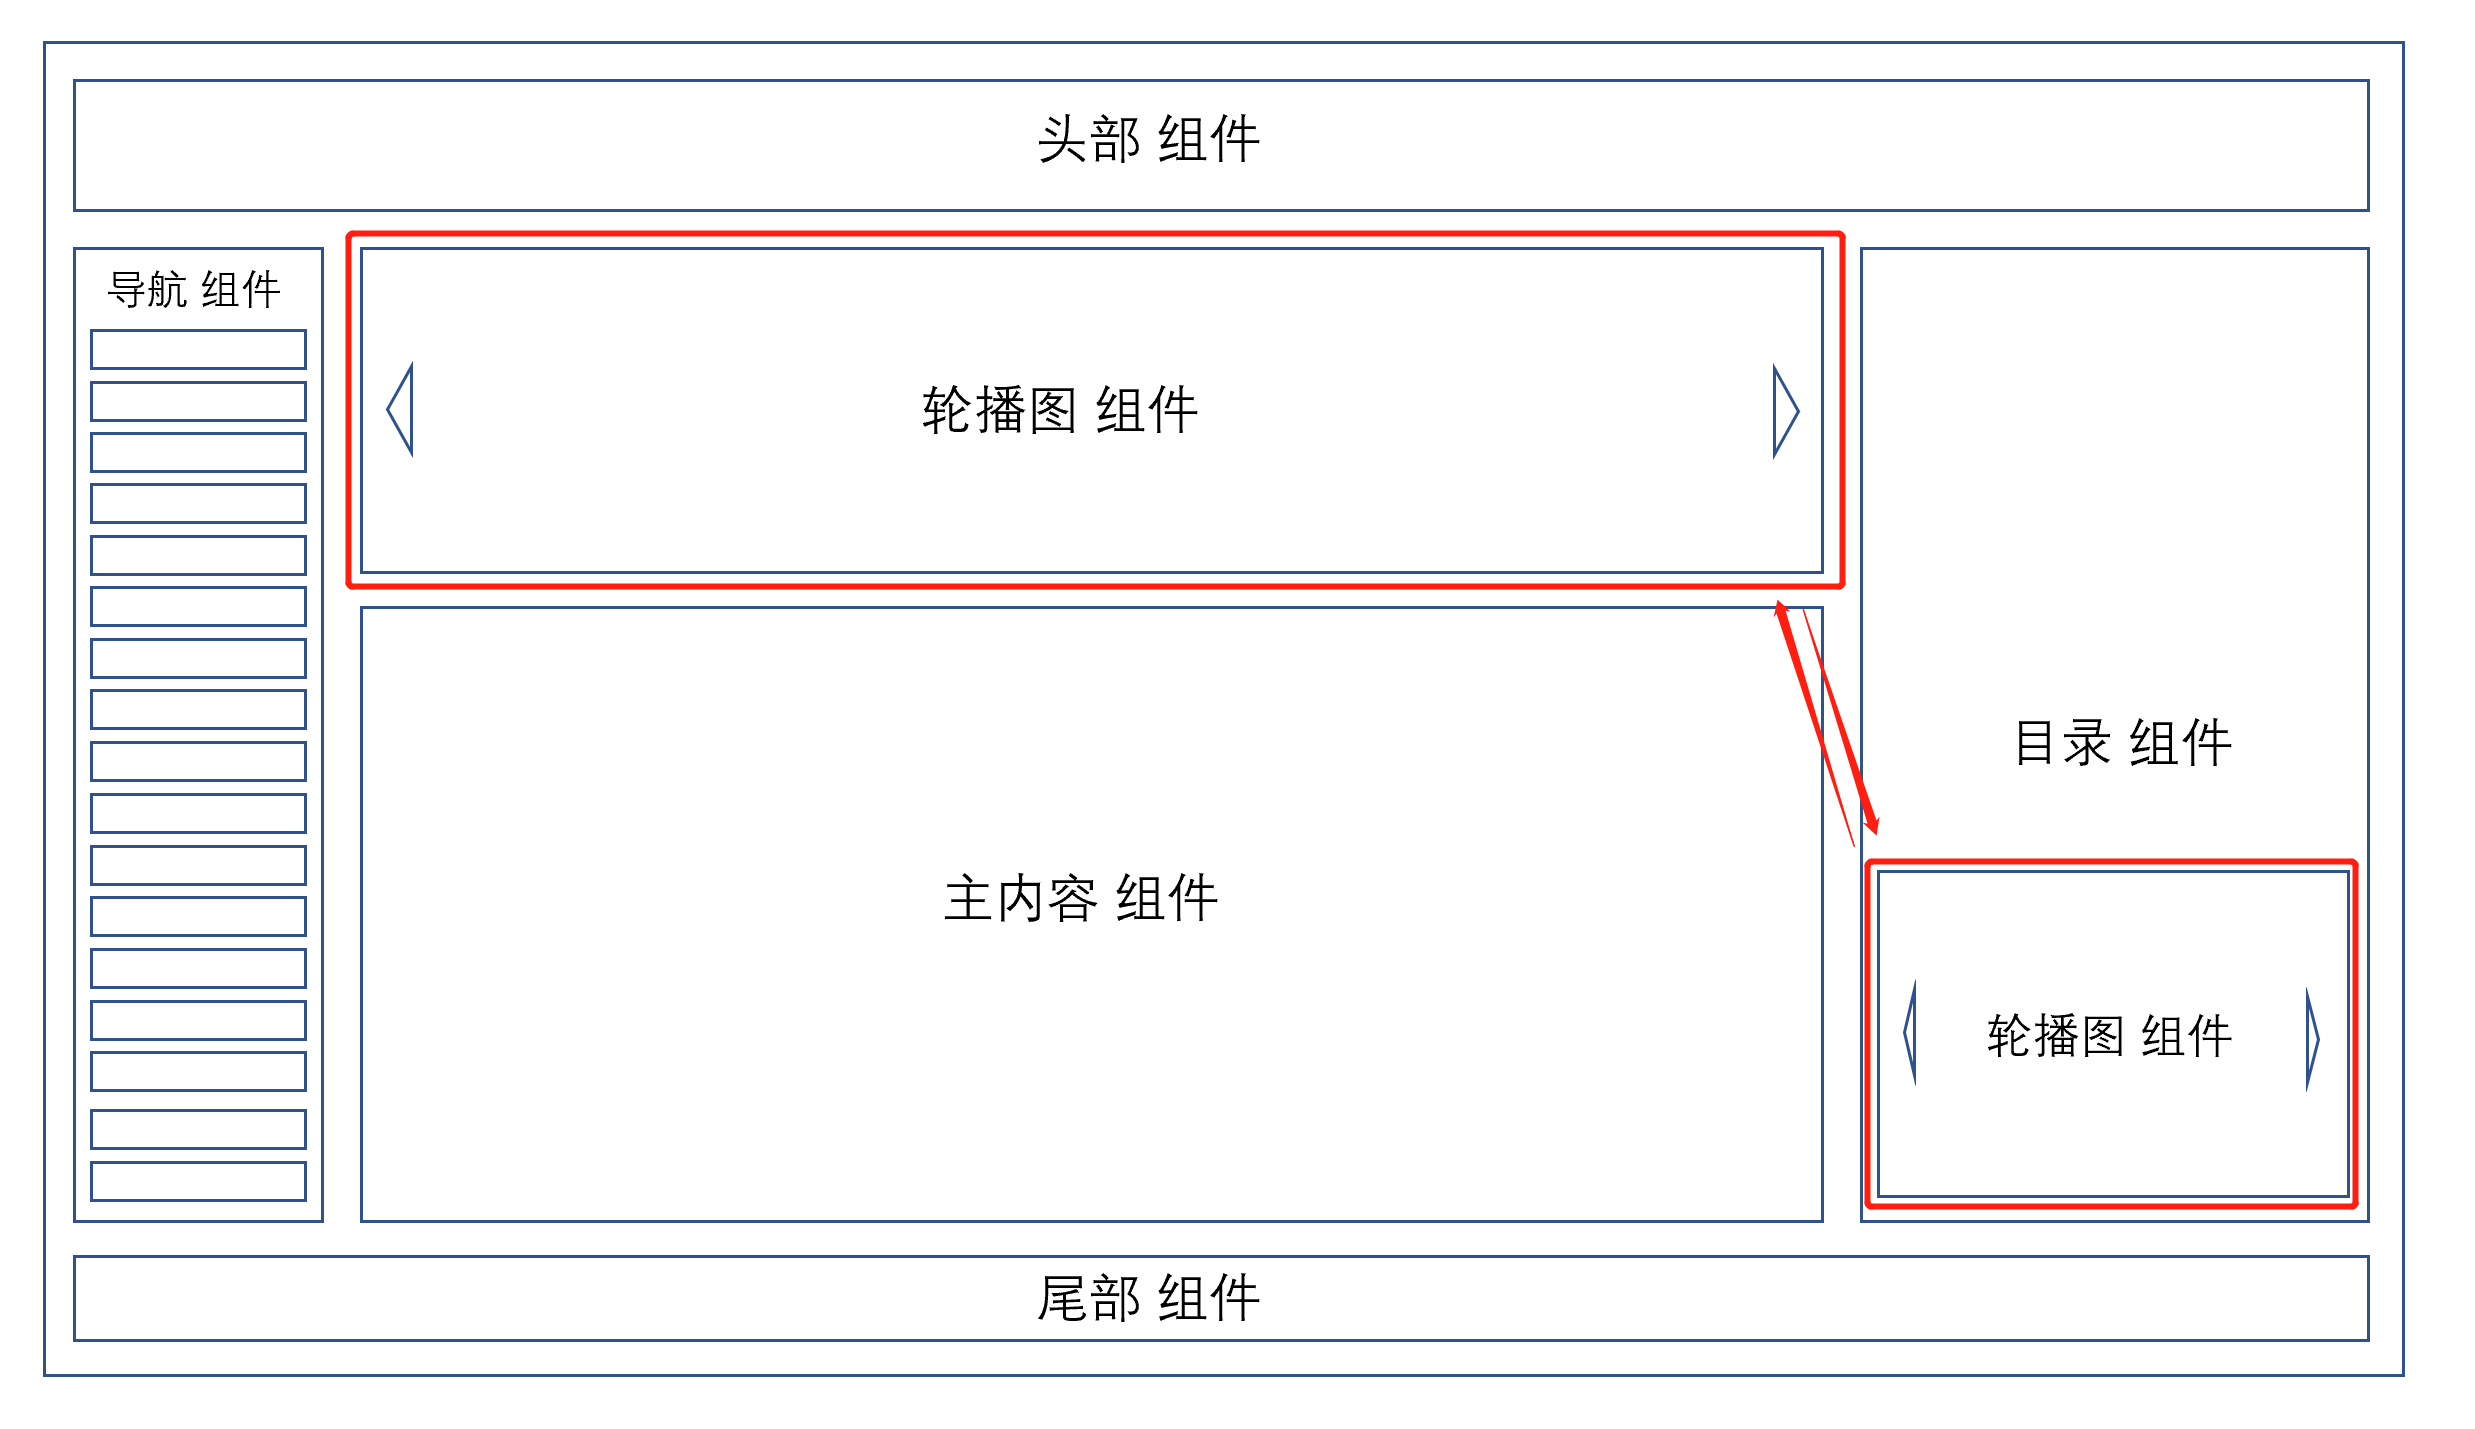
组件就是:扩展 HTML 元素,封装可重用的代码,目的是复用
例如:有一个轮播图,可以在很多页面中使用,一个轮播有js,css,html
组件把js,css,html放到一起,有逻辑,有样式,有html
组件的分类
- 1 全局组件是使用Vue.component定义的,可以在全局任意组件中使用
- 2 局部组件是定义在某个组件内的:components,只能用在当前组件中
- 3 组件可以嵌套定义和使用
- 扩展:elementui,提供给咱们很多全局组件
二:组件的注册方式
1. 定义全局组件
<!DOCTYPE html> <html lang="en"> <head> <meta charset="UTF-8"> <script src="./js/vue.js"></script> <title>Title</title> </head> <body> <div id="app"> <div @click="handleClick">我是根部组件</div> <yzk></yzk> <ul> <li v-for="i in 4"> <yzk></yzk> </li> </ul> </div> </body> <script> Vue.component('yzk',{ template:` <div> <div style="background: rgba(24,241,184,0.7); padding: 5px;" @click="handleClick">我是头部组件</div> <div v-if="isShow">显示消失</div> </div> `, methods:{ handleClick(){ console.log('我被点击了') this.isShow = !this.isShow } }, data(){ return{ isShow:true } } }) var vm = new Vue({ el:'#app', data:{ isShow: true }, methods: { handleClick() { console.log('我被点击了 我是根组件') } } }) </script> </html>
2.局部组件
① 局部组件 放在 Vue实例(根组件) 中
<!DOCTYPE html> <html lang="en"> <head> <meta charset="UTF-8"> <script src="./js/vue.js"></script> <title>Title</title> </head> <body> <div id="box" style="max-width: 300px"> <local></local> <global></global> </div> </body> <script> // 创建1个组件对象(全局组件) Vue.component('global', { template: ` <div> <div style="background: rgba(255,104,104,0.7); padding: 5px 10px; border-radius: 5px;margin: 5px 0;"> 我是全局组件 </div> </div> `, }) let vm = new Vue({ el: '#box', data: {}, // 创建1个组件对象(局部组件) components: { local: { // local 组件名 template: ` <div> <div style="background: rgba(104,255,104,0.7); padding: 5px 10px; border-radius: 5px; margin: 3px 50px 3px 0;" @click="handleClick">我是局部组件 </div> </div> `, // 组件的模板 methods: { handleClick() { console.log('我被点击了') } } } } }) </script> </html>

② 局部组件 放在 全局组件 中
<!DOCTYPE html> <html lang="en"> <head> <meta charset="UTF-8"> <script src="./js/vue.js"></script> <title>Title</title> </head> <body> <div id="box" style="max-width: 300px"> <ul> <li v-for="i in 3"> <global></global> </li> </ul> </div> </body> <script> // 创建1个组件对象(全局组件) Vue.component('global', { template: ` <div> <div style="background: rgba(255,104,104,0.7); padding: 5px 10px; border-radius: 5px;margin: 5px 0;"> 我是全局的组件 </div> <local></local> <local></local> <br> </div> `, // 创建1个组件对象(局部组件) components: { local: { template: ` <div> <div style="background: rgba(104,255,104,0.7); padding: 5px 10px; border-radius: 5px; margin: 3px 50px 3px 0;">我是局部组件</div> </div> `, } } }) let vm = new Vue({ el: '#box', }) </script> </html>

注意点:
- 定义的组件(body中的位置)必须要放在Vue实例中
- 局部组件 必须放在 全局组件/根组件 中,无法单独使用
- 定义的组件必须在Vue实例的上方
三:组件通信
1.父传子
父组件被数据传递给子组件
-自定义属性
-1 在子组件中自定义属性,使用属性指令绑定父组件的变量
-2 在子组件中,使用props接受 ['属性名','属性名2']
-3 在子组件中,使用属性名即可
<!DOCTYPE html> <html lang="en"> <head> <meta charset="UTF-8"> <script src="./js/vue.js"></script> <title>Title</title> </head> <body> <div id="box"> <!-- myName是自定义属性 --> <!-- <global :myname="name" :myage="19" :isshow="'false'"></global>--> <global :my_name="name" :is_show="is_show"></global> <global :my_name="name" :is_show="false"></global> </div> </body> <script> // 创建1个组件对象(全局组件/子组件) Vue.component('global', { template: ` <div> <div style="background: rgba(255,104,104,0.7); padding: 5px;">我是子组件:{{is_show}}</div> <span>{{my_name}}</span> </div> `, props: { my_name: String, is_show: Boolean } }) // 父组件 let vm = new Vue({ el: '#box', data: { name: 'darker', is_show: true }, }) </script> </body> </html>

2.子传父(通过事件
<!DOCTYPE html> <html lang="en"> <head> <meta charset="UTF-8"> <script src="./js/vue.js"></script> <title>Title</title> </head> <body> <div id="box"> <global @my_event="handleClick"></global> </div> </body> <script> // 创建1个组件对象(全局组件/子组件) Vue.component('global', { template: ` <div> <div style="background: rgba(255,104,104,0.7); padding: 5px;">全局组件/子组件</div> <button @click="handleNav">点我</button> </div> `, data() { return { name: 'Darker' } }, methods: { handleNav() { console.log('我是子组件的函数') // let obj = { // a:666,b:777,c:this.name // } this.$emit('my_event',111,222,333 ) } } }) // 父组件 let vm = new Vue({ el: '#box', data: {}, methods: { handleClick(a,b,c) { console.log('我是父组件的函数') console.log(a) console.log(b) console.log(c) } } }) </script> </body> </html>

小案例
<!DOCTYPE html> <html lang="en"> <head> <meta charset="UTF-8"> <title>Title</title> <script src="./js/vue.js"></script> </head> <body> <div id="app"> <h1>组件的使用</h1> 接受到的子组件输入的内容是:{{username}} <hr> <lqz @myevent="handelEvent"></lqz> <hr> </div> </body> <script> // 2 var lqz = { template: ` <div> <h1>我是局部组件</h1> <img :src="url" alt="" height="400px"> <br> <input type="text" v-model="username"> <button @click="handleSend">传递到父组件</button> </div>`, data() { return { url: 'http://pic.imeitou.com/uploads/allimg/230331/7-230331110I0.jpg', username: '' } }, methods: { handleSend() { // 传递给父组件 this.$emit('myevent', this.username) } } } // 根组件 var vm = new Vue({ el: '#app', data: { username: '' }, methods: { handelEvent(username) { console.log('父组件自定义事件的event执行了') console.log(username) this.username = username } }, // 局部组件是定义在某个组件内,可以定义多个,只能在它父组件中使用,不能到别的地方使用 components: { lqz, } }) </script> </html>
四、ref属性
ref属性,vue提供的,写在标签上
可以写在普通标签:在vue中使用 this.$refs.名字 拿到dom对象,可以原生操作
可以写在组件上:在vue中使用 this.$refs.名字 拿到[组件]对象,组件属性,方法直接使用即可
<!DOCTYPE html> <html lang="en"> <head> <meta charset="UTF-8"> <title>Title</title> <script src="./js/vue.js"></script> </head> <body> <div id="app"> <h1>ref属性放在普通标签上</h1> <input type="text" v-model="username" ref="myinput"> <br> <img src="http://pic.imeitou.com/uploads/allimg/230331/7-230331110I0.jpg" alt="" height="300px" ref="myimg"> <h1>ref放在组件上</h1> <hr> <lqz ref="mylqz"></lqz> <hr> <button @click="handleClick">点我执行函数</button> <br> {{username}} </div> </body> <script> var vm = new Vue({ el: '#app', data: { username: '' }, methods: { handleClick() { console.log(this.$refs) // 通过key,取到标签,拿到原生dom,通过dom操作,控制标签 // this.$refs.myinput.value = 'lqz' // this.$refs.myimg.src='https://img2.woyaogexing.com/2021/09/22/3c686eb61fe34696840c478584b73d36!400x400.jpeg' // 放在组件上---》现在在父组件中,能拿到子组件对象,对象中的属性和方法直接用即可 console.log(this.$refs.mylqz) // this.$refs.mylqz.title = 'sb' // this.username=this.$refs.mylqz.title this.$refs.mylqz.handleBack() } }, components: { lqz: { template: ` <div> <button @click="handleBack">后退</button> {{ title }} <button>前进</button> </div>`, data() { return { title: "首页" } }, methods: { handleBack() { alert('后退了') } } } } }) </script> </html>
五、动态组件
1.基本使用
<!DOCTYPE html> <html lang="en"> <head> <meta charset="UTF-8"> <script src="./js/vue.js"></script> <title>Title</title> </head> <body> <div id="app"> <ul> <li> <button @click="who='child1'">首页</button> </li> <li> <button @click="who='child2'">订单</button> </li> <li> <button @click="who='child3'">商品</button> </li> </ul> <component :is="who"></component> </div> </body> <script> var vm = new Vue({ el: '#app', data: { who: 'child1' }, components:{child1: { template: ` <div> <span style="border-bottom: 5px solid rgba(255,104,104,0.7)">我是首页</span> </div> `, }, child2: { template: ` <div> <span style="border-bottom: 5px solid rgba(255,104,255,0.7)">我是订单</span> </div> `, }, child3: { template: ` <div> <span style="border-bottom: 5px solid rgba(104,255,104,0.7)">我是商品</span> </div> `, }} }) </script> </html>

2、keep-alive的使用
keep-alive可以让输入框内有的内容一致保持,不会因为切换而重置
<!DOCTYPE html> <html lang="en"> <head> <meta charset="UTF-8"> <script src="./js/vue.js"></script> <title>Title</title> </head> <body> <div id="app"> <ul> <li> <button @click="who='child1'">首页</button> </li> <li> <button @click="who='child2'">订单</button> </li> <li> <button @click="who='child3'">商品</button> </li> </ul> <keep-alive> <component :is="who"></component> </keep-alive> </div> </body> <script> let child1 = { template: ` <div> <span style="border-bottom: 5px solid rgba(255,104,104,0.7)">我是首页</span> <input type="text"> </div> `, } let child2 = { template: ` <div> <span style="border-bottom: 5px solid rgba(255,104,255,0.7)">我是订单</span> <input type="text"> </div> `, } let child3 = { template: ` <div> <span style="border-bottom: 5px solid rgba(104,255,104,0.7)">我是商品</span> <input type="text"> </div> `, } var vm = new Vue({ el: '#app', data: { who: 'child1' }, components: {child1,child2,child3} }) </script> </html>
六、插槽
一般情况下,编写完1个组件之后,组件的内容都是写死的,需要加数据 只能去组件中修改,扩展性很差
然后就出现了插槽这个概念,只需在组件中添加,就可以在body的组件标签中添加内容
使用步骤:
#1 在组件的html的任意位置,放个标签 <slot></slot> # 2 后期在父组件使用该组件时 <lqz> 放内容 </lqz> # 3 放的内容,就会被渲染到slot标签中
基本使用:
<!DOCTYPE html> <html lang="en"> <head> <meta charset="UTF-8"> <script src="./js/vue.js"></script> <title>Title</title> </head> <body> <div id="box"> <yzk> <h6>Hello World</h6> </yzk> </div> </body> <script> yzk= { template: ` <div> <slot></slot> <span style="border-bottom: 5px solid rgba(255,104,104,0.7)">我是组件的原内容</span> <slot></slot> </div> `, } let vm = new Vue({ el: '#box', data: { who: 'child1' }, components: { yzk } }) </script> </body> </html>

小案例
<!DOCTYPE html> <html lang="en"> <head> <meta charset="UTF-8"> <script src="./js/vue.js"></script> <title>Title</title> </head> <body> <div id="box"> <!--通过插槽实现在一个组件中控制另一个组件的显示隐藏--> <child1> <button @click="isShow=!isShow">显示/隐藏组件2</button> </child1> <child2 v-if="isShow"></child2> </div> </body> <script> Vue.component('child1', { template: `<div> 组件1 <slot></slot> </div>`, }) Vue.component('child2', { template: `<div> <img src="https://img1.baidu.com/it/u=824759385,522304088&fm=253&fmt=auto&app=138&f=JPEG?w=500&h=650" alt=""> </div>`, }) var vm = new Vue({ el: '#box', data: { isShow: true } }) </script> </body> </html>

具名插槽
<!DOCTYPE html> <html lang="en"> <head> <meta charset="UTF-8"> <script src="./js/vue.js"></script> <title>Title</title> </head> <body> <div id="box"> <!-- 具名插槽,把p标签给a插槽,div标签给b插槽--> <child> <p slot="a">我是具名插槽a插入的内容</p> <div slot="b">我是具名插槽b插入的内容</div> </child> </div> <script> Vue.component('child', { template: `<div> <slot name="b"></slot> <hr> <span style="border-bottom: 5px solid rgba(255,104,104,0.7)">我是组件的原内容</span> <hr> <slot name="a"></slot> </div>`, }) var vm = new Vue({ el: '#box', data: {} }) </script> </body> </html>

本文作者:Python学习之旅
本文链接:https://www.cnblogs.com/yuezongke/p/17461497.html
版权声明:本作品采用知识共享署名-非商业性使用-禁止演绎 2.5 中国大陆许可协议进行许可。
分类:
Vue


【推荐】国内首个AI IDE,深度理解中文开发场景,立即下载体验Trae
【推荐】编程新体验,更懂你的AI,立即体验豆包MarsCode编程助手
【推荐】抖音旗下AI助手豆包,你的智能百科全书,全免费不限次数
【推荐】轻量又高性能的 SSH 工具 IShell:AI 加持,快人一步