SpringCloud详解 第三章 服务容错保护 Hystrix(五)
本章介绍Hystrix请求合并
一、通过继承HystrixCollapser实现请求合并器
微服务架构中的依赖通常通过远程调用实现, 而远程调用中最常见的问题就是通信消耗与连接数占用。 在高并发的情况之下, 因通信次数的增加, 总的通信时间消耗将会变得不那么理想。 同时, 因为依赖服务的线程池资源有限,将出现排队等待与响应延迟的清况。为了优化这两个问题, Hystrix 提供了 HystrixCollapser 来实现请求的合并,以减少通信消耗和线程数的占用。
HystrixCollapser 实现 了在 HystrixCommand 之前放置 一 个合并处理器, 将处于一个很短的时间窗(默认 10 毫秒)内对同 一 依赖服务的多个请求进行整合并以批量方式发起请 求 的功能(服 务提供方也需 要 提供相应的批 量实 现 接口)。 通 过HystrixCollapser 的封装, 开发者不需要关注线程合并的细节过程, 只需关注批量化服务和处理。 下面我们从 HystrixCollapser 的使用实例 中对其合并请求的过程 一 探究竟。
public abstract class HystrixCollapser<BatchReturnType, ResponseType, RequestArgumentType> implements HystrixExecutable<ResponseType>, HystrixObservable<ResponseType> {
  //BatchReturnType: 合并后批量请求的返回类型。
  // ResponseType: 单个请求返回的类型。
  //RequestArgumentType: 请求参数类型。
  //该函数用来定义获取请求参数的方法。
  public abstract RequestArgumentType getRequestArgument();
  //合并请求产生批量命令的具体实现方法。
  protected abstract HystrixCommand<BatchReturnType> createCommand(Collection<CollapsedRequest<ResponseType, RequestArgumentType>> requests);
  //批量命令结果返回后 的处理, 这里需要实现将批量结果拆分并传递给合并前的各个原子请求命令的逻辑。
  protected abstract void mapResponseToRequests(BatchReturnType batchResponse, Collection<CollapsedRequest<ResponseType, RequestArgumentType>> requests);
}
接下来, 我们通过 一 个简单的示例来直观理解实现请求合并的过程。
首先在我们原来的服务提供者 cloud-provider工程中加入一个批量获取的接口,那么现在两个接口如下:
@GetMapping("/hello")
public String helloEureka(){
  return  "Hello Eureka Provider1";
}

@GetMapping("/hi")
public List<String> hi(String ids) {
  //ids是 , 隔开的字符串
  String[] split = ids.split(",");
  ArrayList<String> objects = new ArrayList<String>();
  for(String s:split){
    objects.add("hi! wuzz:ID: " + s);
  }
  return objects;
}
创建一个独立的消费者服务,用于通过 RestTemplate 实现了简单的调用
@Service
public class HelloCollapseService {

    @Autowired
    private RestTemplate restTemplate;

    private static final String REST_URL_PREFIX = "http://cloud-provider";

    //同步
    public String hello(String id) {
        return restTemplate.getForObject(REST_URL_PREFIX + "/hello/{1}", String.class, id);
    }

    //同步
    public List<String> hi(List<String> ids) {
        String[] forObject = restTemplate.getForObject(REST_URL_PREFIX + "/hi?ids={1}", String[].class, StringUtils.join(ids, ","));
        return Arrays.asList(forObject);
    }
}
接着, 我们实现将短时间内多个获取单一对象的请求命令进行合并。第 一 步,为请求合并的实现准备 一 个批量请求命令的实现, 具体如下:
//为请求合并的实现准备 一 个批量请求命令的实现
//批量请求命令实际上就是 一 个简单的HystrixCommand实现
public class HelloBatchCommand extends HystrixCommand<List<String>> {

    private HelloCollapseService helloCollapseService;

    private List<String> ids;

    public HelloBatchCommand(HelloCollapseService helloCollapseService, List<String> ids) {
        super(Setter.withGroupKey(HystrixCommandGroupKey.Factory.asKey("helloBatchCommand")));
        this.helloCollapseService = helloCollapseService;
        this.ids = ids;
    }

    @Override
    protected List<String> run() {
        //这段打印用域等等测试,查看是否是调用这个接口去服务获取数据的
        System.out.println("finaAll request:---------" + ids + "Thread.currentThread().getName():-------" + Thread.currentThread().getName());
        return helloCollapseService.hi(ids);
    }

    @Override
    protected List<String> getFallback() {
        List<String> users = new ArrayList<String>();
        users.add("失败者");
        return new ArrayList<String>(users);
    }
}
批量请求命令实际上就是 一 个简单的HystrixCommand实现,从上面的实现中可以看到它通过调用 helloCollapseService.hi(ids) 来批量获取结果。
第二步, 通过继承HystrixCollapser实现请求合并器,关于这个类的定义以及需要实现的方法已经在上面说明:
//通过继承HystrixCollapser实现请求合并器
public class HelloCollapseCommand extends HystrixCollapser<List<String>, String, String> {

    private HelloCollapseService helloCollapseService;

    private String id;

    public HelloCollapseCommand(HelloCollapseService helloCollapseService, String id) {
        super(Setter.withCollapserKey(HystrixCollapserKey.Factory.asKey("helloCollapseCommand"))
                .andCollapserPropertiesDefaults(
                        HystrixCollapserProperties.Setter()
                                .withTimerDelayInMilliseconds(100)));
        this.helloCollapseService = helloCollapseService;
        this.id = id;
    }

    @Override
    public String getRequestArgument() {
        return id;
    }

    @Override
    protected HystrixCommand<List<String>> createCommand(Collection<CollapsedRequest<String, String>> collapsedRequests) {
        List<String> userids = new ArrayList<>(collapsedRequests.size());
        userids.addAll(collapsedRequests.stream().map(CollapsedRequest::getArgument).collect(Collectors.toList()));
        return new HelloBatchCommand(helloCollapseService, userids);
    }

    @Override
    protected void mapResponseToRequests(List<String> batchResponse, Collection<CollapsedRequest<String, String>> collapsedRequests) {
        int count = 0;
        for (CollapsedRequest<String, String> collapsedRequest : collapsedRequests) {
            String user
                    = batchResponse.get(count++);
            collapsedRequest.setResponse(user);
        }
    }
}
最后创建测试类,从以下这个测试方法可以看出,我们想要的结果是一共发送了两次请求,一次是6、5、9作为批量的请求。由于程序sleep了 3秒,而我们设置的时间间隔为1秒,所以这里8这个ID的请求会单独发送:
@RequestMapping(value = "/batchHello")
public List<String> batchHello() throws InterruptedException, ExecutionException {
        //需要开启HystrixRequest上下文,合并请求和缓存必须开启
        HystrixRequestContext context = HystrixRequestContext.initializeContext();
        List<String> result = new ArrayList<>();
        HelloCollapseCommand bc1 = new HelloCollapseCommand(helloCollapseService, "6");
        HelloCollapseCommand bc2 = new HelloCollapseCommand(helloCollapseService, "9");
        HelloCollapseCommand bc3 = new HelloCollapseCommand(helloCollapseService, "5");
        HelloCollapseCommand bc4 = new HelloCollapseCommand(helloCollapseService, "8");
        Future<String> q1 = bc1.queue();
        Future<String> q2 = bc2.queue();
        Future<String> q3 = bc3.queue();
        String result1 = q1.get();
        String result2 = q2.get();
        String result3 = q3.get();
        Thread.sleep(3000);
        Future<String> q4 = bc4.queue();
        String result4 = q4.get();

        return result;
}
启动服务调用 http://localhost:9001/batchHello ,然后查看控制台,可以看到结果是我们所预期的:

二、通过注解的方式实现请求合并
在原来的 HelloCollapseService 上做改动,增加find、findAll方法如下:
@Service
public class HelloCollapseService {

    @Autowired
    private RestTemplate restTemplate;

    private static final String REST_URL_PREFIX = "http://cloud-provider";

    //同步
    public String hello(String id) {
        return restTemplate.getForObject(REST_URL_PREFIX + "/hello/{1}", String.class, id);
    }

    //同步
    public List<String> hi(List<String> ids) {
        String[] forObject = restTemplate.getForObject(REST_URL_PREFIX + "/hi?ids={1}", String[].class, StringUtils.join(ids, ","));
        return Arrays.asList(forObject);
    }

    @HystrixCollapser(batchMethod = "findAll",
            collapserProperties = {@HystrixProperty(name = "timerDelayInMilliseconds", value = "100")})
    public Future<String> find(String id) {
        throw new RuntimeException("This method body should not be executed");
    }

    @HystrixCommand(fallbackMethod = "annotationBatchHelloBack")
    public List<String> findAll(List<String> ids) {
        System.out.println("Annotation---------" + ids + "Thread.currentThread().getName():" + Thread.currentThread().getName());
        String[] users = restTemplate.getForObject(REST_URL_PREFIX + "/hi?ids={1}", String[].class, StringUtils.join(ids, ","));
        return Arrays.asList(users);
    }

    public List<String> annotationBatchHelloBack(List<Long> ids) {
        return Arrays.asList("annotationBatchHelloBack Hystrix" +ids);
    }
}
增加测试方法:
@RequestMapping(value = "/annotationBatchHello")
public String find(String id) throws ExecutionException, InterruptedException {
        HystrixRequestContext context = HystrixRequestContext.initializeContext();
        Future<String> stringFuture = helloCollapseService.find(id);
        Future<String> stringFuture2 = helloCollapseService.find("6");
        return stringFuture.get()+"======"+stringFuture2.get();
}
这个时候我访问的路径变为 http://localhost:9001/annotationBatchHello?id=88 应该看到的结果是 88 +6 两个ID组成一个批量请求发送,如下图所示:

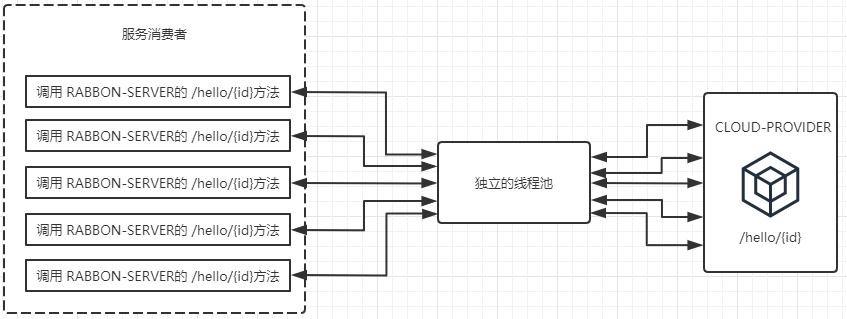
下图展示了在未使用HystrixCollapser请求合并器之前的线程使用情况。 可以看到, 当服务消费者同时对RIBBON-SERVER的 /hello/{id}接口发起了5个请求时, 会向该依赖服务的独立线程池中申请5个线程来完成各自的请求操作。

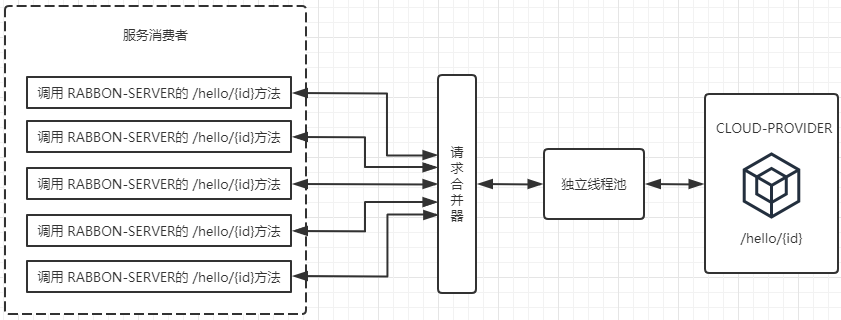
而在使用了HystrixCollapser请求合并器之后, 相同情况下的线程占用如下图所示。由于同一 时间发生的5个请求处于请求合并器的 一 个时间窗内,这些发向/hello/{id}接口的请求被请求合并器拦截下来, 并在合并器中进行组合, 然后将这些请求合并成 一 个请求发向 CLOUD-PROVIDER 的批量接口 /hi/{ids} 。在获取到批量请求结果之后,通过请求合并器再将批量结果拆分并分配给每个被合并的请求。 从图中我们可以看到, 通过使用请求合并器有效减少了对线程池中资源的占用。 所以在资源有效并且短时间内会产生高并发请求的时候, 为避免连接不够用而引起的延迟可以考虑使用请求合并器的方式来处理和优化。

请求合并的额外开销:
虽然通过请求合并可以减少请求的数量以缓解依赖服务线程池的资源, 但是在使用的时候也需要注意它所带来的额外开销: 用于请求合并的延迟时间窗会使得依赖服务的请求延迟增高。 比如, 某个请求不通过请求合并器访问的平均耗时为5ms, 请求合并的延迟时间窗为10ms (默认值), 那么当该请求设置了请求合并器之后, 最坏情况下(在延迟时间窗结束时才发起请求)该请求需要 15ms才能完成。由于请求合并器的延迟时间窗会带来额外开销, 所以我们是否使用请求合并器需要 根据依赖服务调用的实际情况来选择, 主要考虑下面两个方面。
- 请求命令本身的延迟。 如果依赖服务的请求命令本身是 一 个高延迟的命令, 那么可以使用请求合并器, 因为延迟时间窗的时间消耗显得微不足道了。
- 延迟时间窗内的并发量。 如果 一 个时间窗内只有1-2个请求, 那么这样的依赖服务不适合使用请求合并器。 这种情况不但不能提升系统性能, 反而会成为系统瓶颈,因为每个请求都需要多消耗 一 个时间窗才响应。 相反, 如果 一 个时间窗内具有很高的并发量, 并且服务提供方也实现了批量处理接口, 那么使用请求合并器可以有效减少网络连接数量并极大提升系统吞吐量, 此时延迟时间窗所增加的消耗就可以忽略不计了。


