这一篇比上一遍更形象一点,整合到一起看看还是不错的
SSM框架中使用Spring的@Transactional注解进行事务管理(详细说明)
原创出处:http://983836259.blog.51cto.com/7311475/1835807
一 介绍
在企业级应用中,保护数据的完整性是非常重要的一件事。因此不管应用的性能是多么的高、界面是多么的好看,如果在转账的过程中出现了意外导致用户的账号金额发生错误,那么这样的应用程序也是不可接受的
数据库的事务管理可以有效地保护数据的完整性(PS:关于数据库的事务管理基础可以参考我以前写过的这篇文章:http://www.zifangsky.cn/385.html),但是原生态的事务操作需要写不少的代码,无疑是非常麻烦的。在使用了Spring框架的应用中,我们可以使用@Transactional 注解方便地进行事务操作,如事务的回滚等。接下来我将以SSM框架中的事务注解操作进行举例说明:
二 测试项目的搭建
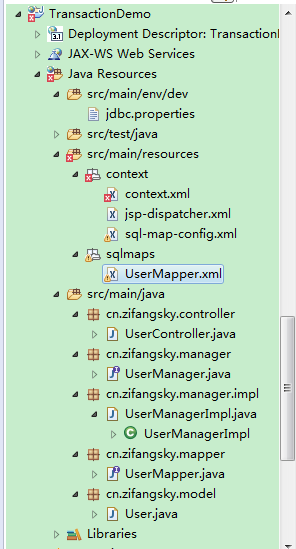
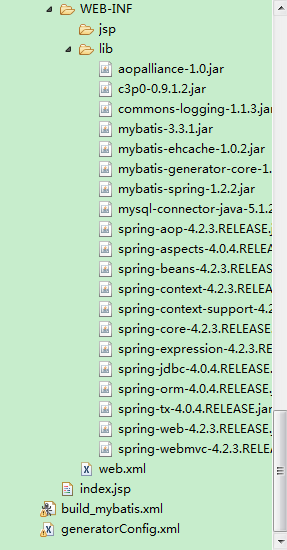
(1)项目结构和用到的jar包:
(2)测试使用到的SQL文件:
|
1
2
3
4
5
6
7
8
9
10
11
12
13
14
15
16
17
18
19
20
21
22
|
SET FOREIGN_KEY_CHECKS=0;
-- ----------------------------
-- Table structure for user
-- ----------------------------
DROP TABLE IF EXISTS `user`;
CREATE TABLE `user` (
`id` int(11) NOT NULL AUTO_INCREMENT,
`name` varchar(32) DEFAULT NULL,
`password` varchar(64) DEFAULT NULL,
`email` varchar(64) DEFAULT NULL,
`birthday` date DEFAULT NULL,
`money` decimal(15,2) DEFAULT NULL,
PRIMARY KEY (`id`)
) ENGINE=InnoDB AUTO_INCREMENT=4 DEFAULT CHARSET=utf8;
-- ----------------------------
-- Records of user
-- ----------------------------
INSERT INTO `user` VALUES ('1', 'admin', '123456', 'admin@qq.com', '2000-01-02', '1000.00');
INSERT INTO `user` VALUES ('2', 'test', '1234', 'test@zifangsky.cn', '1990-12-12', '2500.00');
INSERT INTO `user` VALUES ('3', 'xxxx', 'xx', 'xx@zifangsky.cn', '1723-06-21', '4000.00');
|
(3)使用mybatis-generator结合Ant脚本快速自动生成Model、Mapper等文件:
关于这方面可以参考我以前写过的一篇文章,这里就不多说了,传送门:http://www.zifangsky.cn/431.html
(4)一些基础配置文件:
i)web.xml:
|
1
2
3
4
5
6
7
8
9
10
11
12
13
14
15
16
17
18
19
20
21
22
23
24
25
26
27
28
29
30
31
32
33
34
35
36
37
38
39
40
41
42
43
44
45
46
47
48
49
|
<web-app xmlns="http://xmlns.jcp.org/xml/ns/javaee"
xmlns:xsi="http://www.w3.org/2001/XMLSchema-instance"
xsi:schemaLocation="http://xmlns.jcp.org/xml/ns/javaee
http://xmlns.jcp.org/xml/ns/javaee/web-app_3_1.xsd"
version="3.1">
<context-param>
<param-name>contextConfigLocation</param-name>
<param-value>
classpath:context/context.xml
</param-value>
</context-param>
<listener>
<listener-class>org.springframework.web.context.ContextLoaderListener</listener-class>
</listener>
<listener>
<listener-class>org.springframework.web.context.request.RequestContextListener</listener-class>
</listener>
<servlet>
<servlet-name>springmvc</servlet-name>
<servlet-class>org.springframework.web.servlet.DispatcherServlet</servlet-class>
<init-param>
<param-name>contextConfigLocation</param-name>
<param-value>classpath:context/jsp-dispatcher.xml</param-value>
</init-param>
<load-on-startup>1</load-on-startup>
</servlet>
<servlet-mapping>
<servlet-name>springmvc</servlet-name>
<url-pattern>*.html</url-pattern>
</servlet-mapping>
<filter>
<filter-name>characterEncodingFilter</filter-name>
<filter-class>org.springframework.web.filter.CharacterEncodingFilter</filter-class>
<init-param>
<param-name>encoding</param-name>
<param-value>UTF-8</param-value>
</init-param>
</filter>
<filter-mapping>
<filter-name>characterEncodingFilter</filter-name>
<url-pattern>/*</url-pattern>
</filter-mapping>
</web-app>
|
ii)jdbc配置文件jdbc.properties:
|
1
2
3
4
5
|
master.jdbc.driverClassName=com.mysql.jdbc.Driver
master.jdbc.url=jdbc:mysql://127.0.0.1:3306/transaction
#user
master.jdbc.username=root
master.jdbc.password=root
|
iii)context.xml:
|
1
2
3
4
5
6
7
8
9
10
11
12
13
14
15
16
17
18
19
20
21
22
23
24
25
26
27
28
29
30
31
32
33
34
35
36
37
38
39
40
41
42
43
44
45
46
47
48
49
50
51
52
53
54
55
56
57
58
59
60
61
62
63
64
65
66
67
68
69
70
71
72
73
74
75
76
77
78
79
80
81
82
83
84
85
86
87
88
89
90
91
92
93
94
95
96
97
98
99
100
101
102
103
104
105
106
107
108
109
110
111
112
113
114
115
116
117
|
<?xml version="1.0" encoding="UTF-8"?>
<beans xmlns="http://www.springframework.org/schema/beans"
xmlns:cache="http://www.springframework.org/schema/cache"
xmlns:xsi="http://www.w3.org/2001/XMLSchema-instance" xmlns:jee="http://www.springframework.org/schema/jee"
xsi:schemaLocation="http://www.springframework.org/schema/beans
http://www.springframework.org/schema/beans/spring-beans-4.0.xsd
http://www.springframework.org/schema/jee
http://www.springframework.org/schema/jee/spring-jee-4.0.xsd
http://www.springframework.org/schema/aop
http://www.springframework.org/schema/aop/spring-aop-4.0.xsd
http://www.springframework.org/schema/context
http://www.springframework.org/schema/context/spring-context-4.0.xsd
http://www.springframework.org/schema/cache
http://www.springframework.org/schema/cache/spring-cache-4.0.xsd
http://www.springframework.org/schema/tx
http://www.springframework.org/schema/tx/spring-tx-4.0.xsd"
xmlns:context="http://www.springframework.org/schema/context" xmlns:tx="http://www.springframework.org/schema/tx"
xmlns:aop="http://www.springframework.org/schema/aop">
<context:component-scan base-package="cn.zifangsky.dao"
annotation-config="true" />
<context:component-scan base-package="cn.zifangsky.manager"
annotation-config="true" />
<bean id="propertyConfigurer"
class="org.springframework.beans.factory.config.PropertyPlaceholderConfigurer">
<property name="locations">
<list>
<value>classpath:jdbc.properties</value>
</list>
</property>
</bean>
<!-- 配置数据源 -->
<bean id="dataSource" class="com.mchange.v2.c3p0.ComboPooledDataSource"
destroy-method="close">
<property name="driverClass">
<value>${master.jdbc.driverClassName}</value>
</property>
<property name="jdbcUrl">
<value>${master.jdbc.url}</value>
</property>
<property name="user">
<value>${master.jdbc.username}</value>
</property>
<property name="password">
<value>${master.jdbc.password}</value>
</property>
<!--连接池中保留的最小连接数。 -->
<property name="minPoolSize">
<value>5</value>
</property>
<!--连接池中保留的最大连接数。Default: 15 -->
<property name="maxPoolSize">
<value>30</value>
</property>
<!--初始化时获取的连接数,取值应在minPoolSize与maxPoolSize之间。Default: 3 -->
<property name="initialPoolSize">
<value>10</value>
</property>
<!--最大空闲时间,60秒内未使用则连接被丢弃。若为0则永不丢弃。Default: 0 -->
<property name="maxIdleTime">
<value>60</value>
</property>
<!--当连接池中的连接耗尽的时候c3p0一次同时获取的连接数。Default: 3 -->
<property name="acquireIncrement">
<value>5</value>
</property>
<!--JDBC的标准参数,用以控制数据源内加载的PreparedStatements数量。但由于预缓存的statements 属于单个 connection而不是整个连接池。所以设置这个参数需要考虑到多方面的因素。
如果maxStatements与maxStatementsPerConnection均为0,则缓存被关闭。Default: 0 -->
<property name="maxStatements">
<value>0</value>
</property>
<!--每60秒检查所有连接池中的空闲连接。Default: 0 -->
<property name="idleConnectionTestPeriod">
<value>60</value>
</property>
<!--定义在从数据库获取新连接失败后重复尝试的次数。Default: 30 -->
<property name="acquireRetryAttempts">
<value>30</value>
</property>
<!--获取连接失败将会引起所有等待连接池来获取连接的线程抛出异常。但是数据源仍有效 保留,并在下次调用 getConnection()的时候继续尝试获取连接。如果设为true,那么在尝试
获取连接失败后该数据源将申明已断开并永久关闭。Default: false -->
<property name="breakAfterAcquireFailure">
<value>true</value>
</property>
<!--因性能消耗大请只在需要的时候使用它。如果设为true那么在每个connection提交的 时候都将校验其有效性。建议 使用idleConnectionTestPeriod或automaticTestTable
等方法来提升连接测试的性能。Default: false -->
<property name="testConnectionOnCheckout">
<value>false</value>
</property>
</bean>
<!-- SqlMap setup for iBATIS Database Layer -->
<bean id="sqlSessionFactory" class="org.mybatis.spring.SqlSessionFactoryBean">
<property name="configLocation" value="classpath:context/sql-map-config.xml" />
<property name="dataSource" ref="dataSource" />
</bean>
<bean class="org.mybatis.spring.mapper.MapperScannerConfigurer">
<property name="basePackage" value="cn.zifangsky.mapper" />
<property name="sqlSessionFactoryBeanName" value="sqlSessionFactory" />
</bean>
<bean id="sqlSessionTemplate" class="org.mybatis.spring.SqlSessionTemplate">
<constructor-arg index="0" ref="sqlSessionFactory" />
</bean>
<!-- Transaction manager for a single JDBC DataSource -->
<bean id="transactionManager"
class="org.springframework.jdbc.datasource.DataSourceTransactionManager">
<property name="dataSource" ref="dataSource" />
</bean>
<!-- 开启注解方式声明事务 -->
<tx:annotation-driven transaction-manager="transactionManager" />
</beans>
|
在上面的配置中,使用了C3P0作为数据库连接池,同时定义了自动扫描注解,Mybatis相关配置以及申明式事务管理,如果对这些基础不太熟的话可以参考下我以前写过的一些文章
iv)jsp-dispatcher.xml:
|
1
2
3
4
5
6
7
8
9
10
11
12
13
14
15
16
17
18
19
20
21
22
23
24
25
26
27
28
29
30
31
32
33
34
35
|
<?xml version="1.0" encoding="UTF-8"?>
<beans xmlns="http://www.springframework.org/schema/beans"
xmlns:xsi="http://www.w3.org/2001/XMLSchema-instance" xmlns:context="http://www.springframework.org/schema/context"
xmlns:cache="http://www.springframework.org/schema/cache"
xmlns:mvc="http://www.springframework.org/schema/mvc"
xsi:schemaLocation="http://www.springframework.org/schema/beans
http://www.springframework.org/schema/beans/spring-beans-4.0.xsd
http://www.springframework.org/schema/context
http://www.springframework.org/schema/context/spring-context-4.0.xsd
http://www.springframework.org/schema/cache
http://www.springframework.org/schema/cache/spring-cache-4.0.xsd
http://www.springframework.org/schema/mvc
http://www.springframework.org/schema/mvc/spring-mvc-4.0.xsd"
default-lazy-init="true">
<mvc:annotation-driven />
<context:annotation-config /> <!-- 激活Bean中定义的注解 -->
<!-- 启动自动扫描该包下所有的Bean(例如@Controller) -->
<context:component-scan base-package="cn.zifangsky.controller"
annotation-config="true" />
<!-- 定义视图解析器 -->
<bean
class="org.springframework.web.servlet.view.InternalResourceViewResolver">
<property name="prefix">
<value>/WEB-INF/jsp/</value>
</property>
<property name="suffix">
<value>.jsp</value>
</property>
</bean>
</beans>
|
v)sql-map-config.xml:
|
1
2
3
4
5
6
7
8
9
10
11
12
13
14
15
16
17
18
19
20
21
22
23
24
25
|
<?xml version="1.0" encoding="UTF-8" ?>
<!DOCTYPE configuration PUBLIC "-//mybatis.org//DTD Config 3.0//EN"
"http://mybatis.org/dtd/mybatis-3-config.dtd">
<configuration>
<settings>
<!-- 全局的映射器启用或禁用缓存。 -->
<setting name="cacheEnabled" value="true" />
<!-- 全局启用或禁用延迟加载 -->
<setting name="lazyLoadingEnabled" value="true" />
<!-- 允许或不允许多种结果集从一个单独的语句中返回 -->
<setting name="multipleResultSetsEnabled" value="true" />
<!-- 使用列标签代替列名 -->
<setting name="useColumnLabel" value="true" />
<!-- 允许JDBC支持生成的键 -->
<setting name="useGeneratedKeys" value="false" />
<!-- 配置默认的执行器 -->
<setting name="defaultExecutorType" value="SIMPLE" />
<!-- 设置超时时间 -->
<setting name="defaultStatementTimeout" value="25000" />
</settings>
<mappers>
<mapper resource="sqlmaps/UserMapper.xml" />
</mappers>
</configuration>
|
(5)测试搭建的项目环境:
i)在UserManager.java接口中添加几个基本的接口:
|
1
2
3
4
5
6
7
8
9
10
11
12
13
|
public interface UserManager {
int deleteByPrimaryKey(Integer id);
int insert(User record);
int insertSelective(User record);
User selectByPrimaryKey(Integer id);
int updateByPrimaryKeySelective(User record);
int updateByPrimaryKey(User record);
}
|
ii)UserManagerImpl.java:
|
1
2
3
4
5
6
7
8
9
10
11
12
13
14
15
16
17
18
19
20
21
22
23
24
25
26
27
28
29
30
31
32
33
34
35
36
37
38
39
40
41
42
43
|
package cn.zifangsky.manager.impl;
import java.math.BigDecimal;
import javax.annotation.Resource;
import org.apache.ibatis.jdbc.RuntimeSqlException;
import org.springframework.stereotype.Service;
import org.springframework.transaction.annotation.Transactional;
import cn.zifangsky.manager.UserManager;
import cn.zifangsky.mapper.UserMapper;
import cn.zifangsky.model.User;
@Service(value="userManagerImpl")
public class UserManagerImpl implements UserManager{
@Resource(name="userMapper")
private UserMapper userMapper;
public int deleteByPrimaryKey(Integer id) {
return 0;
}
public int insert(User record) {
return 0;
}
public int insertSelective(User record) {
return 0;
}
public User selectByPrimaryKey(Integer id) {
return userMapper.selectByPrimaryKey(id);
}
public int updateByPrimaryKeySelective(User record) {
return 0;
}
public int updateByPrimaryKey(User record) {
return 0;
}
}
|
iii)UserController.java:
|
1
2
3
4
5
6
7
8
9
10
11
12
13
14
15
16
17
18
19
20
21
22
23
24
25
26
27
28
29
|
package cn.zifangsky.controller;
import java.math.BigDecimal;
import javax.annotation.Resource;
import org.springframework.stereotype.Controller;
import org.springframework.web.bind.annotation.RequestMapping;
import org.springframework.web.bind.annotation.RequestParam;
import cn.zifangsky.manager.UserManager;
import cn.zifangsky.model.User;
@Controller
public class UserController {
@Resource(name = "userManagerImpl")
private UserManager userManager;
@RequestMapping(value = "/select")
public String user(@RequestParam(name = "userId", required = false) Integer userId) {
User user = userManager.selectByPrimaryKey(userId);
System.out.println("用户名: " + user.getName());
System.out.println("邮箱: " + user.getEmail());
return "success";
}
}
|
iv)启动项目并进行测试:
项目启动后访问:http://localhost:8090/TransactionDemo/select.html?userId=2 ,如果发现控制台中输出如下则说明测试环境已经搭建成功了:
|
1
2
|
用户名: test
邮箱: test@zifangsky.cn
|
三 使用@Transactional注解管理事务示例
(1)在UserManager接口中添加一个如下方法:
|
1
2
3
4
5
6
7
8
9
10
11
|
/**
* 转账
*
* @param sourceAccountId
* 源账户
* @param targetAccountId
* 目标账户
* @param amount
* 转账金额
*/
void transferMoney(Integer sourceAccountId, Integer targetAccountId, BigDecimal amount);
|
此方法目的是为了模拟转账操作
(2)在UserManagerImpl实现类中添加对用的实现方法:
|
1
2
3
4
5
6
7
8
9
10
11
12
13
14
15
16
17
18
19
|
@Transactional(rollbackFor=Exception.class)
public void transferMoney(Integer sourceAccountId, Integer targetAccountId, BigDecimal amount) {
User sourceAccount = userMapper.selectByPrimaryKey(sourceAccountId);
User targetAccount = userMapper.selectByPrimaryKey(targetAccountId);
BigDecimal sourceMoney = sourceAccount.getMoney();
BigDecimal targetMoney = targetAccount.getMoney();
//判断账户余额是否足够
if(sourceMoney.compareTo(amount) > 0){
sourceAccount.setMoney(sourceMoney.subtract(amount));
targetAccount.setMoney(targetMoney.add(amount));
//更新数据库
userMapper.updateByPrimaryKeySelective(sourceAccount);
throw new RuntimeSqlException("手动模拟转账时出现异常");
// userMapper.updateByPrimaryKeySelective(targetAccount);
}
}
|
可以看出,在这个方法上面申明了一个@Transactional,表明这个方法将要进行事务管理,同时需要说明的是rollbackFor参数定义了在出现了什么异常时进行事务的回滚,显然这里定义的就是所有的Exception都要进行事务回滚。与之相反的一个参数是norollbackFor,这里就不多说了。对于@Transactional注解我们不仅可以在一个方法上放置,而且可以在类上进行申明。如果在类级别上使用该注解,那么类中的所有公共方法都被事务化,否则就只有使用了@Transactional注解的公共方法才被事务化
在这个方法中为了模拟转账出现异常,因此在第一个账户进行更新后就手动抛出了一个异常
(3)在UserController类中添加一个模拟转账的方法:
|
1
2
3
4
5
6
7
8
9
10
11
12
13
14
15
16
|
@RequestMapping(value = "/transfer")
public String transfer(@RequestParam(name = "account1") Integer account1,
@RequestParam(name = "account2") Integer account2, @RequestParam(name = "amount") Long amount) {
System.out.println("转账之前:");
System.out.println("账户一的资金:" + userManager.selectByPrimaryKey(account1).getMoney().longValue());
System.out.println("账户二的资金:" + userManager.selectByPrimaryKey(account2).getMoney().longValue());
// 转账
userManager.transferMoney(account1, account2, BigDecimal.valueOf(amount));
System.out.println("转账之后:");
System.out.println("账户一的资金:" + userManager.selectByPrimaryKey(account1).getMoney().longValue());
System.out.println("账户二的资金:" + userManager.selectByPrimaryKey(account2).getMoney().longValue());
return "success";
}
|
(4)效果测试:
项目运行后访问:http://localhost:8090/TransactionDemo/transfer.html?account1=1&account2=2&amount=500
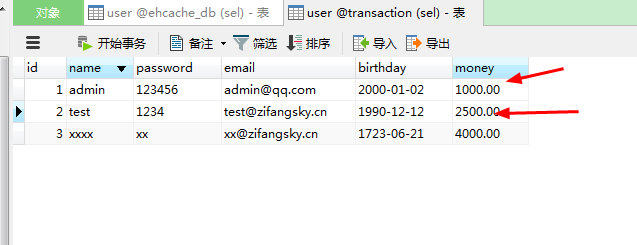
可以发现项目会进行保存,这时我们查看数据库中看看账户1和账户2中的金额有没有发生变化:
可以看出,两者的金额都没有发生改变,说明事物的确进行了回滚。当然,有兴趣的同学可以把UserManagerImpl中那个 @Transactional 注解给去掉看看数据库中的这个金额在执行“转账”后又会不会发生改变?
本文出自 “zifangsky的个人博客” 博客,请务必保留此出处http://983836259.blog.51cto.com/7311475/1835807


