树莓派 Zero W 安装与内核驱动开发入门
介绍
The Raspberry Pi Zero W extends the Pi Zero family and comes with added wireless LAN and Bluetooth connectivity.
缺点:没有 ADC 数模转换,自己想办法加配件啊
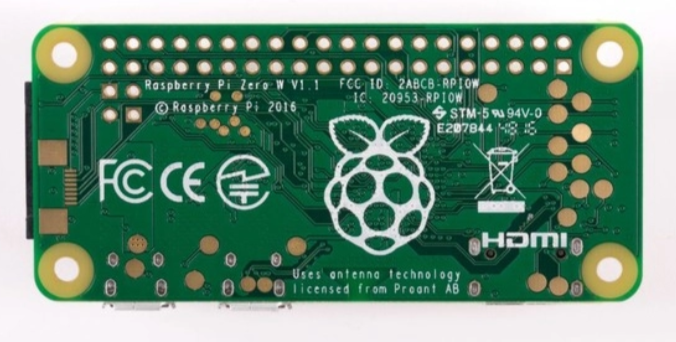
产品图


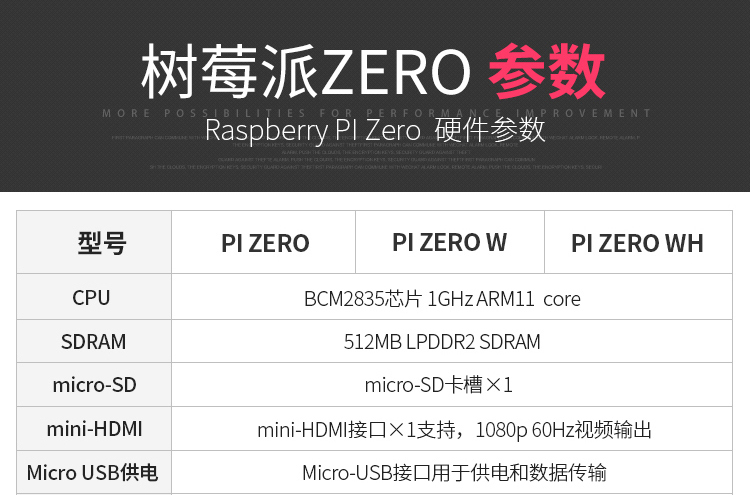
配置

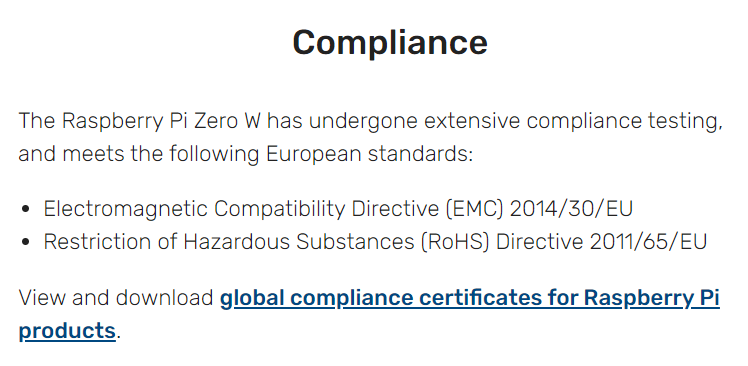
欧盟合规认证
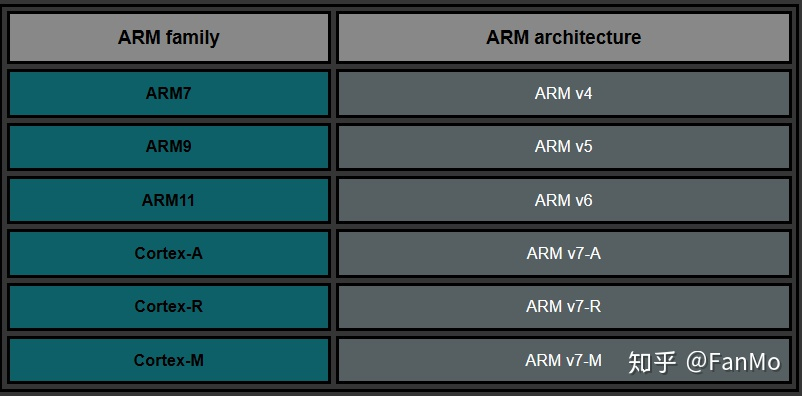
pi@raspberrypi:~ $ dpkg --print-architecture

armhf
armhf架构
安装系统
格式化SD卡为FAT分区,用 Win32DiskImager 把系统镜像如2020-08-20-raspios-buster-armhf-full.img写入到SD卡。写入后SD卡会分成两个区,Windows下只能见到一个BOOT区
在BOOT分区下创建两个文件,用于连接路由器和开启SSH
1.空文件 ssh
2.Unix文本文件 wpa_supplicant.conf
ctrl_interface=DIR=/var/run/wpa_supplicant GROUP=netdev
update_config=1
country=CN

network={
    ssid="YourWifiName"
    psk="YourWifiPassword"
    scan_ssid=1
}
路由器WIFI账号密码写你自己的。该文件会在初次系统安装时被读取用于配置WIFI,然后该文件就会被自动删除。
把SD卡插回树莓派,把usb数据线一端插到树莓派zeroW(两个口都可以,标有 USB 是数据+供电,标有 PWR IN 的是单供电),一端插到电脑上。
这时候树莓派就会闪灯开机(如果没有插SD卡,灯是一点都不会亮的)
等到树莓派灯不怎么闪烁时,登陆路由器后台看看

远程登陆
ssh
电脑cmd窗口输入
ssh pi@192.168.123.8
密码默认为 raspberry
修改密码命令:
passwd
修改镜像源
sudo sed -i 's|raspbian.raspberrypi.org|mirrors.ustc.edu.cn/raspbian|g' /etc/apt/sources.list
sudo sed -i 's|//archive.raspberrypi.org|//mirrors.ustc.edu.cn/archive.raspberrypi.org|g' /etc/apt/sources.list.d/raspi.list
sudo apt update
Windows远程桌面(RDP)
安装 Windows 远程桌面服务
sudo apt-get install xrdp
效果图

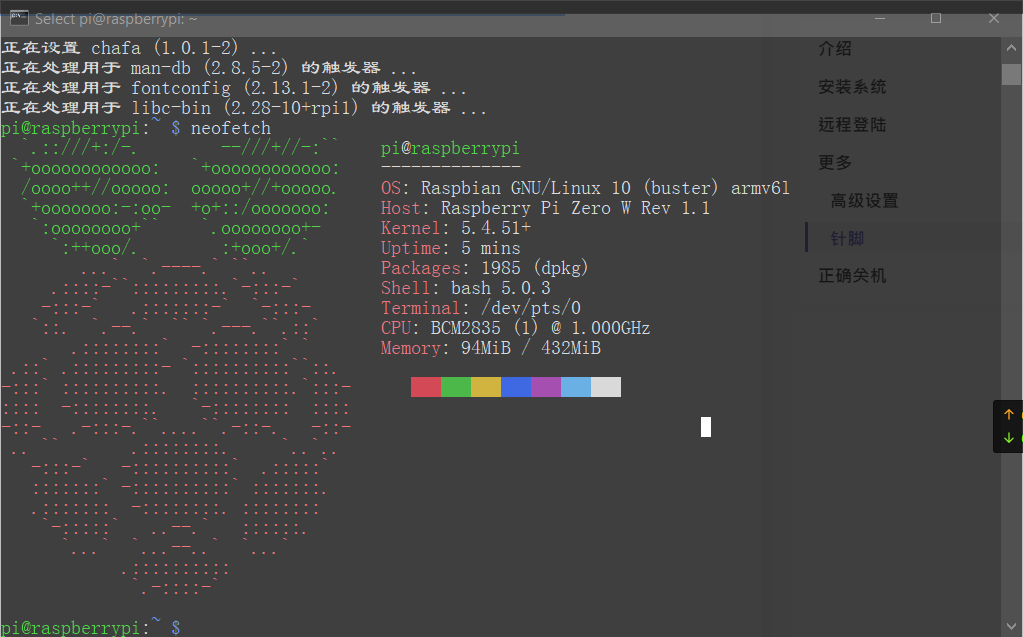
也可以用支持ssh rdp x11等多种协议的远程控制工具 Mobaxterm
板载外设相关
高级设置
还有一些高级设置,可以通过命令行设置
sudo raspi-config
如果是 可以安装 rasp-AP
开启 USB 网卡
作用:给树莓派插上USB,连接到电脑,树莓派被识别成一个
USB Ethernet/RNDIS Gadget网卡
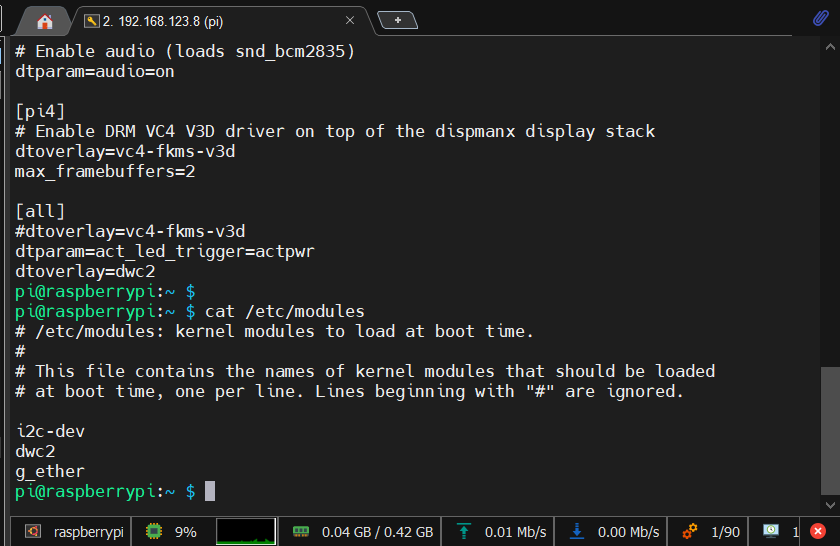
树莓派配置:
- 本配置适用于树莓派系统
已经安装完成的 - 启动时加载 dwc2 USB driver
echo "dtoverlay=dwc2" | sudo tee -a /boot/config.txt
- 开启 dwc2
echo "dwc2" | sudo tee -a /etc/modules
- 选择网卡模块并启用(如果你要使用别的模块,请参考以下链接,模块不能使用多个只能一个)
echo "g_ether" | sudo tee -a /etc/modules
参考:
驱动:在微软驱动官网下载并解压 Acer Incorporated. - Other hardware - USB Ethernet/RNDIS Gadget Windows Vista版本的
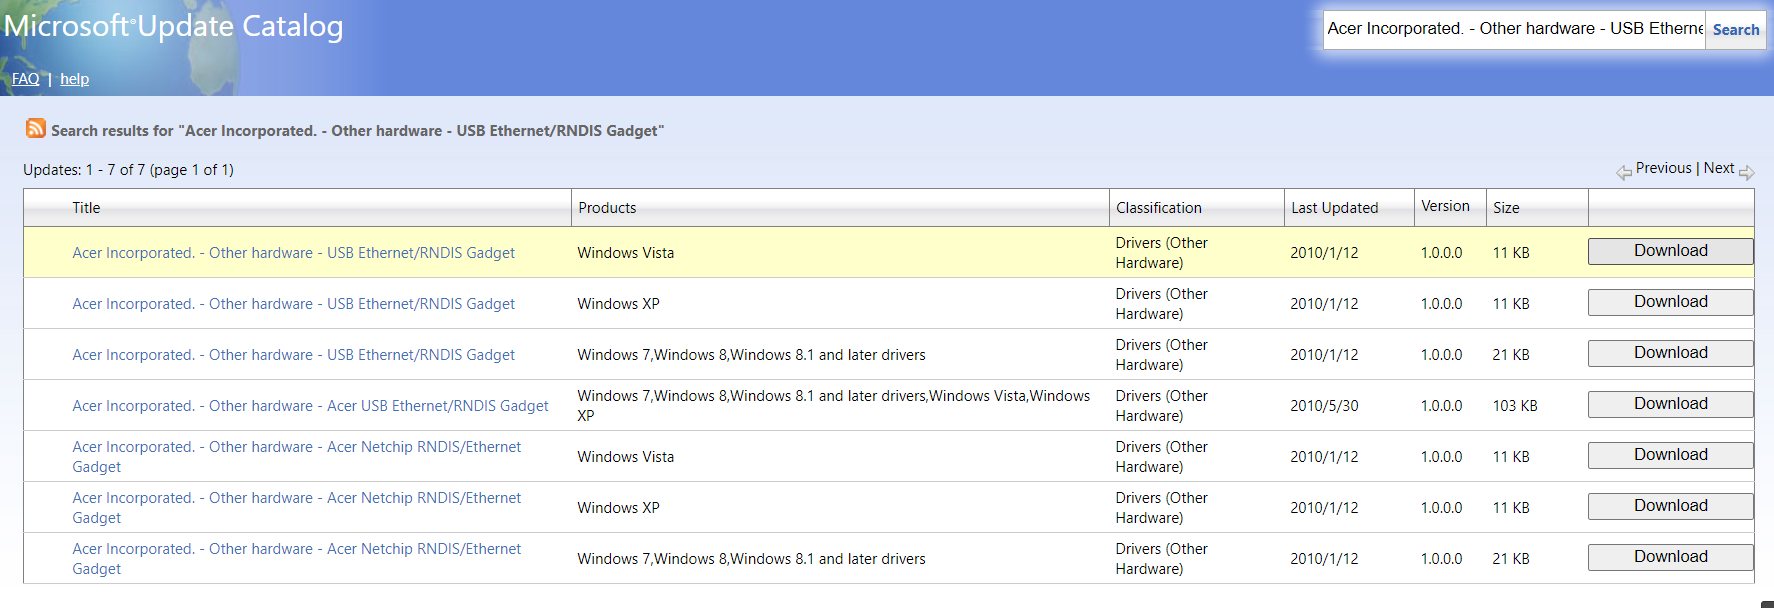
图中第一个就是 Windows Vista 版本的
解压后,从设备管理器,右击树莓派那个USB叹号设备(名字一般是未识别的),更新驱动,路径选你解压的路径即可。
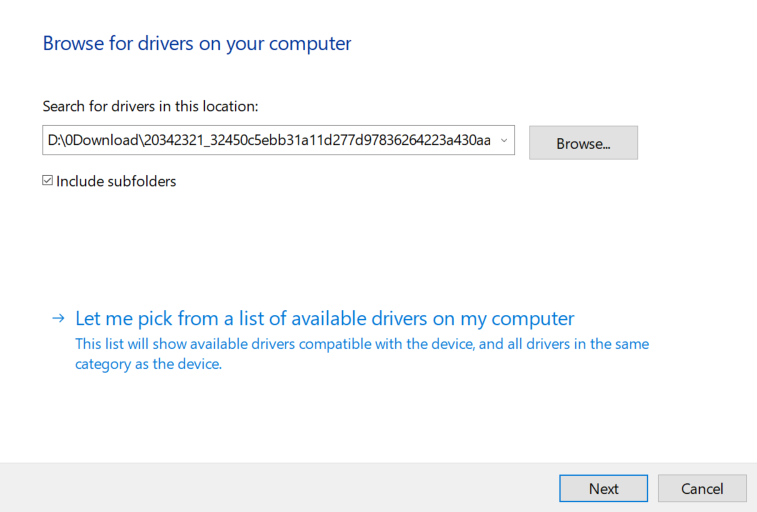
效果图(我的是英文系统)
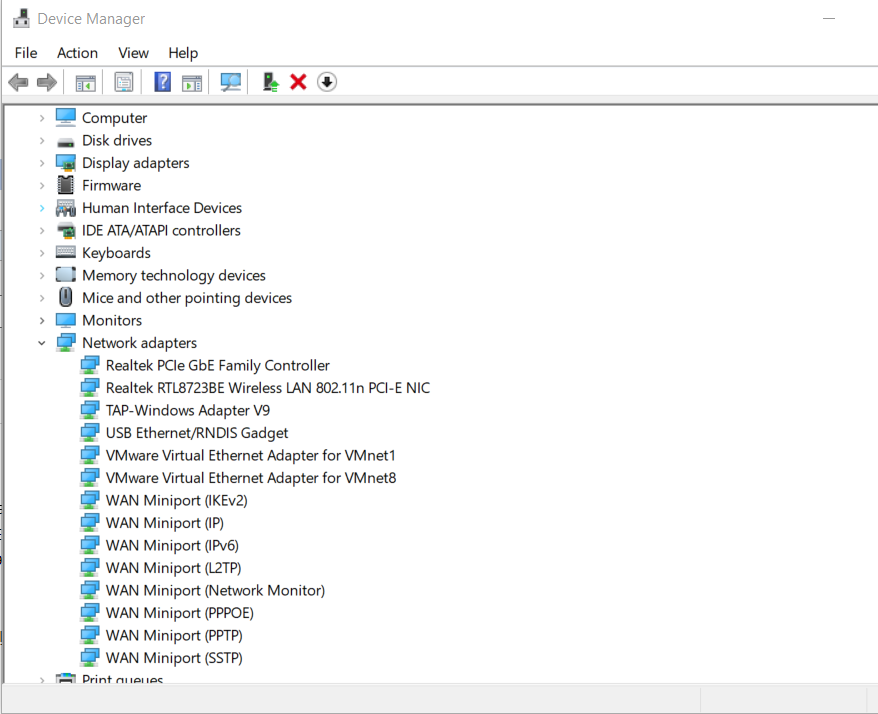
IP地址可以通过 cmd 命令查看(先看你树莓派USB Ethernet/RNDIS Gadget网卡的网段),如我的是 192.168.137.1
就输入
arp -a | findstr 192.168.137
查看arp表里含有192.168.137的设备
C:\WINDOWS\system32>arp -a | findstr 192.168.137
Interface: 192.168.137.1 --- 0x41
192.168.137.233 da-xx-xx-xx-xx-24 static
192.168.137.255 ff-ff-ff-ff-ff-ff static
然后255是广播地址嘛(计算机网络知识),所以树莓派的USB网卡ip地址就是 192.168.137.233 了
确保树莓派开了SSH服务,然后
ssh -T pi@192.168.137.233
成功的话会提示你接受密钥并输入密码,即找到并SSH测试连接通了树莓派
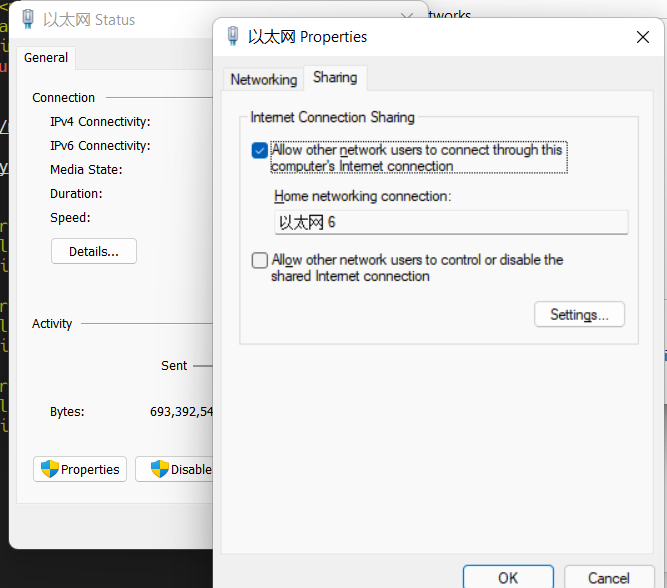
设置网络共享:电脑共享网络给树莓派用(通过USB Ethernet/RNDIS Gadget网卡)

图盗自 https://gist.github.com/gbaman/975e2db164b3ca2b51ae11e45e8fd40a
当然也可以通过 ping raspberrypi.local
前提是你电脑装了 mDNS 协议(一个局域网版本的DNS无服务端协议)支持软件,如 Bonjour
CMD>ping raspberrypi.local

Pinging raspberrypi.local [fe80::f1b9:ff1f:c643:b627%66] with 32 bytes of data:
Reply from fe80::f1b9:ff1f:c643:b627%66: time=1ms
Reply from fe80::f1b9:ff1f:c643:b627%66: time<1ms
Reply from fe80::f1b9:ff1f:c643:b627%66: time<1ms
Reply from fe80::f1b9:ff1f:c643:b627%66: time=1ms

Ping statistics for fe80::f1b9:ff1f:c643:b627%66:
    Packets: Sent = 4, Received = 4, Lost = 0 (0% loss),
Approximate round trip times in milli-seconds:
    Minimum = 0ms, Maximum = 1ms, Average = 0ms

CMD>ssh pi@fe80::f1b9:ff1f:c643:b627%66

pi@fe80::f1b9:ff1f:c643:b627%66's password:
Linux raspberrypi 5.10.17+ #1421 Thu May 27 13:58:02 BST 2021 armv6l

The programs included with the Debian GNU/Linux system are free software;
the exact distribution terms for each program are described in the
individual files in /usr/share/doc/*/copyright.

Debian GNU/Linux comes with ABSOLUTELY NO WARRANTY, to the extent
permitted by applicable law.
Last login: Fri Jul 23 11:48:49 2021
pi@raspberrypi:~ $
记得把你电脑网络 共享给 树莓派 USB 网卡
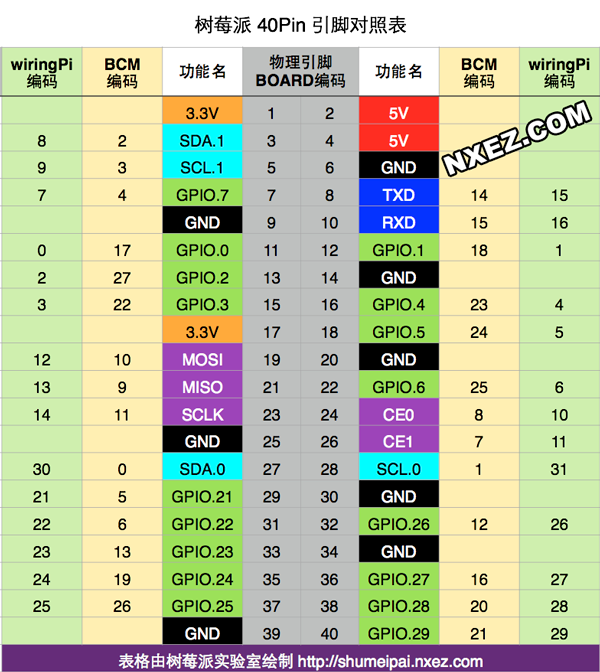
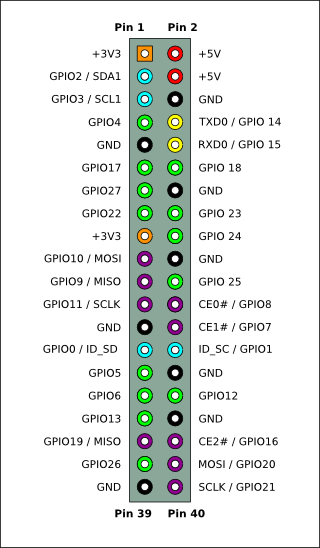
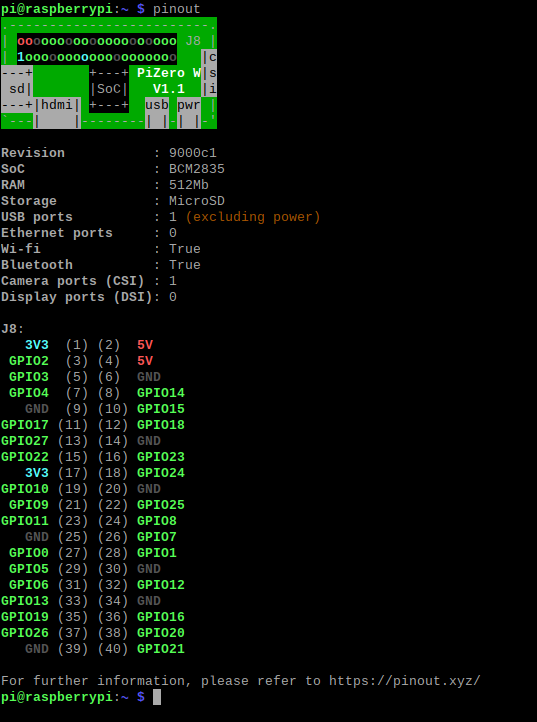
GPIO 针脚
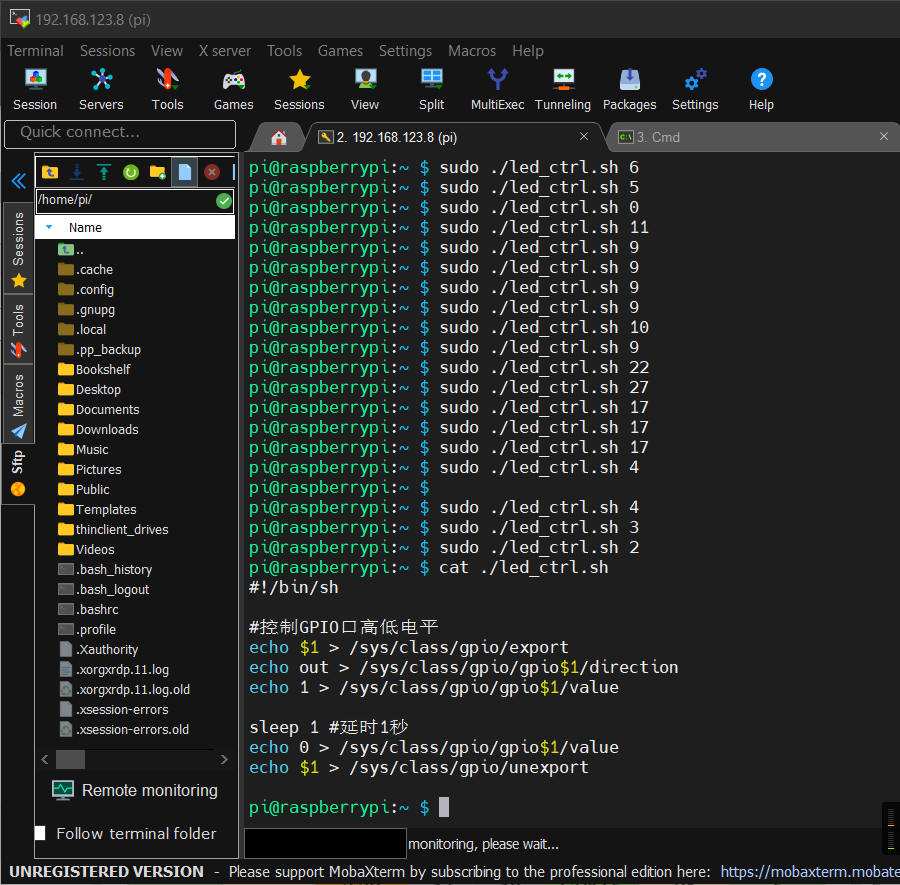
测试脚本 (led_ctrl.sh)
#!/bin/sh

#控制GPIO口高低电平
echo $1 > /sys/class/gpio/export
echo out > /sys/class/gpio/gpio$1/direction
echo 1 > /sys/class/gpio/gpio$1/value

sleep 1 #延时1秒
echo 0 > /sys/class/gpio/gpio$1/value
echo $1 > /sys/class/gpio/unexport
给脚本加上执行权限
sudo chmod+x ./led_ctrl.sh
测试GPIO命令
# sudo ./led_ctrl.sh 你要测试的GPIO口号

sudo ./led_ctrl.sh 2
使用:在面包板上,LED灯接220Ω电阻,一脚接GND,一脚接你要测试的GPIO引脚。(当然我还用了 T 型拓展板)
效果:亮灯,一秒后灭灯
这里借一下别人的连线图
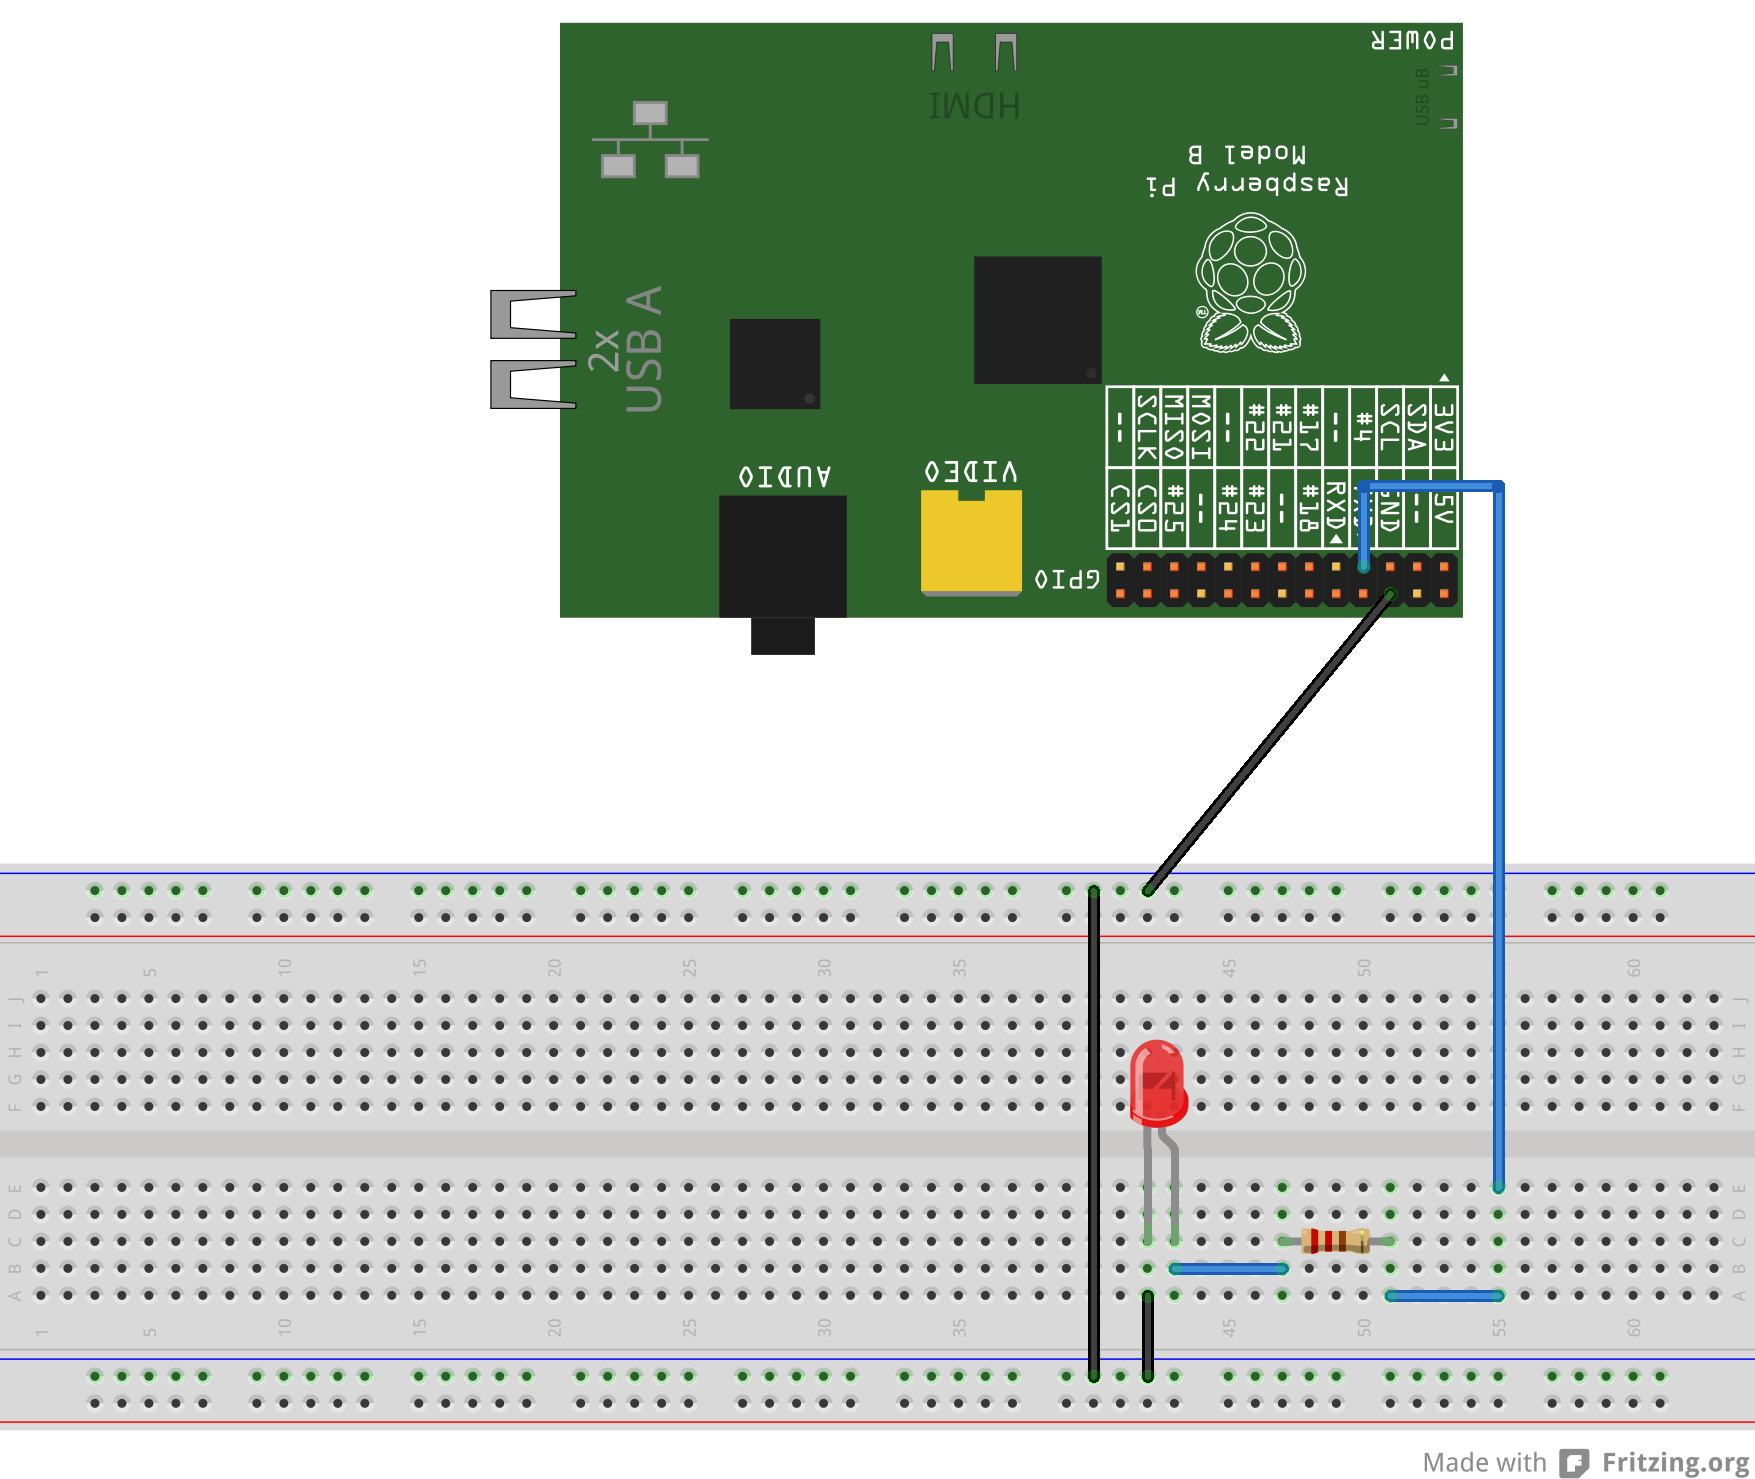
http://www.ruanyifeng.com/blog/2017/06/raspberry-pi-tutorial.html
树莓派学习二(点亮LED灯)
讓你的 Raspberry Pi 透過 GPIO 閃爍 LED 燈
Shell C C++ Java Python NodeJS 等语言均有支持GPIO的库,详情谷歌
这里pip换镜像源,不说了我们先一起烧香谢谢方校长:
树莓派使用 Python 驱动 SSD1306(IIC/SPI 通信) 先测试IIC通讯,成功后再去玩 Linux C 编程 实现I2C总线的OLED驱动 - 暮光小猿wzt。
开启色相头
查看硬件输出信息
如查看 SoC 温度(也就是常说的 CPU)
vcgencmd measure_temp
详见:https://www.raspberrypi.org/documentation/raspbian/applications/vcgencmd.md
正确关机
sudo halt
配置 Web版的 VSCode Server
由于 VSCode SSH Remote 不支持 armhf,所以我们直接用弱一点的 Web 版 VSCode
https://github.com/cdr/code-server/releases
见文档 https://coder.com/docs/code-server/latest/install#yarn-npm
如果没网,可能是你没在控制面板里把网络共享给树莓派
如果还是没网,可以在windows控制面板把树莓派网卡的 IPV6 关了,IPV4设置为自动获取dchp
然后关闭 MobaXterm 的 SSH 标签页再重新打开,使其重新获取ip
在树莓派测网: ping 114.114.114.114
驱动开发
https://www.raspberrypi.org/documentation/hardware/raspberrypi/bcm2835/README.md
译文:BCM2835
这是树莓派 A, B, B+, the Compute Module 及 Zero 系列所用的博通 CPU 芯片
请参考:
Peripheral specification 参考手册
注:该文档有一些错误,已知错误和一些额外信息可以点这里获取
GPU 文档 及其 开源驱动
ARM1176 processor
ARM1176JZF-S
Also see the Raspberry Pi 2 Model B's chip, BCM2836.
Peripheral specification(ARM 外设说明书) 是博通的数据手册,在其文档介绍里可看到这么一行:
The purpose of this
datasheetis to provide documentation for these peripherals in sufficient
detail to allow a developer to port an operating system to BCM2835.
There are a number of peripherals which are intended to be controlled by the GPU. These are
omitted from this datasheet. Accessing these peripherals from the ARM is not recommended.
总结:
| 资料名 | 文件名 | 网址 |
|---|---|---|
| CPU 数据手册 | BCM2835-ARM-Peripherals.pdf | https://www.raspberrypi.org/documentation/hardware/raspberrypi/bcm2835/BCM2835-ARM-Peripherals.pdf |
| CPU 数据手册错误修正与注意 | BCM2835 datasheet errata - eLinux.org.mhtml | https://elinux.org/BCM2835_datasheet_errata |
| ZeroW 电路原理图(schematics) | rpi_SCH_ZeroW_1p1_reduced.pdf | https://www.raspberrypi.org/documentation/hardware/raspberrypi/schematics/rpi_SCH_ZeroW_1p1_reduced.pdf |
| GPU 文档 | VideoCoreIV-AG100-R.pdf | https://docs.broadcom.com/docs/12358545 |
| CPU 开源驱动 | Brcm_Android_ICS_Graphics_Stack.tar.gz | https://docs.broadcom.com/docs/12358546 |
为方便大家使用,我已经把上面5个资料都打包了,下载地址:Pi_zeroW.zip 更新日期:2021-01-13
以上硬件资料均可在树莓派官网 HardWare 文档 找到
软硬件等更多资料详见:https://www.raspberrypi.org/documentation/
PS. 树莓派 ZeroW 的 CPU 是 BCM2835,该 CPU 内核是 ARM1176 processor 系列里的 ARM1176JZF-S
剩下的就是:看手册/看寄存器/看电路图->写代码了,和普通的 ARM Linux 驱动开发没有什么两样
给个案例:
驱动编写教程(非树莓派,但大同小异): [野火]i.MX Linux开发实战指南-驱动章节
开发方式推荐:VSCode + Remote SSH + Linux X64 桌面操作系统(或虚拟机)交叉编译环境 和 NFS 服务 + 树莓派挂载 NFS (当然 树莓派3之类的SSH Remote支持,zeroW不支持只能用 code-server)
在 VSCode 直接调用 Makefile 的方法:https://www.cnblogs.com/yucloud/p/vs_code_config.html#makefile
树莓派挂载 NFS:
# 192.168.12.130 是你的服务器地址,一般是台式/笔记本/虚拟机系统上的 NFS Server
mount -t nfs 192.168.12.130:/mnt /media
#修改 /etc/fstab 文件,添加以下代码,更多参数见 https://wiki.archlinux.org/index.php/Fstab_(简体中文)#字段定义
192.168.12.130:/mnt /mnt            nfs     rw
NOTE: 不要在 zeroW 上编译,因为它没有树莓派3 那么好的性能。
拉取代码
pi@raspberrypi:~ $ uname -a
Linux raspberrypi 5.4.83+ #1379 Mon Dec 14 13:06:05 GMT 2020 armv6l GNU/Linux
# 根据版本号和Github仓库代码分支,可确定应该拉取  rpi-5.4.y
# 然后在 笔记本或台式机上拉取代码 git clone --depth=1 --branch rpi-5.4.y https://github.com/raspberrypi/linux
# 编译构建部分请看以下官方资料
- 内核源码及其编译构建指南(请看 Cross-compiling 部分): https://www.raspberrypi.org/documentation/linux/kernel/building.md
- raspbian 系统相关配置:https://www.raspberrypi.org/documentation/raspbian/
- Github 搜索关键词"rasp kernel module"
- 裸机编程(像STM32单片机那样)Raspberry Pi Zero baremetal examples: https://github.com/dwelch67/raspberrypi-zero
- 树莓派官方论坛-裸机及汇编区Bare metal, Assembly language


 浙公网安备 33010602011771号