Spring Boot (日志篇):Log4j2整合ELK,搭建实时日志平台
一、安装JDK1.8以上版本
1、从Oracle官网上下载Linux x64版本的 下载地址: http://www.oracle.com/technetwork/java/javase/downloads/jre8-downloads-2133155.html
jdk-8u201-linux-x64.tar.gz2、解压jdk安装包并创建软连接:
tar zxf /usr/local/src/jdk-8u201-linux-x64.tar.gz –C /usr/local/
ln -s /usr/local/jdk1.8.0_201/ /usr/local/jdk
3、配置环境变量:
vim /etc/profile
#修改内容如下:
JAVA_HOME=/usr/local/jdk
export JRE_HOME=/usr/local/jdk/jre
export CLASSPATH=.:$JAVA_HOME/lib:$JRE_HOME/lib:$CLASSPATH
export PATH=$PATH:$JAVA_HOME/bin:$JRE_HOME/bin
4、重新载入环境变量:
source /etc/profile5、查看jdk是否安装成功:
java -version6、效果展示

二、Elasticsearch安装配置
1. 解压elasticsearch-5.3.1.tar源码包
下载链接:https://artifacts.elastic.co/downloads/elasticsearch/elasticsearch-5.3.1.tar.gz
解压至/usr/local/目录下
tar -zxvf /usr/local/src/elasticsearch-5.3.1.tar.gz -C /usr/local/
2. 修改配置文件
修改 /usr/local/elasticsearch-5.3.1/config/elasticsearch.yml
配置文件。
以下供参考配置,实际以需求为准:
 vi /usr/local/elasticsearch-5.3.1/config/elasticsearch.yml
 # 这里指定的是集群名称,需要修改为对应的,开启了自发现功能后,ES会按照此集群名称进行集群发现
cluster.name: skynet_es_cluster
node.name: skynet_es_cluster_dev1

 # 数据目录
path.data: /data/elk/data

 # log 目录
path.logs: /data/elk/logs

 # 修改一下ES的监听地址,这样别的机器也可以访问
network.host: 0.0.0.0

# 默认的端口号
http.port: 9200
discovery.zen.ping.unicast.hosts: ["172.18.5.111", "172.18.5.112"]
 # discovery.zen.minimum_master_nodes: 3
 # enable cors,保证_site类的插件可以访问es
http.cors.enabled: true
http.cors.allow-origin: "*"

 # Centos6不支持SecComp,而ES5.2.0默认bootstrap.system_call_filter为true进行检测,所以导致检测失败,失败后直接导致ES不能启动。
bootstrap.memory_lock: false
bootstrap.system_call_filter: false
注意,设置参数的时候:后面要有空格!
tips:ElasticSearch 配置文件译文解析
3. 修改系统参数
确保系统有足够资源启动ES 注:ES启动的时候回占用特别大的资源所以需要修改下系统参数,若不修改资源启动会异常退出
设置内核参数
vi /etc/sysctl.conf
# 增加以下参数
vm.max_map_count=655360
执行以下命令,确保生效配置生效:
sysctl -p设置资源参数
vi /etc/security/limits.conf
# 修改
* soft nofile 65536
* hard nofile 131072
* soft nproc 65536
* hard nproc 131072
设置用户资源参数
vi /etc/security/limits.d/20-nproc.conf
# 设置elk用户参数
elk    soft    nproc     65536
4. 添加启动用户,设置权限
启动ElasticSearch5版本要非root用户,需要新建一个用户来启动ElasticSearch
useradd elk         #创建用户elk
groupadd elk        #创建组elk
useradd elk -g elk  #将用户添加到组

mkdir  -pv  /data/elk/{data,logs} # 创建数据和日志目录

# 修改文件所有者
chown -R elk:elk /data/elk/
chown -R elk:elk /usr/local/elasticsearch-5.3.1/
5. 启动ES
查看内存剩余
free -gps:启动时候不能以root用户启动,否则会报错。
使用elk用户启动elasticsearch服务
切换至elk用户
su elk
/usr/local/elasticsearch-5.3.1/bin/elasticsearch
检查elasticsearch服务,如下图所示,即成功开启服务了,这就意味着你现在已经启动并运行一个Elasticsearch节点了。
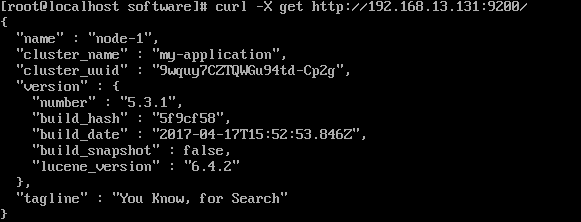
浏览器访问http://192.168.13.131:9200/_search?pretty。如下json格式网页展示,表示ES启动成功
(注意如防火墙开启中,需要把9200端口开启监听,否则需要关闭防火墙systemctl stop firewalld.service)
{
  "took" : 1,
  "timed_out" : false,
  "_shards" : {
    "total" : 0,
    "successful" : 0,
    "failed" : 0
  },
  "hits" : {
    "total" : 0,
    "max_score" : 0.0,
    "hits" : [ ]
  }
}
5.检测elasticsearch状态
三、安装 Logstash
下载并安装 Logstash ,安装 logstash 只需将它解压的对应目录即可,例如: /usr/local 下:
1.解压源码包 wget https://artifacts.elastic.co/downloads/logstash/logstash-5.3.1.tar.gz
tar /usr/local/src/logstash-5.3.1.tar.gz -C /usr/local/解压并创建软连接:
tar /usr/local/src/logstash-5.3.1.tar.gz –C /usr/local/
ln –s /usr/local/logstash-5.3.1 /usr/local/logstash
2.测试logstash是否可用:
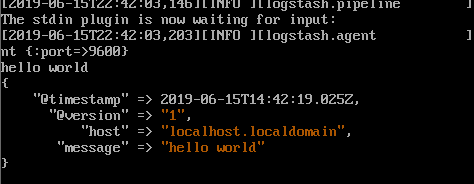
/usr/local/logstash/bin/logstash -e 'input { stdin { } } output { stdout {} }'
![]()
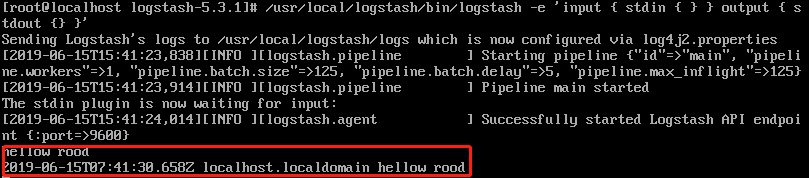
我们可以看到,我们输入什么内容logstash按照某种格式输出,其中-e参数参数允许Logstash直接通过命令行接受设置。这点尤其快速的帮助我们反复的测试配置是否正确而不用写配置文件。使用ctrl-c命令可以退出之前运行的Logstash。
使用-e参数在命令行中指定配置是很常用的方式,不过如果需要配置更多设置则需要很长的内容。这种情况,我们首先创建一个简单的配置文件,并且指定logstash使用这个配置文件。 例如:在 logstash 安装目录下(/usr/local/logstash-5.3.1/config)创建一个“基本配置”测试文件 logstash-simple.conf, 文件内容如下:vim logstash-simple.conf
input { stdin { } }
output {
    stdout { codec=> rubydebug }
}
Logstash 使用 input 和 output 定义收集日志时的输入和输出的相关配置,本例中 input 定义了一个叫 "stdin" 的 input , output 定义一个叫 "stdout" 的 output 。无论我们输入什么字符, Logstash 都会按照某种格式来返回我们输入的字符,其中 output 被定义为 "stdout" 并使用了 codec 参数来指定 logstash 输出格式。
使用logstash的-f参数来读取配置文件,执行如下开始进行测试:
/usr/local/logstash/bin/logstash -f /usr/local/logstash/config/logstash-simple.conf 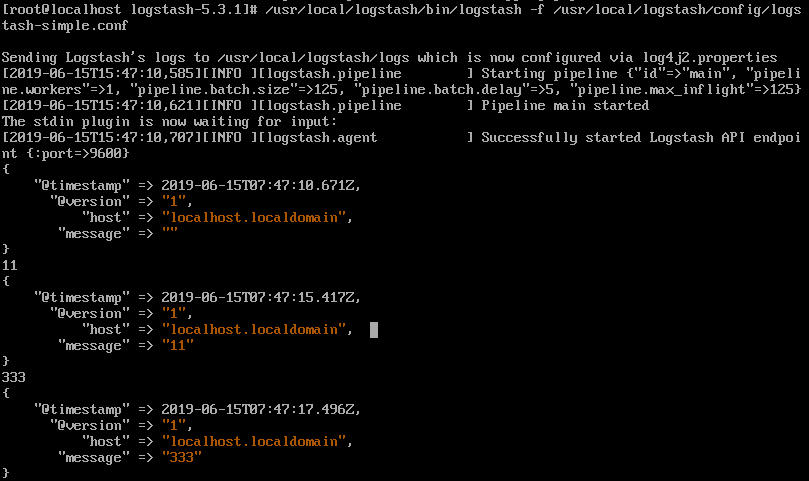
此时说明我们的logstash是完全没有问题了,可以进行日志收集了
3.创建配置文件获取redis日志的数据:
vim /usr/local/logstash/config/redis-spring.conf
input {
  redis {
    port => "7001"
    host => "192.168.13.131"
    data_type => "list"
    type => "log"
    key => "eureka-log"
  }
}
output {
  elasticsearch {
     hosts => "192.168.13.131:9200"
     index => "logstash1-%{+YYYY.MM.dd}"
  }
}
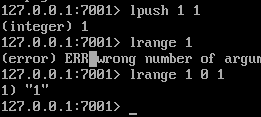
redis服务器中的值
通过配置文件启动服务查看效果:
/usr/local/logstash/bin/logstash -f /usr/local/logstash/config/redis-spring.conf
![]()
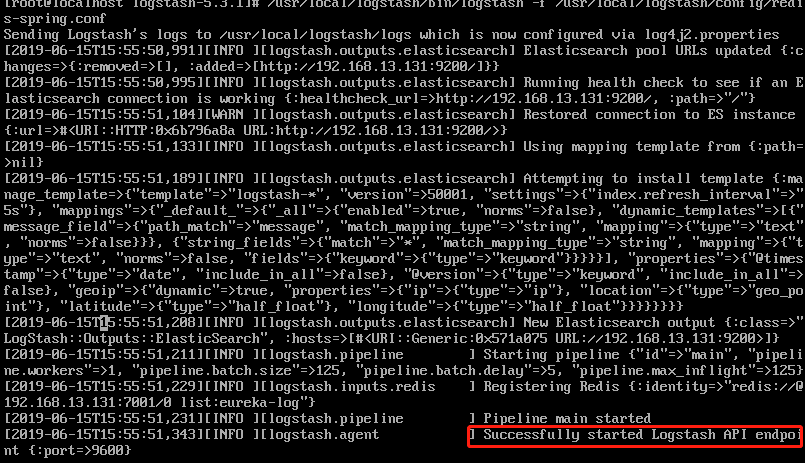
启动成功后
此时我们再去查看reids中key:(此时已经没有数据了,数据已经被logstash取完)使用curl 查看ES是否接受到数据
curl http://192.168.13.131:9200/_search?pretty
4.测试Elasticsearch 和 Logstash 来收集日志数据
接下来我们在 logstash 安装目录下创建一个用于测试 logstash 使用 elasticsearch 作为 logstash 的后端的测试文件 logstash-test.conf,该文件中定义了stdout和elasticsearch作为output,这样的“多重输出”即保证输出结果显示到屏幕上,同时也输出到elastisearch中。
前提要保证elasticsearch和logstash都正常启动(需要先启动elasticsearch,再启动logstash)
vim logstash-test.conf
input { stdin { } }
output {
    elasticsearch {hosts => "192.168.13.131:9200" } #elasticsearch服务地址
  stdout { codec=> rubydebug }
}
开启服务,执行如下命令:
/usr/local/logstash-5.3.1/bin/logstash -f /usr/local/logstash-5.3.1/config/logstash-test.conf 我们可以使用 curl 命令发送请求来查看 ES 是否接收到了数据:
curl 'http://192.168.30.132:9200/_search?pretty'

输入消息
![]()
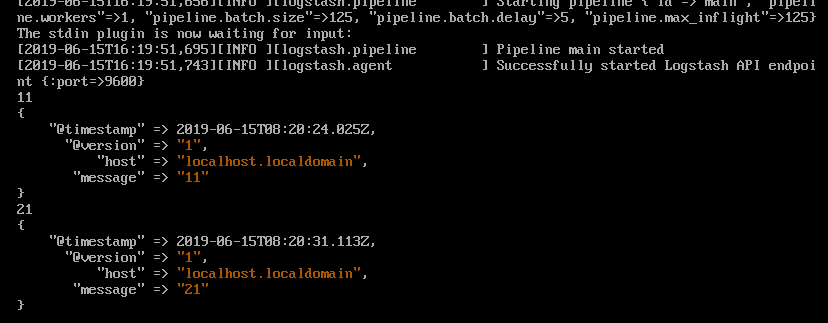
返回结果如下{ "took" : 61, "timed_out" : false, "_shards" : { "total" : 10, "successful" : 10, "failed" : 0 }, "hits" : { "total" : 3, "max_score" : 1.0, "hits" : [ { "_index" : "logstash1-2019.06.15", "_type" : "log", "_id" : "AWtaLo8LKrKD-dkRoCEX", "_score" : 1.0, "_source" : { "@timestamp" : "2019-06-15T08:08:48.725Z", "@version" : "1", "message" : "1", "type" : "log", "tags" : [ "_jsonparsefailure" ] } }, { "_index" : "logstash-2019.06.15", "_type" : "logs", "_id" : "AWtaOUUZKrKD-dkRoCEa", "_score" : 1.0, "_source" : { "@timestamp" : "2019-06-15T08:20:31.113Z", "@version" : "1", "host" : "localhost.localdomain", "message" : "21" } }, { "_index" : "logstash-2019.06.15", "_type" : "logs", "_id" : "AWtaOSnhKrKD-dkRoCEZ", "_score" : 1.0, "_source" : { "@timestamp" : "2019-06-15T08:20:24.025Z", "@version" : "1", "host" : "localhost.localdomain", "message" : "11" } } ] } }
至此,你已经成功利用 Elasticsearch 和 Logstash 来收集日志数据了。
四、kibana的安装
1. 解压kibana-5.3.1-linux-x86_64源码包
下载地址:https://artifacts.elastic.co/downloads/kibana/kibana-5.3.1-linux-x86_64.tar.gz
解压至/usr/local/下
tar -zxvf /usr/local/src/kibana-5.3.1-linux-x86_64.tar.gz  -C /usr/local/
2.配置kibana
编辑kibana.yml配置文件
vi /usr/local/kibana-5.3.1-linux-x86_64/config/kibana.yml

修改以下参数:
server.port: 5601           #开启默认端口5601
server.host: “192.168.30.132”   #站点地址
elasticsearch.url: http://192.168.30.132:9200   #指向elasticsearch服务的ip地址
kibana.index: “.kibana”
3.启动
执行以下命令启动:
/usr/local/kibana-5.3.1-linux-x86_64/bin/kibana
出现如下页面表示kibana启动成功![]()
或者
查看端口监听:
netstat –anot | grep 5601
五、配置ES索引
根据logstash配置文件中index设置索引:
首先查看logstash中的index:
修改logstash-test.conf启动配置文件
vim logstash-test.conf
![]()
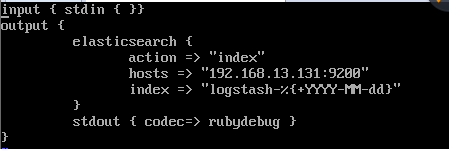
重启logstash,然后输入hello world
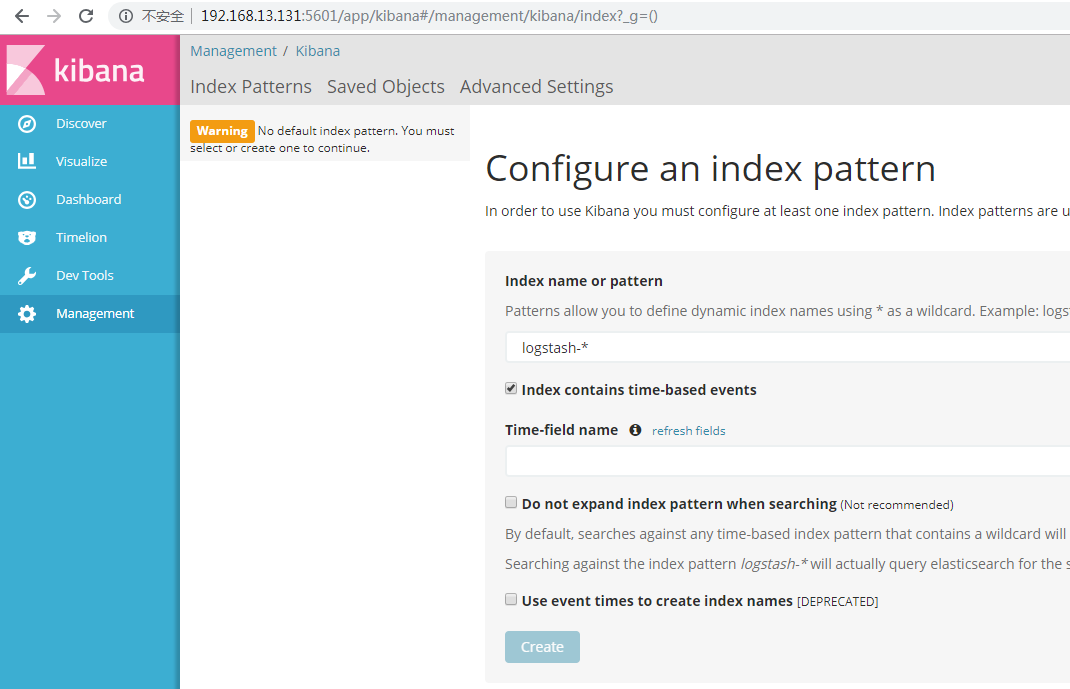
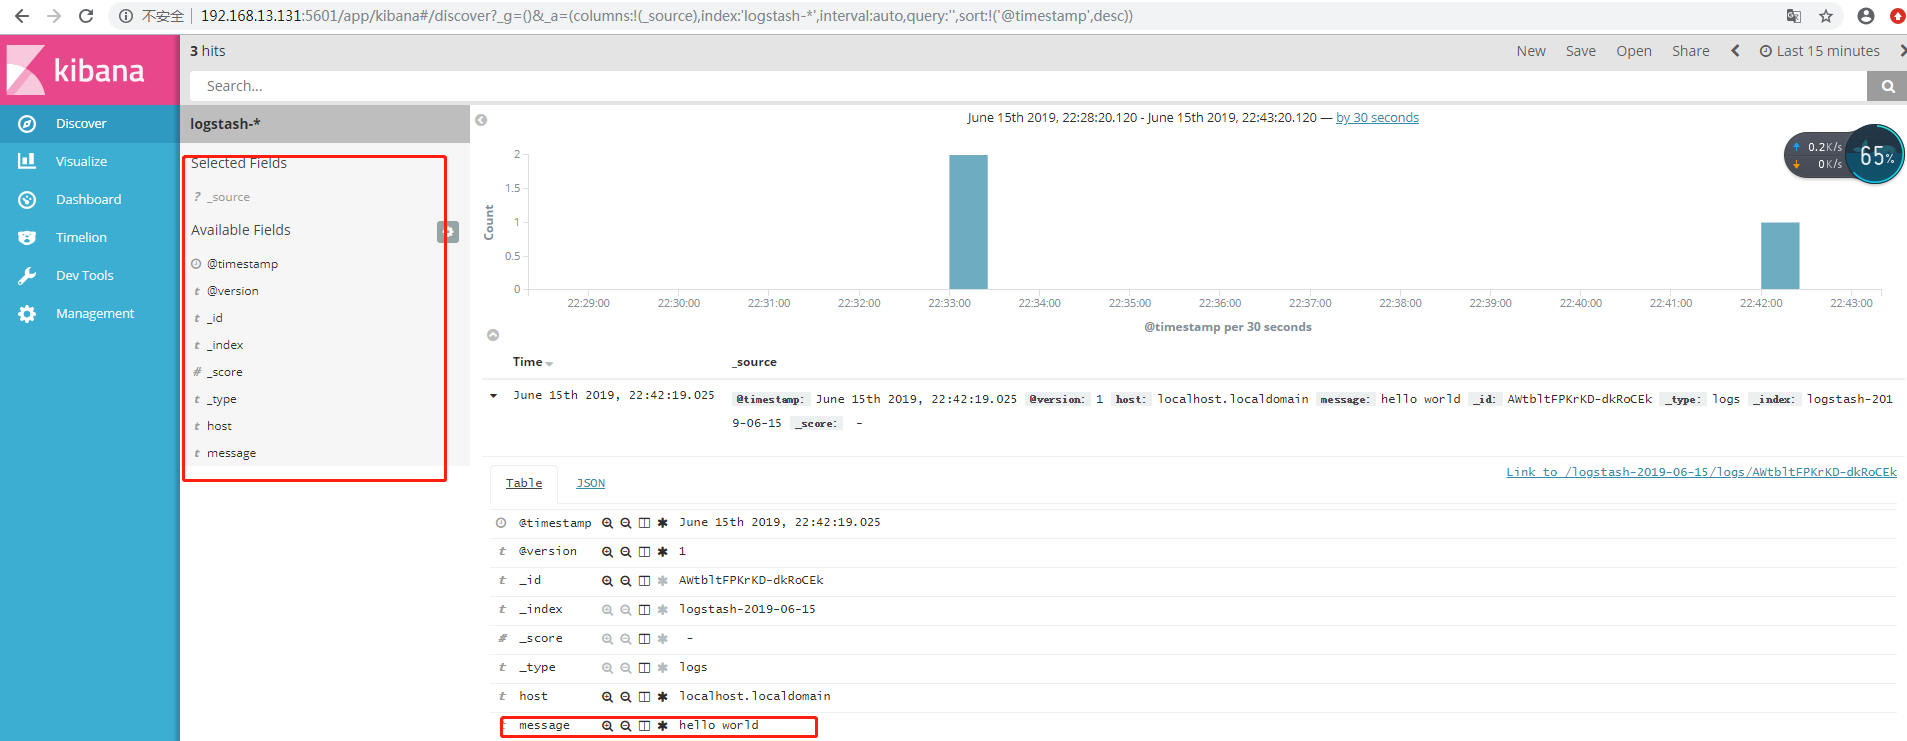
然后Kibana中创建index:(在Management选项菜单中创建)
创建成功后,在discover中查询出现如下图,能查询到日志数据,就成功了。
六.插件
参考链接:
Elasticsearch 5.0 —— Head插件部署指南
ElasticSearch 5.0的head插件安装
https://www.elastic.co/guide/cn/elasticsearch/guide/current/running-elasticsearch.html 中文社区
七、安装ES插件:(elasticsearch-head)
注:head安装需要从国外网站拉去东西,可能网速过慢导致安装失败(可以多试几次),下面有几种方法安装:
方法一、
导入node-v8.2.1.tar.gz phantomjs-2.1.1-linux-x86_64.tar.bz2 安装包
安装node:
tar zxvf node-v8.2.1.tar.gz
cd node-v8.2.1/
./configure && make && make install

安装phantomjs:
tar jxvf phantomjs-2.1.1-linux-x86_64.tar.bz2
cd phantomjs-2.1.1-linux-x86_64/bin/
cp phantomjs /usr/local/bin/

导入es-head程序包并解压:
unzip master.zip –d /usr/local/
cd elasticsearch-head/
npm install
npm run start &

查看端口状态:(端口默认9100)
netstat –anpt | grep 9100

方法二、
git clone git://github.com/mobz/elasticsearch-head.git
cd elasticsearch-head
npm install
npm run start
netstat –anpt | grep 9100

方法三、
拉镜像:
docker push mobz/elasticsearch-head:5
启动镜像:
docker run -p 9100:9100 mobz/elasticsearch-head:5
web访问测试:
http://IP:9100
八.问题集
1、安装head插件时,[root@localhost elasticsearch-head]# npm install
报错如下
npm WARN deprecated coffee-script@1.10.0: CoffeeScript on NPM has moved to "coffeescript" (no hyphen)
npm WARN deprecated http2@3.3.7: Use the built-in module in node 9.0.0 or newer, instead
npm WARN deprecated phantomjs-prebuilt@2.1.16: this package is now deprecated
npm WARN deprecated json3@3.2.6: Please use the native JSON object instead of JSON 3
npm WARN deprecated json3@3.3.2: Please use the native JSON object instead of JSON 3

> phantomjs-prebuilt@2.1.16 install /usr/local/fast/elasticsearch-head/node_modules/phantomjs-prebuilt
> node install.js

PhantomJS not found on PATH
Download already available at /tmp/phantomjs/phantomjs-2.1.1-linux-x86_64.tar.bz2
Verified checksum of previously downloaded file
Extracting tar contents (via spawned process)
Removing /usr/local/fast/elasticsearch-head/node_modules/phantomjs-prebuilt/lib/phantom
Copying extracted folder /tmp/phantomjs/phantomjs-2.1.1-linux-x86_64.tar.bz2-extract-1569630895676/phantomjs-2.1.1-linux-x86_64 -> /usr/local/fast/elasticsearch-head/node_modules/phantomjs-prebuilt/lib/phantom
Phantom installation failed { [Error: EACCES: permission denied, link '/tmp/phantomjs/phantomjs-2.1.1-linux-x86_64.tar.bz2-extract-1569630895676/phantomjs-2.1.1-linux-x86_64' -> '/usr/local/fast/elasticsearch-head/node_modules/phantomjs-prebuilt/lib/phantom']
  errno: -13,
  code: 'EACCES',
  syscall: 'link',
  path:
   '/tmp/phantomjs/phantomjs-2.1.1-linux-x86_64.tar.bz2-extract-1569630895676/phantomjs-2.1.1-linux-x86_64',
  dest:
   '/usr/local/fast/elasticsearch-head/node_modules/phantomjs-prebuilt/lib/phantom' } Error: EACCES: permission denied, link '/tmp/phantomjs/phantomjs-2.1.1-linux-x86_64.tar.bz2-extract-1569630895676/phantomjs-2.1.1-linux-x86_64' -> '/usr/local/fast/elasticsearch-head/node_modules/phantomjs-prebuilt/lib/phantom'
npm WARN elasticsearch-head@0.0.0 license should be a valid SPDX license expression
npm WARN optional SKIPPING OPTIONAL DEPENDENCY: fsevents@1.2.9 (node_modules/fsevents):
npm WARN notsup SKIPPING OPTIONAL DEPENDENCY: Unsupported platform for fsevents@1.2.9: wanted {"os":"darwin","arch":"any"} (current: {"os":"linux","arch":"x64"})

npm ERR! code ELIFECYCLE
npm ERR! errno 1
npm ERR! phantomjs-prebuilt@2.1.16 install: `node install.js`
npm ERR! Exit status 1
npm ERR!
npm ERR! Failed at the phantomjs-prebuilt@2.1.16 install script.
npm ERR! This is probably not a problem with npm. There is likely additional logging output above.

npm ERR! A complete log of this run can be found in:
npm ERR!     /root/.npm/_logs/2019-09-28T00_35_00_168Z-debug.log
解决方案:
1、输入npm install -g
提示错误如下
[root@localhost elasticsearch-head]# npm install -g
+ elasticsearch-head@0.0.0
updated 1 package in 1.698s
2、然后继续grunt server
[root@localhost elasticsearch-head]# grunt server
Loading "Gruntfile.js" tasks...ERROR
>> SyntaxError: Unexpected identifier
Warning: Task "server" not found. Use --force to continue.

Aborted due to warnings.
3、根据错误提示,server未发现,重新安装npm,先删除head目录下的node_modules
[root@localhost elasticsearch-head]# rm -rf node_modules/
4、然后安装npm
[root@localhost elasticsearch-head]# npm install -g
+ elasticsearch-head@0.0.0
added 150 packages from 121 contributors and updated 1 package in 28.152s
[root@localhost elasticsearch-head]# grunt server
grunt-cli: The grunt command line interface (v1.3.2)

Fatal error: Unable to find local grunt.

If you're seeing this message, grunt hasn't been installed locally to
your project. For more information about installing and configuring grunt,
please see the Getting Started guide:

https://gruntjs.com/getting-started
5、错误提示Unable to find local grunt, 根据提示进行本地安装grunt,接着启动server
[root@localhost elasticsearch-head]# npm install grunt --save-dev
npm WARN deprecated coffee-script@1.10.0: CoffeeScript on NPM has moved to "coffeescript" (no hyphen)
npm WARN elasticsearch-head@0.0.0 license should be a valid SPDX license expression

+ grunt@1.0.1
added 91 packages from 68 contributors, updated 4 packages and audited 1131 packages in 28.775s
found 24 vulnerabilities (2 low, 2 moderate, 20 high)
  run `npm audit fix` to fix them, or `npm audit` for details
[root@localhost elasticsearch-head]# grunt -version
grunt-cli v1.3.2
grunt v1.0.1
[root@localhost elasticsearch-head]# grunt server
Loading "Gruntfile.js" tasks...ERROR
>> SyntaxError: Unexpected identifier
Warning: Task "server" not found. Use --force to continue.

Aborted due to warnings.
6、这里提示Gruntfile.js错误,由于前面把hostname改成了*,打开文件后忘记加,现在修改过来后,保存退出
7、重新启动服务grunt server
[root@localhost elasticsearch-head]# grunt server
>> Local Npm module "grunt-contrib-clean" not found. Is it installed?
>> Local Npm module "grunt-contrib-concat" not found. Is it installed?
>> Local Npm module "grunt-contrib-watch" not found. Is it installed?
>> Local Npm module "grunt-contrib-connect" not found. Is it installed?
>> Local Npm module "grunt-contrib-copy" not found. Is it installed?
>> Local Npm module "grunt-contrib-jasmine" not found. Is it installed?
Warning: Task "connect:server" not found. Use --force to continue.

Aborted due to warnings.
8、根据错误提示安装modual
(1)安装module
[root@localhost elasticsearch-head]# npm install grunt-contrib-clean --registry=https://registry.npm.taobao.org
npm WARN elasticsearch-head@0.0.0 license should be a valid SPDX license expression

+ grunt-contrib-clean@1.0.0
added 3 packages from 2 contributors and removed 6 packages in 1.611s
[root@localhost elasticsearch-head]# npm install grunt-contrib-concat --registry=https://registry.npm.taobao.org
npm WARN elasticsearch-head@0.0.0 license should be a valid SPDX license expression

+ grunt-contrib-concat@1.0.1
added 1 package from 1 contributor in 1.489s
[root@localhost elasticsearch-head]# npm install grunt-contrib-watch --registry=https://registry.npm.taobao.org
npm WARN elasticsearch-head@0.0.0 license should be a valid SPDX license expression

+ grunt-contrib-watch@1.0.0
added 36 packages from 41 contributors in 3.025s
[root@localhost elasticsearch-head]# npm install grunt-contrib-connect --registry=https://registry.npm.taobao.org
npm WARN deprecated http2@3.3.7: Use the built-in module in node 9.0.0 or newer, instead
npm WARN elasticsearch-head@0.0.0 license should be a valid SPDX license expression

+ grunt-contrib-connect@1.0.2
added 32 packages from 30 contributors in 3.492s
[root@localhost elasticsearch-head]# npm install grunt-contrib-copy --registry=https://registry.npm.taobao.org
npm WARN elasticsearch-head@0.0.0 license should be a valid SPDX license expression

+ grunt-contrib-copy@1.0.0
added 2 packages from 2 contributors in 1.827s
[root@localhost elasticsearch-head]# npm install grunt-contrib-jasmine --registry=https://registry.npm.taobao.org

> phantomjs-prebuilt@2.1.16 install /usr/local/fast/elasticsearch-head/node_modules/phantomjs-prebuilt
> node install.js

PhantomJS not found on PATH
Download already available at /tmp/phantomjs/phantomjs-2.1.1-linux-x86_64.tar.bz2
Verified checksum of previously downloaded file
Extracting tar contents (via spawned process)
Removing /usr/local/fast/elasticsearch-head/node_modules/phantomjs-prebuilt/lib/phantom
Copying extracted folder /tmp/phantomjs/phantomjs-2.1.1-linux-x86_64.tar.bz2-extract-1569636068657/phantomjs-2.1.1-linux-x86_64 -> /usr/local/fast/elasticsearch-head/node_modules/phantomjs-prebuilt/lib/phantom
Phantom installation failed { [Error: EACCES: permission denied, link '/tmp/phantomjs/phantomjs-2.1.1-linux-x86_64.tar.bz2-extract-1569636068657/phantomjs-2.1.1-linux-x86_64' -> '/usr/local/fast/elasticsearch-head/node_modules/phantomjs-prebuilt/lib/phantom']
  errno: -13,
  code: 'EACCES',
  syscall: 'link',
  path:
   '/tmp/phantomjs/phantomjs-2.1.1-linux-x86_64.tar.bz2-extract-1569636068657/phantomjs-2.1.1-linux-x86_64',
  dest:
   '/usr/local/fast/elasticsearch-head/node_modules/phantomjs-prebuilt/lib/phantom' } Error: EACCES: permission denied, link '/tmp/phantomjs/phantomjs-2.1.1-linux-x86_64.tar.bz2-extract-1569636068657/phantomjs-2.1.1-linux-x86_64' -> '/usr/local/fast/elasticsearch-head/node_modules/phantomjs-prebuilt/lib/phantom'
npm WARN elasticsearch-head@0.0.0 license should be a valid SPDX license expression

npm ERR! code ELIFECYCLE
npm ERR! errno 1
npm ERR! phantomjs-prebuilt@2.1.16 install: `node install.js`
npm ERR! Exit status 1
npm ERR!
npm ERR! Failed at the phantomjs-prebuilt@2.1.16 install script.
npm ERR! This is probably not a problem with npm. There is likely additional logging output above.

npm ERR! A complete log of this run can be found in:
npm ERR!     /root/.npm/_logs/2019-09-28T02_01_11_594Z-debug.log
(2)修复最后一个modual安装错误
[root@localhost elasticsearch-head]# npm install --unsafe-perm
npm WARN deprecated phantomjs-prebuilt@2.1.16: this package is now deprecated
npm WARN deprecated json3@3.3.2: Please use the native JSON object instead of JSON 3
npm WARN deprecated json3@3.2.6: Please use the native JSON object instead of JSON 3

> phantomjs-prebuilt@2.1.16 install /usr/local/fast/elasticsearch-head/node_modules/phantomjs-prebuilt
> node install.js

PhantomJS not found on PATH
Download already available at /tmp/phantomjs/phantomjs-2.1.1-linux-x86_64.tar.bz2
Verified checksum of previously downloaded file
Extracting tar contents (via spawned process)
Removing /usr/local/fast/elasticsearch-head/node_modules/phantomjs-prebuilt/lib/phantom
Copying extracted folder /tmp/phantomjs/phantomjs-2.1.1-linux-x86_64.tar.bz2-extract-1569636202947/phantomjs-2.1.1-linux-x86_64 -> /usr/local/fast/elasticsearch-head/node_modules/phantomjs-prebuilt/lib/phantom
Writing location.js file
Done. Phantomjs binary available at /usr/local/fast/elasticsearch-head/node_modules/phantomjs-prebuilt/lib/phantom/bin/phantomjs

> core-js@2.6.9 postinstall /usr/local/fast/elasticsearch-head/node_modules/core-js
> node scripts/postinstall || echo "ignore"

Thank you for using core-js ( https://github.com/zloirock/core-js ) for polyfilling JavaScript standard library!

The project needs your help! Please consider supporting of core-js on Open Collective or Patreon:
> https://opencollective.com/core-js
> https://www.patreon.com/zloirock

Also, the author of core-js ( https://github.com/zloirock ) is looking for a good job -)

npm WARN elasticsearch-head@0.0.0 license should be a valid SPDX license expression
npm WARN optional SKIPPING OPTIONAL DEPENDENCY: fsevents@1.2.9 (node_modules/fsevents):
npm WARN notsup SKIPPING OPTIONAL DEPENDENCY: Unsupported platform for fsevents@1.2.9: wanted {"os":"darwin","arch":"any"} (current: {"os":"linux","arch":"x64"})

added 541 packages from 639 contributors and audited 2722 packages in 28.198s
found 70 vulnerabilities (19 low, 2 moderate, 49 high)
  run `npm audit fix` to fix them, or `npm audit` for details
[root@localhost elasticsearch-head]# npm audit fix
npm WARN rm not removing /usr/local/fast/elasticsearch-head/node_modules/.bin/grunt as it wasn't installed by /usr/local/fast/elasticsearch-head/node_modules/grunt
npm WARN elasticsearch-head@0.0.0 license should be a valid SPDX license expression
npm WARN optional SKIPPING OPTIONAL DEPENDENCY: fsevents@1.2.9 (node_modules/fsevents):
npm WARN notsup SKIPPING OPTIONAL DEPENDENCY: Unsupported platform for fsevents@1.2.9: wanted {"os":"darwin","arch":"any"} (current: {"os":"linux","arch":"x64"})

+ grunt@1.0.4
+ grunt-contrib-watch@1.1.0
added 23 packages from 18 contributors, removed 15 packages and updated 23 packages in 41.075s
fixed 45 of 70 vulnerabilities in 2722 scanned packages
  1 vulnerability required manual review and could not be updated
  3 package updates for 24 vulns involved breaking changes
  (use `npm audit fix --force` to install breaking changes; or refer to `npm audit` for steps to fix these manually)
9、启动服务,运行head插件
[root@localhost elasticsearch-head]# grunt server
Running "connect:server" (connect) task
Waiting forever...
Started connect web server on http://localhost:9100
10、在浏览器输入http://192.168.76.128:9100/
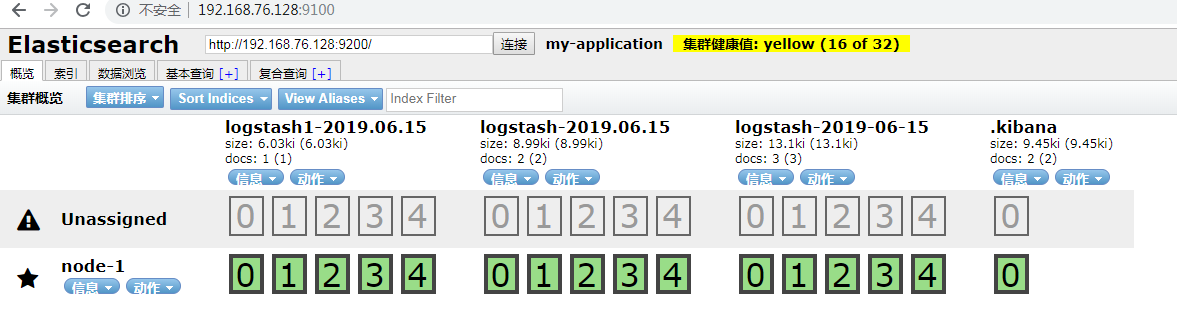
11、es 启动报错
如果报错: exception during geoip databases update
因为ES默认会去官网下载最新的GEO信息,公司内网server一般和外网不通,所以会报错;
需要编辑config/elasticsearch.yml,在末尾添加: ingest.geoip.downloader.enabled: false

 浙公网安备 33010602011771号