

十六、输入子系统驱动模型
一、概述
- 输入子系统驱动模型也是字符设备驱动的一种模型,是对普通字符设备驱动的封装,专门用于输入类型的设备。
- 嵌入式linux系统中的输入类型设备:按键、鼠标、键盘、触摸屏、游戏手柄、手写板等等。
二、输入子系统驱动模型的优点
- 简化普通字符设备驱动的设计步骤
- 给应用程序提供统一的标准接口。硬件平台不同,驱动程序不同,但是驱动给应用程序的接口是相同的,应用程序是相同的。
三、查看输入设备
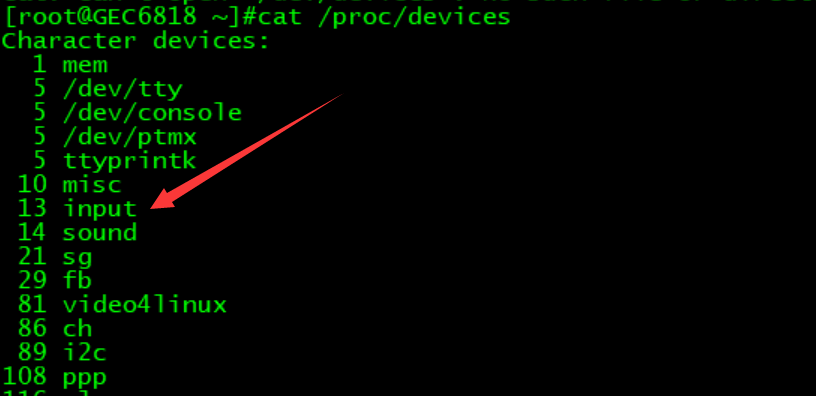
1、输入设备的设备文件

输入设备的主设备号都是13,次设备号不同。
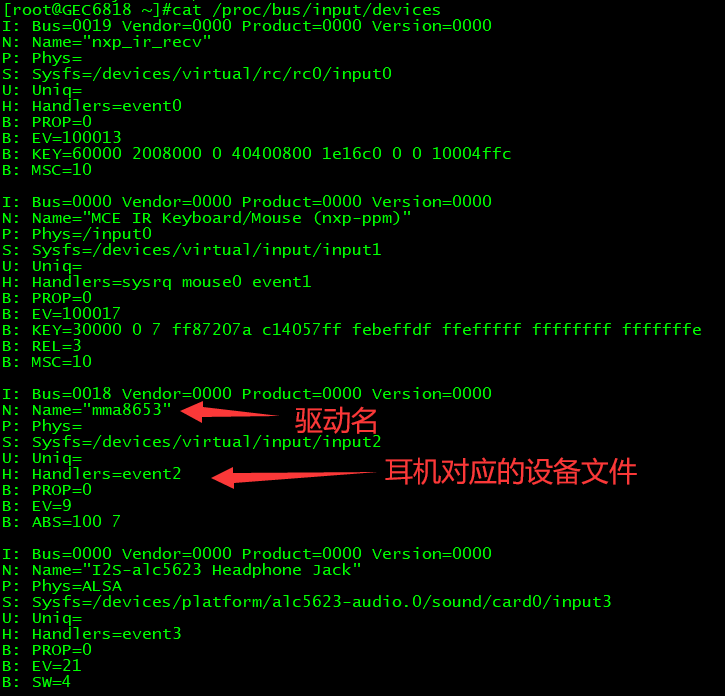
2、设备名称
3、查看输入设备驱动信息
4.简单读取输入设备文件的内容
[root@GEC6818 /]#cat /dev/input/event0
四、应用程序如何读取驱动提供的数据
对于输入子系统驱动模型,驱动程序提供应用程序的是一个统一格式的结构体。
1 2 3 4 5 6 | struct input_event { struct timeval time; //输入时间发生的时间戳 __u16 type; //输入设备的类型 __u16 code; // __s32 value;}; |
结构体成员说明:
(1)time:输入事件发生的时间戳。
(2)type:输入设备的类型。
1 2 3 4 5 6 7 8 9 10 11 12 13 14 | #define EV_SYN 0x00-----同步类型的事件,按键或触摸屏每次动作都会触发一次同步类型的事件#define EV_KEY 0x01----按键类型的事件,键盘或鼠标的左右键#define EV_REL 0x02----相对位移事件,鼠标滑动#define EV_ABS 0x03----绝对位移事件,触摸屏的点击#define EV_MSC 0x04#define EV_SW 0x05#define EV_LED 0x11#define EV_SND 0x12#define EV_REP 0x14#define EV_FF 0x15#define EV_PWR 0x16#define EV_FF_STATUS 0x17#define EV_MAX 0x1f#define EV_CNT (EV_MAX+1) |
(3)code:输入事件的编码
- 如果type==EV_ABS(绝对位移),测code表示的是坐标轴方向。
1 2 3 4 5 6 7 | /* * Absolute axes */#define ABS_X 0x00----x坐标轴#define ABS_Y 0x01----y坐标轴#define ABS_Z 0x02 |
- 如果type==EV_REL(相对位移),那么code表示的是坐标轴方向
1 2 3 | #define REL_X 0x00----x坐标轴#define REL_Y 0x01----y坐标轴#define REL_Z 0x02----z坐标轴 |
- 如果type==EV_KEY,那么code表示的是具体哪一个按键
1 2 3 4 5 6 7 8 9 10 | #define KEY_1 2#define KEY_2 3#define KEY_3 4#define KEY_4 5#define KEY_5 6#define KEY_A 30#define KEY_S 31#define KEY_D 32#define KEY_F 33 |
(4)value
1 2 3 | 如果type==EV_KEY && code == KEY_A,那么value表示的是按键A的状态:0----松开,1----按下,2---长按如果type==EV_ABS && code == ABS_X,那么value表示的是X轴的具体坐标值 && code == ABS_Y,那么value表示的是Y轴的具体坐标值 |
五、输入子系统驱动设计---以开发板上按键为例
1、定义一个输入设备(input_dev结构体变量)
1 2 3 4 5 6 7 8 9 10 11 12 13 14 15 16 17 18 19 20 21 22 23 24 25 26 27 28 29 30 31 32 33 34 35 36 37 38 39 40 41 42 43 44 45 46 47 48 49 50 51 52 53 54 55 56 57 58 59 60 61 62 63 64 65 66 67 68 69 70 71 72 73 74 75 76 77 78 79 80 | struct input_dev{ const char *name;----输入设备的名字 #cat /proc/bus/input/devices const char *phys; const char *uniq; struct input_id id;----I: Bus=0018 Vendor=12fa Product=2143 Version=0100 ---------------------------------------------- struct input_id { __u16 bustype;----总线类型Bus __u16 vendor;-----厂商编码Vendor __u16 product;----产品编号Product __u16 version;----版本号Version }; unsigned long propbit[BITS_TO_LONGS(INPUT_PROP_CNT)]; unsigned long evbit[BITS_TO_LONGS(EV_CNT)];-----输入设备的类型标志 unsigned long keybit[BITS_TO_LONGS(KEY_CNT)];----如果type==EV_KEY,keybit标识的是那些按键 unsigned long relbit[BITS_TO_LONGS(REL_CNT)]; unsigned long absbit[BITS_TO_LONGS(ABS_CNT)]; unsigned long mscbit[BITS_TO_LONGS(MSC_CNT)]; unsigned long ledbit[BITS_TO_LONGS(LED_CNT)]; unsigned long sndbit[BITS_TO_LONGS(SND_CNT)]; unsigned long ffbit[BITS_TO_LONGS(FF_CNT)]; unsigned long swbit[BITS_TO_LONGS(SW_CNT)]; unsigned int hint_events_per_packet; unsigned int keycodemax; unsigned int keycodesize; void *keycode; int (*setkeycode)(struct input_dev *dev, const struct input_keymap_entry *ke, unsigned int *old_keycode); int (*getkeycode)(struct input_dev *dev, struct input_keymap_entry *ke); struct ff_device *ff; unsigned int repeat_key; struct timer_list timer; int rep[REP_CNT]; struct input_mt_slot *mt; int mtsize; int slot; int trkid; struct input_absinfo *absinfo; unsigned long key[BITS_TO_LONGS(KEY_CNT)]; unsigned long led[BITS_TO_LONGS(LED_CNT)]; unsigned long snd[BITS_TO_LONGS(SND_CNT)]; unsigned long sw[BITS_TO_LONGS(SW_CNT)]; int (*open)(struct input_dev *dev); void (*close)(struct input_dev *dev); int (*flush)(struct input_dev *dev, struct file *file); int (*event)(struct input_dev *dev, unsigned int type, unsigned int code, int value); struct input_handle __rcu *grab; spinlock_t event_lock; struct mutex mutex; unsigned int users; unsigned int users_private; bool going_away; bool disabled; bool sync; struct device dev; struct list_head h_list; struct list_head node;} |
1 | 例如:static struct input_dev *gec6818_key; |
2、给输入设备结构体指针分配内存空间,并做基本的初始化。
1 2 3 4 5 6 7 8 9 10 | /** * input_allocate_device - allocate memory for new input device * * Returns prepared struct input_dev or NULL. * * NOTE: Use input_free_device() to free devices that have not been * registered; input_unregister_device() should be used for already * registered devices. */struct input_dev *input_allocate_device(void) |
3、向内核注册输入设备结构体
1 2 3 4 5 6 7 8 9 10 11 12 13 14 | /** * input_register_device - register device with input core * @dev: device to be registered * * This function registers device with input core. The device must be * allocated with input_allocate_device() and all it's capabilities * set up before registering. * If function fails the device must be freed with input_free_device(). * Once device has been successfully registered it can be unregistered * with input_unregister_device(); input_free_device() should not be * called in this case. */int input_register_device(struct input_dev *dev) |
4、注册申请中断
1 2 3 | static inline int __must_checkrequest_irq(unsigned int irq, irq_handler_t handler, unsigned long flags, const char *name, void *dev) |
5、中断处理程序
1 2 3 4 5 6 7 8 | irqreturn_t xxx_handler(int, void *){ //上报输入事件 void input_event(struct input_dev *dev, unsigned int type, unsigned int code, int value)} |
6、驱动模块的出口函数
1 2 3 4 | (1)注销输入设备 :void input_unregister_device(struct input_dev *dev)(2)释放输入设备内存空间 void input_free_device(struct input_dev *dev) |
六、驱动设计的注意事项
1、输入子系统模型中,自带等待队列。如果没有输入事件,应用程序中的read会阻塞;如果有输入事件,应用程序会被唤醒。
2、输入子系统模型中,自带了默认的文件操作集合,不需要提供文件操作集合
3、输入设备结构体中evbit keybit的位操作,要用到内核源码提供的位接口函数,以下几个位接口函数是原子操作,在位操作时不会 被打断;而”或“和”与“不是原子操作,在与或过程中会被打断。
1 2 3 4 5 6 7 8 9 10 11 12 13 14 15 16 17 18 19 20 21 22 23 24 25 26 27 28 29 30 31 32 33 34 35 36 37 38 39 40 41 42 43 44 45 46 47 48 49 50 51 52 | /* * NMI events can occur at any time, including when interrupts have been * disabled by *_irqsave(). So you can get NMI events occurring while a * *_bit function is holding a spin lock. If the NMI handler also wants * to do bit manipulation (and they do) then you can get a deadlock * between the original caller of *_bit() and the NMI handler. * * by Keith Owens *//** * set_bit - Atomically set a bit in memory * @nr: the bit to set * @addr: the address to start counting from * * This function is atomic and may not be reordered. See __set_bit() * if you do not require the atomic guarantees. * * Note: there are no guarantees that this function will not be reordered * on non x86 architectures, so if you are writing portable code, * make sure not to rely on its reordering guarantees. * * Note that @nr may be almost arbitrarily large; this function is not * restricted to acting on a single-word quantity. */static inline void set_bit(int nr, volatile unsigned long *addr)/** * clear_bit - Clears a bit in memory * @nr: Bit to clear * @addr: Address to start counting from * * clear_bit() is atomic and may not be reordered. However, it does * not contain a memory barrier, so if it is used for locking purposes, * you should call smp_mb__before_clear_bit() and/or smp_mb__after_clear_bit() * in order to ensure changes are visible on other processors. */static inline void clear_bit(int nr, volatile unsigned long *addr)/** * change_bit - Toggle a bit in memory * @nr: Bit to change * @addr: Address to start counting from * * change_bit() is atomic and may not be reordered. It may be * reordered on other architectures than x86. * Note that @nr may be almost arbitrarily large; this function is not * restricted to acting on a single-word quantity. */static inline void change_bit(int nr, volatile unsigned long *addr) |
4、按键驱动中必须有按下和松开两种状态,如果只检测按下(下降沿触发),没有松开,程序会卡死。所以,中断注册时,上升沿和下降沿都触发中断。
七、按键输入设备驱动代码
key_drv.c
1 2 3 4 5 6 7 8 9 10 11 12 13 14 15 16 17 18 19 20 21 22 23 24 25 26 27 28 29 30 31 32 33 34 35 36 37 38 39 40 41 42 43 44 45 46 47 48 49 50 51 52 53 54 55 56 57 58 59 60 61 62 63 64 65 66 67 68 69 70 71 72 73 74 75 76 77 78 79 80 81 82 83 84 85 86 87 88 89 90 91 92 93 94 95 96 97 98 99 100 101 102 103 104 105 106 107 108 109 110 111 112 113 114 115 116 117 118 119 120 | #include <linux/init.h>#include <linux/module.h>#include <linux/kernel.h>#include <linux/cdev.h>#include <linux/fs.h>#include <linux/device.h>#include <linux/ioport.h>#include <linux/io.h>#include <linux/uaccess.h>#include <linux/types.h>#include <linux/gpio.h>#include <cfg_type.h>#include <linux/interrupt.h>#include <linux/miscdevice.h>#include <linux/delay.h>#include <linux/input.h>struct key_gpio_t{ unsigned int irq; unsigned int gpiono; char irqname[20]; unsigned char keyvalue; unsigned int code;};static struct input_dev *key_input=NULL;static struct key_gpio_t key_gpio[]={ {IRQ_GPIO_A_START+28,PAD_GPIO_A+28,"KEY2_GPIOA28",2,KEY_UP}, {IRQ_GPIO_B_START+30,PAD_GPIO_B+30,"KEY3_GPIOB30",3,KEY_DOWN}, {IRQ_GPIO_B_START+31,PAD_GPIO_B+31,"KEY4_GPIOB31",4,KEY_LEFT}, {IRQ_GPIO_B_START+9, PAD_GPIO_B+9,"KEY6_GPIOB9",6,KEY_LEFT},};static irqreturn_t key_handler(int irq, void * dev){ int value; struct key_gpio_t keytmp=*(struct key_gpio_t *)dev; value=gpio_get_value(keytmp.gpiono); input_report_key(key_input, keytmp.code, !value); //上报输入事件 input_sync(key_input); //每次上报事件结束,都需要上报一次同步事件 return IRQ_HANDLED;} static int __init key_init(void){ int ret,i; printk(KERN_INFO"key_init\n"); key_input = input_allocate_device(); if(key_input==NULL) { printk(KERN_INFO"allocate input device failed.\n"); ret = -ENOMEM; goto input_allocate_device_err; } key_input->name = "key_input_dev"; key_input->id.bustype = 0x0001; key_input->id.vendor= 0x0002; key_input->id.product= 0x0003; key_input->id.version = 0x0004; //该输入设备能够触发按键类型的事件 set_bit(EV_KEY,key_input->evbit); //触发的是按键类型中 的KEY_UP KEY_DOWN KEY_LEFT KEY_RIGHT for(i=0;i<4;i++) { set_bit(key_gpio[i].code,key_input->keybit); } //注册输入设备 ret = input_register_device(key_input); if(ret < 0) { printk(KERN_INFO"register input dev failed.\n"); goto input_register_device_err; } for(i=0;i<4;i++) { //按键按下和释放都要检测到 ret = request_irq(key_gpio[i].irq, key_handler,IRQF_TRIGGER_FALLING|IRQF_TRIGGER_RISING,key_gpio[i].irqname,(void*)&key_gpio[i]); if(ret < 0) { printk(KERN_INFO"request_irq fail.\n"); goto irq_request_err; } } return 0;irq_request_err: while(i--) { free_irq(key_gpio[i].irq,NULL); } input_unregister_device(key_input);input_register_device_err: input_free_device(key_input);input_allocate_device_err: return ret;}static void __exit key_exit(void){ int i; printk(KERN_INFO"key_exit\n"); for(i=0;i<4;i++) { free_irq(key_gpio[i].irq,(void *)&key_gpio[i]); } input_unregister_device(key_input); input_free_device(key_input); }module_init(key_init);module_exit(key_exit);MODULE_LICENSE("GPL"); |
main.c
1 2 3 4 5 6 7 8 9 10 11 12 13 14 15 16 17 18 19 20 21 22 23 24 25 26 27 28 29 30 31 32 33 34 35 36 37 38 39 40 41 42 43 44 45 46 47 48 49 50 51 52 53 54 55 56 57 58 59 60 61 62 63 64 65 66 67 68 69 70 71 72 73 74 75 76 77 78 79 80 81 82 83 | #include <sys/types.h>#include <sys/stat.h>#include <fcntl.h>#include <unistd.h>#include <stdio.h>#include <sys/ioctl.h>#include <linux/input.h>struct input_event keyinfo;int main(){ int fd,ret; fd = open("/dev/input/event4",O_RDONLY); if(fd<0) { perror("open event4 error!"); return -1; } while(1) { ret=read(fd,&keyinfo,sizeof(keyinfo)); //没有按键动作,阻塞。 /* if(ret !=1) { perror("read error"); continue; }*/ if(keyinfo.type==EV_KEY) { switch(keyinfo.code) { case KEY_UP: if(keyinfo.value == 1) { printf("key_up press\n"); } else if(keyinfo.value == 0) { printf("key_up release\n"); } break; case KEY_DOWN: if(keyinfo.value == 1) { printf("KEY_DOWN press\n"); } else if(keyinfo.value == 0) { printf("KEY_DOWN release\n"); } break; case KEY_LEFT: if(keyinfo.value == 1) { printf("KEY_LEFT press\n"); } else if(keyinfo.value == 0) { printf("KEY_LEFT release\n"); } break; case KEY_RIGHT: if(keyinfo.value == 1) { printf("KEY_RIGHT press\n"); } else if(keyinfo.value == 0) { printf("KEY_RIGHT release\n"); } break; default: printf("other\n"); break; } } } close(fd);} |


【推荐】国内首个AI IDE,深度理解中文开发场景,立即下载体验Trae
【推荐】编程新体验,更懂你的AI,立即体验豆包MarsCode编程助手
【推荐】抖音旗下AI助手豆包,你的智能百科全书,全免费不限次数
【推荐】轻量又高性能的 SSH 工具 IShell:AI 加持,快人一步
· 震惊!C++程序真的从main开始吗?99%的程序员都答错了
· 别再用vector<bool>了!Google高级工程师:这可能是STL最大的设计失误
· 单元测试从入门到精通
· 【硬核科普】Trae如何「偷看」你的代码?零基础破解AI编程运行原理
· 上周热点回顾(3.3-3.9)