
四、【字符设备】基本字符设备驱动模型
一. 设计驱动程序的步骤:

1、定义一个字符设备结构体struct cdev,用来描述某个字符设备
struct cdev {
	struct kobject kobj;          //内核管理字符设备时使用该程序,驱动程序设计不需要初始化它
	struct module *owner;          //当前字符设备属于哪个内核模块,一般设置THIS_MODULE
	const struct file_operations *ops;  //文件操作集合
	struct list_head list;         //用于管理cdev的内核链表的节点
	dev_t dev;                 //用来存放设备号
	unsigned int count;            //此设备(号)的个数
};
2、初始化字符设备结构体,其中有一个非常重要的成员,文件操作集合成员
struct file_operations-------需要事先定义文件操作集合结构体
void cdev_init(struct cdev *cdev, const struct file_operations *fops) //初始化字符设备结构体
参数:
- cdev:字符设备
- fops:文件操作集合
struct file_operations {
	struct module *owner;
	loff_t (*llseek) (struct file *, loff_t, int);
	ssize_t (*read) (struct file *, char __user *, size_t, loff_t *);
	ssize_t (*write) (struct file *, const char __user *, size_t, loff_t *);
	ssize_t (*aio_read) (struct kiocb *, const struct iovec *, unsigned long, loff_t);
	ssize_t (*aio_write) (struct kiocb *, const struct iovec *, unsigned long, loff_t);
	int (*readdir) (struct file *, void *, filldir_t);
	unsigned int (*poll) (struct file *, struct poll_table_struct *);
	long (*unlocked_ioctl) (struct file *, unsigned int, unsigned long);
	long (*compat_ioctl) (struct file *, unsigned int, unsigned long);
	int (*mmap) (struct file *, struct vm_area_struct *);
	int (*open) (struct inode *, struct file *);
	int (*flush) (struct file *, fl_owner_t id);
	int (*release) (struct inode *, struct file *);
	int (*fsync) (struct file *, loff_t, loff_t, int datasync);
	int (*aio_fsync) (struct kiocb *, int datasync);
	int (*fasync) (int, struct file *, int);
	int (*lock) (struct file *, int, struct file_lock *);
	ssize_t (*sendpage) (struct file *, struct page *, int, size_t, loff_t *, int);
	unsigned long (*get_unmapped_area)(struct file *, unsigned long, unsigned long, unsigned long, unsigned long);
	int (*check_flags)(int);
	int (*flock) (struct file *, int, struct file_lock *);
	ssize_t (*splice_write)(struct pipe_inode_info *, struct file *, loff_t *, size_t, unsigned int);
	ssize_t (*splice_read)(struct file *, loff_t *, struct pipe_inode_info *, size_t, unsigned int);
	int (*setlease)(struct file *, long, struct file_lock **);
	long (*fallocate)(struct file *file, int mode, loff_t offset,
			  loff_t len);
};
3、申请设备号(主设备号,次设备号)
(1)设备号介绍
- 设备号是一个32bit的无符号整数。
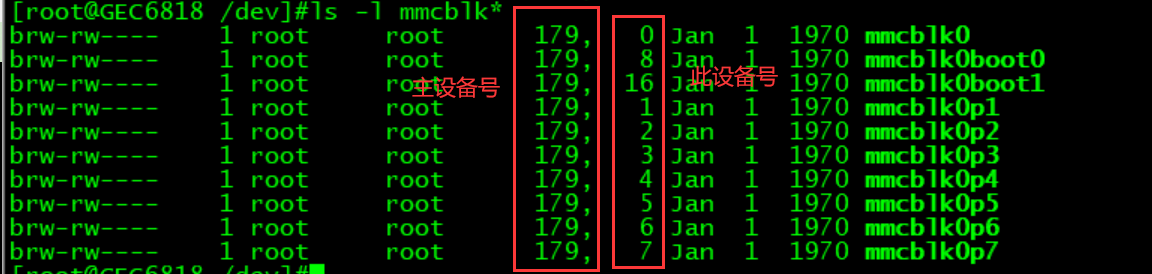
- 高12bit是主设备号——表示某一类设备,主设备号相同,使用同一个驱动程序
- 低20bit是次设备号——表示这一类设备中的具体某个设备。
- 完整的设备号=(major<<20|(minor<<0)。
如下图,都使用mmc的驱动程序,不同的设备次设备号不一样,以此来区分不同的设备。
![]()
- 内核中提供大的设备号相关的宏
#define MINORBITS	20
#define MINORMASK	((1U << MINORBITS) - 1)

#define MAJOR(dev)	((unsigned int) ((dev) >> MINORBITS))  //从完整设备号中获取主设备号
#define MINOR(dev)	((unsigned int) ((dev) & MINORMASK))  //从完整设备号中获取次设备号
#define MKDEV(ma,mi)	(((ma) << MINORBITS) | (mi))       //用主次设备号合成完整设备号
(2)设备号的动态申请
int alloc_chrdev_region(dev_t *dev, unsigned baseminor, unsigned count,
			const char *name)
参数:
- dev:指向的内存用来存申请到的设备号的第一个。
- baseminor:次设备号从几开始。
- count:申请几个。
- name:设备名。注意:设备名和设备文件名不是一样的。用同一个驱动的设备设备名一样,但是设备文件名不一样,应用层是通过设备文件名去访问驱动程序的。
返回值:
- 申请成功返回0,失败返回负的错误码。
(3)设备号的静态申请
int register_chrdev_region(dev_t from, unsigned count, const char *name)
参数:
- from:指定设备号的第一个。
- 申请几个
- 自定义的设备名
返回值:
- 申请成功返回0;失败返回负的错误码。
(4)释放设备号
void unregister_chrdev_region(dev_t from, unsigned count)
- from:从哪个设备号开始释放。
- count:释放几个。
4、字符设备的注册和注销
(1)注册
int cdev_add(struct cdev *p, dev_t dev, unsigned count)
参数:
- p:指向待注册的字符设备结构体
- dev:设备号
- count:注册几个。
返回值:
- 注册成功返回0,失败则返回错误码。
(2)注销
void cdev_del(struct cdev *p)
5、创建跟字符设备对应的设备文件-----应用程序操作设备文件
(1)手动创建----mknod命令
- 如果驱动程序中没有自动创建设备文件,先将驱动文件first_cdev_drv.ko进行安装
insmod firt_cdev_drv.ko
- 查看驱动安装是否成功
cat /proc/devices
- 查看驱动程序中申请的主设备号和次设备号,然后手动创建设备文件
mknod /dev/first_cdev_node c 244 0
- 创建成功后,在/dev/目录下会看到一个first_cdev_node的设备文件。
注意:
手动创建的设备文件,在驱动模块卸载时,不会自动删除,如果需要删除,使用rm命令删除即可。
rm /dev/first_dev_node
(2)自动创建
基本原理:驱动程序提供信息(设备文件名、设备号),根文件系统中的应用程序mdev根据驱动提供的信息,在/dev目录下自动创建出设备文件
- 创建class(创建目录)
struct class * class_create (struct module *owner, const char *name)

参数:
  owner : 一般设置为THIS_MODULE.
  name : 自定义的class名字
- 销毁class
void class_destroy(struct class *cls)
- 在class下创建device
struct device *device_create(struct class *class, struct device *parent,
			     dev_t devt, void *drvdata, const char *fmt, ...)
参数:
  class :在哪个class创建device。
  parent:待创建设备的父设备是哪个。
  devt: 设备号。
  drvdata: 设备驱动的私有数据,一般设置为NULL.
  fmt:自定义的device的名字(设备文件名)。

返回值:
  成功返回strct device*.
  失败返回ERR_PTR()
- 销毁设备
void device_destroy(struct class *class, dev_t devt)
6、申请IO内存(为了资源的互斥访问)和释放IO内存
(1)申请IO内存
request_mem_region(start,n,name)
#define request_mem_region(start,n,name) __request_region(&iomem_resource, (start), (n), (name), 0)
struct resource * __request_region(struct resource *parent, resource_size_t start, resource_size_t n, const char *name, int flags)
参数:
- Start:要申请使用的IO内存(物理内存)的起始地址
- n :要申请的IO内存的大小(字节为单位)
- name:自定义的IO内存的名字
返回值:
- 成功返回struct resource *。
- 失败返回NULL。
(2)释放IO内存
#define release_mem_region(start,n)	__release_region(&iomem_resource, (start), (n))
void __release_region(struct resource *parent, resource_size_t start,resource_size_t n)
7、把IO内存映射成虚拟内存,得到虚拟地址
(1)映射虚拟内存
void __iomem *ioremap(unsigned long phys_addr, size_t size)
参数:
- phys_addr:待映射为虚拟内存的物理内存的起始地址。
- size: 大小,字节为单位。
返回值:
成功返回与物理内存对应的虚拟内存的起始地址。
(2)取消映射
void iounmap(volatile void __iomem *io_addr)
8、驱动程序与应用程序之间的数据交互
(1)写操作
应用层:
write(fd, buf, size);
驱动层:
static ssize_t xxx_write (struct file *filp, const char __user *user, size_t size, loff_t *oft)
{
copy_from_user
}
驱动层主要将用户空间的数据拷贝到驱动层的函数:
static inline unsigned long __must_check copy_from_user(void *to, const void __user *from, unsigned long n)
函数类型:
- __must_check :必须检查该函数的返回值,否则编译时报警告。
- __user : from指针指向的是用户空间某处。
参数:
- to:指向内核空间的某片内存,这片内存用于存储从用户空间拷贝过来的数据
- from: from指针指向的是用户空间某处,从用户空间的此处拷贝数据
- n: 拷贝数据的大小,单位是字节
返回值:
- 返回的是剩余的未拷贝的字节数。
(2)读操作
应用层:
read(fd, buf ,10)
驱动层:
ssize_t xxx_read (struct file *, char __user *, size_t, loff_t *)
{
	copy_to_user
}
static inline unsigned long __must_check copy_to_user(void __user *to, const void *from, unsigned long n)
二、驱动程序编写
功能:《6818开发板流水灯实现》
1、驱动程序解析
#include <linux/kernel.h>
#include <linux/module.h>
#include <linux/init.h>
#include <linux/cdev.h>
#include <linux/fs.h>
#include <linux/types.h>
#include <linux/device.h>
#include <linux/ioport.h>
#include <linux/io.h>
#include <linux/uaccess.h>
static struct cdev led_cdev;//定义字符设备
static dev_t dev;
struct class * led_class=NULL;
struct device * led_device = NULL;
struct resource *led_res = NULL;

static void __iomem * GPIOCBASE = NULL;
static void __iomem * GPIOCOUT = NULL;
static void __iomem * GPIOCOUTENB = NULL;
static void __iomem * GPIOCALTFN0 = NULL;
static void __iomem * GPIOCALTFN1 = NULL;


ssize_t led_write (struct file * filp, const char __user *buf, size_t size, loff_t *oft)
{
	char kbuf[2]={0};
	int ret;
	if(size !=2 )
	{
		printk(KERN_ALERT"size error\n");
		return -EINVAL;
	}
	//获取用于空间的数据
	ret = copy_from_user(kbuf, buf, size);
	if(ret !=0 )
	{
		printk(KERN_ALERT"copy_from_user error\n");
		return (size-ret);
	}

	//printk(KERN_ALERT"ret = %d,kbuf[0]=%d,kbuf[1]=%d\n",ret,kbuf[0],kbuf[1]);

	//根据用户空间的数据,操作不同的LED
	switch(kbuf[0])//哪一个LED
	{
		case 8 :
			if(kbuf[1]==1)
				*(unsigned int *)GPIOCOUT &= ~(1<<17);//D8---GPIOC17
			else if(kbuf[1]==0)
				*(unsigned int *)GPIOCOUT |= (1<<17);
			else
				return -EINVAL;  //代表无效的参数,可以在内核源码中找到EINVAL是一个宏,代表一个错误码
		break;

		case 9 :
			if(kbuf[1]==1)
				*(unsigned int *)GPIOCOUT &= ~(1<<8);//D9---GPIOC8
			else if(kbuf[1]==0)
				*(unsigned int *)GPIOCOUT |= (1<<8);
			else
				return -EINVAL;
		break;

		case 10 :
			if(kbuf[1]==1)
				*(unsigned int *)GPIOCOUT &= ~(1<<7);//D10---GPIOC7
			else if(kbuf[1]==0)
				*(unsigned int *)GPIOCOUT |= (1<<7);
			else
				return -EINVAL;
		break;

		default:
			return -EINVAL;

	}

	return size;

}

//定义文件操作集合结构体
static struct file_operations  fops =
{
	//.open = led_open,//操作集合中没有提供.open和.release
	//.release = led_close,//使用系统默认的,其它操作函数没有默认
	.write 	= led_write,
};

//入口函数
static int  __init led_init (void)
{
	int ret;
	printk("<1>""led_init\n");

	//申请设备号
	ret = alloc_chrdev_region(&dev, 0, 1, "led_chrdev");
	if(ret != 0)
	{
		printk(KERN_ALERT"alloc_chrdev_region fail\n");
		goto alloc_chrdev_region_err;
	}

	//初始化
	led_cdev.owner = THIS_MODULE;
	cdev_init(&led_cdev,&fops);

	//注册字符设备
	ret = cdev_add(&led_cdev, dev, 1);
	if(ret != 0)
	{
		printk(KERN_ALERT"cdev_add fail\n");
		goto cdev_add_err;
	}


	//创建class(创建目录)
	led_class = class_create(THIS_MODULE, "led_class");
	if (IS_ERR(led_class))
	{
		printk(KERN_ALERT"class_create fail\n");
		ret = -EBUSY;
		goto class_create_err;
	}


	//在class下创建device
	led_device = device_create(led_class, NULL, dev, NULL, "led_node");
	if (IS_ERR(led_device))
	{
		printk(KERN_ALERT"class_create fail\n");
		ret = -ENOMEM;
		goto device_create_err;
	}


	//申请物理内存(IO内存)
	led_res = request_mem_region(0xc001c000, 0x44,"led_iomem");
	if(led_res == NULL)
	{
		printk(KERN_ALERT"request_mem_region fail\n");
		ret = -EBUSY;
		goto request_mem_region_err;
	}

	//io内存的动态映射
	GPIOCBASE = ioremap(0xc001c000,0x44);
	if(GPIOCBASE == NULL)
	{
		printk(KERN_ALERT"ioremap fail\n");
		ret = -EBUSY;
		goto ioremap_err;
	}


	GPIOCOUT = GPIOCBASE;
	GPIOCOUTENB = GPIOCBASE + 0x4;
	GPIOCALTFN0 = GPIOCBASE + 0x20;
	GPIOCALTFN1 = GPIOCBASE + 0x24;

	//printk(KERN_ALERT"GPIOCBASE = %p\n",GPIOCBASE);

	//通过映射得到的虚拟地址操作寄存器
	//选择与LED相连引脚为复用功能1---GPIOC7/8/17
	//*(unsigned int *)GPIOCALTFN0 &= ~(0xf<<14);
	writel(  (readl(GPIOCALTFN0) & (~(0xf<<14))),GPIOCALTFN0  );

	*(unsigned int *)GPIOCALTFN0 |= (1<<14) |(1<<16);

	*(unsigned int *)GPIOCALTFN1 &= ~(0x3<<2);
	*(unsigned int *)GPIOCALTFN1 |= (1<<2) ;

	//设置GPIOC7/8/17为output
	*(unsigned int *)GPIOCOUTENB  |= (1<<7) |(1<<8)|(1<<17);

	//默认都灭
	*(unsigned int *)GPIOCOUT |= (1<<7) |(1<<8)|(1<<17);

	return 0;

//各个资源创建申请失败要跳转进行销毁,注意:如果goto跳转到ioremap_err,则会继续执行request_mem_region_err、device_create_err、class_create_err...一直到return。不是只执行一个标签下的语句(这是跳转语句特点)
ioremap_err:
	//释放IO内存
	release_mem_region(0xc001c000,0x44);

request_mem_region_err:
	//销毁device
	device_destroy(led_class, dev);

device_create_err:
	//销毁前面创建成功的class
	class_destroy(led_class);

class_create_err:
	//注销前面注册成的字符设备
	cdev_del(&led_cdev);

cdev_add_err:
	//释放前面申请成功的设备号
	unregister_chrdev_region(dev, 1);

alloc_chrdev_region_err:
	return ret;


}

//出口函数  :卸载驱动模块的时候会执行exit函数,此函数是按照init的反向顺序去销毁和释放资源的。
static void __exit led_exit(void)
{

	printk(KERN_ALERT"led_exit\n");
	//取消映射
	iounmap(GPIOCBASE);

	//释放IO内存
	release_mem_region(0xc001c000,0x44);

	//销毁device
	device_destroy(led_class, dev);

	//销毁class
	class_destroy(led_class);

	//注销字符设备
	cdev_del(&led_cdev);

	//释放设备号
	unregister_chrdev_region(dev, 1);

}


module_init(led_init);
module_exit(led_exit);
MODULE_LICENSE("GPL");
MODULE_AUTHOR("XLG");
MODULE_DESCRIPTION("first chardev drv");


3、应用层程序
#include <sys/types.h>
#include <sys/stat.h>
#include <fcntl.h>
#include <unistd.h>
#include <errno.h>
#include <stdio.h>
int main(void)
{
	char buf[2] = {0};//buf[0]存入LED编号,buf[1]存入LED的亮灭状态
	int ret;
	int fd = open("/dev/led_node",O_RDWR);
	if(fd < 0)
	{
		perror("open failed");
		return -1;
	}

	while(1)
	{

		buf[0] = 10;buf[1]=0;
		ret = write(fd,buf,2);
		if(ret < 0)
		{
			perror("write failed");

		}
		buf[0] = 8;buf[1]=1;
		write(fd,buf,2);
		sleep(1);

		buf[0] = 8;buf[1]=0;
		write(fd,buf,2);
		buf[0] = 9;buf[1]=1;
		write(fd,buf,2);
		sleep(1);

		buf[0] = 9;buf[1]=0;
		write(fd,buf,2);
		buf[0] = 10;buf[1]=1;
		write(fd,buf,2);
		sleep(1);

	}

	close(fd);

	return 0;

}
2、Makefile
obj-m += led_drv.o
CROSS_DIR=/home/gec/6818GEC/prebuilts/gcc/linux-x86/arm/arm-eabi-4.8/bin/arm-eabi-
KERN_DIR=/home/gec/6818GEC/kernel
all:
	make ARCH=arm CROSS_COMPILE=$(CROSS_DIR) -C $(KERN_DIR) M=`pwd` modules
     #编译应用层程序
	cp *.ko /opt/nfs
	arm-linux-gcc test.c -o test
	cp test /opt/nfs

clean:
	make ARCH=arm CROSS_COMPILE=$(CROSS_DIR) -C $(KERN_DIR) M=`pwd` modules clean
	rm test -f
