uvm 用例选择机制(run_test)
UVM的用例选择机制run_test()
1、编写基于UVM的最简单代码
harness.v
module harness(clk, rst);
input clk;
input rst;

endmodule
test_uvm.sv

```sv
`include "uvm_pkg.sv"
import uvm_pkg::*;

class my_driver extends uvm_driver;
    `uvm_component_utils(my_driver);// 注册my_driver,让my_driver类型存在一张表中,这样run_test("my_driver")或者my_driver::type_id::create("my_driver",this)才能找到my_driver类型,然后通过factory例化my_driver。
    function new(string name="my_driver", uvm_component parent=null); // 必须定义new函数,因为如果不定义,那么默认的new函数是无参函数,但是在create的时候需要一个有两个参数的函数。
        super.new(name.parent);
    endfunction

endclass

class my_env extends uvm_env;
    `uvm_component_utils(my_env);
    my_driver m_driver;

    function new(string name="my_env", uvm_component parent=null);
        super.new(name, parent);
    endfunction

    function void build_phase(uvm_phase phase);
        m_driver = my_driver::type_id::create("my_driver", this);  // 在my_env下例化了,my_driver,那么my_driver就是my_env的子节点。
    endfunction

    task main_phase(uvm_phase phase);
      phase.raise_objection(this);// 为了harness中有时间
         uvm_top.print_topology();   // 打印环境的拓扑结构
      #100;               // 为了harness中有时间
      phase.drop_objection(this);
    endtask
endclass

program automatic test;

    initial begin
        $display("hello");
     force harness.clk = 1'b1;  // force rtl中的信号
     force harness.rst = 1'b0;
        run_test();               // run_test()根据+UVM_TESTNAME=xxx参数,选择例化的component,xxx必须是注册了的component类型。这个语句一般在harness的initial语句中。
    end
endprogram
2、编写编译和执行的Makefile脚本(基于VCS)
Makefile
export file := test

run: cmp # 第一个目标就是默认目标,只敲make就是执行这个目标,目标依赖cmp,所以会先去执行cmp目标
    @echo run simv ....
    ./simv +UVM_TESTNAME=my_env # VCS默认生成的可执行文件就是simv,+UVM_TESTNAME为参数,用于$value$plusargs()接收。

cmp:
    vcs -full64 -sverilog $(file).sv -ntb_opts uvm-1.1 # -ntb_opt uvm-1.1是VCS编译的参数,目的是要VCS去吃UVM的库文件,这样`include "uvm_pkg.sv"的时候才能找到。
    # 本来想用+incdir+/software/synopsys/vcs/2018.09.sp2/etc/uvm-1.1方式来加UVM的库文件,但这种方式加库文件不彻底,编译没问题,执行的时候报错。
写好Makefile后,直接敲make file=test_uvm即可完成编译和执行
3、执行结果

可以看到,uvm_test_top为my_env,my_env下面包含了my_driver,由于uvm_driver中例化了uvm_analysis_port和uvm_seq_item_pull_port所以my_driver下面还有子节点。
4、原理分析
在my_env中使用了`uvm_component_utils(my_driver)宏对my_env进行了注册,这样my_env这个类就添加到了uvm_factory中的表中,运行simv后,执行到run_test()函数时会根据+UVM_TESTNAME选择注册的component类进行例化。

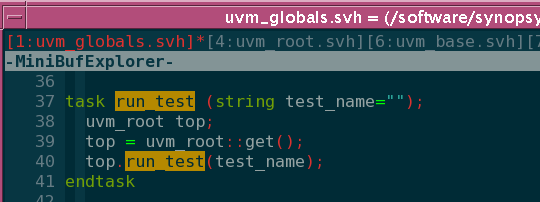
调用的run_test任务在uvm_globals.svh中,接着直接调用了uvm_root的run_test任务。

在uvm_root的run_test中先用$value$plusargs任务获取UVM_TESTNAME参数赋给test_name,我们传的参数是my_env;然后用factory根据名字test_name调用create_component_by_name函数查表例化component对象,并把对象实例名设为uvm_test_top。这个节点节点的父节点为null所以说这是根节点(其实还有uvm_top节点)

后续开始执行各个phase,环境自动跑起来。


