Spring学习笔记
Spring 学习笔记
Spring概述
Spring框架是什么
Spring是于2003年兴起的一个轻量级的 Java开发框架,是为了解决企业应用开发的复杂性而创建的。
Spring的核心是控制反转(IoC)和面向切面编程(AOP)
Spring是可以在 Java SE/EE 中使用的轻量级开源框架
Spring的主要作用就是为了代码的“解耦”,降低代码间的耦合度。就是让对象和对象(模块和模块)之间的关系不是使用代码相关联而是通过配置来说明。即在 Spring中说明对象(模块)间的关系。
Spring根据代码的功能特点,使用 IoC降低业务对象之间的耦合度。IoC使得主业务在相互调用的过程中不用再自己维护关系了,即不用再自己创建要使用的对象了。而是由 Spring容器统一管理,自动“注入”(赋值)。而 AOP使得系统级服务得到了最大复用,且不用再由程序员手工将系统级服务“混杂”到主业务逻辑中了,而是由 Spring容器统一完成“织入”。
Spring的优点
Spring是一个框架,一个半成品的软件。由 20 个模块组成。是一个容器管理对象。
容器是装东西的,Spring 容器是装对象的,是存储对象的容器。
1)轻量
Spring框架使用的 jar包都比较小,一般在 1M以下或者几百KB。
Spring核心功能的所需 jar包总共在 3M左右
Spring框架运行占用的资源少,运行效率高,不依赖其他 jar
2)面向接口编程,解耦合
Spring框架提供了 IoC控制反转,由容器管理对象和对象间的依赖关系。
原来在程序代码中的对象创建方式,现在由容器完成,对象之间的依赖解耦合。
3)AOP编程的支持
通过 Spring提供的 AOP功能,方便进行面向切面的编程
许多不容易用传统 OOP 实现的功能可以通过 AOP轻松应付
在Spring中,开发人员可以从繁杂的事务管理代码中解脱出来
通过声明式方式灵活地进行事务的管理,提高开发效率和质量
4)方便集成各种优秀框架
Spring不排斥各种优秀的开源框架,相反,Spring可以降低各种框架共同使用的难度
Spring提供了针对各种优秀框架(如:Struts2, Hibernate, MyBatis等)的直接支持,简化了框架的使用
Spring像是插线板一样,其他框架就是插头,可以很容易地组合到一起。
Spring的体系结构

Spring由 20 多个模块组成,它们可以分为
- 数据访问/集成(Data Access / Integration)
- Web
- 面向切面编程(AOP, Aspects)
- JVM代理(Instrumentation)
- 消息发送(Messaging)
- 核心容器(Core Container)
- 测试(Test)
IoC 控制反转
控制反转(IoC,Inversion of Control)
是一个概念,指将传统上由程序代码直接操控的对象调用权交给容器,通过容器来实现对象的装配和管理
控制反转就是对象控制权的转移,从程序代码本身反转到了外部容器,通过容器实现对象的创建、属性的赋值、依赖的管理
依赖
ClassA类中含有 ClassB的实例,在 ClassA中调用 ClassB的方法完成功能,即 ClassA对 ClassB有依赖
DI
依赖注入(DI, Dependency Injection)是 IoC实现的关键所在,程序代码不做定位调查,这些工作由容器自行注入
依赖注入是指程序运行过程中,若需要调用另一个对象协助时,无须再代码中创建被调用者,而是依赖于外部容器,由外部容器创建后传递给程序
Spring的依赖注入对调用者和被调用者几乎没有任何要求,完全支持对象之间依赖关系的管理。
Spring使用依赖注入实现IoC。Spring容器是一个超级大工厂,负则创建、管理所有的 Java对象,这些Java对象被称为 Bean,Spring使用依赖注入的方式管理着容器中 Bean之间的依赖关系
Spring的第一个程序
1)创建 Maven项目
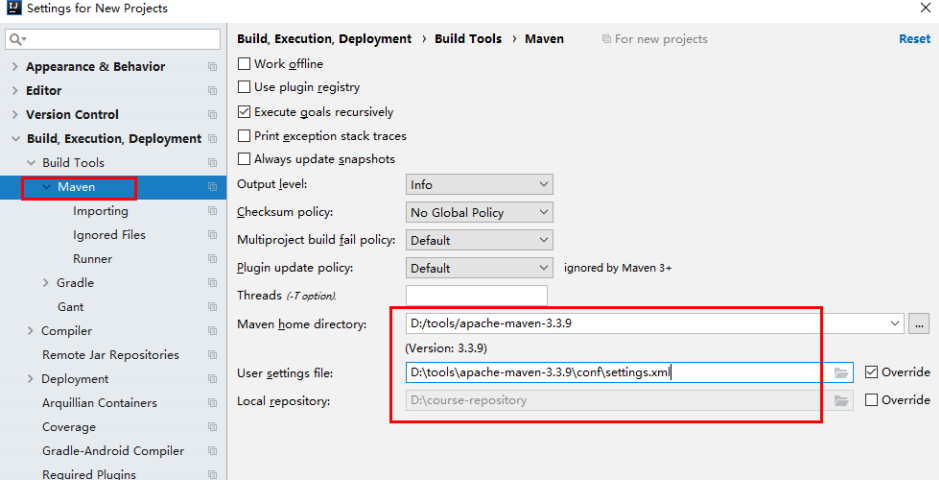
2)引入 pom依赖
<dependency>
    <groupId>org.springframework</groupId>
    <artifactId>spring-context</artifactId>
    <version>5.2.5.RELEASE</version>
</dependency>

<build>
    <plugins>
        <plugin>
            <artifactId>maven-compiler-plugin</artifactId>
            <version>3.1</version>
            <configuration>
                <source>1.8</source>
                <target>1.8</target>
            </configuration>
        </plugin>
    </plugins>
</build>
3)定义接口和实体类
// 定义接口
public interface SomeService {
    void doSome();
}
// 定义实体类
public class SomeServiceImpl implements SomeService {
    public SomeSerivceImpl() {
        super();
        System.out.println("SomeServiceImpl的无参构造");
    }

    @Override
    public void doSome() {
        System.out.println("业务方法 doSome()");
    }
}
4)创建 Spring配置文件
在 src/main/resources/ 目录下创建一个 xml文件,名字任意,建议为 applicationContext.xml
<?xml version="1.0" encoding="UTF-8"?>
<beans xmlns="http://www.springframework.org/schema/beans"
       xmlns:xsi="http://www.w3.org/2001/XMLSchema-instance"
       xsi:schemaLocation="http://www.springframework.org/schema/beans http://www.springframework.org/schema/beans/spring-beans.xsd">

    <bean id="someServiceImpl" class="com.bjpowernode.service.SomeServiceImpl"></bean>
</beans>
- <bean>标签用于定义一个实例对象,一个实例对应一个 bean元素
- id:是 Bean实例的唯一标识,程序通过 id属性访问 Bean,Bean 与 Bean之间的依赖关系也是通过 id属性关联的
- class:指定该 Bean所属的类,不能是接口
5)创建测试类
// 测试类

@Test
public void test01() {
    // 指定 Spring配置文件的位置和名称
    String resource = "applicationContext.xml";
    // 创建 Spring容器对象
    ApplicationContext ac = new ClassPathXmlApplicationContext(resource);
    // 从 Spring容器中获取对象,使用 id
    SomeService service = (SomeService) ac.getBean("someService");
    // 执行对象的业务方法
    service.doSome();
}
容器接口和实现类
ApplicationContext 是用于加载 Spring的配置文件,在程序中充当“容器”的角色,有两个实现类
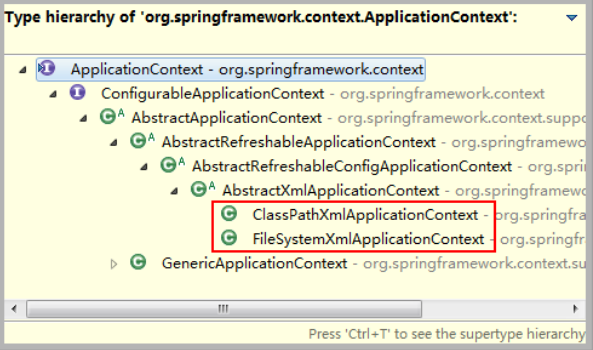
A)配置文件在类路径下
若 Spring配置文件存放在项目的类路径下,则使用 ClassPathXmlApplicationContext 实现类的加载
@Test
public void test02() {
    // Spring配置文件在类路径下(classpath)
    String resource = "applicationContext.xml";
    // 创建 Spring容器对象
    ApplicationContext ac = new ClassPathXmlApplicationContext(resource);
    // 从 Spring容器中获取对象,使用 id
    SomeService service = (SomeService) ac.getBean("someService");
    service.doSome();
}
B)ApplicationContext容器中对象的装配时机
Spring 会在容器对象初始化时将其中的所有对象一次性全部装配好,以后代码中若要使用到这些对象,只需从内存中直接获取即可。执行效率高,但占用内存多。
// ApplicationContext 容器装载对象的时机
@Test
public void test07() {
    // 获取容器,此时容器中的所有对象都已装配完毕
    ApplicationContext ac = new ClassPathXmlApplicationContext("applicationContext.xml");
}
C)使用 Spring容器创建的 java对象

基于 XML的 DI
set注入
set注入也叫做设值注入,指通过 setter方法传入被调用者的实例,这种方法简单直观,因而在 Spring的依赖注入中大量使用
A)简单类型
//  创建实体类
public class Student {
    private String name;
    private int age;
    // setter, toString()
}
<!-- ApplicationContext.xml -->
<bean id="myStudnet" class="com.bjpowernode.ba01.Studnet">
	<property name="name" value="张三" />
    <property name="age" value="20" />
</bean>


<bean id="myDate" class="java.util.Date">
	<property name="time" value="1234566794" />
</bean>
// 测试类
@Test
public void test01() {
    ApplicationContext ac = new ClassPathXmlApplicationContext("ApplicationContext.xml");
    Studnet stu = (Student) ac.getBean("myStudent");
    System.out.println("Studnet:" + stu);
    Date date = (Date) ac.getBean("myDate");
    System.out.println("Date:" + date);
}
B)引用类型
当指定 bean的某属性值为另一 bean的实例时,通过 ref属性指定它们间的引用关系,ref的值必须为某 bean的 id值
// 定义实体类
public class Student {
    private String name;
    private int age;
    private School school;
    // setters, toString()
}


public class School {
    private String name;
    private String address;
    // setters, toString()
}
<!-- ApplicationContext.xml -->
<bean id="mySchool" class="com.bjpowernode.ba02.school" >
	<property name="name" value="北京大学" />
    <property name="address" value="北京海淀" />
</bean>

<bean id="myStudent" class="com.bjpowernode.ba02/Student" >
    <!-- 简单类型赋值 -->
	<property name="name" value="张三" />
    <property name="age" value="20"/>
    <!-- 引用类型赋值 -->
    <property name="school" ref="mySchool" />
</bean>
// 测试方法
@Test
public void test01() {
    ApplicationContext ac = new ClassPathXmlApplicationContext("applicationContext.xml");
    Studnet stu = (Studnet) ac.getBean("myStudent");
    System.out.println("Student:" + stu);
}
构造注入
构造注入指的是在构造调用者实例的同时完成被调用者的实例化,即使用构造器设置依赖关系
// 有参构造的实体类
public Student(String myname, int myage, School myXuexiao) {
    System.out.println("Student类的有参构造");
    this.name = myname;
    this.age = myage;
    this.school = myXuexiao;
}
<!-- applicationContext.xml -->
<bean id="myStudnet" class="com.bjpowernode.ba03.Student" >
	<constructor-arg name="myage" value="22" />
    <constructor-age name="myname" value="张三" />
    <constructor-aeg name="myXuexiao" ref="mySchool" />
</bean>
<constructor-arg>标签中用于指定参数的属性有:
- name:指定参数名称
- index:指定该参数对应着高早期的第几个参数,从0开始计数
引用类型属性的自动注入
对于引用类型属性的注入,也可以不在配置文件中显示的注入,通过 <bean>标签设置 autowire属性值,为引用类型属性进行隐式地自动注入
A)byName 方式自动注入
当配置文件中被调用者 bean的 id值与代码中调用者 bean类的属性名相同时,可使用 byName方式,让容器自动将被调用者 bean注入给调用者 bean。
容器是通过调用者的 bean类的属性名和配置文件的被调用者 bean的 id进行比较而实现自动注入的。
// 构造实体类
public class Studnet {
    private String name;
    private int age;

    private School school;
}

public class School {
    private String name;
}
<!-- applicationContext.xml -->
<bean id="school" class="com.bjpowernode.ba04.School" >
	<property name="name" value="北京大学" />
</bean>

<bean id="myStudent" class="com.bjpowernode.ba04.School"  autowire="byName">
	<property name="name" value="张三" />
    <property name="age" value="20" />
</bean>
// 测试类
@Test
public void test01() {
    ApplicationContext ac = new ClassPathXmlApplicationContext("applicationContext.xml");
    Student stu = (Student) ac.getBean("myStudent");
     System.out.println("Student:" + stu);
}
B)byType方式自动注入
使用 byType方式自动注入,要求:配置文件中被调用者 bean的 class属性指定的类与代码中调用者 bean类的某引用类型属性类型同源,即要么相同,要么有 is-a 关系(子类或是实现类)。
但这样的同源的被调用 bean只能有一个,多于一个,容器就不知道该匹配哪一个了!
// 构造实体类
public class Studnet {
    private String name;
    private int age;

    private School school;
}

public class School {
    private String name;
}
<!-- applicationContext.xml -->
<bean id="mySchool" class="com.bjpowernode.ba04.School" >
	<property name="name" value="北京大学" />
</bean>

<bean id="myStudent" class="com.bjpowernode.ba04.School"  autowire="byType">
	<property name="name" value="张三" />
    <property name="age" value="20" />
</bean>
// 测试类
@Test
public void test02() {
    ApplicationContext ac = new ClassPathXmlApplicationContext("applicationContext.xml");
    Student stu = (Student) ac.getBean("myStudent");
     System.out.println("Student:" + stu);
}
为应用指定多个配置文件
在实际应用里,随着应用规模的增加,系统中 Bean数量也大量增加,导致配置文件变得非常庞大、臃肿。为了避免这种情况的产生,提高配置文件的可读性与可维护性,可以将 Spring配置文件按分解成多个配置文件。
多个配置文件中有一个汇总文件,总配置文件将各个其他子文件通过 <import>标签引入。在 Java代码中只需要使用总配置文件对容器进行初始化即可。
<!-- applicationContext.xml -->
<import resource="classpath:com/bjpowernode/ba06/spring-schoool.xml" />
<import resource="classpath:com/bjpowernode/ba06/spring-student.xml" />
<!-- 也可以使用通配符 *,此时要求父配置文件名不能满足 * 所能匹配的格式,否则将出现循环递归包含 -->
<import resource="classpath:com/bjpowernode/ba06/spring-*.xml" />
// 测试类
@Test
public void test01() {
    AplicationContext ac = new ClassPathXmlApplicationContext("applicationContext.xml");
    Student student = (Studnet) ac.getBean("myStudent");
    System.out.println("Student:" + student);
}
基于注解的 DI
对于 DI 使用注解, 将不再需要在 Spring配置文件中声明 bean实例。
Spring中使用注解,需要在原有 Spring运行环境上再做一些改变。
需要在 Spring配置文件中配置组件扫描器,用于在指定的基本包中进行扫描
<?xml version="1.0" encoding="UTF-8"?>
<beans xmlns="http://www.springframework.org/schema/beans"
       xmlns:xsi="http://www.w3.org/2001/XMLSchema-instance"
       xmlns:context="http://www.springframework.org/schema/context"
       xsi:schemaLocation="http://www.springframework.org/schema/beans
        http://www.springframework.org/schema/beans/spring-beans.xsd
        http://www.springframework.org/schema/context
        http://www.springframework.org/schema/context/spring-context.xsd">

    <context:component-scan base-package="com.kuang"></context:component-scan>
</beans>
1)使用多个 <context:component-scan>指定不同的包路径
<context:component-scan base-package="com.bjpowernode.beans" />
<context:component-scan base-package="com.bjpowernode.beans" />
2)在指定 base-package 的值使用分隔符
<!-- 逗号分隔 -->
<context:component-scan base-package="com.bjpowernode.beans,com.bjpowernode.beans" />
<!-- 分号分隔 -->
<context:component-scan base-package="com.bjpowernode.beans;com.bjpowernode.beans" />
<!-- 空格分隔 -->
<context:component-scan base-package="com.bjpowernode.beans com.bjpowernode.beans" />
3)base-package指定到父包名
base-package的值是基本包,容器启动时会扫描该包及其子包中的注解,当然也会扫描到子包下级的子包,所以 base-package可以指定一个父包就可以了
<context:component-scan base-package="com.bjpowernode" />
<!-- 或者 -->
<context:component-scan base-package="com" />
但不建议使用顶级的父包,扫描路径增多会导致容器启动时间变慢。
定义 Bean的注解 @Component
需要在类上使用注解 @Component,该注解的 value属性用于指定该 bean的 id值
// 注解参数中可以省略 value属性名,直接指定 Bean的 id值
@Component("myStudent")
public class Student {
  	private String name;
    private int age;
}
另外,Spring还提供了 3个创建对象的注解:
- @Repository:用于对 DAO实现类进行注解
- @Service:用于对 Service实现类进行注解,创建业务层对象,可以加入事务功能
- @Controller:用于对 Controller实现类进行注解,创建处理层对象,可以接收用户的请求
如果 @Component 注解不指定 value属性,bean 的 id 是类名的首字母小写
// 构建实体类
@Component
public class Student{}
// 测试类
@Test
public void test01() {
    ApplicationContext ac = new ClassPathXmlApplicationContext("applicationContext.xml");
    Student student = (Student) ac.getBean("student");
}
简单类型属性注入 @Value
需要在属性上使用注解 @Value,该注解的 value属性用于指定要注入的值
使用该注解完成属性注入时,类中可以没有 setters方法
//  构建实体类
@Component("myStudnet")
public class Student {
    @Value("张三")
    private String name;
    @Value("21")
    private int age;
}
byType自动注入 @Autowired
需要在引用属性上使用注解 @Autowired,该注解默认使用按类型自动装配 Bean的方式
使用该注解完成属性注入时,类中可以没有 setter
// 构造实体类
@Component
public class Student {
    @Value("张三")
    private String name;
    @Value("21")
    private int age;
    @Autowired
    private School school;
}
byName自动注入 @Autowired 和 @Qualifier
需要在引用属性上联合使用注解 @Autowired与 @Qualifier
@Qualifier的 value属性用于指定要匹配的 Bean的 id值,类中可以没有 setters方法
// 构造实体类
@Component
public class Student {
    @Value("张三")
    private String name;
    @Value("21")
    private int age;
    @Autowired
    @Qualifier("mySchool")
    private School school;
}
@Autowired还有一个属性 required,默认值为 true,表示当匹配失败后会报错并终止程序运行,若设置为 false,匹配失败后,将被忽略,未匹配到的内容将被设置为 null
JDK注解 @Resource 实现自动注入
Spring 提供了对 JDK中 @Resource注解的支持。
@Resource注解既可以按名称匹配 Bean,也可以按类型匹配 Bean。默认是按名称注入
JDK版本必须在 6 以上
1)byType注入引用类型属性
@Resource 注解若不带任何参数,采用默认按名称的方式注入,若按名称不能注入 bean,则会自动转换为按类型注入
// 构建实体类
@Component
public class Student {
    @Value("张三")
    private String name;
    @Value("21")
    private int age;
    @Resource
    private School school;
}
2)byName注入引用类型属性
@Resource注解指定其 name属性,则 name的值即为按照名称进行匹配的 Bean的 id值
// 构造实体类
@Component
public class Student {
    @Value("张三")
    private String name;
    @Value("21")
    private int age;
    @Resource(name = "mySchool")
    private School school;
}
注解方式与 配置文件方式的对比
注解方式的优点
- 方便
- 直观
- 高效
- 代码少
弊端:以硬编码的方式写入到 Java代码中,修改时需要重新编译代码
XML方式的优点
- 配置和代码是分离的
- 在 XML文件中做修改,无需编译代码,只需重启服务器即可重新加载配置文件
弊端:编写麻烦,效率低下,过于复杂
AOP 面向切面编程
不使用AOP的开发方法
A)直接继承接口
先定义好接口和一个实现类,该实现类中除了要实现接口中的方法外,还要再写两个非业务方法(交叉业务逻辑):
- doTransaciton():处理业务逻辑
- doLog():用于日志处理
// 编写接口
public interface SomService {
    void doSome();
    void doOther();
}
// 编写实现类
public class SomServiceImpl implements SomeService {
    @Override
    public void doSome() {
        doLog();
        System.out.println("执行了业务方法doSome");
        doTrans();
    }

    @Override
    public void doOther() {
        doLog();
        System.out.println("执行了业务方法doOther");
        doTrans();
    }

    public void doLog() {
        System.out.println("非业务功能,日志功能,在方法开始时输出日志");
    }

    public void doTrans() {
        System.out.println("非业务功能,事务功能,在方法执行后加入事务");
    }
}
B)编写工具类
将交叉业务逻辑代码专门放到工具类或处理类中调用
//  定义工具类
public class ServiceTools {
    public static void doLog() {
        System.out.println("非业务功能,日志功能,在方法开始时输出日志");
    }


    public static void doTrans() {
        System.out.println("非业务功能,事务功能,在方法执行后加入事务");
    }
}
// 编写实现类
public class SomServiceImpl implements SomeService {
    @Override
    public void doSome() {
       ServiceTools.doLog();
        System.out.println("执行了业务方法doSome");
        ServiceTools.doTrans();
    }

    @Override
    public void doOther() {
       ServiceTools.doLog();
        System.out.println("执行了业务方法doOther");
        ServiceTools.doTrans();
    }
}
C)动态代理
以上的解决方案中,交叉业务逻辑代码和主业务深度耦合在一起。当交叉业务逻辑代码较多时,在主业务代码中会出现大量的交叉业务逻辑代码调用语句,大大影响了著业务逻辑的可读性,降低了代码的可维护性,同时也增加了开发的难度。
所以,可以采用动态代理的方式,在不修改主业务逻辑的前提下,扩展和增强其功能
// 编写代理类
public class MyInvocationHandler implements InvocationHandler {
    private Object target;
    public MyInvocationHandler(Object object) {
        super();
        this.target = object;
    }

    public MyInvocationHandler() {}

    @Override
    public Object invoke(Object proxy, Method method, Object[] args) throws Throwable {
        Object obj = null;
        // 在方法之前输出日志
        ServiceTools.doLog();
        // 执行目标方法,执行target对象的方法
        obj = method.invoke(target, args);
        // 在方法之后执行事务
        ServiceTools.doTrans();
        // 返回目标方法的执行结果
        return obj;
    }
}
// 编写测试类
@Test
public void doTest() {
    // 创建代理对象
	SomeService target = new SomeServiceImpl();
    MyInvocationHandler handler = new MyInvocationHandler(target);

    SomeService proxy = (SomeService) Proxy.newProxyInstance(target.getClass().getClassLoader(), target.getClass().getInterfaces(), handler);

    // 通过代理对象执行业务方法,实现日志和事务的增强
    proxy.doSome();
    proxy.doOther();
}
AOP简介
AOP(Aspect Oriented Programming),面向切面编程。面向切面编程是从动态的角度考虑程序执行的过程
AOP底层,就是采用动态代理模式实现的。采用两种代理:JDK的动态代理 和 CGLIB的动态代理
AOP是指,通过运行期动态代理实现程序功能的统一维护的一种技术。AOP是 Spring框架中的一个重要内容。利用 AOP可以对业务逻辑的各个部分进行隔离,从而使得业务逻辑各部分之间的耦合度降低,提高程序的可重用性,同时提高开发效率。
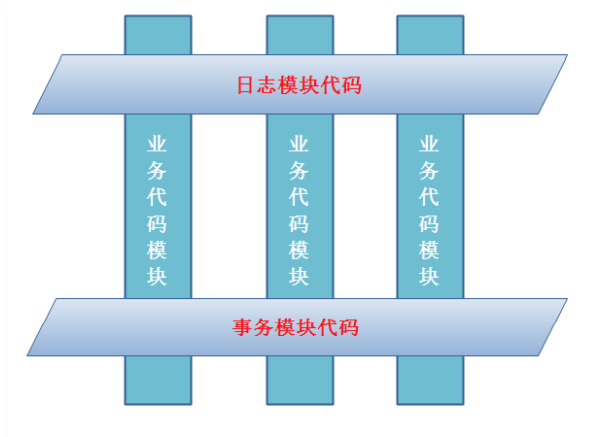
面向切面编程就是将交叉业务逻辑封装成切面,利用 AOP容器的功能将切面织入到主业务逻辑中。所谓交叉业务逻辑是指,通用的、与业务逻辑无关的代码,如安全检查、事务、日志、缓存等。
若不使用 AOP,则会出现代码纠缠,即交叉业务逻辑与主业务逻辑混合在一起。这样,会使主业务逻辑变得混杂不清
例如:转账功能,在真正的转账业务逻辑前后,需要权限控制、日志记录、加载事务、结束事务等交叉业务逻辑,而这些业务逻辑与主业务逻辑间并没有直接关系。但,它们的代码量所占比重达到总代码量的一半甚至更多。它们的存在,不仅产生了大量的“冗余”还会干扰主业务逻辑——转账。
AOP的好处
面向切面编程能有效的减少代码重复,使程序员专注于业务操作。
AOP术语
1)切面(Aspect)
切面泛指交叉业务逻辑,上例中的事务处理、日志处理就可以理解为切面,常用的切面是 通知(Advice)
实际上就是对主业务逻辑的一种增强
2)连接点(JoinPoint)
连接点指可以被切面织入的具体方法,通常业务接口中的方法均为连接点
3)切入点(PointCut)
切入点指声明一个或多个连接点的集合,通过切入点指定一组方法
被标记为 final的方法是不能作为连接点和切入点的,不能被增强。
4)目标对象(Target)
目标对象指将要被增强的对象,即包含主业务逻辑的类的对象。
上例中的 StudentServiceImpl 的对象若被增强,则该类称为目标类,该对象称为目标对象。
5)通知(Advice)
通知表示切面的执行时间,Advice也叫增强。
上例中的 MyInvocationHandler就可以理解为一种通知,换个角度说,。通知定义了增强代码切入到目标代码的时间点,是目标方法执行前还是执行后等。通知类型不同,切入时间不同。
切入点定义了切入的位置,通知定义切入的时间
AspectJ
对于 AOP这种编程思想,很多框架都进行了实现。Spring就是其中之一,可以完成面向切面编程。然而,AspectJ也实现了 AOP的功能,且其实现方式更为简洁,使用更为方便,而且支持注解开发。所以 Spring又将 AspectJ的对于 AOP的实现也引入到了自己的框架中。
在 Spring中使用 AOP开发时,一般使用 AspectJ的实现方式。

AspectJ的通知类型
AspectJ中常用的通知有 5种类型:
- 前置通知
- 后置通知
- 环绕通知
- 异常通知
- 最终通知
AspectJ的切入点表达式
AspectJ定义了专门的表达式用于指定切入点
// 表达式原型
execution([modifiers-pattern] ret-type-pattern [declaring-type-pattern]name-pattern(param-pattern) [throws-pattern])
- modifiers-pattern:访问权限类型
- ret-type-pattern:返回值类型
- declaring-type-pattern:包名类名
- name-pattern(param-pattern):方法名(参数类型和参数个数)
- throws-pattern:抛出异常类型
总结:execution(访问权限 方法返回值 方法声明(参数) 异常类型)
切入表达式要匹配的对象就是目标方法的方法名,所以,execution表达式中明显就是方法的签名。各部分间用空格分开,在其中可以使用以下符号:
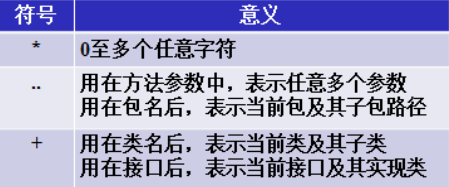
举例:
- execution(public * *(..)):任意公共方法
- execution(* set*(..)):任何一个以 set开始的方法
- execution(* com.xyz.service.*.*(..)):在service包下或子包下的任意类的任意方法,.. 出现在类名中时,后面必须跟 * 表示包、子包下的所有类
- execution(* *..service.*.*(..)):所有包下的service及其子包下的所有类(接口)中的所有方法
- execution(* *.service.*.*(..)):一级包下的service及其子包下所有类(接口)中的所有方法
- execution(* *.ISomeService.*(..)):一级包下的 ISomeService包下的所有类(接口)中的所有方法
- execution(* *..ISomeService.*(..)):所有包下的 ISomeService包下的所有类(接口)中的所有方法
- execution(* com.xyz.service.IAccountService.*(..)):IAccountService 接口中的任意方法。
- execution(* com.xyz.service.IAccountService+.*(..)):IAccountService 若为接口,则为接口中的任意方法及其所有实现类中的任意 方法;若为类,则为该类及其子类中的任意方法。
- execution(* joke(String,int))):所有的 joke(String,int)方法,且 joke()方法的第一个参数是 String,第二个参 数是 int。如果方法中的参数类型是 java.lang 包下的类,可以直接使用类名,否则必须使用 全限定类名,如 joke( java.util.List, int)。
- execution(* joke(String,*))):所有的 joke()方法,该方法第一个参数为 String,第二个参数可以是任意类 型,如joke(String s1,String s2)和joke(String s1,double d2)都是,但joke(String s1,double d2,String s3)不是。
- execution(* joke(String,..))):所有的 joke()方法,该方法第一个参数为 String,后面可以有任意个参数且 参数类型不限,如 joke(String s1)、joke(String s1,String s2)和 joke(String s1,double d2,String s3) 都是。
- execution(* joke(Object)):所有的 joke()方法,方法拥有一个参数,且参数是 Object 类型。joke(Object ob) 是,但,joke(String s)与 joke(User u)均不是。
- execution(* joke(Object+))):所有的 joke()方法,方法拥有一个参数,且参数是 Object 类型或该类的子类。 不仅 joke(Object ob)是,joke(String s)和 joke(User u)也是。
AspectJ的开发环境
1)添加 pom依赖
<dependency>
    <groupId>junit</groupId>
    <artifactId>junit</artifactId>
    <version>4.11</version>
    <scope>test</scope>
</dependency>
<dependency>
    <groupId>org.springframework</groupId>
    <artifactId>spring-context</artifactId>
    <version>5.2.5.RELEASE</version>
</dependency>
<dependency>
    <groupId>org.springframework</groupId>
    <artifactId>spring-aspects</artifactId>
    <version>5.2.5.RELEASE</version>
</dependency>

<build>
    <plugins>
        <plugin>
            <artifactId>maven-compiler-plugin</artifactId>
            <version>3.1</version>
            <configuration>
                <source>1.8</source>
                <target>1.8</target>
            </configuration>
        </plugin>
    </plugins>
</build>
2)引入AOP约束
在 AspectJ 实现 AOP时,需要引入 AOP的约束,配置文件中使用的AOP约束中的标签,均是在 AspectJ框架中使用的,而非 Spring框架本身在实现 AOP时使用的。
AspectJ对于 AOP的实现有注解和配置文件两种方式,通常是注解方式
注解实现 AOP
1)定义业务接口和实现类
// 定义业务接口
public interface SomeService {
    void doSome(String name, int age);
}
// 定义实现类
public class SomeServiceImpl implements SomeService {
    @Override
    public void doSome(String name, int age) {
        System.out.println("执行了业务方法 doSome");
    }
}
2)定义切面类
类中定义了若干普通方法,作为不同的通知方法,用来增强功能。
// 定义切面类
@Aspect
public class MyAspect {
    @Before(value="execution(* com.bjpowernode.ba01.SomeServiceImpl.doSome(..))")
    public void myBefore() {
        // 切面代码的功能,例如:日志的输出,事务的处理
        System.out.println("前置通知,在目标方法前执行,如输出日志");
    }
}
3)声明目标对象切面类对象并注册 AspectJ的自动代理
<!-- applicationContext.xml -->
<bean id="SomeServiceTarget" class="com.bjpowernode.ba01.SpmeServiceImpl" />
<bean id="myAspect" class="com.bjpowernode.ba01.MyAspect" />
<aop:aspectj-autoproxy />
<aop:aspectj-autoproxy />会在 Spring配置文件中注册一个基于 AspectJ的自动代理生成器,会自动扫描 @Aspect注解,并按通知类型与切入点,将其织入生成代理。
<aop:aspectj-autoproxy />的底层是由 AnnotationAwareAspectJAutoProxyCreator 实现的
4)编写测试类
// 编写测试类
@Test
public void test01() {
    ApplicationContext ac = new ClassPathXmlApplicationContext("applicationContext.xml");
    // 从Spring容器中获取目标对象(经过 aspectj修改后的代理对象)
    SomeService proxy = (SomeService) ac.getBean("someServiceTarget");
    System.out.println("proxy:" + proxy.getClass().getName());
    proxy.doSome("张三", 21);
}
各种通知方法
1)@Before 前置通知方法
在目标方法执行之前执行,被逐节为前置通知的方法,可以包含一个 JoinPoint类型的参数,该类型的对象本身就是切入点表达式
/**
* 通知方法:使用了通知注解修饰的方法
* 通知方法可以有参数,但参数不是任意的
*/


@Before(value="execution(* *..SomeServiceImpl.do*(..))")
public void myBefore2(JoinPoint jp) {
    // JoinPoint能够获取到方法的定义,方法的参数等诸多信息
    System.out.println("连接点的方法定义:" + jp.getSignature());
    System.out.println("连接点方法的参数个数:" + jp.getArgs().length;
    // 方法的参数信息
    Object[] args = jp.getArgs();
	for(Object o:args) {
        System.out.println(arg);
    }
	// 就是切面代码的功能,例如日志的输出,事务的处理
	System.out.println("前置通知:在方法之前执行,如输出日志")
}
2)@AfterReturning 后置通知方法
在目标方法执行之后执行。由于是目标方法之后执行,所以可以获取到目标方法的返回值
该注解的 returning属性就是用于接收方法返回值的变量名的,接收返回值的变量最好是 Object类型
// 接口增加方法
public interface SomeService {
    String doOther(String name, int age);
}
// 实现方法
@Override
public String doOther(String name, int age) {
    System.out.println("执行了业务方法doOther");
    return "abcd";
}
// 定义切面
@AfterReturning(value="execution(* *..SomeServiceImpl.doOther(..))", returning="result")
public void myAfterReturning(Object result) {
    // 修改目标方法的执行结果
    if(result != null) {
        String s = (String)result;
        result = s.toUpperCase();
    }
    System.out.println("后置通知:在目标方法之后执行的功能增强,例如执行事务处理(切面)" + result);
}
3)@Around 环绕通知方法
在目标方法执行之前和之后执行,被注解为环绕增强的方法要有返回值,为 Object类型。并且方法可以包含一个 ProceedingJoinPoint类型的参数,用于执行目标方法,若目标方法有返回值,则该方法的返回值就是目标方法的返回值。最后,环绕增强方法将其返回值返回。
// 定义接口
public interface SomeService {
    String doFirst(String name, int age);
}
// 实现接口方法
@Override
public String doFirst(String name, int age) {
    System.out.println("执行了业务方法 doFirst");
    return "doFirst";
}
// 定义切面
@Around(value="execution(* *..SomeServiceImpl.doFIrst(..))")
public Object myAround(ProceedingJoinPoint pjp) throws Throwable {
    Object obj = null;
    // 增强功能
    System.out.println("环绕通知:在目标方法之前执行的,例如:输出日志");
    // 执行目标方法的调用,等同于 method.invoke(target, args)
    obj = pjp.proceed();
    // 增强功能
    System.out.println("环绕通知:在目标方法之后执行的,例如:处理事务");
    // 返回目标方法的执行结果
    return obj;
}
4)@AfterThrowing 异常通知方法
在目标方法抛出异常后执行,该注解的 throwing属性用于指定所发生的异常类对象。
被注解为异常通知的方法可以包含一个参数 Throwable,参数名称为 throwing 指定的名称,表示发生的异常对象。
// 增加业务方法
public interface SomeService {
    void doSecond();
}
// 方法实现
@Override
public void doSecond() {
    System.out.println("执行了业务方法 doSecond" +(10 / 0));
}
// 定义切面
@AfterThrowing(value="execution(* *..SomeServiceImpl.doSecond(..))", throwing="ex")
public void myAfterThrowing(Throwable ex) {
    // 把异常发生的时间、位置、原因,记录到数据库、日志文件等等
    // 在异常发生时,把异常信息通过短信、邮件的形式发送给开发人员
    System.out.println("异常通知:在目标方法抛出异常时执行的,异常原因:" + ex.getMessage());
}
5)@After 最终通知方法
无论目标方法是否抛出了异常,该增强均会被执行
// 增强方法
public interface SomService {
    void doThird();
}
// 方法实现
@Override
public void doThird() {
    System.out.println("执行了业务方法 doThird" + (10 / 0));
}
// 定义切面
@After(value="execution(* *..SomeServiceImpl.doThird(..))")
public void myAfter() {
    System.out.println("最终通知:总是会被执行的方法");
}
6)@Pointcut 定义切入点
当较多的通知增强方法使用相同的 execution表达式时,编写、维护均比较麻烦。
AspectJ提供了 @Pointcut注解,用于定义在 execution切入点表达式
其用法是:将@Pointcut注解在一个方法上,以后所有的 execution的 value属性值均可使用该方法名作为切入点,被 @Pointcut注解作用的方法一般使用 private的标识方法,没有实际作用的方法。
// 举例
@Pointcut(value="execution(* *..SomeServiceImpl.doThird(..))")
private void mypt() {
    // 无需代码
}

@After(value="mypt()")
public void myAfter() {
    System.out.println("最终通知:总是会被执行的方法");
}
Spring集成MyBatis
将 MyBatis与 Spring进行整合,主要解决的问题就是将 SqlSessionFactory对象交由 Spring来管理。
所以,只需要将 SqlSessionFactory的对象生成器 SqlSessionFactoryBean注册在 Spring容器中,再将其注入给 Dao的实现类即可完成整合。
实现 Spring与 MyBatis的整合常用的方式:扫描的 Mapper动态代理
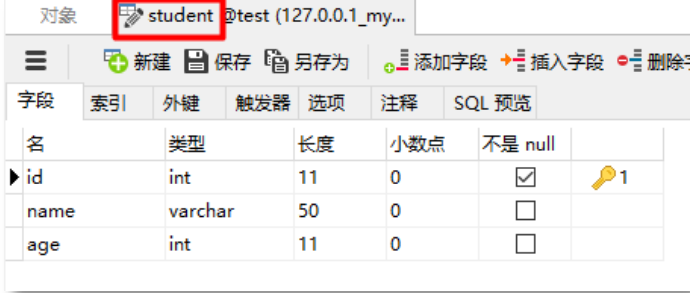
环境构建
<!-- pom.xml -->
<dependency>
    <groupId>junit</groupId>
    <artifactId>junit</artifactId>
    <version>4.11</version>
    <scope>test</scope>
</dependency>
<dependency>
    <groupId>org.springframework</groupId>
    <artifactId>spring-context</artifactId>
    <version>5.2.5.RELEASE</version>
</dependency>
<dependency>
    北京动力节点 www.bjpowernode.com 讲师王鹤
    37
    <groupId>org.springframework</groupId>
    <artifactId>spring-tx</artifactId>
    <version>5.2.5.RELEASE</version>
</dependency>
<dependency>
    <groupId>org.springframework</groupId>
    <artifactId>spring-jdbc</artifactId>
    <version>5.2.5.RELEASE</version>
</dependency>
<dependency>
    <groupId>org.mybatis</groupId>
    <artifactId>mybatis</artifactId>
    <version>3.5.1</version>
</dependency>
<dependency>
    <groupId>org.mybatis</groupId>
    <artifactId>mybatis-spring</artifactId>
    <version>1.3.1</version>
</dependency>
<dependency>
    <groupId>mysql</groupId>
    <artifactId>mysql-connector-java</artifactId>
    <version>5.1.9</version>
</dependency>
<dependency>
    <groupId>com.alibaba</groupId>
    <artifactId>druid</artifactId>
    <version>1.1.12</version>
</dependency>
<build>
    <resources>
        <resource>
            <directory>src/main/java</directory><!--所在的目录-->
            <includes><!--包括目录下的.properties,.xml 文件都会扫描到-->
                <include>**/*.properties</include>
                <include>**/*.xml</include>
            </includes>
            <filtering>false</filtering>
        </resource>
    </resources>
    <plugins>
        <plugin>
            <artifactId>maven-compiler-plugin</artifactId>
            <version>3.1</version>
            <configuration>
                <source>1.8</source>
                <target>1.8</target>
            </configuration>
        </plugin>
    </plugins>
</build>
// 定义实体类
public class Student {
    private int id;
    private String name;
    private int age;
    // setters getters toString()
}
// 定义 StudentDao接口
public interface StudentDao {
    int insertStudent(Student student);
    int updateStudent(Student student);
    int deleteStudentById(int id);

    Student selectStudentById(int id);
    List<Student> selectAllStudents();
}
<!-- 定义 Mapper文件 -->
<?xml version="1.0" encoding="UTF-8" ?>
<!DOCTYPE mapper PUBLIC "-//mybatis.org//DTD Mapper 3.0//EN" "http://mybatis.org/dtd/mybatis-3-mapper.dtd" >
<mapper namespace="com.bjpowernode.dao.StudentDao">
    <insert id="insertStudent">
    	insert into student(name, age)
        values(#{name}, #{age})
    </insert>

    <update id="updateStudent">
    	update student
        set name=#{name}, age=#{age}
        where id=#{id}
    </update>

    <delete id="deleteStudentById">
    	delete from student
        where id=#{studnetId}
    </delete>

    <select id="selectStudentById" resultType="student">
    	select id, name, age
        from student
        where id=#{sutdentId}
    </select>

    <select id="selectAllStudents" resultType="student">
        select id, name, age
        from student
        order by id desc
    </select>
</mapper>
// 定义 Service接口和实现类
public interface StudentService {
    int addStudent(Student student);
    int modifyStudent(Student student);
    int removeStudent(Student student);

    Student findStudentById(int id);
    List<Student> findAllStudent();
}
// 定义实现类
public class StudentServiceImpl implements StudentService {
    // 定义 Dao的引用类型的属性
    private StudentDao studentDao;
    // 定义set方法
    public void setStudentDao(StudentDao studentDao) {
        this.studentDao = studentDao;
    }

    @Override
    public int addStudent(Student student) {
        return studentDao.insertStudent(student);
    }

    @Override
    public int modifyStudent(Student student) {
        return studentDao.updateStudent(student);
    }

    @Override
    public int removeStudent(int id) {
        return studentDao.deleteStudentById(id);
    }

    @Override
    public Student findStudentById(int id) {
        return studentDao.selectStudentById(id);
    }

    @Override
    public List<Student> findAllStudnets() {
        return studentDao.selectAllStudents();
    }
}
<!-- 定义 MyBatis主配置文件 -->
<!--
 1)主配置文件中不再需要数据源的配置了,数据源交给 Spring容器来管理
-->
<?xml version="1.0" encoding="UTF-8"?>
<!DOCTYPE configuration
        PUBLIC "-//mybatis.org//DTD Config 3.0//EN"
        "http://mybatis.org/dtd/mybatis-3-config.dtd">
<configuration>
    <typeAliases>
        <package name="com.kuang.pojo"/>
    </typeAliases>

    <mappers>
        <mapper class="com.kuang.mapper.UserMapper"></mapper>
    </mappers>
</configuration>
// 定义属性文件
jdbc.driver=com.mysql.jdbc.Driver
jdbc.url=jdbc:mysql:///test
jdbc.user=root
jdbc.password=zhao
<!-- 修改 Spring配置文件 -->
<?xml version="1.0" encoding="UTF-8"?>
<beans xmlns="http://www.springframework.org/schema/beans"
       xmlns:xsi="http://www.w3.org/2001/XMLSchema-instance"
       xmlns:context="http://www.springframework.org/schema/context"
       xmlns:aop="http://www.springframework.org/schema/aop"
       xsi:schemaLocation="http://www.springframework.org/schema/beans http://www.springframework.org/schema/beans/spring-beans.xsd http://www.springframework.org/schema/context https://www.springframework.org/schema/context/spring-context.xsd http://www.springframework.org/schema/aop https://www.springframework.org/schema/aop/spring-aop.xsd">


   <!-- 从属性文件读取数据库连接池 -->
    <context:property-placeholder location="classpath:db.properties" file-encoding="utf8"/>
	<!-- 配置数据库连接池 -->
    <bean class="com.alibaba.druid.pool.DruidDataSource" id="druid" init-method="init" destroy-method="close">
        <property name="url" value="${jdbc.url}"/>
        <property name="username" value="${jdbc.username}"/>
        <property name="password" value="${jdbc.password}"/>
        <property name="maxActive" value="${jdbc.maxActive}"/>
    </bean>
	<!-- 注册 SqlSessionFactory -->
    <bean class="org.mybatis.spring.SqlSessionFactoryBean" id="sqlSessionFactory">
        <property name="dataSource" ref="druid"/>
        <property name="configLocation" value="classpath:mybatis-config.xml"/>
    </bean>
	<!-- 定义 Mapper扫描配置器 MapperScannerConfigurer -->
    <bean class="org.mybatis.spring.mapper.MapperScannerConfigurer" id="configurer">
        <property name="basePackage" value="com.kuang.dao"/>
        <property name="sqlSessionFactoryBeanName" value="sqlSessionFactory"/>
    </bean>
	<!-- 向 Service注入接口名 -->
    <bean class="com.kuang.service.Impl.UserServiceImpl" id="userService">
        <property name="mapper" ref="userMapper"/>
    </bean>

    <aop:aspectj-autoproxy/>
</beans>
Druid数据源 DruidDataSource,是阿里的开源数据库连接池。是 Java语言中最好的数据库连接池之一。Druid能够提供强大的监控和扩展功能。
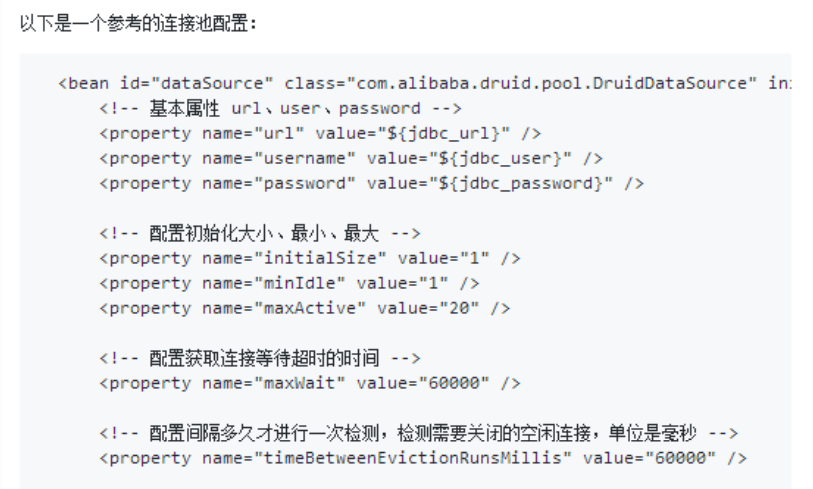
<context:property-placehoder location=“classpath:db.properties”/>标签可导入类路径下的 properties文件
Spring事务
事务管理
事务原本是数据库中的概念,在 Dao层。
但一般情况下,需要将事务上升到业务层,即 Service层
在 Spring中通常可以通过以下两种方式实现对事务的管理:
- 使用 Spring的事务注解管理
- 使用 AspectJ的 AOP配置管理
事务管理API
Spring的事务管理,主要用到两个事务相关的接口
事务管理接口
事务管理器是 Platform TransactionManager 接口对象,主要用于完成事务的提交、回滚,及获取事务的状态信息。

A)常用的两个实现类
PlatfromTransactionManager接口有两个常用的实现类:
- DataSourceTransactionManager:使用 JDBC或 MyBatis进行数据库操作时使用
- HibernateTransactionManager:使用 Hibernate进行持久化数据时使用
B)Spring的回滚方式
Spring事务的默认回滚方式是:发生运行时异常和 error时回滚,发生受查(编译)异常时提交。
C)回顾错误和异常
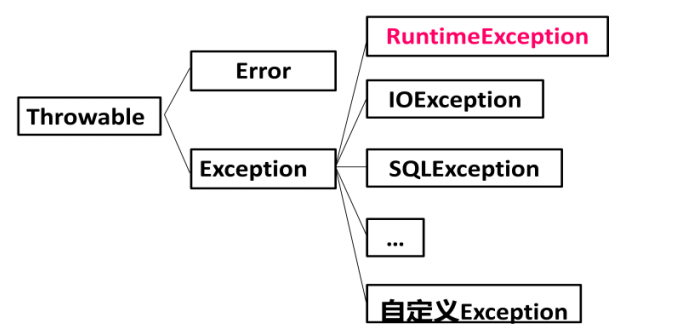
Throwable类是 Java语言中所有错误或异常的超类。只有当对象是此类(或其子类之一)的实例时,才能通过 Java虚拟机或者 Java的 throw语句抛出。
Error是程序正在运行过程中出现的无法处理的错误,比如:OutOfMemoryError, ThreadDeath, NoSuchMethodError等。当发生这些错误时,程序自身是无法处理的,JVM一般会终止线程。
程序在编译和运行时出现的另一类错误称为异常,是 JVM通知程序员的一种方式。通过这种方式,让程序员指导已经或者可能出现的错误,要求程序员对其进行处理。
异常分为 运行时异常和受查异常
运行时异常:是 RuntimeException类或其子类,即只有在运行时才出现的异常。如:NullPointerException, ArrayIndexOutOfBoundsException, ILeagakArgumentException等均属于运行时异常。这些异常通常由 JVM抛出,在编译时不要求必须处理。但只要代码编写足够仔细,程序足够健壮就可以避免。
受查异常:也叫编译时异常,即在代码编写时要求必须捕获或抛出的异常,若不处理,则无法通过编译。如:SQLException, ClassNotFoundException, IOException等都属于受查异常。
RuntimeException及其子类以外的异常,均属于受查异常。当然,用户自定义的 Exception的子类,即用户自定义的异常也属于受查异常。
事务定义接口
事务定义接口 TransactionDefinition 中定义了事务描述相关的三类常量:
- 事务隔离级别
- 事务传播行为
- 事务默认超时时限

A)五个事务隔离级别
- ISOLATION_DEFAULT:采用 DB 默认的事务隔离级别。MySQL的默认是 REPEATABLE_READ, Oracle的默认是 READ_COMMITTED
- ISOLATION_READ_UNCOMMITTED:读未提交,为解决任何并发问题
- ISOLATION_READ_COMMITTED:读已提交,解决脏读
- ISOLATION_REPEATABLE_READ:可重复读,解决脏读、不可重复读
- ISOLATION_SERIALIZABLE:串行化,不存在并发问题
B)七个事务传播行为常量
所谓事务传播行为是指,处于不不同事务中的方法在相互调用时,执行期间事务的维护情况。
如:A事务中的方法 doSome() 调用 B事务中的方法 doOther(),在调用执行期间事务的维护情况,就称为事务传播行为。事务传播行为是加在方法上的。
- PROPAGATION_REQUIRED
- PROPAGATION_REQUIRES_NEW
- PROPAGATION_SUPPORTS
- PROPAGATION_MANDATORY
- PROPAGATION_NESTED
- PROPAGATION_NEVER
- PROPAGATION_NOT_SUPPORTED
PROPAGATION_REQUIRED
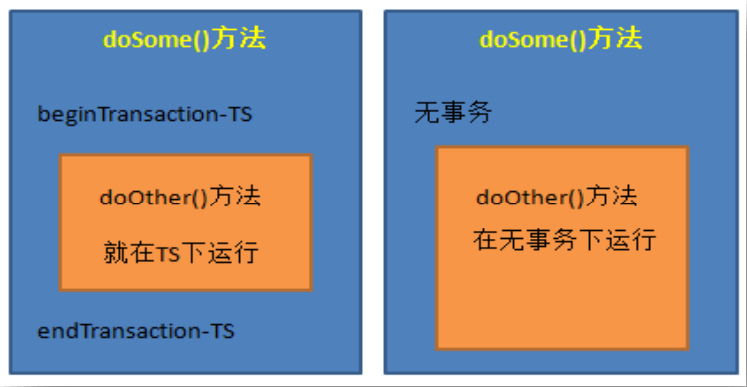
指定的方法必须在事务内执行,若当前存在事务,就加入到当前事务中;若当前没有事务,则创建一个新事务。
这种传播行为是最常见的选择,也是 Spring默认的事务传播行为。
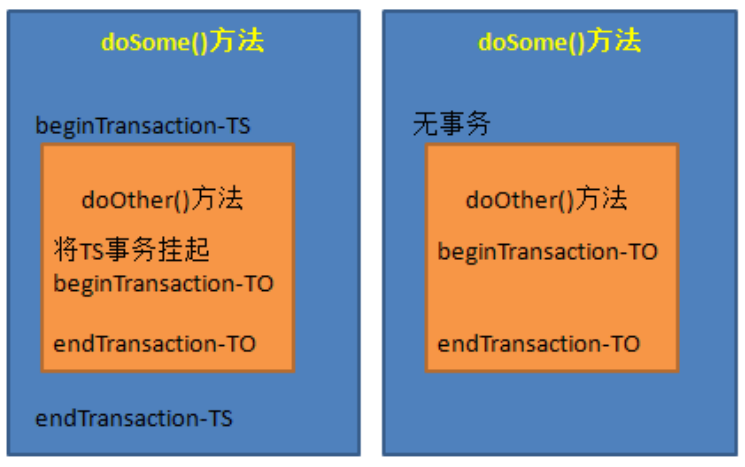
如:该传播行为加在 doOther()方法上,若 doSome()方法在调用 doOther()方法时就是在事务内运行的,则 doOther()方法的执行也加入到该事务内执行。若 doSome()方法在调用 doOther()方法时没有在事务内执行,则 doOther()方法会创建一个事务,并在其中执行。

PROPAGATION_REQUIRES_NEW
总是新建一个事务,若当前存在事务,就将当前事务挂起,知道新事务执行完毕。
PROPAGATION_SUPPORTS
指定的方法支持当前事务,但若当前没有事务,也可以以非事务方式执行
C)定义默认事务超时时限
常量 TIMEOUT_DEFAULT 定义了事务底层默认的超时时限,SQL语句的执行时长。
注意:事务的超时时限起作用的条件比较多,且超时的时间计算点较复杂,所以,该值一般就是用默认值即可。
环境搭建
1)创建数据库表
创建两个数据库表 sale, goods


2)添加 pom依赖
<dependency>
    <groupId>junit</groupId>
    <artifactId>junit</artifactId>
    <version>4.11</version>
    <scope>test</scope>
</dependency>
<dependency>
    <groupId>org.springframework</groupId>
    <artifactId>spring-context</artifactId>
    <version>5.2.5.RELEASE</version>
</dependency>
<dependency>
    <groupId>org.springframework</groupId>
    <artifactId>spring-tx</artifactId>
    <version>5.2.5.RELEASE</version>
</dependency>
<dependency>
    <groupId>org.springframework</groupId>
    <artifactId>spring-jdbc</artifactId>
    <version>5.2.5.RELEASE</version>
</dependency>
<dependency>
    <groupId>org.mybatis</groupId>
    <artifactId>mybatis</artifactId>
    <version>3.5.1</version>
</dependency>
<dependency>
    <groupId>org.mybatis</groupId>
    <artifactId>mybatis-spring</artifactId>
    <version>1.3.1</version>
</dependency>
<dependency>
    <groupId>mysql</groupId>
    <artifactId>mysql-connector-java</artifactId>
    <version>5.1.9</version>
</dependency>
<dependency>
    <groupId>com.alibaba</groupId>
    <artifactId>druid</artifactId>
    <version>1.1.12</version>
</dependency>
<build>
    <resources>
        <resource>
            <directory>src/main/java</directory><!--所在的目录-->
            <includes><!--包括目录下的.properties,.xml 文件都会扫描到-->
                <include>**/*.properties</include>
                <include>**/*.xml</include>
            </includes>
            <filtering>false</filtering>
        </resource>
    </resources>
    <plugins>
        <plugin>
            <artifactId>maven-compiler-plugin</artifactId>
            <version>3.1</version>
            <configuration>
                <source>1.8</source>
                <target>1.8</target>
            </configuration>
        </plugin>
    </plugins>
</build>
3)创建实体类
// 创建实体类
public class Goods {
    private Integer id;
    private String name;
    private Integer amount;
    private float price;
}


public class Sale {
    private Integer id;
    private Integer gid;
    private Integer nums;
}
4)定义 Dao接口
// 定义两个 dao的接口
public interface GoodsDao {
    int updateGoods(Goods goods);
    Goods selectGoods(Integer goodsId);
}

public interface SaleDao {
    int insertSale(Sale sale);
}
5)创建映射文件
<!-- 创建对应的映射文件-->
<mapper namespace="com.bjpowernode.dao.SaleDao">
	<insert id="insertSale">
    	insert into sale(gid, nums)
        values(#{gid}, #{nums})
    </insert>
</mapper>


<mapper namespace="com.bjpowernode.dao.GoodsDao">
	<update id="updateGoods">
    	update goods
        set amount = amount - #{amount}
        where id=#{id}
    </update>

    <select id="selectGoods" resultType="goods">
    	select id, name, price, amount
        from goods
        where id=#{goondsId}
    </select>
</mapper>
6)定义异常类
定义 service层可能会抛出的异常类 NotEnoughException
// 定义异常类
public class NotEnoughException extends RuntimeException {
    public NotEnoughException() {
        super();
    }

    public NotEnoughException(String msg) {
        super(msg);
    }
}
7)定义 Service接口
定义 Service接口 BuyGoodsService
// 定义接口
public interface BuyGoodsService {
    public void buy(Integer goodsId, Integer amount);
}
8)定义 service实现类
定义 service层接口的实现类 BuyGoodsServiceImpl
// 定义实现类
public class BuyGoodsServiceImpl implements BuyGoodsService {
    private GoodsDao goodsDao;
    private SaleDao saleDao;

    public void setGoodsDao(GoodsDao goodsDao) {
        this.goodsDao = goodsDao;
    }
    public void setSaleDao(SaleDao saleDao) {
        this.saleDao = saleDao;
    }

    public void buy(Integer goodsId, Integer amount) {
        Sale sale = new Sale();
        sale.setGid(goodsId);
        sale.setNums(amount);
        saleDao.insertSale(sale);
        Goods goods = goodsDao.selectGoods(GoodsId);
        if(goods == null) {
            throw new NullPointerException("无此商品");
        }
        if(goods.getAmount() < amount) {
            throw new NotEnoughException("库存不足");
        }
        goods = new Goods();
        goods.setAmount(amount);
        goods.setId(goodsId);
        goodsDao.updateGoods(goods);
    }
}
9)修改 Spring配置文件内容
<!-- 修改 Spring配置文件 -->
<?xml version="1.0" encoding="UTF-8"?>
<beans xmlns="http://www.springframework.org/schema/beans"
       xmlns:xsi="http://www.w3.org/2001/XMLSchema-instance"
       xmlns:context="http://www.springframework.org/schema/context"
       xmlns:aop="http://www.springframework.org/schema/aop"
       xsi:schemaLocation="http://www.springframework.org/schema/beans http://www.springframework.org/schema/beans/spring-beans.xsd http://www.springframework.org/schema/context https://www.springframework.org/schema/context/spring-context.xsd http://www.springframework.org/schema/aop https://www.springframework.org/schema/aop/spring-aop.xsd">


   <!-- 从属性文件读取数据库连接池 -->
    <context:property-placeholder location="classpath:db.properties" file-encoding="utf8"/>
	<!-- 配置数据库连接池 -->
    <bean class="com.alibaba.druid.pool.DruidDataSource" id="druid" init-method="init" destroy-method="close">
        <property name="url" value="${jdbc.url}"/>
        <property name="username" value="${jdbc.username}"/>
        <property name="password" value="${jdbc.password}"/>
        <property name="maxActive" value="${jdbc.maxActive}"/>
    </bean>
	<!-- 注册 SqlSessionFactory -->
    <bean class="org.mybatis.spring.SqlSessionFactoryBean" id="sqlSessionFactory">
        <property name="dataSource" ref="druid"/>
        <property name="configLocation" value="classpath:mybatis-config.xml"/>
    </bean>
	<!-- 定义 Mapper扫描配置器 MapperScannerConfigurer -->
    <bean class="org.mybatis.spring.mapper.MapperScannerConfigurer" id="configurer">
        <property name="basePackage" value="com.kuang.dao"/>
        <property name="sqlSessionFactoryBeanName" value="sqlSessionFactory"/>
    </bean>
	<!-- 向 Service注入接口名 -->
    <bean id="buyService" class="com.bjpowernode.service.impl.BuyGoodsServiceImpl">
    	<property name="goodsDao" ref="goodsDao" />
        <property name="saleDao" ref="saleDao" />
    </bean>

    <aop:aspectj-autoproxy/>
</beans>
10)定义测试类
定义测试类 MyTest,现在就可以在无事务代理的情况下运行了
// 定义测试类
public void testBuy() {
    ApplicationContext ac = new ClassPathXmlApplicationContext("applicationContext.xml");
    BuyGoodsService service = (BuyGoodsService) ac.getBean("buyService");
    service.buy(1001, 2);
}
注解管理事务
通过 @Transactional 注解方式,可以将事务织入到相应的 public 方法中,实现事务管理。
@Transactional的所有可选属性如下所示:
- propagation:设置事务传播属性,为 Propagation枚举,默认值为 Propagation.REQUIRED
- isolation:设置事务的隔离级别,为 Isolation枚举,默认值为 Isolation.DEFAULT
- readOnly:设置该方法对数据库的操作是否是只读的,为 boolean,默认值是 false
- timeout:设置本操作与数据库连接的超时时限,为 int,单位为秒,默认值是 -1 即没有时限
- rollbackFor:指定需要回滚的异常类,为 Class[],默认值为空数组
- noRollbackFor:指定不需要回滚的异常类,为 Class[],默认为空数组
- rollbackForClassName:指定需要回滚的异常类类名,为 String[],默认值为空数组
- noRollbackForClassName:指定不需要回滚的异常类类名,为 String[],默认值为空数组
注意:@Transactional注解只能用在 public方法上,若将 @Transactional注解在类上,则表示该类上所有的方法均将在执行时织入事务
1)配置 applicationContext.xml 文件
<bean id="trasactionManager" class="org.springframework.jdbc.datasource.DataSourceTransactionManager">
	<property name="dataSource" ref="dataSource" />
</bean>

<tx:annotation-driven transaction-manager="transactionManager" />
2)业务层 public方法加入事务属性
@Transactional(propagation=Propagation.REQUIRED, rollbackFor={NotEnoughException.class, NullPointerException.class})
public void buy(Integer goodsId, Integer amount) {
    Sale sale = new Sale();
    sale.setGid(goodsId);
    sale.setNums(amount);
    saleDao.insertSale(sale);
    Goods goods = goodsDao.selectGoods(GoodsId);
    if(goods == null) {
        throw new NullPointerException("无此商品");
    }
    if(goods.getAmount() < amount) {
        throw new NotEnoughException("库存不足");
    }
    goods = new Goods();
    goods.setAmount(amount);
    goods.setId(goodsId);
    goodsDao.updateGoods(goods);
}
AspenctJ管理事务
使用 XML配置事务代理的方式的不足是:每个目标类都需要配置事务代理,当目标类较多时,配置文件会变得臃肿不堪。
使用 XML配置顾问方式可以自动为每个符合切入点表达式的类生成事务代理
1)添加 pom依赖
<dependency>
    <groupId>org.springframework</groupId>
    <artifactId>spring-aspects</artifactId>
    <version>5.2.5.RELEASE</version>
</dependency>
2)添加事务管理器
<bean id="trasactionManager" class="org.springframework.jdbc.datasource.DataSourceTransactionManager">
	<property name="dataSource" ref="dataSource" />
</bean>
3)配置事务通知
<tx:advice id="buyAdvice" transaction-manage="transactionManager">
	<tx:attributes>
    	<tx:method name="buy" propagation="REQUIRE" isolation="DEFAULT" rollback-for="java.lang.NullPointerException, com.bjpowernode.exceptions.NotEnoughException" />
        <tx:method name="*" propagation="REQUIERD" isolation="DEFAULT" rollback-for="java.lang.Exception" />
        <tx:method name="*" propagation="SUPPORTS" />
    </tx:attributes>
</tx:advice>
4)配置增强器
<aop:config>
	<aop:pointcut expression="execution(* *..service..*.*(..))" id="servicePt" />
    <aop:advisor advice-ref="buyAdvice" pointcut-ref="servicePt" />
</aop:config>
5)修改测试类
@Test
public void testBuy() {
    ApplicationContext ac = new ClassPathXmlApplicationContext("applicationContext.xml");
    BuyGoodsService service = (BuyGoodsService) ac.getBean("buyService");
    service.buy(1001, 20);
}
Spring与Web
在 Web项目中使用 Spring框架首先要解决在 web层中获取到 Spring容器的问题
Web项目中使用Spring的问题
1)修改 pom依赖
<!-- servlet依赖 -->
<dependency>
    <groupId>javax.servlet</groupId>
    <artifactId>javax.servlet-api</artifactId>
    <version>3.1.0</version>
    <scope>provided</scope>
</dependency>
<!-- jsp依赖 -->
<dependency>
    <groupId>javax.servlet.jsp</groupId>
    <artifactId>jsp-api</artifactId>
    <version>2.2.1-b03</version>
    <scope>provided</scope>
</dependency>
2)定义 index 页面
<body>
    index.jsp<br/>
    <form action="regservlet" method="post">
        姓名:<input type="text" name="name"><br />
        年龄:<input type="text" name="age"><br />
        <input type="submit" value="注册">
    </form>
</body>
3)定义 RegisterServlet
protected void doGet(HttpServletRequest request, HttpServletResponse response) throws ServletException, IOException {
    // 接收请求参数
    String strName = request.getParameter("name");
    String strAge = request.getParameter("age");

    // 创建 Spring容器,获取 Service对象
    ApplicationContext ac = new ClassPathXmlApplicationContext("applicatioContext.xml");
    System.out.println("容器的信息:" + ac);
    StudnetService service = (StudentService) ac.getBean("studentService");

    Student studnet = new Student(strName, Integer.parseInt(strAge));

    // 调用service方法
    service.addStudent(student);

    // 显示处理结果的 jsp
    request.getRequestDispatcher("/result.jsp").forward(request, response);
}
4)定义 success页面
<body>
    result.jsp:注册成功!!!!
</body>
5)web.xml注册 Servlet
<servlet>
	<servlet-name>RegServlet</servlet-name>
    <servlet-class>com.bjpowernode.controller.RegisterServlet</servlet-class>
</servlet>
<servlet-mapping>
	<servlet-name>RegServlet</servlet-name>
    <url-pattern>/regservlet</url-pattern>
</servlet-mapping>
6)运行结果分析
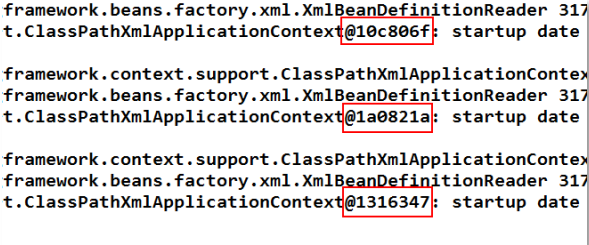
当表单提交,跳转到 success.jsp后,多刷新几次页面,查看后台输出,发现每刷新一次页面,就 new出一个新的 Spring容器。
每一次提交请求,就会创建一个新的 Spring容器
此时,可以考虑将 Spring容器的创建放在 Servlet进行初始化时进行,即执行 init()方法时执行。并且,Servlet还是单例多线程的,即一个业务只有一个Servlet实例,所有执行该业务的用户执行的都是这一个 Servlet实例,这样 Spring容器就具有唯一性了。
但是,Servlet是一个业务一个 Servlet实例,即 LoginServlet只有一个,但还会有 StudentServlet、TeacherServlet等。每个业务都会执行自己的 init()方法,也就都会创建一个 Spring容器。此时,Spring容器又不唯一了。
使用Spring的监听器
对于 Web项目来说,ServletContext对象是唯一的,一个 Web应用,只有一个 ServletContext对象,该对象是在 Web应用装载时初始化的。若将 Spring容器的创建时机,放在 ServletContext初始化时,就可以保证 Spring容器只创建一次了。
当 Spring容器创建好后,在整个应用的生命周期过程中,Spring容器应该是随时可以被访问的,即 Spring容器应该具有全局性。而放入 ServletContext对象的属性,就具有应用的全局性。所以,将创建好的 Spring容器,以属性的形式放入到 ServletContext的空间中,就保证了 Spring容器的全局性
1)添加 pom依赖
<dependency>
    <groupId>org.springframework</groupId>
    <artifactId>spring-web</artifactId>
    <version>5.2.5.RELEASE</version>
</dependency>
2)注册监听器 ContextLoaderListener
若要在 ServletContext初始化时创建 Spring容器,就需要使用监听器接口 ServletContextListener对 ServletContext进行监听。在 web.xml中注册该监听器。
<listener>
	<listener-class>org.springframework.web.context.ContextLoaderListener</listener-class>
</listener>
Spring为该监听器接口定义了一个实现类 ContextLoaderListener,完成了两个很重要的工作:创建容器对象,并将容器对象放入到 ServletContext的空间中。
3)指定 Spring配置文件的位置 <context-param>
ContextLoaderListener在对 Spring容器进行创建时,需要加载 Spring配置文件。
<context-param>
	<param-name>contextConfigLocation</param-name>
    <param-value>classpath:applicationContext.xml</param-value>
</context-param>
4)获取Spring容器对象
-
直接从ServletContext中获取:容器对象在 ServletContext中存放的 Keep为 WebApplicationContext.ROOT_WEB_APPLICATION_CONTEXT_ATTRIBUTE
// 获取容器 String attr = WebApplicationContext.ROOT_WEB_APPLICATION_CONTEXT_ATTRIBUTE; WebApplicationContext ac = (WebApplicatioNContext) this.getServletContext().getAttribute(attr); -
通过 WebApplicationContextUtils获取:工具类 WebApplicationContextUtils有一个方法专门从 ServletContext中获取 Spring容器对象-getRequiredWebApplicationContext(ServletContext sc)
// 获取容器
WebApplicationContext ac = WebApplicationContextUtils.getRequiredWebApplicationContext(getServletContext());


【推荐】国内首个AI IDE,深度理解中文开发场景,立即下载体验Trae
【推荐】编程新体验,更懂你的AI,立即体验豆包MarsCode编程助手
【推荐】抖音旗下AI助手豆包,你的智能百科全书,全免费不限次数
【推荐】轻量又高性能的 SSH 工具 IShell:AI 加持,快人一步
· AI与.NET技术实操系列:基于图像分类模型对图像进行分类
· go语言实现终端里的倒计时
· 如何编写易于单元测试的代码
· 10年+ .NET Coder 心语,封装的思维:从隐藏、稳定开始理解其本质意义
· .NET Core 中如何实现缓存的预热?
· 25岁的心里话
· 闲置电脑爆改个人服务器(超详细) #公网映射 #Vmware虚拟网络编辑器
· 零经验选手,Compose 一天开发一款小游戏!
· 通过 API 将Deepseek响应流式内容输出到前端
· AI Agent开发,如何调用三方的API Function,是通过提示词来发起调用的吗