

1、SpringBoot配置
一、支持种类
常用的支持 yml和properties2种文件类型
二、yml文件
springboot 使用 snakeyaml解析yml文件
支持的数据类型
| 字面量 | 解释 | 备注 |
| 数字 | ||
| 字符串 |
默认不使用引号 可以使用单引号或者双引号,单引号会转义特殊字符 字符串可以写成多行 从第二行开始必须有一个单空格缩进 换行符会被转为空格 |
|
| 布尔 | true false | |
| 日期 | 2022/11/26 | |
| 列表 |
List: - e1 - e2 也可以写到一行 List: [e1,e2] |
|
| json | 可以使用 {k1:v1} | |
| 文档 | 多个文档用 --- 隔开 |
1 2 3 4 5 6 7 8 9 10 11 12 13 14 15 | server: port: 18888person: lastName: zhangsan 也可以写成last-name age: 18 boss: false birth: 2022/11/26 maps: {k1:v1,k2:v2} lists: - yuan - wang dog: name: xiaogou age: 1 |
另外 yml文件内可以 互相引用 也可以使用random获取参数
1 2 3 4 5 6 7 8 9 10 11 12 13 14 15 | server: port: 18888person: lastName: zhangsan age: ${random.int} boss: false birth: 2022/11/26 maps: {k1:v1,k2:v2} lists: - yuan - wang dog: name: xiaogou age: ${person.age} |
三、spring boot 配置文件 文件名固定
- application.properties 如果同yml文件同时存在则优先properties
- application.yml
配置文件 放在 src/main/resources目录或者类路径/config下
全局配置文件可以对一些默认配置值进行修改
四、测试获取配置文件
yml
1 2 3 4 5 6 7 8 9 10 11 12 13 14 15 | server: port: 18888person: lastName: zhangsan age: ${random.int} boss: false birth: 2022/11/26 maps: {k1:v1,k2:v2} lists: - yuan - wang dog: name: xiaogou age: ${person.age} |
java bean person
1 2 3 4 5 6 7 8 9 10 11 12 13 14 15 16 17 18 19 20 21 22 23 24 25 26 27 28 29 30 31 32 33 34 35 36 37 38 39 40 41 42 43 44 45 46 47 48 49 50 51 52 53 54 55 56 57 58 59 60 61 62 63 64 65 66 67 68 69 70 71 72 73 74 75 76 77 78 79 80 81 82 83 84 85 86 87 88 89 90 91 92 93 94 95 96 97 98 99 100 101 102 103 104 105 106 107 | package com.yuan.configstu.bean;/* * @Author:YuanX * @Description: * @Date:下午3:06 2022/11/26 * @Modified: */import org.springframework.boot.context.properties.ConfigurationProperties;import org.springframework.stereotype.Component;import java.util.Date;import java.util.List;import java.util.Map;/** * 把yml 配置的值都映射到这个组件中 * @ConfigurationProperties 告诉springboot江本类中的所有属性和配置 当做组件放置到容器中 * * 只有person这个组件添加Component到容器中 是容器中的组件 才能提供容器提供的功能即 ConfigurationProperties */@Component@ConfigurationProperties(prefix = "person")public class Person { private String lastName; private Integer age; private Boolean boss; private Date birth; private Map<String,Object> maps; private List<Object> lists; private Dog dog; // 对象 另外一个bean public String getLastName() { return lastName; } public void setLastName(String lastName) { this.lastName = lastName; } public Integer getAge() { return age; } public void setAge(Integer age) { this.age = age; } public Boolean getBoss() { return boss; } public void setBoss(Boolean boss) { this.boss = boss; } public Date getBirth() { return birth; } public void setBirth(Date birth) { this.birth = birth; } public Map<String, Object> getMaps() { return maps; } public void setMaps(Map<String, Object> maps) { this.maps = maps; } public List<Object> getLists() { return lists; } public void setLists(List<Object> lists) { this.lists = lists; } public Dog getDog() { return dog; } public void setDog(Dog dog) { this.dog = dog; } @Override public String toString() { return "Person{" + "lastName='" + lastName + '\'' + ", age=" + age + ", boss=" + boss + ", birth=" + birth + ", maps=" + maps + ", lists=" + lists + ", dog=" + dog + '}'; }} |
java bean dog
1 2 3 4 5 6 7 8 9 10 11 12 13 14 15 16 17 18 19 20 21 22 23 24 25 26 27 28 29 30 31 32 33 34 35 36 | package com.yuan.configstu.bean;/* * @Author:YuanX * @Description: * @Date:下午3:08 2022/11/26 * @Modified: */public class Dog { private String name; private Integer age; public String getName() { return name; } public void setName(String name) { this.name = name; } public Integer getAge() { return age; } public void setAge(Integer age) { this.age = age; } @Override public String toString() { return "Dog{" + "name='" + name + '\'' + ", age=" + age + '}'; }} |
引入配置管理器 引入之后 yml中就会有提示
1 2 3 4 5 6 | <!-- 导入配置文件处理器 配置文件进行绑定就会有提示 --> <dependency> <groupId>org.springframework.boot</groupId> <artifactId>spring-boot-configuration-processor</artifactId> <optional>true</optional> </dependency> |
测试
1 2 3 4 5 6 7 8 9 10 11 12 13 14 15 16 17 18 19 20 21 22 23 24 25 26 27 28 | import com.yuan.configstu.bean.Person;import org.junit.jupiter.api.Test;import org.junit.runner.RunWith;import org.springframework.beans.factory.annotation.Autowired;import org.springframework.boot.test.context.SpringBootTest;import org.springframework.test.context.junit4.SpringRunner;/** * springBoot 单元测试 * 可以在测试期间很方便的类似编码进行自动注入等容器的功能 * */@RunWith(SpringRunner.class) // 驱动器修改为springboot的驱动 不是使用 junit@SpringBootTest // springBoot的单元测试class ConfigstuApplicationTests { @Autowired Person person; @Test void contextLoads() { System.out.println(person); }} |
注掉yml文件内容 ,在properties 中编写 可以正常获取配置
1 2 3 4 5 6 7 8 9 10 11 | # idea 默认使用utf8 xml默认 ascii 码 中文会有乱码 修改idea配置setting->file encoding-->transpartent native-to-ascii conversion# 配置person的值person.last-name=文件person.age=19person.birth=2022/11/26person.boss=trueperson.maps.k1=v1person.maps.k2=v2person.lists=a,b,cperson.dog.name=xiaogouperson.dog.age=11 |

五、@ConfigurationProperties 和 @Value 注解的区别
前者是通过文件整体赋值,后者是通过文件单个属性赋值
| ConfigurationProperties | Value | 备注 | |||
| 功能 | 批量赋值 | 单个属性赋值 | |||
| 松散绑定 | 支持 | 不支持 |
例如配置文件中属性 person.last-name=文件 使用ConfigurationProperties 实体类中写成LastName 也能获取到 而value不能 |
||
| SpEl | 不支持 | 支持 |
@Value("#{11*2}")
|
||
| JSR303数据检校 | 支持 | 不支持 | 需要配合
hibernate-validator 框架支持对字段的类型检校 该框架spring boot 已经支持
实体类需要@Validated @Email( message="非合法的邮件地址") |
JSR303数据检校
1 2 3 4 5 6 7 8 9 10 11 12 13 14 15 16 17 18 19 20 21 22 23 24 25 26 27 28 29 30 31 32 33 34 35 36 37 38 39 40 41 42 43 44 45 46 47 48 49 50 51 52 53 54 55 56 57 58 59 60 61 62 63 64 65 66 67 68 69 70 71 72 73 74 75 76 77 78 79 80 81 82 83 84 85 86 87 88 89 90 91 92 93 94 95 96 97 98 99 100 101 102 103 104 105 106 107 108 109 110 111 112 113 114 115 116 117 118 119 120 121 122 123 124 | package com.yuan.configstu.bean;/* * @Author:YuanX * @Description: * @Date:下午3:06 2022/11/26 * @Modified: */import org.hibernate.validator.constraints.NotBlank;import org.springframework.beans.factory.annotation.Value;import org.springframework.boot.context.properties.ConfigurationProperties;import org.springframework.stereotype.Component;import org.springframework.validation.annotation.Validated;import javax.validation.constraints.Email;import javax.validation.constraints.NotNull;import java.util.Date;import java.util.List;import java.util.Map;/** * 把yml 配置的值都映射到这个组件中 * @ConfigurationProperties 告诉springboot江本类中的所有属性和配置 当做组件放置到容器中 * * 只有person这个组件添加Component到容器中 是容器中的组件 才能提供容器提供的功能即 ConfigurationProperties */@Component@ConfigurationProperties(prefix = "person")@Validatedpublic class Person { /** 以前使用xml配置方式 spring boot的value 同样支持 * <bean class="Person"> * <property name="LastName" value="字面量(String boolean)/${Key}从环境变量、配置文件中获取值/#{SpEl}"></property> * </bean> */ //@Value("${person.last-name}") private String lastName; //@Value("#{11*2}") private Integer age; //@Value("true") private Boolean boss; //@Email( message="非合法的邮件地址") private Date birth; //@NotBlank(message = "maps不能为空") private Map<String,Object> maps; private List<Object> lists; private Dog dog; public String getLastName() { return lastName; } public void setLastName(String lastName) { this.lastName = lastName; } public Integer getAge() { return age; } public void setAge(Integer age) { this.age = age; } public Boolean getBoss() { return boss; } public void setBoss(Boolean boss) { this.boss = boss; } public Date getBirth() { return birth; } public void setBirth(Date birth) { this.birth = birth; } public Map<String, Object> getMaps() { return maps; } public void setMaps(Map<String, Object> maps) { this.maps = maps; } public List<Object> getLists() { return lists; } public void setLists(List<Object> lists) { this.lists = lists; } public Dog getDog() { return dog; } public void setDog(Dog dog) { this.dog = dog; } @Override public String toString() { return "Person{" + "lastName='" + lastName + '\'' + ", age=" + age + ", boss=" + boss + ", birth=" + birth + ", maps=" + maps + ", lists=" + lists + ", dog=" + dog + '}'; }} |
@Value注入值
1 2 3 4 5 6 7 8 9 10 11 12 13 14 15 16 17 18 19 20 21 22 23 24 25 26 27 28 29 30 31 32 33 34 35 36 37 38 39 40 41 42 43 44 45 46 47 48 49 50 51 52 53 54 55 56 57 58 59 60 61 62 63 64 65 66 67 68 69 70 71 72 73 74 75 76 77 78 79 80 81 82 83 84 85 86 87 88 89 90 91 92 93 94 95 96 97 98 99 100 101 102 103 104 105 106 107 108 109 110 111 112 113 114 115 116 117 118 119 120 121 122 123 124 | package com.yuan.configstu.bean;/* * @Author:YuanX * @Description: * @Date:下午3:06 2022/11/26 * @Modified: */import org.hibernate.validator.constraints.NotBlank;import org.springframework.beans.factory.annotation.Value;import org.springframework.boot.context.properties.ConfigurationProperties;import org.springframework.stereotype.Component;import org.springframework.validation.annotation.Validated;import javax.validation.constraints.Email;import javax.validation.constraints.NotNull;import java.util.Date;import java.util.List;import java.util.Map;/** * 把yml 配置的值都映射到这个组件中 * @ConfigurationProperties 告诉springboot江本类中的所有属性和配置 当做组件放置到容器中 * * 只有person这个组件添加Component到容器中 是容器中的组件 才能提供容器提供的功能即 ConfigurationProperties */@Component//@ConfigurationProperties(prefix = "person")//@Validatedpublic class Person { /** 以前使用xml配置方式 spring boot的value 同样支持 * <bean class="Person"> * <property name="LastName" value="字面量(String boolean)/${Key}从环境变量、配置文件中获取值/#{SpEl}"></property> * </bean> */ @Value("${person.last-name}") private String lastName; @Value("#{11*2}") private Integer age; @Value("true") private Boolean boss; //@Email( message="非合法的邮件地址") private Date birth; //@NotBlank(message = "maps不能为空") private Map<String,Object> maps; private List<Object> lists; private Dog dog; public String getLastName() { return lastName; } public void setLastName(String lastName) { this.lastName = lastName; } public Integer getAge() { return age; } public void setAge(Integer age) { this.age = age; } public Boolean getBoss() { return boss; } public void setBoss(Boolean boss) { this.boss = boss; } public Date getBirth() { return birth; } public void setBirth(Date birth) { this.birth = birth; } public Map<String, Object> getMaps() { return maps; } public void setMaps(Map<String, Object> maps) { this.maps = maps; } public List<Object> getLists() { return lists; } public void setLists(List<Object> lists) { this.lists = lists; } public Dog getDog() { return dog; } public void setDog(Dog dog) { this.dog = dog; } @Override public String toString() { return "Person{" + "lastName='" + lastName + '\'' + ", age=" + age + ", boss=" + boss + ", birth=" + birth + ", maps=" + maps + ", lists=" + lists + ", dog=" + dog + '}'; }} |
@PropertySource 和 @ImportResource 的区别
PropertySource
     可以将上述的person的配配置内容单独写入一个properties文件当中 然后在实体类使用 PropertySource  注入属性
1 2 3 4 5 6 7 8 9 | person.last-name=文件111person.age=19person.birth=2022/11/26person.boss=trueperson.maps.k1=v1person.maps.k2=v2person.lists=a,b,cperson.dog.name=xiaogouperson.dog.age=11 |
1 2 3 4 5 6 7 8 9 10 11 12 13 14 15 16 17 18 19 20 21 22 23 24 25 26 27 28 29 30 31 32 33 34 35 36 37 38 39 40 41 42 43 44 | package com.yuan.configstu.bean;/* * @Author:YuanX * @Description: * @Date:下午5:50 2022/11/26 * @Modified: */import lombok.Data;import org.springframework.beans.factory.annotation.Value;import org.springframework.boot.context.properties.ConfigurationProperties;import org.springframework.context.annotation.PropertySource;import org.springframework.stereotype.Component;import java.util.Date;import java.util.List;import java.util.Map;/** * * PropertySource 加载指定的配置文件 一般是外部配置文件 * Component 加入到spring组件当中去 * ConfigurationProperties 依赖于 Component 把bean加入到容器当中去,然后在赋值 * */@Data@PropertySource(value = "classpath:person.properties")@Component@ConfigurationProperties(prefix = "person")public class Person2 { private String lastName; private Integer age; private Boolean boss; private Date birth; private Map<String,Object> maps; private List<Object> lists; private Dog dog;} |
@ImportResource 用来导入配置文件
        spring 的非注解写法 使用xml文件配置的方式注入容器

    HelloService
1 2 3 4 5 6 7 8 9 10 | package com.yuan.configstu.Service;/*public class HelloService { public String testHelloComment(){ return ""; }} |
1 2 3 4 5 6 7 8 9 10 | <?xml version="1.0" encoding="UTF-8"?><beans xmlns="http://www.springframework.org/schema/beans" xmlns:xsi="http://www.w3.org/2001/XMLSchema-instance" xsi:schemaLocation="http://www.springframework.org/schema/beans http://www.springframework.org/schema/beans/spring-beans.xsd"> <bean id="HelloService" class="com.yuan.configstu.Service.HelloService"></bean></beans> |
配置在启动类上并不是 测试启动类上
1 2 3 4 5 6 7 8 9 | @ImportResource(locations = {"classpath:beans.xml"})@SpringBootApplicationpublic class ConfigstuApplication { public static void main(String[] args) { SpringApplication.run(ConfigstuApplication.class, args); }} |
在测试启动类上 测试
1 2 3 4 5 6 7 | @Test public void testContainHelloService(){ boolean b = ioc.containsBean("HelloService"); System.out.println(b); }} |
使用 @Configuration 注解的方式 注入bean 同时和xml配置方式共存
helloService02
1 2 3 4 5 6 7 8 | package com.yuan.configstu.Service;/*public class HelloService2 { public String testHelloComment(){ return ""; }} |
编写配置启动类 并使用 @Bean注解注入
1 2 3 4 5 6 7 8 9 10 11 12 13 14 15 16 17 18 19 20 21 22 | import com.yuan.configstu.Service.HelloService2;import org.springframework.context.annotation.Bean;import org.springframework.context.annotation.Configuration;/** * Configuration 指名当前类是一个配置类,用来代替之前spring的配置文件 * 原来 spring 配置文件使用xml 在配置文件汇总使用<bean></bean>的方式添加 */@Configurationpublic class MyAppConfig { /** * @Bean 将方法的返回值添加到容器中 容器中 这个组件默认的id 就是方法名 * * @return */ @Bean public HelloService2 helloService02(){ System.out.println("给容器中 增加 组件"); return new HelloService2(); }} |
测试启动类中
1 2 3 4 5 6 7 8 9 10 11 12 13 14 15 16 17 18 19 20 21 22 23 24 25 26 27 28 | @RunWith(SpringRunner.class) // 驱动器修改为springboot的驱动 不是使用 junit@SpringBootTest // springBoot的单元测试class ConfigstuApplicationTests {// @Autowired// Person person; @Autowired Person2 person; @Autowired ApplicationContext ioc; @Test public void contextLoads() { System.out.println(person); } @Test public void testContainHelloService(){ boolean b = ioc.containsBean("HelloService"); boolean bb = ioc.containsBean("helloService02"); System.out.println(b); System.out.println(bb); }} |
以上发现2个 组件都已经注入进来了
六、多环境配置文件
Profile 是Spring 对不同环境提供不同的配置功能的支持 可以通过激活或者指定参数等方式快速的切换环境
格式:
application-{profile}.properties/yml------>application-dev.properties/yml or application-sit.properties/yml
以下使用了 yml的文档块模式
1 2 3 4 5 6 7 8 9 10 11 12 13 14 15 16 | spring: profiles: active: dev #profiles.active 激活指定配置---spring: profiles: active: devserver: port: 18888 --- #三个短横线分割多个 profile区 (文档块)spring: profiles: active: default #profiles default标识未指定默认配置server: port: 18889 |
如果不适用yml的文档块模式 而是使用了properties文件 则需要配置默认的 application.properties 然后在里边激活对应的 环境的配置例如 application-dev.properties/yml or application-sit.properties/yml
1 | spring.profiles.active=dev |
激活 profile的 方式
1、配置文件中 指定 spring.profile.active = dev
2、命令行方式
java -jar spring-boot.jar --spring.profile.active=dev
也可以在idea中配置
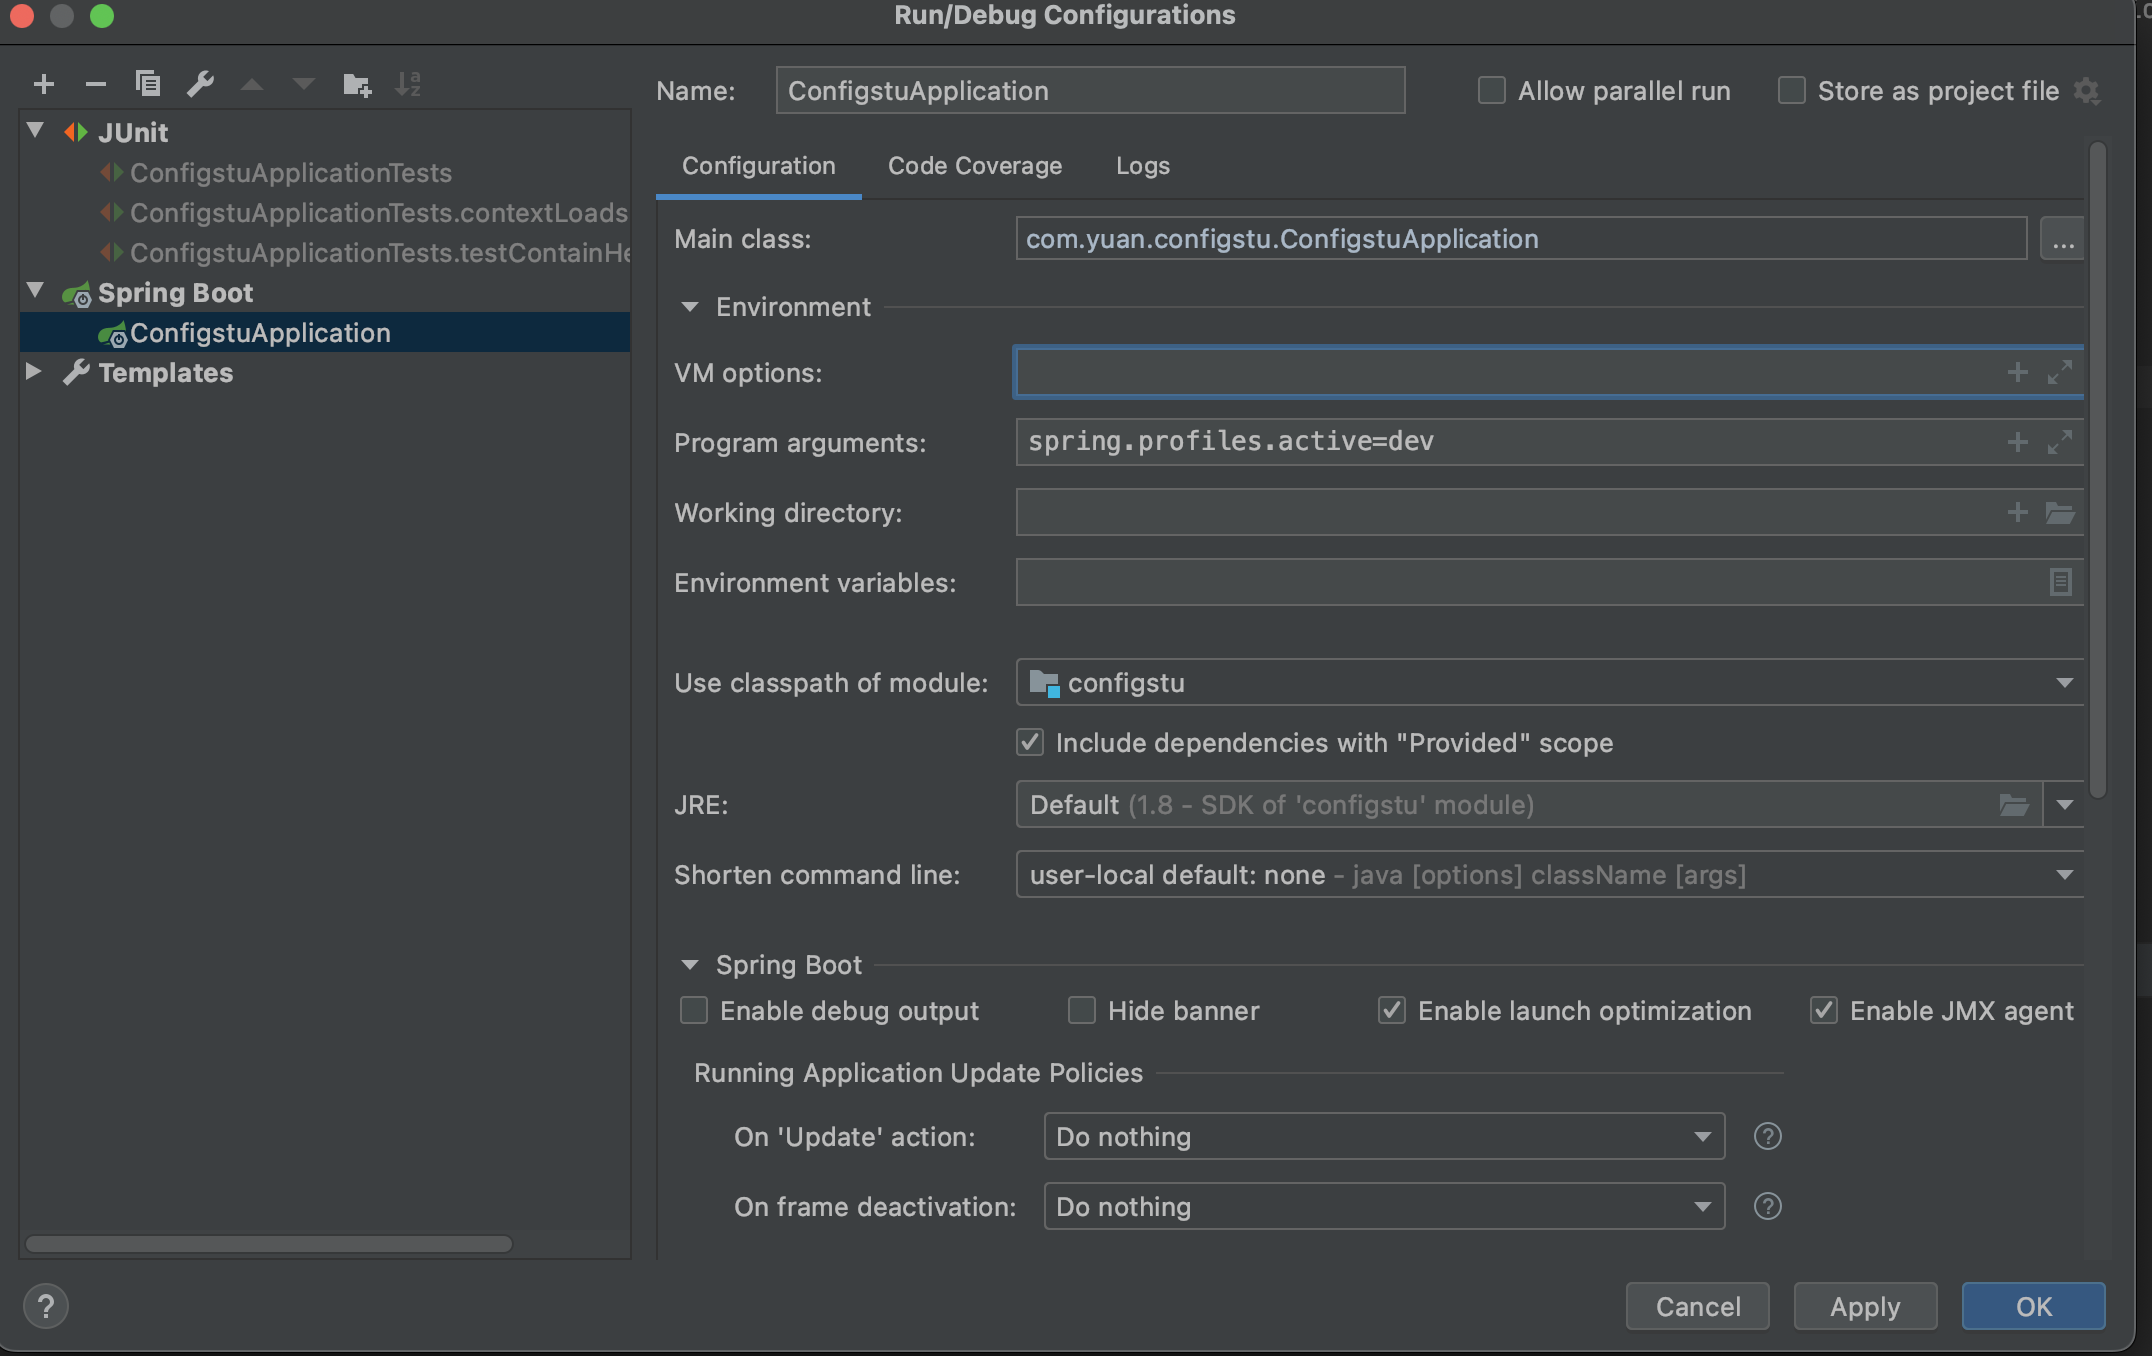
3、虚拟机参数
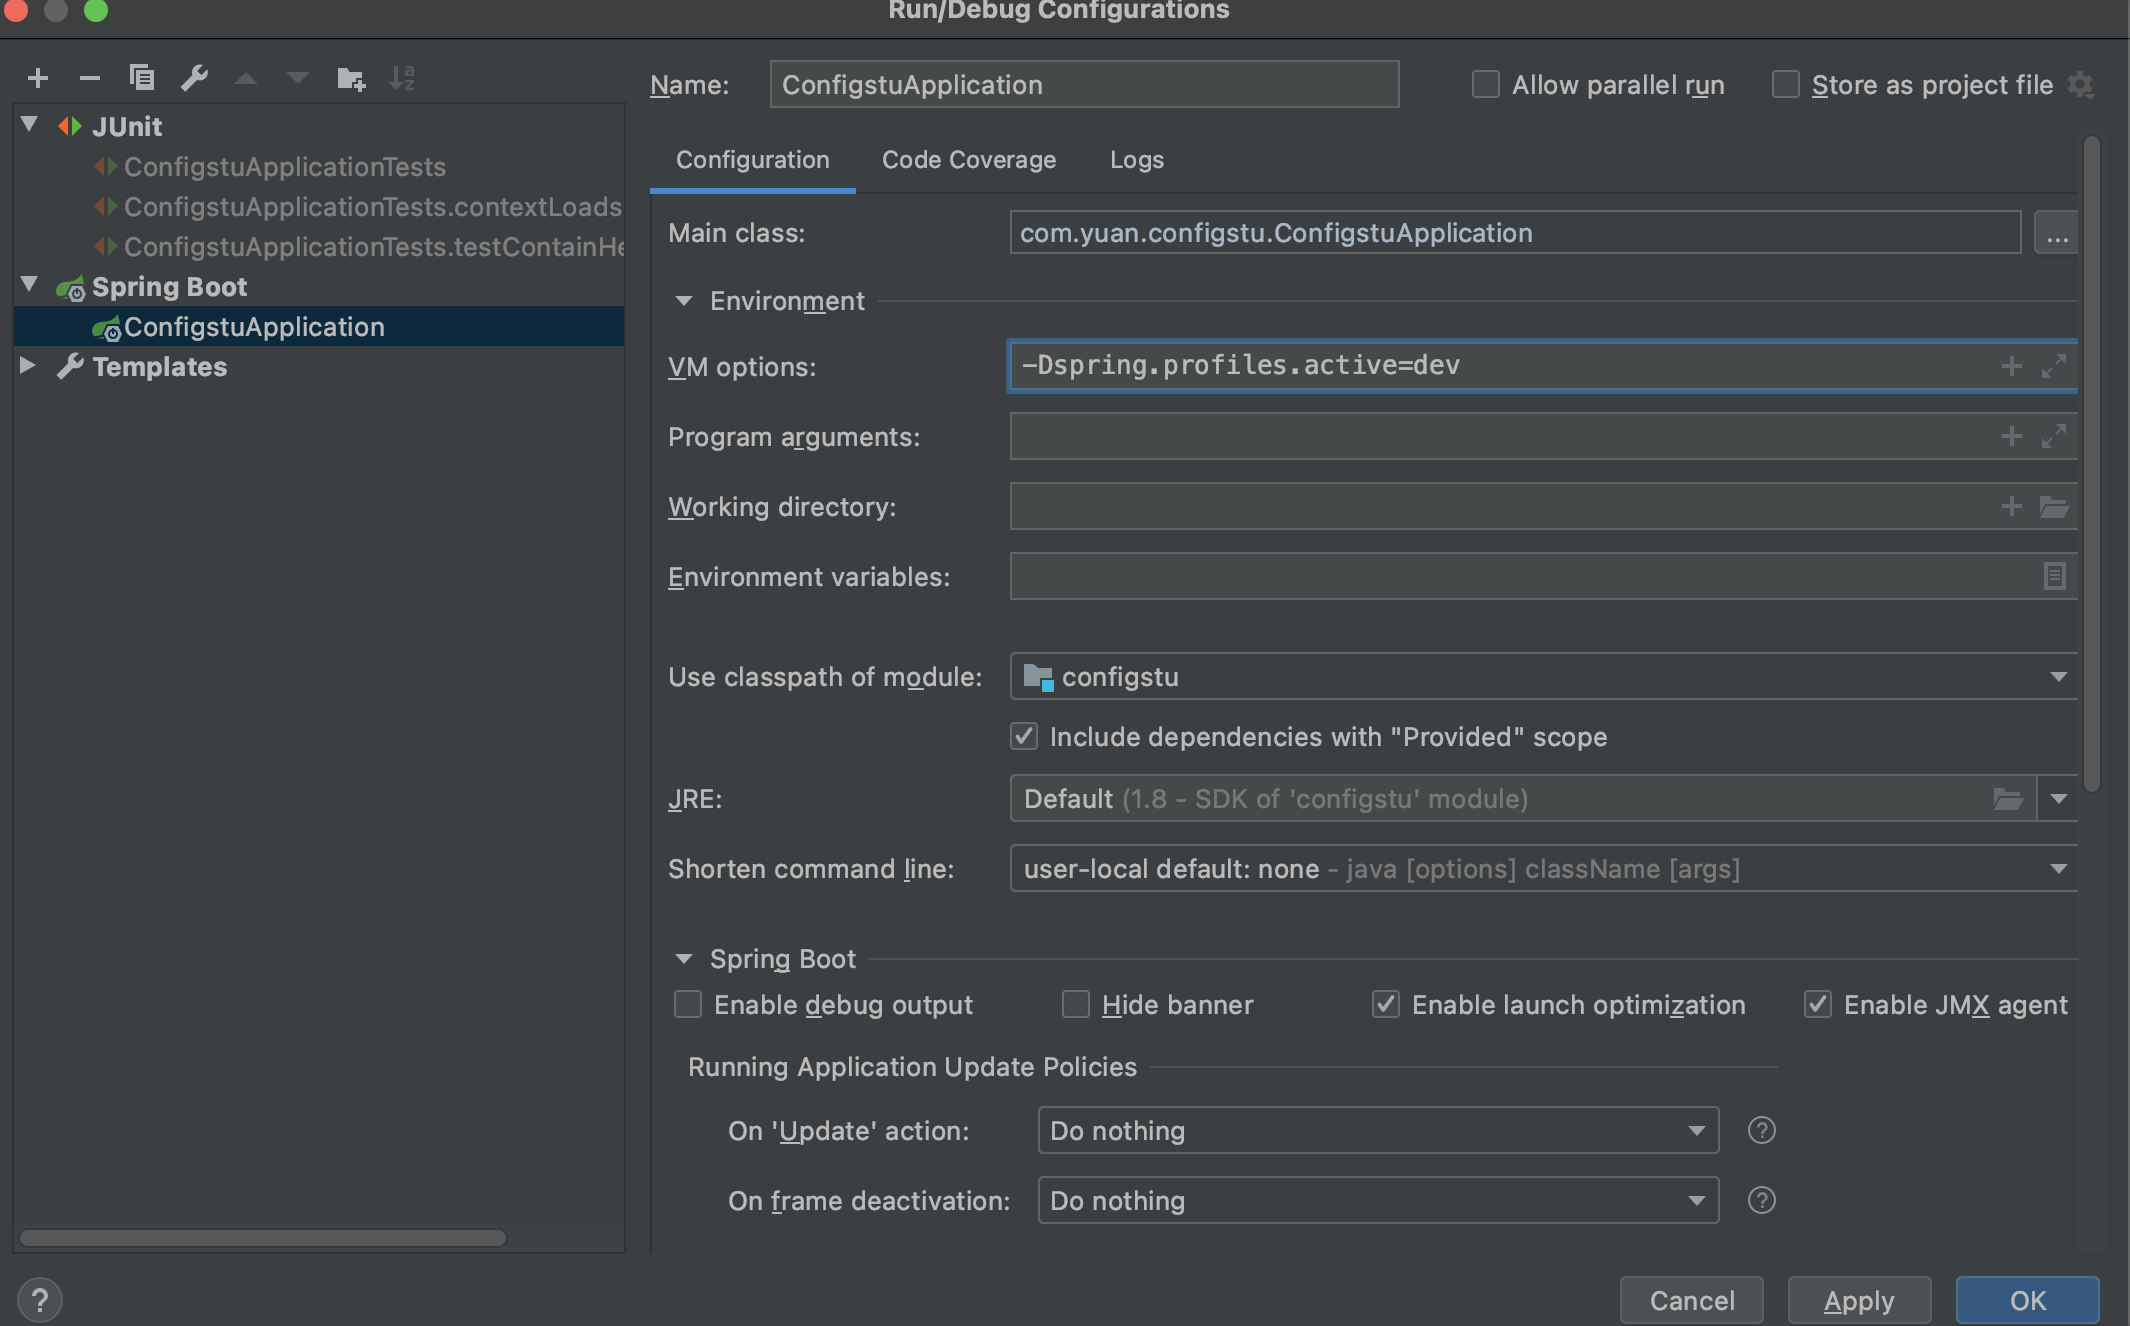
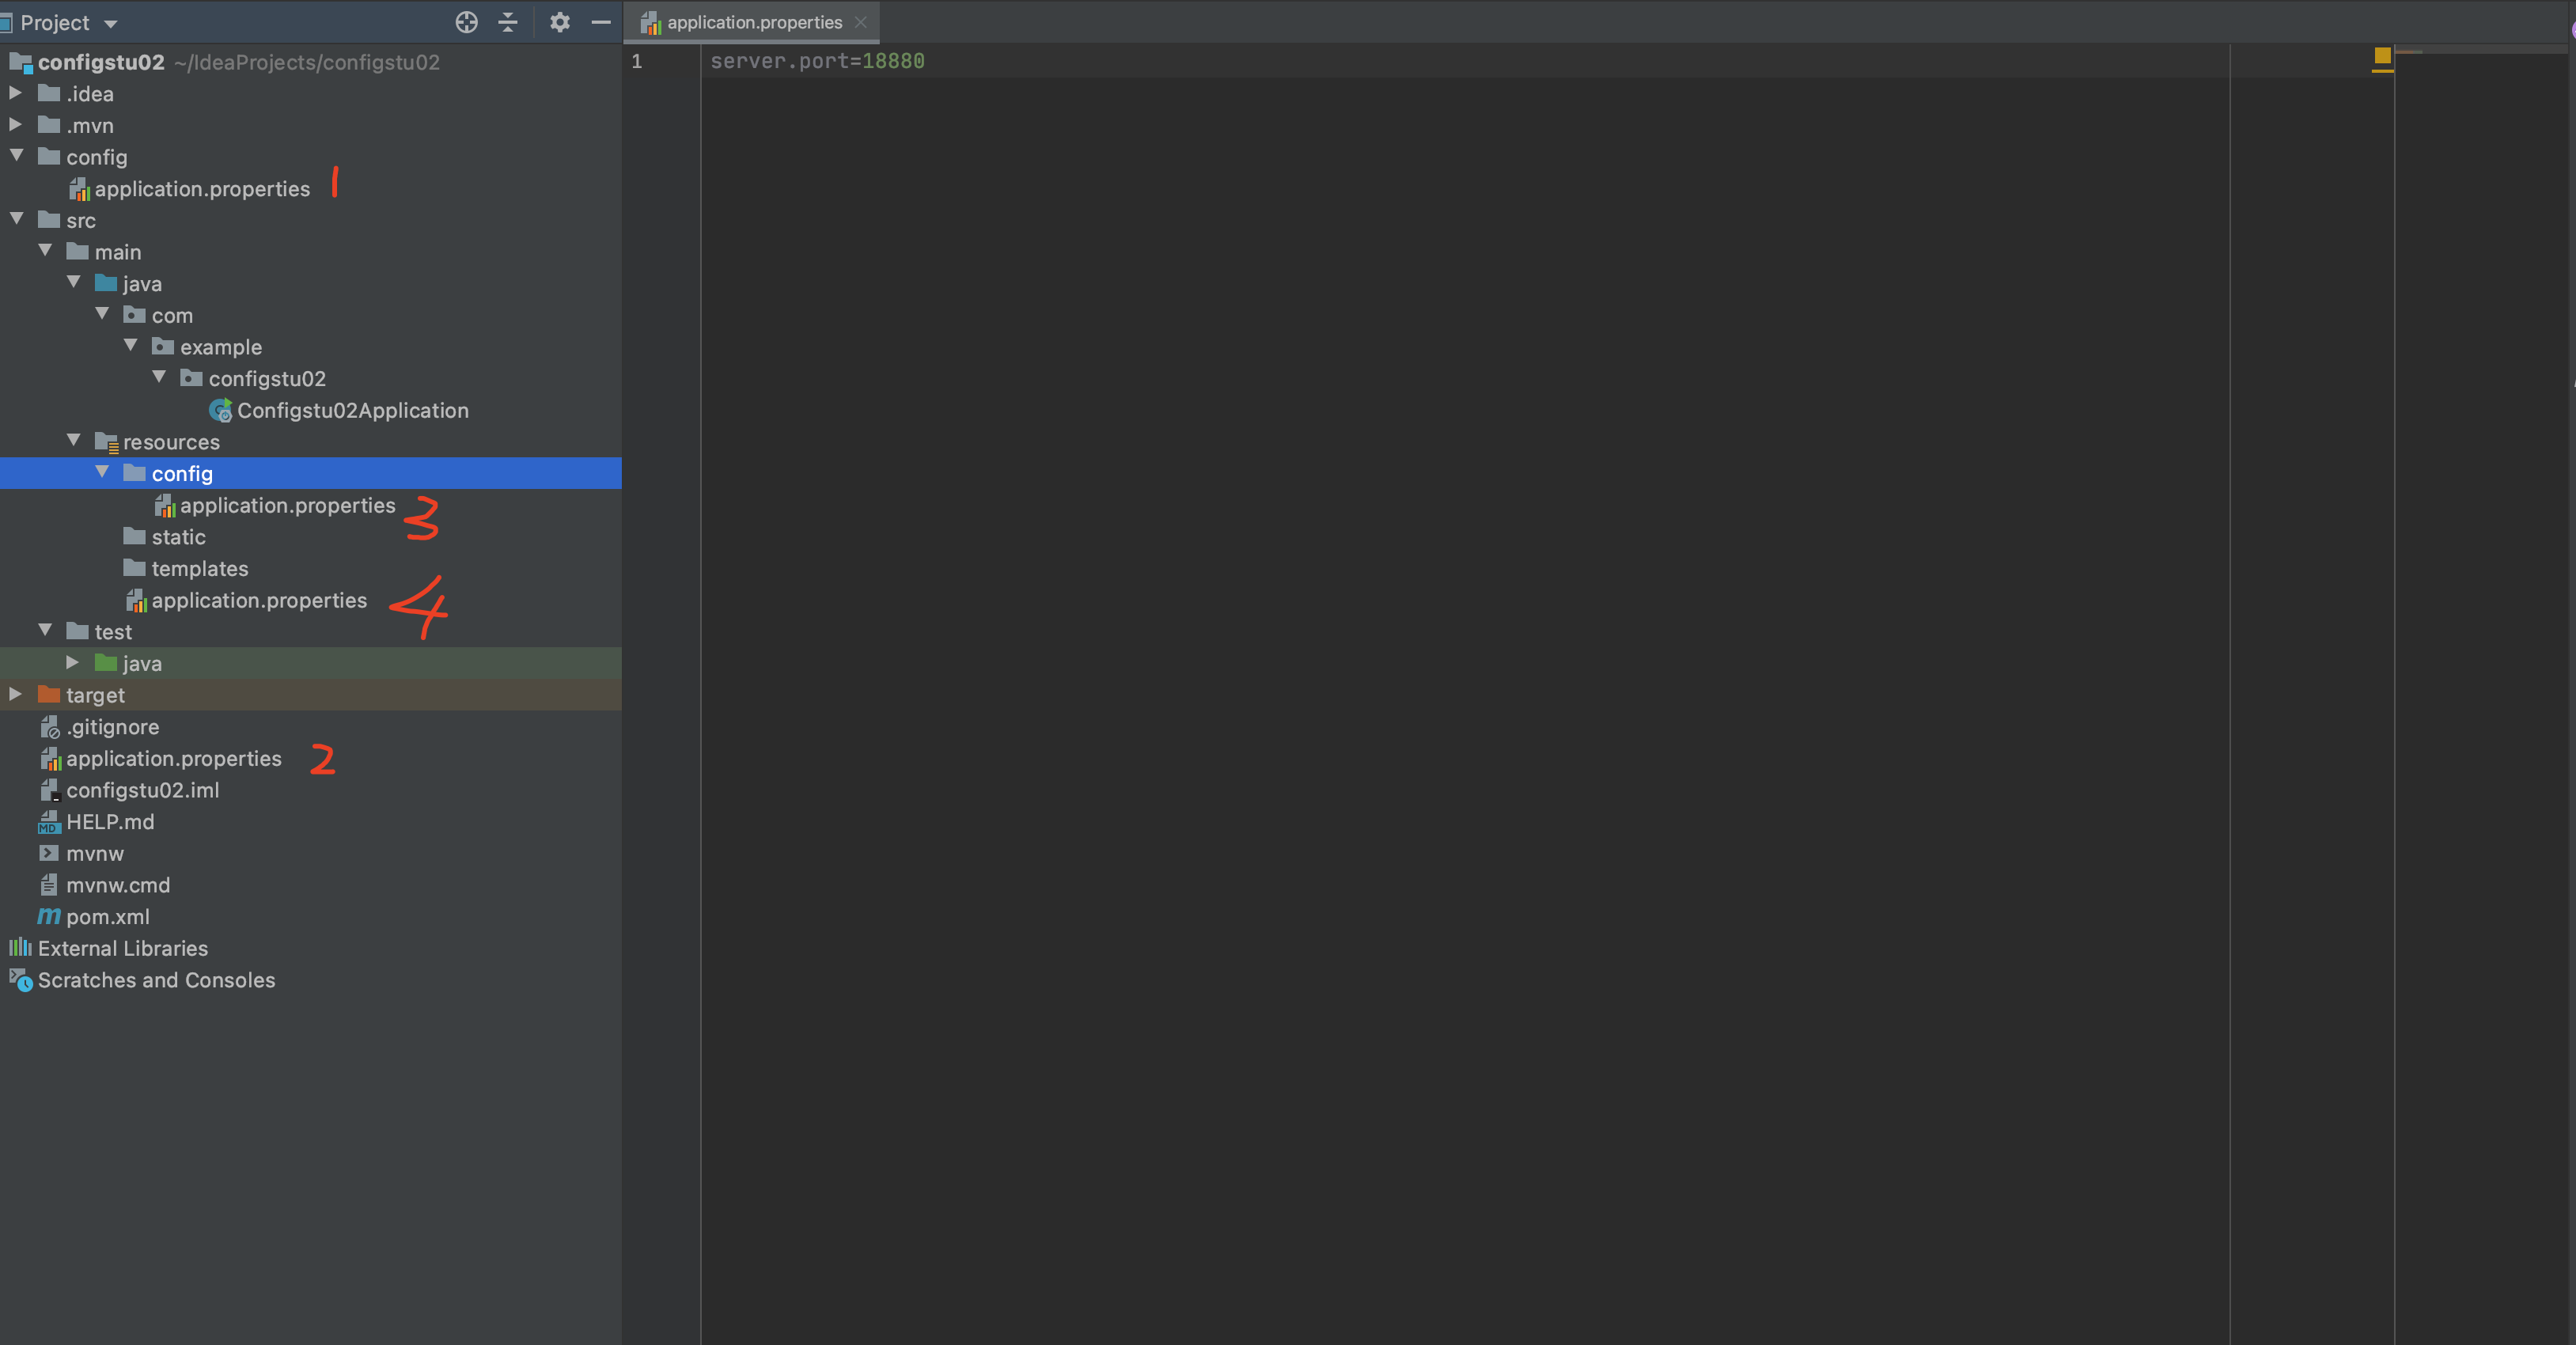
七、Spring加载文件的位置
按照优先级排序
1、file:/config/ 即项目根目录下
2、file:/ 即项目根目录下
3、classpath:/config/ resource文件下
4、classpath:/ resource文件下
以上是按照优先级从高到低的顺序,所有位置的配置文件都会被加载,高优先级的配置会覆盖底优先级的配置,也可以通过spring.config.location 来改变默认配置 红色字体标志对应上述顺序
@Conditional 根据条件选择配置
1 2 3 4 5 6 7 8 9 10 11 12 13 14 15 16 17 18 19 20 21 22 23 24 25 26 27 28 29 30 31 32 33 34 35 | package com.example.configstu02.pojo;/* * @Author:YuanX * @Description: * @Date:下午8:18 2022/11/26 * @Modified: */import org.springframework.context.annotation.Conditional;/* spring boot 根据Conditional 注解 派生出来很多注解 1、ConditionalOnJava 判断系统的java版本是否符合要求 2、ConditionalOnBean 容器中存在bean 3、ConditionalOnMissingBean 容器中不存在bean 4、ConditionalOnExpression 满足sqel表达式指定 5、ConditionalOnClass 系统中有指定的类 6、ConditionalOnMissingClass 系统中没有指定的类 7、ConditionalOnSingleCandidate 容器中只有一个指定的bean 或者 这个bean是首选bean 8、ConditionalOnProperty 系统中指定的属性是否有指定的值 9、ConditionalOnResource 类路径下是否存在指定资源文件 10、ConditionalOnWebApplication 当前是web环境 11、ConditionalOnNotWebAppliaction 当前不是web环境 12、ConditionalOnJndi JNDI存在指定项目 Conditional 是个接口 需要自己实现 并且重写matches方法 也可以使用上述的12的某几个 可以 通过启用 spring boot 的 debug=true ,在控制台打印 自动配置报告* *///@Conditional()public class condtionsth {} |
八、小结
1、配置注解
@ConfigurationProperties @Value @PropertySource 这3个 用在组件单个属性上
@ImportResource @Configuration 通常用在导入一个bean 一个组件
2、思考
            1、java支持的配置方式超过 python的几个框架
            2、使用配置文件映射实体类的方式,其实flask也有,不过直接就是一个配置类实体可以通过继承的一些规则,进行扩展
            3、对字段的检校 java使用了 spring-boot-starter-validation 里边其实使用了  hibernate-validator  ,这块python也有一般继承在框架里边 例如flask_rest_framework中的模版 以及 drf中序列化器中的validae,或者直接使用orm中的检校
            4、多环境配置的问题,spring boot 中的yml虽然支持 profiles 文件块,但是似乎激活的标识并不能在启动后动态的切换,如果在测试工具中,则可能需要类似 需要再加载  的方式使用


【推荐】国内首个AI IDE,深度理解中文开发场景,立即下载体验Trae
【推荐】编程新体验,更懂你的AI,立即体验豆包MarsCode编程助手
【推荐】抖音旗下AI助手豆包,你的智能百科全书,全免费不限次数
【推荐】轻量又高性能的 SSH 工具 IShell:AI 加持,快人一步
· TypeScript + Deepseek 打造卜卦网站:技术与玄学的结合
· 阿里巴巴 QwQ-32B真的超越了 DeepSeek R-1吗?
· 【译】Visual Studio 中新的强大生产力特性
· 10年+ .NET Coder 心语 ── 封装的思维:从隐藏、稳定开始理解其本质意义
· 【设计模式】告别冗长if-else语句:使用策略模式优化代码结构