Spring Security 初学
Spring Security 初学
声明:本篇文章无源码解析,属于初学范围,本文采用SpringBoot+thymeleaf的项目。
实现 SpringSecurity 分三步走
-
继承 WebSecurityConfigurerAdapter 类
-
Override configure
- configure(HttpSecurity http) (权限控制)
- configure(AuthenticationManagerBuilder auth) (认证)
-
@EnableWebSecurity:开启WebSecurity模式
使用内存账号密码登录
环境准备
编写几个页面,首页用作跳转,跳转select、update、delete页面,编写对应controller,此时先别添加security的maven依赖
controller
MyController
@Controller public class MyController {@GetMapping({"/","/index"})
public String toIndex(){
return "index";
}@GetMapping("/select")
public String select(){
return "user/select";
}@GetMapping("/delete")
public String delete(){
return "user/delete";
}@GetMapping("/update")
public String update(){
return "user/update";
}
}
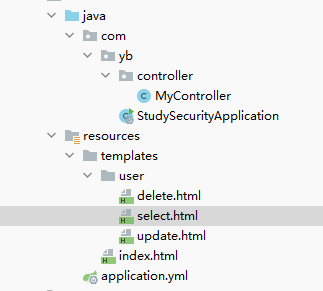
目录结构如下

启动项目试一下正常能否跳转。
使用内存账号密码来进行登录操作
添加 security maven依赖
<dependency>
    <groupId>org.springframework.boot</groupId>
    <artifactId>spring-boot-starter-security</artifactId>
</dependency>
- 继承 WebSecurityConfigurerAdapter 类,
- 重写俩个 configure方法
- @EnableWebSecurity 启用 WebSecurity
@EnableWebSecurity
public class MyWebSecurityConfigurerAdapter extends WebSecurityConfigurerAdapter {

    //权限控制
    @Override
    protected void configure(HttpSecurity http) throws Exception {
        super.configure(http);
    }

	//认证(登录认证)
    @Override
    protected void configure(AuthenticationManagerBuilder auth) throws Exception {
        super.configure(auth);
    }
}
此时直接启动项目,会发现需要登录,账号为 user,密码在启动项目中输出了
Using generated security password:
自动生成的密码肯定不符合我们正常需求,Spring Security提供了不使用数据库就可以配置账号密码的方法,修改认证方法即可。
在此之前,先配置访问 首页 、 select 、 delete 、update 的权限,修改 权限控制 的方法即可。
@Override
protected void configure(HttpSecurity http) throws Exception {
    //配置登录
    http.formLogin();
    //配置权限
    http.authorizeRequests()
        // 首页都可以访问
        .antMatchers("/","/index").permitAll()
        // 访问 /select 需要登录才能访问
        .antMatchers("/select").authenticated()
        // 访问 /delete 需要拥有 delete权限
        .antMatchers("/delete").hasAuthority("delete")
        // 访问 /update 需要拥有 role_update 角色权限
        .antMatchers("/update").hasRole("update");
}
配置用户账号密码及权限(暂时未使用数据库)
@Override
protected void configure(AuthenticationManagerBuilder auth) throws Exception {
    // 使用内存来设置账号密码
    auth.inMemoryAuthentication()
        // 密码加密工具,使用的是 security 中的
        .passwordEncoder(new BCryptPasswordEncoder())
        // 账号密码,密码使用的是加密后的密码,如果你知道加密后密码多少,也可以 .password("xx") //xx为加密后的密码
        .withUser("root").password(new BCryptPasswordEncoder().encode("1"))
        //给予权限,role其实也是Authority,角色就是权限前加一个 ROLE_
        .authorities("delete","ROLE_update")
        // and拼接多个用户
        .and()
        .withUser("test").password(new BCryptPasswordEncoder().encode("1"))
        .authorities("delete");
}
启动项目

由于我们对三个页面都配置了权限,所以访问三个都需要登录操作,
对于select我们登录即可访问,delete需要delete权限,update需要update角色权限
我们登录root,三个都可以访问,登录test,只能访问select和delete,访问update会报403forbidden,
我们配置一下报错页面
新增一个error.html页面,配置对应的controller
@GetMapping("/error")
public String errorPage(){
    //跳转对应页面
    return "error";
}
修改 权限控制 方法,htpp是链式编程,可以接着上方formLogin或者添加角色的地方写,例如 http.formLogin().and().exceptionHandling().accessDeniedPage("/error");
@Override
protected void configure(HttpSecurity http) throws Exception {
    //配置登录
    http.formLogin();
    http.authorizeRequests()
            // 首页都可以访问
            .antMatchers("/","/index").permitAll()
            // 访问 /select 需要登录
            .antMatchers("/select").authenticated()
            // 访问 /delete 需要拥有 delete权限
            .antMatchers("/delete").hasAuthority("delete")
            // 访问 /update 需要拥有 role_update 角色权限
            .antMatchers("/update").hasRole("update");
    //新增错误页面跳转,跳转到接口
    http.exceptionHandling().accessDeniedPage("/error");
}
使用test账号登录,update页面就变成了配置的 error.html 页面
配置登录页面
使用Spring Security的登录页总归是不好的,自己写一个!
首先新建login.html页面
login.html
Title
编写配置跳转的controller
@GetMapping("/toLogin")
public String toLogin(){
    return "login";
}
修改 权限控制 方法
@Override
protected void configure(HttpSecurity http) throws Exception {
    //配置登录
    http.formLogin()
            //登录页面跳转接口
            .loginPage("/toLogin")
            //登录页面提交时的方法名,注意是页面提交 action 的方法名
            .loginProcessingUrl("/login")
        	//账号密码,登录页面 input 的 name 值,注意需要对应
        	.usernameParameter("username").passwordParameter("pwd");

    http.authorizeRequests()
            // 首页都可以访问
            .antMatchers("/","/index").permitAll()
            // 访问 /select 需要登录
            .antMatchers("/select").authenticated()
            // 访问 /delete 需要拥有 delete权限
            .antMatchers("/delete").hasAuthority("delete")
            // 访问 /update 需要拥有 role_update 角色权限
            .antMatchers("/update").hasRole("update");
    http.exceptionHandling().accessDeniedPage("/error");
}
启动项目,成功跳转,成功登录

可以在 index.html 页面加一个登录按钮,跳转至 /toLogin 方法。
登出(退出)
有登录按钮,就有退出按钮,刚才我还是删除浏览器记录才退出的,太麻烦了,写一个退出功能吧。
修改 权限控制 方法,如果为get请求的方法,需要关闭 csrf()
@Override
protected void configure(HttpSecurity http) throws Exception {

    //配置登录
    http.formLogin()
        //登录页面跳转接口
        .loginPage("/toLogin")
        //登录页面提交时的方法名,process,过程
        .loginProcessingUrl("/login")
        //账号密码,登录页面 input 的 name 值
        .usernameParameter("username").passwordParameter("pwd")
        .and()
        //退出操作
        .logout()
        //退出按钮的方法,如果前端退出按钮方法也为 logout,则此处可不写
        .logoutUrl("/logout")
        //退出成功跳转的方法
        .logoutSuccessUrl("/");

    //链式编程,可以直接接在上方
    //http.logout().logoutSuccessUrl("/");

    //如果不关闭,get请求会被拦截,需要验证,本例中的logout为get请求,需要关闭
    http.csrf().disable();

    http.authorizeRequests()
        // 首页都可以访问
        .antMatchers("/","/index").permitAll()
        // 访问 /select 需要登录
        .antMatchers("/select").authenticated()
        // 访问 /delete 需要拥有 delete权限
        .antMatchers("/delete").hasAuthority("delete")
        // 访问 /update 需要拥有 role_update 角色权限
        .antMatchers("/update").hasRole("update");
    http.exceptionHandling().accessDeniedPage("/error");
}
修改 index.html 页面,添加退出按钮
启动项目
让页面退出和登录不同时存在
导入thymeleaf 和 springsecurity 的整合包(我的springboot版本2.5.2,低版本可能使用的是springsecurity4)
<dependency>
    <groupId>org.thymeleaf.extras</groupId>
    <artifactId>thymeleaf-extras-springsecurity5</artifactId>
</dependency>
<!-- 低版本使用4 -->
<dependency>
    <groupId>org.thymeleaf.extras</groupId>
    <artifactId>thymeleaf-extras-springsecurity4</artifactId>
    <version>3.0.2.RELEASE</version>
</dependency>
html引入命名空间,注意 http://www.thymeleaf.org/thymeleaf-extras-springsecurity5 为 http://www.thymeleaf.org/ + 导入依赖的名称,如果导入的是 springsecurity4 则为http://www.thymeleaf.org/thymeleaf-extras-springsecurity4
xmlns:sec="http://www.thymeleaf.org/thymeleaf-extras-springsecurity5"

一般来说,自己没有的权限,不应该显示出来,本例中 root 有所有权限,test 有 select、delete权限,我们让自己的权限显示出来,自己没有的权限不显示出来,修改 index.html 代码
启动项目
由于没有登录,所以什么权限都没有。
使用注解控制方法权限
修改 权限控制 方法,将其他需要登录验证的权限控制删除,添加 permit "/toLogin" 方法,其他方法都需要权限
@Override
protected void configure(HttpSecurity http) throws Exception {

    //配置登录
    http.formLogin()
        //登录页面跳转接口
        .loginPage("/toLogin")
        //登录页面提交时的方法名,process,过程
        .loginProcessingUrl("/login")
        //账号密码,登录页面 input 的 name 值
        .usernameParameter("username").passwordParameter("pwd")
        .and()
        //退出操作
        .logout()
        //退出按钮的方法,如果前端退出按钮方法也为 logout,则此处可不写
        .logoutUrl("/logout")
        //退出成功跳转的方法
        .logoutSuccessUrl("/");

    //        链式编程,可以直接接在上方
    //        http.logout().logoutSuccessUrl("/");

    //如果不关闭,get请求会被拦截,需要验证,本例中的logout为get请求,需要关闭
    http.csrf().disable();

    http.authorizeRequests()
        // 首页都可以访问
        .antMatchers("/","/index","/toLogin").permitAll()
        //                // 访问 /select 需要登录
        //                .antMatchers("/select").authenticated()
        //                // 访问 /delete 需要拥有 delete权限
        //                .antMatchers("/delete").hasAuthority("delete")
        //                // 访问 /update 需要拥有 role_update 角色权限
        //                .antMatchers("/update").hasRole("update");
        //其他方法都需要验证
        .anyRequest().authenticated();
    http.exceptionHandling().accessDeniedPage("/error");
}
修改对应controller增加与上方相同的权限
@Controller
public class MyController {

    @GetMapping({"/","/index"})
    public String toIndex(){
        return "index";
    }

    @GetMapping("/select")
    //需要认证,大部分与前端相同
    @PreAuthorize("isAuthenticated()")
    public String select(){
        return "user/select";
    }

    @GetMapping("/delete")
    //需要delete权限
    @PreAuthorize("hasAuthority('delete')")
    public String delete1(){
        return "user/delete";
    }

    @GetMapping("/update")
    //需要update权限
    @PreAuthorize("hasRole('update')")
    public String update(){
        return "user/update";
    }

    @GetMapping("/error")
    public String errorPage(){
        return "error";
    }

    @GetMapping("/toLogin")
    public String toLogin(){
        return "login";
    }

}
使用数据库账号密码登录
-
实现 UserDetails 实现类
-
实现 UserDetailsService 实现类
-
修改 认证 方法
准备工作
mysql数据库
创建用户表及对应数据
CREATE TABLE user (
id int(20) primary key comment '用户id',
name varchar(30) comment '用户名',
pwd varchar(100) comment '密码'
);
insert into user values (1,'root','$2a$10$r.6c2l3FffSbTfHASQB.vepKYahB/Ct0VhvtgZESK3llquYlpM52q');
insert into user values (2,'test','$2a$10$r.6c2l3FffSbTfHASQB.vepKYahB/Ct0VhvtgZESK3llquYlpM52q');
创建用户权限表
CREATE TABLE user_auth (
id INT(20) comment '用户id',
auth VARCHAR(20) comment '权限'
);
insert into user_auth values (1,'delete');
insert into user_auth values (1,'ROLE_update');
insert into user_auth values (2,'delete');
实现 UserDetails 实现类
实现 UserDetails 接口即可,在重写方法中,他需要什么,我们写什么给他,比如需要password,给他写一个password,其他boolean值返回true即可。
编写无参和有参构造方法,给password和username赋值。
public class MyUserDetail implements UserDetails {

    private String password;
    private String username;
    Collection<GrantedAuthority> authorities;

    public MyUserDetail(){

    }

    public MyUserDetail(String password, String username) {
        this.password = password;
        this.username = username;
    }

    @Override
    public Collection<? extends GrantedAuthority> getAuthorities() {
        return this.authorities;
    }

    @Override
    public String getPassword() {
        return this.password;
    }

    @Override
    public String getUsername() {
        return this.username;
    }

    @Override
    public boolean isAccountNonExpired() {
        return true;
    }

    @Override
    public boolean isAccountNonLocked() {
        return true;
    }

    @Override
    public boolean isCredentialsNonExpired() {
        return true;
    }

    @Override
    public boolean isEnabled() {
        return true;
    }
}
实现 UserDetailsService 实现类
简单实现:查询用户,返回上方的实现类
@Service
public class MyUserServiceImpl implements UserDetailsService {

    @Autowired
    private UserMapper userMapper;

    @Override
    public UserDetails loadUserByUsername(String username) throws UsernameNotFoundException {
        //获取用户,根据用户名获取用户
        User user = userMapper.getUserByName(username);
        if(user == null){
            //用户不存在时抛出异常
            throw new UsernameNotFoundException("用户不存在");
        }
        //由于需要一个 UserDetails(interface),所以我们 new 一个我们写的实现类返回回去,
        MyUserDetail userDetail = new MyUserDetail(user.getPwd(), user.getName());
        return userDetail;
    }

}
修改 认证 方法
之前的认证是通过内存中的账号密码,本次使用数据库
@Override
protected void configure(AuthenticationManagerBuilder auth) throws Exception {
    //BCrypt加密每次盐都不一样,所以加密之后的值一般不一样,下面为 1 加密后的结果
    //$2a$10$r.6c2l3FffSbTfHASQB.vepKYahB/Ct0VhvtgZESK3llquYlpM52q
    auth.userDetailsService(userDetailsService)
        .passwordEncoder(new BCryptPasswordEncoder());
    //        // 使用内存来设置账号密码
    //        auth.inMemoryAuthentication()
    //                // 密码加密工具,使用的是 security 中的
    //                .passwordEncoder(new BCryptPasswordEncoder())
    //                // 账号密码,密码使用的是加密后的密码,如果你知道加密后密码多少,也可以 .password("xx") //xx为加密后的密码
    //                .withUser("root").password(new BCryptPasswordEncoder().encode("1"))
    //                //给予权限
    //                .authorities("delete","ROLE_update")
    //                // and拼接
    //                .and()
    //                .withUser("test").password(new BCryptPasswordEncoder().encode("1"))
    //                .authorities("delete");
}
启动项目

配置权限
我们看到上方用户都只有select权限(select为登录就有权限),没有其他权限,所以我们需要添加用户相关权限。
在 UserDetailsService 实现类中,获取用户权限,set 进 UserDetails 中
@Override
public UserDetails loadUserByUsername(String username) throws UsernameNotFoundException {
    //获取用户,根据用户名获取用户
    User user = userMapper.getUserByName(username);
    if(user == null){
        //用户不存在时抛出异常
        throw new UsernameNotFoundException("用户不存在");
    }
    //由于需要一个 UserDetails(interface),所以我们 new 一个我们写的实现类返回回去,
    MyUserDetail userDetail = new MyUserDetail(user.getPwd(), user.getName());

    //获取用户权限
    List<String> auths = userMapper.getAuthById(user.getId());
    ArrayList<GrantedAuthority> authorityArrayList = new ArrayList<>();
    //配置权限
    for(String auth : auths){
        authorityArrayList.add(new SimpleGrantedAuthority(auth));
    }
    //如果没有set方法,需要到 MyUserDetail 中添加 set 方法
    /**
         *     public void setAuthorities(Collection<GrantedAuthority> authorities) {
         *         this.authorities = authorities;
         *     }
         */
    userDetail.setAuthorities(authorityArrayList);

    return userDetail;
}
重启验证

注意事项
- Role 和 Authority 是一个东西,role只是 Authority 前加一个 ROLE_
- 退出使用 get 方法时需要关闭 csrf
- 使用注解控制权限的时候需要添加 登录 方法可以访问
- 使用的springboot版本
- 如果想自定义加密方式实现 PasswordEncoder 接口即可
- 由于html代码被转义了,附上代码地址

