laravel dingo/api添加jwt-auth认证
前面我们学了laravel dingo/api创建简单的api,这样api是开放给所有人的,如何查看和限制api的调用呢?可以用jwt-auth来验证,JSON Web Token Authentication
1,首先安装jwt-auth插件,在命令行中用composer安装
1 | composer require tymon/jwt-auth '0.5.*' |
2,然后发布
1 | php artisan vendor:publish --provider="Tymon\JWTAuth\Providers\JWTAuthServiceProvider" |
在/config/生成了一个jwt.php文件
3,生成key
1 | php artisan jwt:generate |
如果命令无法运行,可以在/config/jwt.php文件中修改changeme为自己设置的密匙
1 | 'secret' => env('JWT_SECRET', 'changeme'), |
4,修改/app/Api/Controllers/HelloController.php为
1 2 3 4 5 6 7 8 9 10 11 12 13 14 15 16 17 18 19 20 21 22 23 24 25 26 27 28 29 30 31 32 33 34 35 36 | <?phpnamespace App\Api\Controllers;use Illuminate\Http\Request;use App\Http\Controllers\Controller;//添加jwt-auth认证use JWTAuth;use Tymon\JWTAuth\Exceptions\JWTException;class HelloController extends Controller{ public function index() { return '{content:Helloworld!}'; }//添加jwt-auth认证 public function authenticate(Request $request) { // grab credentials from the request $credentials = $request->only('email', 'password'); try { // attempt to verify the credentials and create a token for the user if (! $token = JWTAuth::attempt($credentials)) { return response()->json(['error' => 'invalid_credentials'], 401); } } catch (JWTException $e) { // something went wrong whilst attempting to encode the token return response()->json(['error' => 'could_not_create_token'], 500); } // all good so return the token return response()->json(compact('token')); }} |
5,添加路由(/routes/web.php)
1 | $api->post('auth', 'App\Api\Controllers\HelloController@authenticate'); |
6,测试路由:php artisan api:routes,如果出现如下提示表示正确

访问url:***.com/api/auth显示错误,因为没加token
重新修改hellocontrol和loutes
1 2 3 4 5 6 7 8 9 10 11 12 13 14 15 16 17 18 19 20 21 22 23 24 25 26 27 28 29 30 31 32 33 34 35 36 37 38 39 40 41 42 43 44 45 46 47 48 49 50 51 52 53 | <?phpnamespace App\Api\Controllers;use Illuminate\Http\Request;use App\Http\Controllers\Controller;use JWTAuth;use Tymon\JWTAuth\Exceptions\JWTException;class HelloController extends Controller{ /** * Create a new controller instance. * * @return void */ /** * Show the application dashboard. * * @return \Illuminate\Http\Response */ public function index() { return '{content:Helloworld!}'; } public function authenticate(Request $request) { // grab credentials from the request $credentials = $request->only('email', 'password'); try { // attempt to verify the credentials and create a token for the user if (! $token = JWTAuth::attempt($credentials)) { return response()->json(['error' => 'invalid_credentials'], 401); } } catch (JWTException $e) { // something went wrong whilst attempting to encode the token return response()->json(['error' => 'could_not_create_token'], 500); } // all good so return the token return response()->json(compact('token')); } //添加user public function user() { JWTAuth::parseToken(); $user = JWTAuth::parseToken()->authenticate(); return $user; }} |
1 2 3 4 5 6 7 8 9 10 11 12 13 14 15 16 | <?phpRoute::get('/', function () { return view('welcome');});Auth::routes();Route::get('/home', 'HomeController@index')->name('home');$api = app('Dingo\Api\Routing\Router');$api->version('v1', function ($api) { $api->get('helloworld', 'App\Api\Controllers\HelloController@index'); $api->post('auth', 'App\Api\Controllers\HelloController@authenticate'); $api->get('auth', 'App\Api\Controllers\HelloController@user');}); |
用谷歌浏览器postman插件获取token,注意是post方法,步骤如下图所示
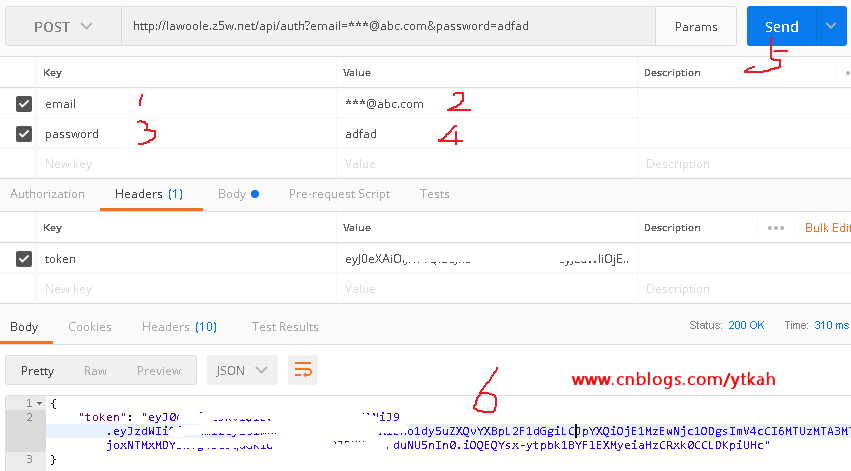
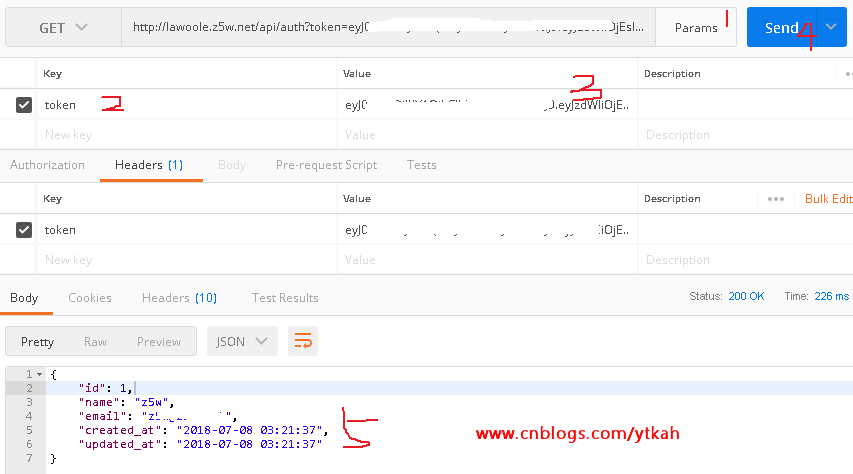
将获取的token复制,黏贴到第二步的用户验证token中,下图5中就是我们刚刚注册的用户

加微信交流


【推荐】国内首个AI IDE,深度理解中文开发场景,立即下载体验Trae
【推荐】编程新体验,更懂你的AI,立即体验豆包MarsCode编程助手
【推荐】抖音旗下AI助手豆包,你的智能百科全书,全免费不限次数
【推荐】轻量又高性能的 SSH 工具 IShell:AI 加持,快人一步
· 10年+ .NET Coder 心语,封装的思维:从隐藏、稳定开始理解其本质意义
· .NET Core 中如何实现缓存的预热?
· 从 HTTP 原因短语缺失研究 HTTP/2 和 HTTP/3 的设计差异
· AI与.NET技术实操系列:向量存储与相似性搜索在 .NET 中的实现
· 基于Microsoft.Extensions.AI核心库实现RAG应用
· 10年+ .NET Coder 心语 ── 封装的思维:从隐藏、稳定开始理解其本质意义
· 地球OL攻略 —— 某应届生求职总结
· 提示词工程——AI应用必不可少的技术
· Open-Sora 2.0 重磅开源!
· 周边上新:园子的第一款马克杯温暖上架
2015-07-09 微信电脑版也能用公众号自定义菜单 微信1.2 for Windows发布