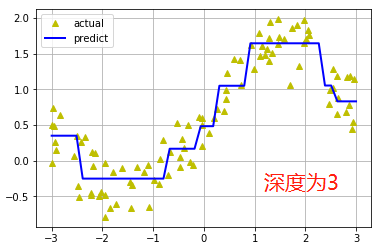
决策树案例
实现代码:
 1 # -*- coding: utf-8 -*-
 2 """
 3 Created on Wed Aug 29 14:52:09 2018
 4
 5 @author: zhen
 6 """
 7 import numpy as np
 8 from sklearn.tree import DecisionTreeRegressor
 9 import matplotlib.pyplot as plt
10 n = 100
11 x = np.random.rand(n) * 6 - 3  # 生成100个范围在-3~3的数据
12 x.sort()  #排序
13
14 y = np.sin(x) + np.random.rand(n) + 0.05
15 x = x.reshape(-1, 1)  #把数据转成任意行一列类型
16 y = y.reshape(-1, 1)
17
18 decision_tree_regressor = DecisionTreeRegressor(criterion='mse', max_depth=3)
19 decision_tree_regressor.fit(x, y)
20
21 x_test = np.linspace(-3, 3, 50).reshape(-1, 1)  # 创建等差数列
22 y_hat = decision_tree_regressor.predict(x_test)
23
24 plt.plot(x, y, "y^", label="actual")
25 plt.plot(x_test, y_hat, "b-", linewidth=2, label="predict")
26
27 plt.legend(loc="upper left")
28 plt.grid()
29 plt.show()
30
31 # 比较不同深度的决策树
32 depth = [2, 4, 6, 8, 10]
33 color = 'rgbmy'
34 dec_tree_reg = DecisionTreeRegressor()
35
36 plt.plot(x, y, "ko", label="actual")
37 x_test = np.linspace(-3, 3, 50).reshape(-1, 1)
38 for d, c in zip(depth, color):
39     dec_tree_reg.set_params(max_depth=d)
40     dec_tree_reg.fit(x, y)
41     y_hat = dec_tree_reg.predict(x_test)
42     plt.plot(x_test, y_hat, '-', color=c, linewidth=2, label="depth=%d" % d)
43
44 plt.legend(loc="upper left")
45 plt.grid(b=True)
46 plt.show()
结果:

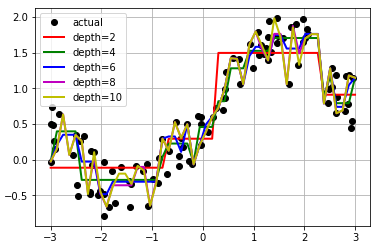
不同深度对预测的影响:

总结:
决策树分量算法有构造速度快、结构明显、分类精度高等优点。
决策树是以实例(Instance)为核心的归纳分类方法。
它从一组无序的、无特殊领域知识的数据集中提取出决策树表现形式的分类规则,
包含了分支节点、叶子节点和分支结构。它采用自顶向下的递归方式构造树状结构,
在决策时分支节点进行基于属性值的分类选择,分支节点覆盖了可能的分类结果,
最终分支节点连接了代表分类结果的叶子节点。
分类过程中经过的连接节点代表了一条分类模式,而这些分类模式的集合就组成了决策树的框架。


【推荐】国内首个AI IDE,深度理解中文开发场景,立即下载体验Trae
【推荐】编程新体验,更懂你的AI,立即体验豆包MarsCode编程助手
【推荐】抖音旗下AI助手豆包,你的智能百科全书,全免费不限次数
【推荐】轻量又高性能的 SSH 工具 IShell:AI 加持,快人一步
· 10年+ .NET Coder 心语,封装的思维:从隐藏、稳定开始理解其本质意义
· .NET Core 中如何实现缓存的预热?
· 从 HTTP 原因短语缺失研究 HTTP/2 和 HTTP/3 的设计差异
· AI与.NET技术实操系列:向量存储与相似性搜索在 .NET 中的实现
· 基于Microsoft.Extensions.AI核心库实现RAG应用
· 10年+ .NET Coder 心语 ── 封装的思维:从隐藏、稳定开始理解其本质意义
· 地球OL攻略 —— 某应届生求职总结
· 提示词工程——AI应用必不可少的技术
· Open-Sora 2.0 重磅开源!
· 周边上新:园子的第一款马克杯温暖上架