qt-bilibili黑马-55-60 TCP通信过程及实例
1 linux下TCP通信过程
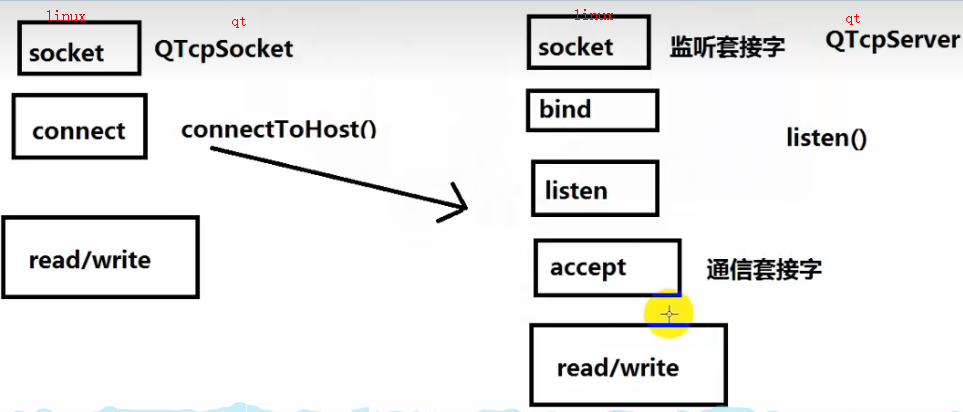
服务器端(右边):有两个套接字:监听套接字socket,通信套接字accept
1)建立监听套接字socket
2) bind:绑定一个固定端口,就像打电话,绑定电话号码
3)监听listen
至此就建立了监听队列(5个?10个?)
客户端(左边):
1)socket:没说
2)connect:主动建立连接,3次握手
服务器端(右边)
1)建立通信套接字
之后服务器端和客户端都开始read/write。可以类比打电话流程。
2 qt下TCP的通信过程:

服务器端(右边):
1)有人和我连接,就会触发newConnection()信号
2)有人给我发送数据,就会触发readReady()信号(服务器给客户端发信号也类似的)
客户端(左边):
1)connected()
2)disconnected()
这里听的不是太明白
3 实例(偷个懒,复制粘贴):
建立连接后,服务器会触发newConnection信号,客户端会触发connected信号
收到数据后,服务器和客户端都会触发readyRead信号
向对方发送数据:tcpSocket->write(str.toUtf8().data());
获取数据:tcpSocket->readAll();
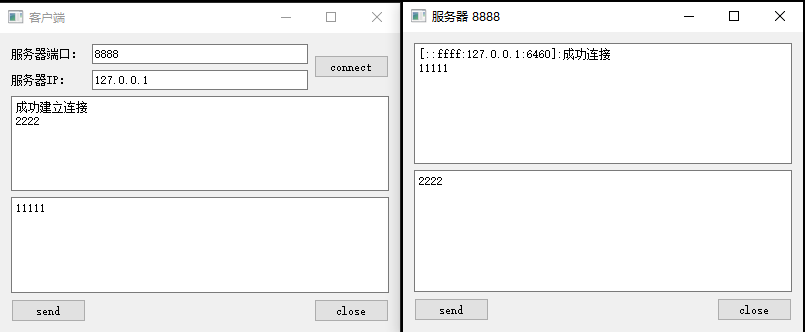
1)服务器端(close指示断开连接):
ServerWidget::ServerWidget(QWidget *parent) :
QWidget(parent),
ui(new Ui::ServerWidget)
{
ui->setupUi(this);
tcpSocket = NULL;
tcpServer = NULL;
setWindowTitle("服务器 8888");
tcpServer = new QTcpServer(this);
tcpServer->listen(QHostAddress::Any, 8888);
connect(tcpServer, &QTcpServer::newConnection,
[=]()
{
// 取出建立好连接的套接字
tcpSocket = tcpServer->nextPendingConnection();
// 获取对方的ip和端口
QString ip = tcpSocket->peerAddress().toString();
qint16 port = tcpSocket->peerPort();
QString temp = QString("[%1:%2]:成功连接").arg(ip).arg(port);
ui->textEditRead->setText(temp);
// 接收数据
connect(tcpSocket, &QTcpSocket::readyRead,
[=]()
{
QByteArray array = tcpSocket->readAll();
ui->textEditRead->append(array);
}
);
}
);
}
void ServerWidget::on_buttonSend_clicked()
{
if (NULL == tcpSocket) return;
QString str = ui->textEditWrite->toPlainText();
// 给对方发送数据
tcpSocket->write(str.toUtf8().data());
}
void ServerWidget::on_buttonClose_clicked()
{
if (NULL == tcpSocket) return;
// 主动和客户端断开连接
tcpSocket->disconnectFromHost();
tcpSocket->close();
tcpSocket = NULL;
}
2)客户端:
ClientWidget::ClientWidget(QWidget *parent) :
QWidget(parent),
ui(new Ui::ClientWidget)
{
ui->setupUi(this);
tcpSocket = NULL;
tcpSocket = new QTcpSocket(this);
setWindowTitle("客户端");
connect(tcpSocket, &QTcpSocket::connected,
[=]()
{
ui->textEditRead->setText("成功建立连接");
}
);
connect(tcpSocket, &QTcpSocket::readyRead,
[=]()
{
// 获取对方发送的内容
QByteArray array = tcpSocket->readAll();
ui->textEditRead->append(array);
}
);
}
void ClientWidget::on_buttonConnect_clicked()
{
// 获取服务器ip和端口
QString ip = ui->lineEditIP->text();
qint16 port = ui->lineEditPort->text().toInt();
// 主动和服务器建立连接
tcpSocket->connectToHost(QHostAddress(ip), port);
// 如何知道连接成功?不用返回值?
}
void ClientWidget::on_buttonSend_clicked()
{
QString str = ui->textEditWrite->toPlainText();
tcpSocket->write(str.toUtf8().data());
}
void ClientWidget::on_pushButton_3_clicked()
{
// 主动和服务器断开连接
tcpSocket->disconnectFromHost();
tcpSocket->close();
}

 浙公网安备 33010602011771号