Windows10编译pysqlcipher3 平替 SQLite,文章包括Windows10编译sqlcipher
Windows10编译pysqlcipher3来增强本地数据的安全性(替换SQLite)
本文是基于 系列文章 PyQt5+SQLAlchemy做登录注册页 的补充,并不单独放在系列文中,主要讲的是,使用 sqlcipher 来保存本地密码,这比直接使用 SQLite 更安全
关于 sqlcipher,官方介绍原文如下:
SQLCipher is a standalone fork of the SQLite database library that adds 256 bit AES encryption of database files and other security features like:
- on-the-fly encryption
- tamper detection
- memory sanitization
- strong key derivation
目录
编译安装pysqlcipher3,比较繁琐,本步骤执行下来并没有任何报错,但是由于每个人环境并不一样,所以希望也能顺利
注意:如果不想编译,可以尝试使用编译好的包体,直接安装,见这里 Windows10 安装编译后的 pysqlcipher3-1.2.1
- 编译适用于 Windows10 的 Python x64 的 pysqlcipher3
- 编译适用于 Windows10 的 Python x32 的 pysqlcipher3
- 测试 pysqlcipher3
- 在虚拟环境使用 pysqlcipher3
- 修改记住密码 crypto.py,改为 pysqlcipher3
64位
第1步,编译准备
-
安装 ActiveTcl 8.6,官网下载需要登录,这里提供一个网盘下载蓝奏云下载,密码:
f9cf,需要用到其中的tclsh.exe,安装后,会默认添加到系统环境变量,可查看:path=C:\ActiveTcl\bin,验证是否安装成功,可在CMD输入tclsh,不报错即成功

-
安装
Microsoft Visual Studio 2022 x64点击前往网盘下载,密码:cpf5只安装 C++ 桌面开发,此处你安装最新版的 Visual Studio 也行,注意软件位数

-
安装 Win64 OpenSSL v1.1.1w(我发现此网站上已经不提供:
Win64 OpenSSL v1.1.1w下载了,于是我这里分享一个网盘链供需要得下载:蓝奏云网盘分享 提取码:d0ht)
除了安装路径,其他都选项不做修改,安装后需要添加系统环境变量:
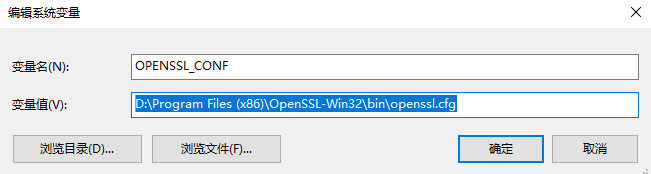
x64添加OPENSSL_CONF=D:\Program Files\OpenSSL-Win64\bin\openssl.cfg

-
对安装的
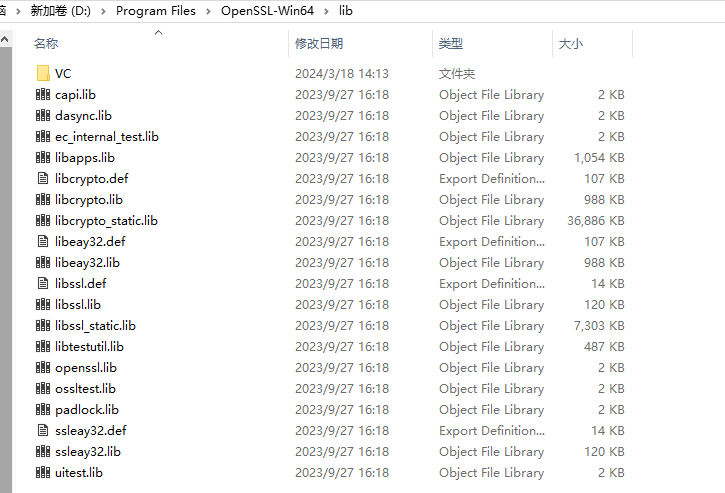
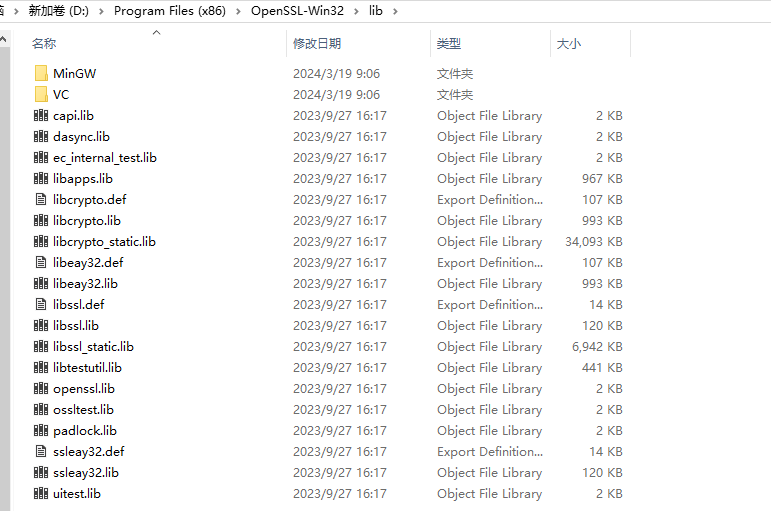
OpenSSL做一些修改,下面操作全在文件夹D:\Program Files\OpenSSL-Win64\lib中执行
复制libcrypto.def和libcrypto.lib为副本,并修改副本名称为libeay32.def和libeay32.lib
复制libssl.def和libssl.lib为副本,并修改副本名称为ssleay32.def和ssleay32.lib
-
复制路径
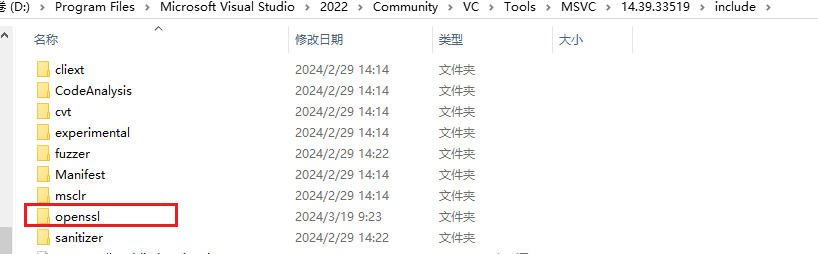
D:\Program Files\OpenSSL-Win64\include下的openssl文件夹到D:\Program Files\Microsoft Visual Studio\2022\Community\VC\Tools\MSVC\14.39.33519\include,前一个路径是OpenSSL安装路径,后一个路径是Visual Studio 2022 x64安装路径
第2步,安装sqlcipher x64
-
下载 sqlcipher,可直接克隆,或者下载压缩包
-
用
管理员方式打开 Visual Studio 的 x64工具 ,执行下的操作:执行后会在
 sqlcipher文件夹中生成sqlite3.c和sqlite3.h# 切换到sqlcipher cd /d F:\Projects\sqlcipher # 编译 nmake /f Makefile.msc clean nmake /f Makefile.msc sqlite3.c
-
安装
sqlcipher(这一步可有可无,因为最后将安装pysqlcipher3来集成sqlcipher)# 注意修改其中的 OpenSSL 的安装路径 cl -I"D:\Program Files\OpenSSL-Win64\include" sqlite3.c -DSQLITE_API=__declspec(dllexport) -DSQLITE_TEMP_STORE=2 -DSQLITE_HAS_CODEC /MT -link -dll -out:sqlcipher.dll -LIBPATH:"D:\Program Files\OpenSSL-Win64\lib" libeay32.lib ssleay32.lib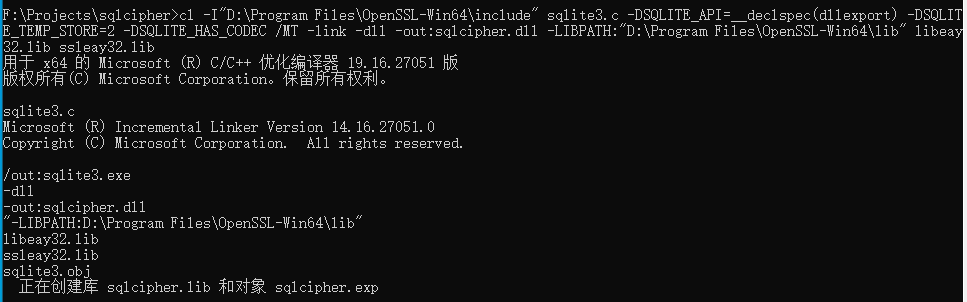
第3步,安装pysqlcipher3 x64
-
下载pysqlcipher3,可直接克隆,或者下载压缩包。在
/pysqlcipher3中创建文件夹amalgamation,然后将上面中生成的sqlite3.c和sqlite3.h复制到amalgamation中。 -
下载sqlite-amalgamation,我这里使用的是这个sqlite-amalgamation-3340100,下载解压后,复制其中的4个文件
shell.c sqlite3.c sqlite.h sqliteext.h,并复制到/pysqlcipher3/src/python3/sqlcipher路径中 -
继续在 Visual Studio 的 x64工具
,执行下的操作:我这里使用的是 Python3.8.10 64bit# 切换到 pysqlcipher3 cd F:\Projects\pysqlcipher3 python setup.py clean python setup.py build_amalgamation python setup.py installpython setup.py build_amalgamation执行后截图

python setup.py install执行后截图

32位
第1步,编译准备
-
安装 ActiveTcl 8.6,官网下载需要登录,这里提供一个网盘下载蓝奏云下载,密码:
f9cf,需要用到其中的tclsh.exe,安装后,会默认添加到系统环境变量,可查看:path=C:\ActiveTcl\bin,验证是否安装成功,可在CMD输入tclsh,不报错即成功
-
安装
Microsoft Visual Studio 2017 x86点击前往网盘下载,密码:cpf5只安装 C++ 桌面开发,此处你安装最新版的 Visual Studio 也行,注意软件位数
-
安装 Win32 OpenSSL v1.1.1w(我发现此网站上已经不提供:
Win32 OpenSSL v1.1.1w下载了,于是我这里分享一个网盘链供需要得下载:蓝奏云网盘分享 提取码:d0ht)
除了安装路径,其他都选项不做修改,安装后需要添加系统环境变量:
x32添加OPENSSL_CONF=D:\Program Files(x86)\OpenSSL-Win32\bin\openssl.cfg
-
对安装的
OpenSSL做一些修改,下面操作全在文件夹D:\Program Files (x86)\OpenSSL-Win32\lib中执行
复制libcrypto.def和libcrypto.lib为副本,并修改副本名称为libeay32.def和libeay32.lib
复制libssl.def和libssl.lib为副本,并修改副本名称为ssleay32.def和ssleay32.lib
-
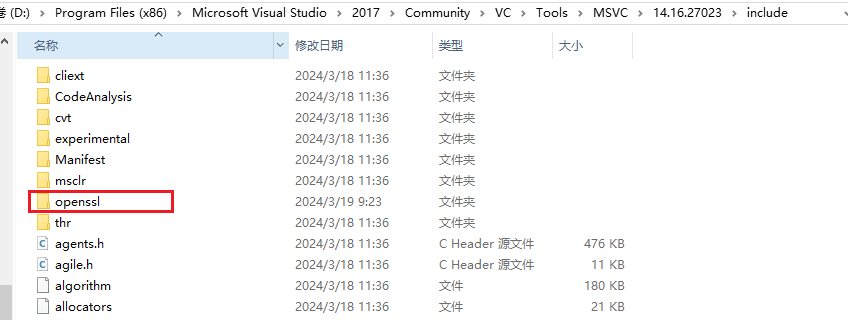
复制此路径
D:\Program Files (x86)\OpenSSL-Win32\include下的openssl文件夹到D:\Program Files (x86)\Microsoft Visual Studio\2017\Community\VC\Tools\MSVC\14.16.27023\include,前一个路径是OpenSSL安装路径,后一个路径是Visual Studio 2017 x32安装路径
第2步,安装sqlcipher x32
-
下载 sqlcipher,可直接克隆,或者下载压缩包
-
用
管理员方式打开 Visual Studio 的 x64_x86交叉工具,执行下的操作: ,执行后会在
 sqlcipher文件夹中生成sqlite3.c和sqlite3.h# 切换到sqlcipher cd /d F:\Projects\sqlcipher # 编译 nmake /f Makefile.msc clean nmake /f Makefile.msc sqlite3.c
-
安装
sqlcipher(这一步可有可无,因为最后将安装pysqlcipher3来集成sqlcipher)# 注意修改其中的 OpenSSL 的安装路径 cl -I"D:\Program Files (x86)\OpenSSL-Win32\include" sqlite3.c -DSQLITE_API=__declspec(dllexport) -DSQLITE_TEMP_STORE=2 -DSQLITE_HAS_CODEC /MT -link -dll -out:sqlcipher.dll -LIBPATH:"D:\Program Files (x86)\OpenSSL-Win32\lib" libeay32.lib ssleay32.lib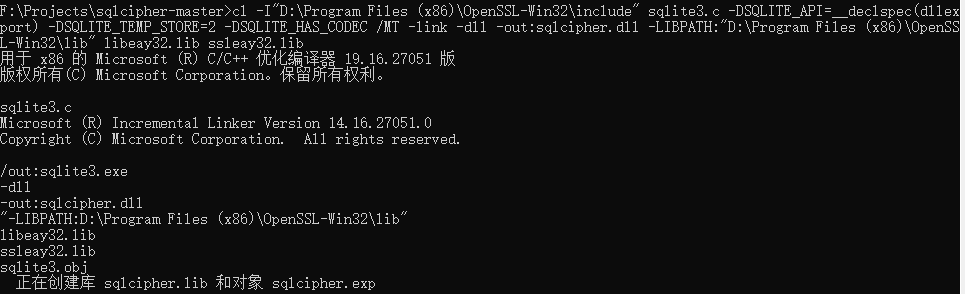
第3步,安装pysqlcipher3 x32
-
下载pysqlcipher3,可直接克隆,或者下载压缩包,在
/pysqlcipher3中创建文件夹amalgamation,然后将上面生成的sqlite3.c和sqlite3.h复制到amalgamation中。 -
下载sqlite-amalgamation,我这里使用的是这个sqlite-amalgamation-3340100,下载解压后,复制其中的4个文件
shell.c sqlite3.c sqlite.h sqliteext.h,复制到/pysqlcipher3/src/python3/sqlcipher -
打开 Visual Studio 的 x64_x86交叉工具,执行下的操作:
,我这里使用的是Python3.8.10 32bit# 切换到 pysqlcipher3 cd F:\Projects\pysqlcipher3 python setup.py clean python setup.py build_amalgamation python setup.py installpython setup.py build_amalgamation执行后截图

python setup.py install执行后截图

测试安装
使用下列代码测试
#!/usr/bin/env python3
# -*- coding: UTF-8 -*-
"""
@ File        : test.py
@ Version     : V1.0.0
@ Description :
"""
from pysqlcipher3 import dbapi2 as sqlite

conn1 = sqlite.connect("test.db")
c1 = conn1.cursor()
c1.execute("PRAGMA key='123456'")
c1.execute("""create table stocks (date text, trans text, symbol text, qty real, price real)""")
c1.execute("""insert into stocks values ('2006-01-05','BUY','RHAT',100,35.14)""")
conn1.commit()
c1.close()

conn2 = sqlite.connect("test.db")
c2 = conn2.cursor()
c2.execute("PRAGMA key='123456'")
print(c2.execute("""select * from stocks""").fetchall())
c2.close()
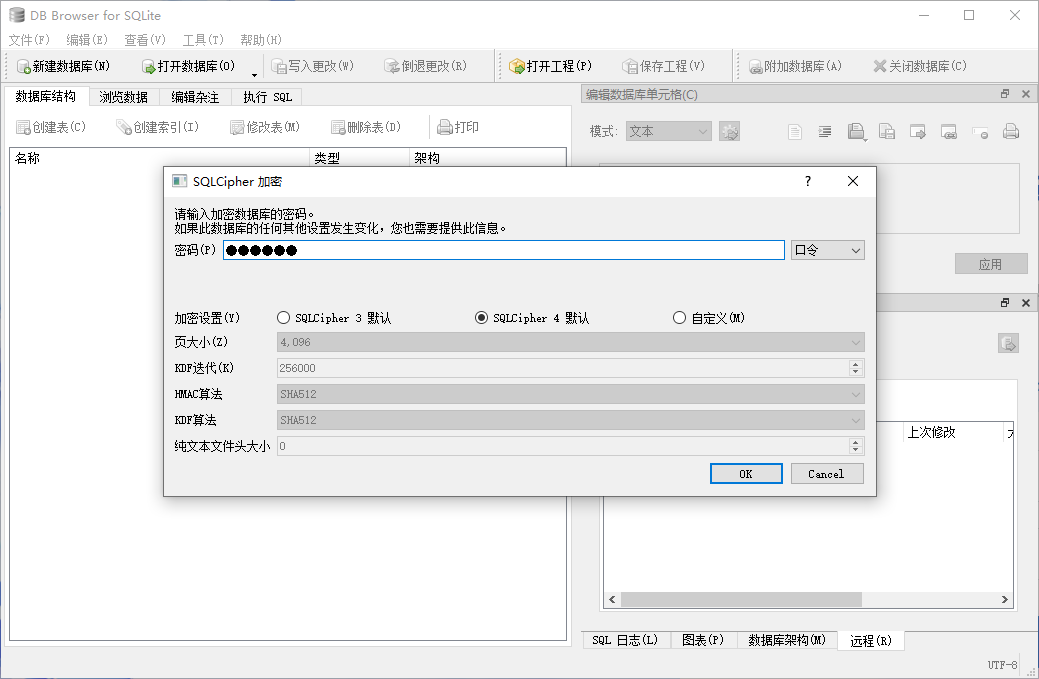
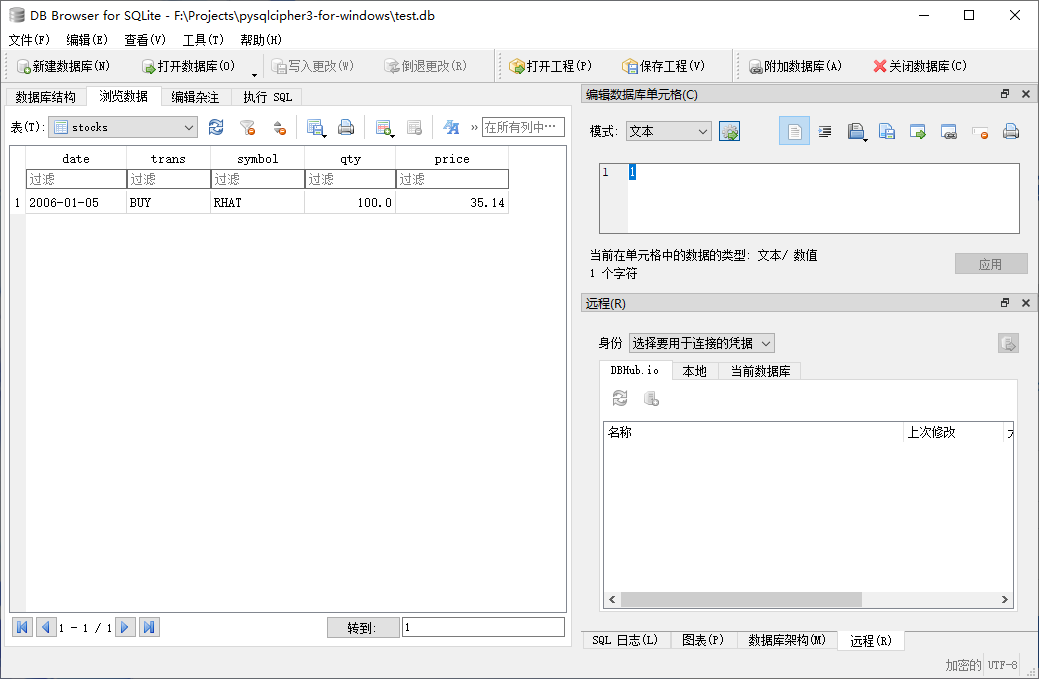
使用最新版本的DB.Browser.for.SQLite 3.12.2查看
虚拟环境使用
若需要在虚拟环境中使用pysqlcipher3,则需要在已安装的系统环境中的Lib\site-packages目录下,复制下面两个,到虚拟环境 venv\Lib\site-packages 目录下
- 文件夹:
pysqlcipher3-1.2.1-py3.8-win32.egg - 文件:
easy-install.pth
修改替换
修改crypto.py,将 sqlite3 替换为 pysqlcipher3,GitHUb源码见这里
#!/usr/bin/env python3
# -*- coding: UTF-8 -*-
"""
@ Project     : QtLoginRegistration
@ File        : crypto_sqlcipher.py
@ Author      : yqbao
@ Version     : V1.0.0
@ Description : 将 sqlite3 替换为 pysqlcipher3,实现密码访问
                pysqlcipher3 实现密码访问 SQLite,需要手动安装
                安装看这里:https://www.cnblogs.com/yqbaowo/p/18043628
"""
from os import getenv

from pysqlcipher3 import dbapi2 as sqlite3
import win32crypt

db_password = getenv('DB_PASSWORD')  # 读取环境变量,数据库密码


def crypto(password):
    encrypt = win32crypt.CryptProtectData(password.encode('utf-8'))
    return encrypt


def create_db(db, table):
    conn = sqlite3.connect(db)
    cursor = conn.cursor()
    cursor.execute(f"PRAGMA key='{db_password}'")  # 密码
    try:
        cursor.execute(f'CREATE TABLE {table} (username text , password text)')
        conn.commit()
    except sqlite3.OperationalError:
        pass
    conn.close()


def insert_db(db, table, username, password):
    conn = sqlite3.connect(db)
    cursor = conn.cursor()
    cursor.execute(f"PRAGMA key='{db_password}'")  # 密码
    encrypt = crypto(password)
    cursor.execute(f"INSERT INTO {table}(username,password) VALUES(?,?)", (username, encrypt))
    conn.commit()
    conn.close()


def delete_db(db, table):
    conn = sqlite3.connect(db)
    cursor = conn.cursor()
    cursor.execute(f"PRAGMA key='{db_password}'")  # 密码
    cursor.execute(f"DELETE FROM {table}")
    conn.commit()
    conn.close()


def decrypt(db, table):
    conn = sqlite3.connect(db)
    cursor = conn.cursor()
    cursor.execute(f"PRAGMA key='{db_password}'")  # 密码
    cursor.execute(f"SELECT * FROM {table}")
    result = cursor.fetchall()[-1]
    username = result[0]
    password = win32crypt.CryptUnprotectData(result[1])[-1]
    password = password.decode('utf-8')
    return username, password


if __name__ == '__main__':
    db_ = 'test.db'
    table_ = 'test'
    create_db(db_, table_)
    delete_db(db_, table_)
    insert_db(db_, table_, 'test', '111111')
    print(decrypt(db_, table_))
效果如下:

参考文章
Install pysqlcipher3 windows
编译Windows 64bit平台pysqlcipher3 for Python3.7
本文来自博客园作者:星尘的博客,转载请注明出处:https://www.cnblogs.com/yqbaowo/p/18043628


【推荐】国内首个AI IDE,深度理解中文开发场景,立即下载体验Trae
【推荐】编程新体验,更懂你的AI,立即体验豆包MarsCode编程助手
【推荐】抖音旗下AI助手豆包,你的智能百科全书,全免费不限次数
【推荐】轻量又高性能的 SSH 工具 IShell:AI 加持,快人一步
· TypeScript + Deepseek 打造卜卦网站:技术与玄学的结合
· Manus的开源复刻OpenManus初探
· AI 智能体引爆开源社区「GitHub 热点速览」
· 从HTTP原因短语缺失研究HTTP/2和HTTP/3的设计差异
· 三行代码完成国际化适配,妙~啊~