

Vue页面传值与数据存储 cookie LocalStorage sessionStorage
Posted on 2022-02-28 17:31 yqphare 阅读(680) 评论(0) 编辑 收藏 举报一、父子组件传值
-
基本概念
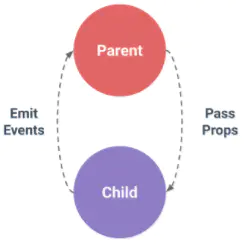
在Vue中,父子组件间的数据流向可以总结为prop向下传递,事件向上传递,即父组件通过prop给子组件下发数据,子组件通过自定义事件给父组件发送信息。
(1) 父组件给子组件传值
父组件通过属性传值,子组件利用props接收值
// 给子组件传入一个静态的值:
<child title="哈哈" />
// 传动态的值,需要v-bind绑定:
<child :title="data" />

// 子组件接收值
export default {
  props: {
    title: {
      type: String,
      default: 'hello world'
    }
  }
}
关于父组件的传值类型和props更多的定义详见官网
(2)子组件向父组件传值
<!-- 父组件 -->
<template>
    <div class="test">
      <test-com @childFn="parentFn"></test-com>
      <br/>
      子组件传来的值 : {{message}}
    </div>
</template>

<script>
export default {
    // ...
    data: {
        message: ''
    },
    methods: {
       parentFn(payload) {
        this.message = payload;
      }
    }
}
</script>
<!-- 子组件 -->
<template>
<div>
    <input type="text" v-model="message" />
    <button @click="click">Send</button>
</div>
</template>
<script>
export default {
    // ...
    data() {
        return {
          message: '子组件数据'
        }
    },
    methods: {
      click() {
            this.$emit('childFn', this.message);
        }
    }
}
</script>
(3)通过parent,chlidren等方法调取用层级关系的组件内的数据和方法。
-
// 获取子组件data中的id
const id = this.$children.$data.id
// 获取父组件data中的id
const id = this.$parent.$data.id
注意:获取父元素data中的id 这样用起来比较灵活,但是容易造成代码耦合性太强,导致维护困难
二、非父子组件间传值
有很多时候根据业务需求要在同级组件或页面间传值,此处提供以下几种方法作为参考:
(1)通过router-link进行跳转
<router-link
    :to="{
        path: '/test',
        params: {
            key: 'value',
        },
        query: {
           key: 'value',
        }
    }">
    <button type="button">跳转</button>
</router-link>
- path -> 是要跳转的路由路径
- name ->路由文件里面配置的name,必须一致,这两者都可以进行路由导航
- params -> 是要传送的参数,参数可以直接key:value形式传递
- query -> 是通过 url 来传递参数的同样是key:value形式传递
跳转页面接受参数:
let value1 = this.$route.query.key
let value2 = this.$route.params.key
(2) this.$router.push()
此方法同样是有path+query和name+params两种方式:
- this.$router.push({name:'路由命名',params:{参数名:参数值,参数名:参数值}})
- this.$router.push({path:'跳转路由',query:{参数名:参数值,参数名:参数值}})
this.$router.push({
    path: 'yourPath',
    name: '要跳转的路径的 name,在 router 文件夹下的 index.js 文件内找',
    params: {
        key: 'key',
        value: this.msg
     }
    /*query: {
           key: 'key',
            value: this.msg
     }*/
})
// 接收参数
export default{
    data () {
      return {
        msg: '',
        // 保存传递过来的index
        index: ''
      }
    mounted() {
      this.msg = this.$route.params.value
      // this.index = this.$route.query.key
    }
}
总结:使用query,传输的值会在url后面以参数的形式显示出来,可以刷新页面,数据不变,但会是页面路由过长;而params只要一刷新传递的参数就没了。
(3)LocalStorage缓存传值
//保存userid至内存
const userId = 1;
localStorage.setItem('storeId',JSON.stringify(userId));
//取,注意这里取出的是字符串。
this.userId= JSON.parse(localStorage.userId);
注意:简单的小项目可以这么做,如果项目很大,建议直接用vuex。
(4)通过Vuex进行传值
// store/index.js
import Vue from 'vue'
import Vuex from 'vuex'
import data from './modules/data'
Vue.use(Vuex)
export default new Vuex.Store({
  modules: {
    data
  },
  state: {},
  getters: {},
  mutations: {},
  actions: {},
  strict: process.env.NODE_ENV !== 'production', // 严格模式
})

// store/modules/data.js
const state = {
  checkedCars: [],
}
const getters = {}
Object.keys(state).forEach(prop => {
  getters[prop] = state => state[prop]
})
const mutations = {
  loadCheckedCars: (state, payload) => {
    state.checkedCars = [].concat(payload)
  },
  deleteCheckedCar: (state, payload) => {
    const result = state.checkedCars.findIndex(item => {
      // eslint-disable-next-line no-unused-expressions
      item.id === payload.id
    })
    if (result > -1) {
      state.checkedCars.splice(result, 1)
    }
  },
}
const actions = {}
export default {
  state,
  getters,
  mutations,
  actions,
}
-
三、页面缓存问题
Vue中如何在切换组件过程中,将状态保存到内存中,防止DOM重新渲染,通俗的讲就是实现如何在一个页面输入部分数据后到了另一个页面再返回该页面,数据还在。
需求分析:Page1中录入信息,页面跳转带Page2,然后再返回Page1,之前Page1录入的信息还存在。
- keepAlive组件
此处结合router-view,将整个路由页面缓存,使用$route.meta的keepAlive属性:
在APP.Vue文件中 :
<keep-alive>
      <router-view v-if="$route.meta.keepAlive"></router-view>
</keep-alive>
<router-view v-if="!$route.meta.keepAlive"></router-view>
routes: [
  {
    path: '/page2',
    name: 'Page2',
    component: Hello,
    meta: {
        keepAlive: false // 不需要缓存
    }
  },
  {
    path: '/page1’,
    name: 'Page1’,
    component: Page1,
    meta: {
      keepAlive: true // 需要被缓存
    }
  }
]
现在更改需求为:
首页是A页面
A页面跳转到B,B页面不需要缓存
B页面跳转到C,C页面不需要被缓存
C页面返回到B,B页面需要缓存
B页面返回到A,
A再次跳转到B
(1)此时思路是在每个路由的beforeRouteLeave(to, from, next)钩子中设置to.meta.keepAlive
beforeRouteLeave讲解
// B的路由:
{
  path: '/',
  name: ‘B',
  component: B,
  meta: {
    keepAlive: true // 需要被缓存
  }
}
PageA页面:
// 重新加载A页面
let isRefresh = sessionStorage.getItem('isRefresh’);
if(isRefresh == '1’){
  sessionStorage.setItem('isRefresh',null);
    window.location.reload();
  } else {
    sessionStorage.setItem('isRefresh',1);
}
// 并非刷新页面,而是重置页面数据达到页面刷新效果
beforeRouteEnter:function(to,form,next){
  next(vm => {
    let calculateReload = sessionStorage.getItem('calculateReload’);
      if(calculateReload == 'reload’){
        sessionStorage.setItem('calculateReload',null);
        vm.clearFinancing();vm.load();
      } else {
        sessionStorage.setItem('calculateReload','reload');
      }
  })
},
PageB页面:
beforeRouteLeave (to, from, next) {
    if (to.name === 'CheckedCars' || to.name === 'CarInfo') {
      from.meta.keepAlive = true
      next()
    } else {
      to.meta.keepAlive = false
      from.meta.keepAlive = false
      this.$destroy()
      next()
    }
  },
methods:{
    clearFinancing(){
  this.financing = {};
  },
load(){
  this.financing.product_name_write =
  this.$route.params.financing.product_name_write;
  this.financing.invoice_price = null;
  this.financing.annual_pay_times_n = '月';//还款频率
  this.financing.annual_pay_times = 12;//还款频率
  this.financing.lease_charge = 0;//手续费
},
}
