SSM3.1【Spring:Spring集成web环境】
搭建初始项目

  1 <?xml version="1.0" encoding="UTF-8"?>
  2 <project xmlns="http://maven.apache.org/POM/4.0.0"
  3          xmlns:xsi="http://www.w3.org/2001/XMLSchema-instance"
  4          xsi:schemaLocation="http://maven.apache.org/POM/4.0.0 http://maven.apache.org/xsd/maven-4.0.0.xsd">
  5     <modelVersion>4.0.0</modelVersion>
  6
  7     <groupId>com.haifei</groupId>
  8     <artifactId>SSM3_spring_mvc</artifactId>
  9     <version>1.0-SNAPSHOT</version>
 10     <packaging>war</packaging>
 11     <!--web项目设置好打包方式为war-->
 12
 13
 14     <!--maven依赖-->
 15     <dependencies>
 16         <!--mysql数据库驱动坐标-->
 17         <dependency>
 18             <groupId>mysql</groupId>
 19             <artifactId>mysql-connector-java</artifactId>
 20             <version>5.1.32</version>
 21         </dependency>
 22         <!--c3p0数据库连接池坐标-->
 23         <dependency>
 24             <groupId>c3p0</groupId>
 25             <artifactId>c3p0</artifactId>
 26             <version>0.9.1.2</version>
 27         </dependency>
 28         <!--druid数据库连接池坐标-->
 29         <dependency>
 30             <groupId>com.alibaba</groupId>
 31             <artifactId>druid</artifactId>
 32             <version>1.1.10</version>
 33         </dependency>
 34         <!--junit单元测试坐标-->
 35         <dependency>
 36             <groupId>junit</groupId>
 37             <artifactId>junit</artifactId>
 38             <version>4.12</version>
 39             <scope>test</scope>
 40         </dependency>
 41
 42         <!--spring坐标-->
 43         <dependency>
 44             <groupId>org.springframework</groupId>
 45             <artifactId>spring-context</artifactId>
 46             <version>5.0.5.RELEASE</version>
 47         </dependency>
 48         <!--spring测试坐标-->
 49         <dependency>
 50             <groupId>org.springframework</groupId>
 51             <artifactId>spring-test</artifactId>
 52             <version>5.0.5.RELEASE</version>
 53         </dependency>
 54
 55         <!--servlet坐标-->
 56         <dependency>
 57             <groupId>javax.servlet</groupId>
 58             <artifactId>javax.servlet-api</artifactId>
 59             <version>3.0.1</version>
 60             <scope>provided</scope>
 61         </dependency>
 62         <!--jsp坐标-->
 63         <dependency>
 64             <groupId>javax.servlet.jsp</groupId>
 65             <artifactId>javax.servlet.jsp-api</artifactId>
 66             <version>2.2.1</version>
 67             <scope>provided</scope>
 68         </dependency>
 69
 70     </dependencies>
 71
 72
 73     <!--maven插件-->
 74     <build>
 75         <plugins>
 76             <!--jdk编译插件-->
 77             <plugin>
 78                 <groupId>org.apache.maven.plugins</groupId>
 79                 <artifactId>maven-compiler-plugin</artifactId>
 80                 <version>3.1</version>
 81                 <configuration>
 82                     <target>1.8</target>
 83                     <source>1.8</source>
 84                 </configuration>
 85             </plugin>
 86             <!--tomcat7插件-->
 87             <plugin>
 88                 <groupId>org.apache.tomcat.maven</groupId>
 89                 <artifactId>tomcat7-maven-plugin</artifactId>
 90                 <version>2.1</version>
 91                 <configuration>
 92                     <port>8080</port>
 93                     <path>/ssm3</path>
 94                 </configuration>
 95             </plugin>
 96         </plugins>
 97     </build>
 98
 99
100 </project>
1 jdbc.driver=com.mysql.jdbc.Driver
2 jdbc.url=jdbc:mysql://localhost:3306/test
3 jdbc.username=root
4 jdbc.password=root
 1 <?xml version="1.0" encoding="UTF-8"?>
 2 <beans xmlns="http://www.springframework.org/schema/beans"
 3        xmlns:xsi="http://www.w3.org/2001/XMLSchema-instance"
 4        xmlns:context="http://www.springframework.org/schema/context"
 5        xsi:schemaLocation="
 6         http://www.springframework.org/schema/beans http://www.springframework.org/schema/beans/spring-beans.xsd
 7         http://www.springframework.org/schema/context http://www.springframework.org/schema/context/spring-context.xsd">
 8     <!--配置context命名空间及其约束-->
 9
10
11     <!--加载外部的properties文件-->
12     <context:property-placeholder location="classpath:jdbc.properties"/>
13
14     <!--配置数据源-->
15     <bean id="dataSource" class="com.mchange.v2.c3p0.ComboPooledDataSource">
16         <property name="driverClass" value="${jdbc.driver}"></property>
17         <property name="jdbcUrl" value="${jdbc.url}"></property>
18         <property name="user" value="${jdbc.username}"></property>
19         <property name="password" value="${jdbc.password}"></property>
20     </bean>
21
22     <!--配置dao-->
23     <bean id="userDao" class="com.haifei.dao.impl.UserDaoImpl"></bean>
24
25     <!--配置service-->
26     <bean id="userService" class="com.haifei.service.impl.UserServiceImpl">
27         <property name="userDao" ref="userDao"/>
28     </bean>
29
30 </beans>
1 package com.haifei.dao;
2
3 public interface UserDao {
4
5     public void save();
6 }
 1 package com.haifei.dao.impl;
 2
 3 import com.haifei.dao.UserDao;
 4
 5 public class UserDaoImpl implements UserDao {
 6
 7     @Override
 8     public void save() {
 9         System.out.println("save...");
10     }
11 }
1 package com.haifei.service;
2
3 public interface UserService {
4
5     public void save();
6 }
 1 package com.haifei.service.impl;
 2
 3 import com.haifei.dao.UserDao;
 4 import com.haifei.service.UserService;
 5
 6 public class UserServiceImpl implements UserService {
 7
 8     private UserDao userDao;
 9     public void setUserDao(UserDao userDao) {
10         this.userDao = userDao;
11     }
12
13     @Override
14     public void save() {
15         userDao.save();
16     }
17 }
 1 package com.haifei.web;
 2
 3 import com.haifei.service.UserService;
 4 import org.springframework.context.ApplicationContext;
 5 import org.springframework.context.support.ClassPathXmlApplicationContext;
 6
 7 import javax.servlet.ServletException;
 8 import javax.servlet.annotation.WebServlet;
 9 import javax.servlet.http.HttpServlet;
10 import javax.servlet.http.HttpServletRequest;
11 import javax.servlet.http.HttpServletResponse;
12 import java.io.IOException;
13
14 @WebServlet("/userServlet") //配置此注解时不需再在web.xm里配置servlet
15 public class UserServlet extends HttpServlet {
16     protected void doPost(HttpServletRequest request, HttpServletResponse response) throws ServletException, IOException {
17         ApplicationContext app = new ClassPathXmlApplicationContext("applicationContext.xml");
18         UserService userService = app.getBean(UserService.class);
19         userService.save();
20
21         /*
22         http://localhost:8080/ssm3/userServlet
23         save...
24          */
25     }
26
27     protected void doGet(HttpServletRequest request, HttpServletResponse response) throws ServletException, IOException {
28         this.doPost(request, response);
29     }
30 }
Spring与Web环境集成
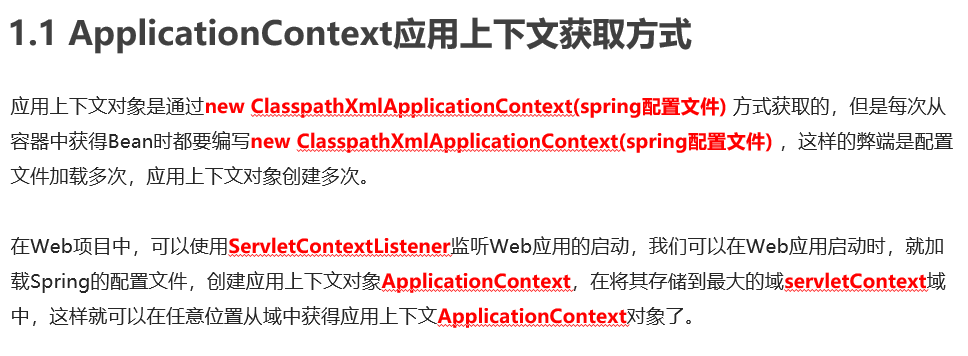
手动实现:获取ApplicationContext应用上下文
 1 public class ContextLoaderLintener implements ServletContextListener {
 2
 3     @Override
 4     public void contextInitialized(ServletContextEvent servletContextEvent) {
 5         ApplicationContext app = new ClassPathXmlApplicationContext("applicationContext.xml");
 6         ServletContext servletContext = servletContextEvent.getServletContext();
 7         servletContext.setAttribute("app", app);
 8         System.out.println("spring容器创建完毕");
 9     }
10     //"applicationContext.xml"耦合
11     //"app", app耦合
12 }
1 web.xml
2
3
4 <!--配置监听器-->
5     <listener>
6         <listener-class>com.haifei.listener.ContextLoaderLintener</listener-class>
7     </listener>
 1 @WebServlet("/userServlet") //配置此注解时不需再在web.xm里配置servlet
 2 public class UserServlet extends HttpServlet {
 3         /**
 4      * 编写ContextLoaderLintener,并在web.xml中配置监听器后
 5      *
 6      * @param request
 7      * @param response
 8      * @throws ServletException
 9      * @throws IOException
10      */
11     protected void doPost(HttpServletRequest request, HttpServletResponse response) throws ServletException, IOException {
12 //        ServletContext servletContext = request.getServletContext();
13         ServletContext servletContext = this.getServletContext();
14
15 //        Object app = servletContext.getAttribute("app");
16         ApplicationContext app = (ApplicationContext)servletContext.getAttribute("app");
17
18         UserService userService = app.getBean(UserService.class);
19         userService.save();
20     }
21
22 }
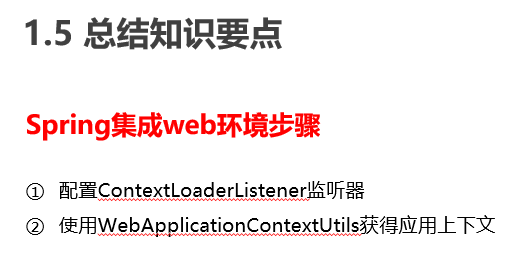
优化上述实现
 1 web.xml
 2
 3
 4 <!--配置监听器-->
 5     <listener>
 6         <listener-class>com.haifei.listener.ContextLoaderLintener</listener-class>
 7     </listener>
 8
 9 <!--全局初始化参数-->
10     <context-param>
11         <param-name>contextConfigLocation</param-name>
12         <param-value>classpath:applicationContext.xml</param-value>
13     </context-param>
 1 public class ContextLoaderLintener implements ServletContextListener {
 2
 3         /**
 4      * 通过在web.xml中配置全局初始化参数进行优化
 5      *  解耦合
 6      * @param servletContextEvent
 7      */
 8     @Override
 9     public void contextInitialized(ServletContextEvent servletContextEvent) {
10         //创建ServletContext对象
11         ServletContext servletContext = servletContextEvent.getServletContext();
12
13         //读取web.xml中的全局初始化参数
14         String contextConfigLocation = servletContext.getInitParameter("contextConfigLocation");
15
16         //获取ApplicationContext对象
17         ApplicationContext app = new ClassPathXmlApplicationContext(contextConfigLocation);
18
19         //将Spring的应用上下文对象存储到ServletContext域中
20         servletContext.setAttribute("app", app);
21
22         System.out.println("spring容器创建完毕");
23     }
24
25
26 }
 1 package com.haifei.listener;
 2
 3 import org.springframework.context.ApplicationContext;
 4
 5 import javax.servlet.ServletContext;
 6
 7 /**
 8  *  进一步优化:工具类(加一层)
 9  */
10 public class WebApplicationContextUtils {
11
12     public static ApplicationContext getWebApplicationContext(ServletContext servletContext){
13         return (ApplicationContext)servletContext.getAttribute("app");
14     }
15
16 }
 1 @WebServlet("/userServlet") //配置此注解时不需再在web.xm里配置servlet
 2 public class UserServlet extends HttpServlet {
 3
 4
 5         /**
 6      *  优化:
 7      *  ContextLoaderLintener监听器 + WebApplicationContextUtils工具类
 8      * @param request
 9      * @param response
10      * @throws ServletException
11      * @throws IOException
12      */
13     protected void doPost(HttpServletRequest request, HttpServletResponse response) throws ServletException, IOException {
14         ServletContext servletContext = this.getServletContext();
15         ApplicationContext app = WebApplicationContextUtils.getWebApplicationContext(servletContext);
16         UserService userService = app.getBean(UserService.class);
17         userService.save();
18     }
19
20
21 }

使用Spring提供的工具自动获取应用上下文(上述手动实现即其原理)
 1 pom.xml
 2
 3
 4 +
 5
 6 <!--Spring集成web的坐标-->
 7         <dependency>
 8             <groupId>org.springframework</groupId>
 9             <artifactId>spring-web</artifactId>
10             <version>5.0.5.RELEASE</version>
11         </dependency>
 1 <?xml version="1.0" encoding="UTF-8"?>
 2 <web-app version="3.0" xmlns="http://java.sun.com/xml/ns/javaee"
 3          xmlns:xsi="http://www.w3.org/2001/XMLSchema-instance"
 4          xsi:schemaLocation="http://java.sun.com/xml/ns/javaee http://java.sun.com/xml/ns/javaee/web-app_3_0.xsd">
 5
 6
 7     <!--配置servlet-->
 8     <!--<servlet>
 9         <servlet-name>UserServlet</servlet-name>
10         <servlet-class>com.haifei.web.UserServlet</servlet-class>
11     </servlet>
12     <servlet-mapping>
13         <servlet-name>UserServlet</servlet-name>
14         <url-pattern>/userServlet</url-pattern>
15     </servlet-mapping>-->
16     <!--在UserServlet类上使用注解@WebServlet("/userServlet")可以替换上述配置-->
17
18
19     <!--配置监听器-->
20     <!--<listener>
21         <listener-class>com.haifei.listener.ContextLoaderLintener</listener-class>
22     </listener>-->
23     <!--上述监听器为手动实现-->
24     <!--下面监听器为spring提供,需要在pom.xml中导入spring-web的依赖坐标-->
25     <listener>
26         <listener-class>org.springframework.web.context.ContextLoaderListener</listener-class>
27     </listener>
28
29
30     <!--全局初始化参数-->
31     <context-param>
32         <param-name>contextConfigLocation</param-name>
33         <param-value>classpath:applicationContext.xml</param-value>
34     </context-param>
35
36
37 </web-app>
 1 @WebServlet("/userServlet") //配置此注解时不需再在web.xm里配置servlet
 2 public class UserServlet extends HttpServlet {
 3
 4
 5         /**
 6      * 使用spring提供的上述功能(ContextLoaderLintener监听器 + WebApplicationContextUtils工具类)
 7      * @param request
 8      * @param response
 9      * @throws ServletException
10      * @throws IOException
11      */
12     protected void doPost(HttpServletRequest request, HttpServletResponse response) throws ServletException, IOException {
13         ServletContext servletContext = this.getServletContext();
14
15 //        ApplicationContext app = WebApplicationContextUtils.getWebApplicationContext(servletContext); //手动实现获取ApplicationContext,了解spring此功能的原理
16
17 //        WebApplicationContext app = WebApplicationContextUtils.getWebApplicationContext(servletContext);//来自spring.web.context包,而不是自己写的那个
18         ApplicationContext app = WebApplicationContextUtils.getWebApplicationContext(servletContext);//来自spring.web.context包,而不是自己写的那个
19         //显然,WebApplicationContext是ApplicationContext的子类,故也可以将其换为ApplicationContext实现多态
20
21         UserService userService = app.getBean(UserService.class);
22         userService.save();
23     }
24
25
26     protected void doGet(HttpServletRequest request, HttpServletResponse response) throws ServletException, IOException {
27         this.doPost(request, response);
28     }
29
30 }


【推荐】国内首个AI IDE,深度理解中文开发场景,立即下载体验Trae
【推荐】编程新体验,更懂你的AI,立即体验豆包MarsCode编程助手
【推荐】抖音旗下AI助手豆包,你的智能百科全书,全免费不限次数
【推荐】轻量又高性能的 SSH 工具 IShell:AI 加持,快人一步
· Linux系列:如何用heaptrack跟踪.NET程序的非托管内存泄露
· 开发者必知的日志记录最佳实践
· SQL Server 2025 AI相关能力初探
· Linux系列:如何用 C#调用 C方法造成内存泄露
· AI与.NET技术实操系列(二):开始使用ML.NET
· 被坑几百块钱后,我竟然真的恢复了删除的微信聊天记录!
· 没有Manus邀请码?试试免邀请码的MGX或者开源的OpenManus吧
· 【自荐】一款简洁、开源的在线白板工具 Drawnix
· 园子的第一款AI主题卫衣上架——"HELLO! HOW CAN I ASSIST YOU TODAY
· Docker 太简单,K8s 太复杂?w7panel 让容器管理更轻松!