【Liunx】前后端项目分离部署
一、部署前端代码
部署前端代码,就是一些静态文件,丢给nginx去解析
前端node js + vue的部署 + nginx的部署
1、下载vue的代码
wget https://files.cnblogs.com/files/songzhixue/07-luffy_project_01.zip
2、编译vue的代码
编译vue的代码,生成dist静态文件夹,需要用到node js解释器环境
# 下载nodejs的源代码包
wget https://nodejs.org/download/release/v8.6.0/node-v8.6.0-linux-x64.tar.gz
3、解压缩node的源码包
tar -zxvf node-v8.6.0-linux-x64.tar.gz
4、配置环境变量
进入源码包目录,直接配置环境变量即可,人家已经编译好了
找到node可执行程序
![]()
# 进入目录/opt/s20luff/node-v8.6.0-linux-x64/bin
# 将上面的路径加到/etc/profile中的PATH环境变量里
# 配置完需要执行下
source /etc/profile
node -v
npm -v
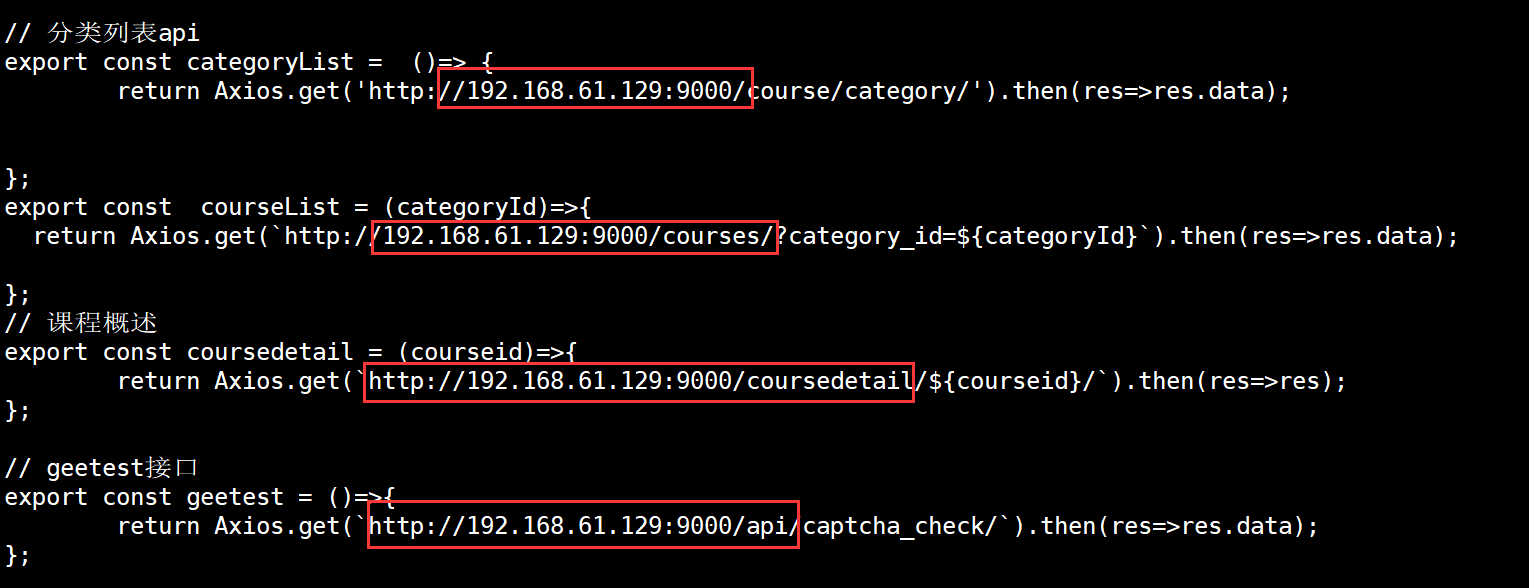
5、修改vue的请求发送路径
修改vue的请求发送路径,vue向服务器发起请求,修改127.0.0.1为linux的ip地址
# 进入前端页面(07-luffy_project_01 )找到src文件下的restful,修改ip
sed -i "s/127.0.0.1:8000/192.168.61.129:9000/g"  api.js

修改api.js中的请求ip

6、开始编译vue的代码
# 由于网速问题,下载包可能超级慢
# 修改npm的下载源,如同pip 更改豆瓣源一样
# 进入/node-v8.6.0-linux-x64/bin/   将npm的路径添加到环境变量
# 修改安装源·
npm config set registry https://registry.npm.taobao.org

# 找到/opt/s20luff/07-luffy_project_01执行:
npm install  #找到package.json然后安装模块,如同pip install

npm run build   #这一步会生成dist静态文件夹,路飞首页在这index.html
# (如果修改了vue向向服务器发起请求的ip地址,那么我们修改后需要重新编译vue的代码,也就是重新执行第六步的操作)
在这里执行:

7、配置nginx.conf
http {
    include       mime.types;
    default_type  application/octet-stream;
    sendfile        on;
    keepalive_timeout  65;
    server {
        listen       80;
        server_name  localhost;
        # 只需要找到第一个虚拟主机,配置dist的静态文件夹即可
        # 第一个虚拟主机的配置
        location / {
            # 网站首页的静态文件路径
            root   /opt/s20luff/07-luffy_project_01/dist;
            index  index.html index.htm;
            # 确保刷新不出现404
            try_files $uri $uri/ /index.html;
        }
        error_page   500 502 503 504  /50x.html;
        location = /50x.html {
            root   html;
        }
    }
    # 第二个虚拟主机的配置,用作反向代理
    server {
        listen 9000;
        server_name localhost;
        location / {
        include uwsgi_params;
        # django运行的ip端口
        uwsgi_pass 127.0.0.1:9999;
        }

        }
}
|
1
2
3
|
1、客户端访问默认是80端口,先走nginx2、nginx配置文件中我们给80端口配置了,返回网站首页的静态文件3、路飞学成除了首页以外的所有请求都是用的9000端口,这时候我们用到了反向代理 |
二、后端uwsgi+django的部署
1.激活虚拟环境
mkvirtualenv  s20luffy

workon  s20luffy
2.解决运行路飞所需的依赖环境
方式二选一
方式1:
requirements.txt
    certifi==2018.11.29
    chardet==3.0.4
    crypto==1.4.1
    Django==2.1.4
    django-redis==4.10.0
    django-rest-framework==0.1.0
    djangorestframework==3.9.0
    idna==2.8
    Naked==0.1.31
    pycrypto==2.6.1
    pytz==2018.7
    PyYAML==3.13
    redis==3.0.1
    requests==2.21.0
    shellescape==3.4.1
    urllib3==1.24.1
    uWSGI==2.0.17.1

方式2:手动解决依赖关系
    pip3 install -i https://pypi.douban.com/simple django==2.0
    pip3 install -i https://pypi.douban.com/simple django-rest-framework
    pip3 install -i https://pypi.douban.com/simple requests
    pip3 install -i https://pypi.douban.com/simple django-redis
    pip3 install -i https://pypi.douban.com/simple crypto==1.4.1
    pip3 install -i https://pypi.douban.com/simple pycrypto==2.6.1
3、下载uwsgi
下载uwsgi,编写uwsgi.ini配置文件,去运行路飞学城后端
 pip3 install -i https://pypi.douban.com/simple  uwsgi
【在任意位置创建uwsgi.ini文件】
【注意我们用uwsgi启动项目的时候也要在该目录下】
下载项目包wget https://files.cnblogs.com/files/songzhixue/luffy_boy.zip
uwsgi.ini内容如下


[uwsgi]
# Django-related settings
# the base directory (full path)
# 项目目录的绝对路径【第一层】
chdir           = /opt/s20luffy/luffy_boy/
# Django's wsgi file
# 项目目录的第二层目录【wsgi同级】
module          = luffy_boy.wsgi
# the virtualenv (full path)
# 虚拟环境路径【虚拟环境中执行cdvirtualenv,pwd查看路径】
home            = /root/Envs/s20luffy
# process-related settings
# master
master          = true
# maximum number of worker processes
# 开启的进程数
processes       = 4
# the socket (use the full path to be safe
socket          = 0.0.0.0:9999
# clear environment on exit
vacuum          = true
4.启动uwsgi后端
# 找到uwsgi.ini这个文件的目录下执行下面命令
uwsgi --ini uwsgi.ini
# 重启nginx
# 访问页面
5.还得启动redis,才能添加购物车
# 最省事的安装
yum install redis -y
systemctl start redis
6、将商品添加到购物车,查看redis中的数据
# 登录账户密码
alex
alex3714


