tensorflow环境搭建
2018-05-11 01:15 youxin 阅读(5971) 评论(0) 收藏 举报官网:https://www.tensorflow.org/
https://www.tensorflow.org/install/install_windows
You must choose one of the following types of TensorFlow to install:
- TensorFlow with CPU support only. If your system does not have a NVIDIA® GPU, you must install this version. Note that this version of TensorFlow is typically much easier to install (typically, in 5 or 10 minutes), so even if you have an NVIDIA GPU, we recommend installing this version first. Prebuilt binaries will use AVX instructions.
- TensorFlow with GPU support. TensorFlow programs typically run significantly faster on a GPU than on a CPU. Therefore, if your system has a NVIDIA® GPU meeting the prerequisites shown below and you need to run performance-critical applications, you should ultimately install this version.
Requirements to run TensorFlow with GPU support
If you are installing TensorFlow with GPU support using one of the mechanisms described in this guide, then the following NVIDIA software must be installed on your system:
- CUDA® Toolkit 9.0. For details, see NVIDIA's documentation Ensure that you append the relevant Cuda pathnames to the
%PATH%environment variable as described in the NVIDIA documentation. - The NVIDIA drivers associated with CUDA Toolkit 9.0.
- cuDNN v7.0. For details, see NVIDIA's documentation. Note that cuDNN is typically installed in a different location from the other CUDA DLLs. Ensure that you add the directory where you installed the cuDNN DLL to your
%PATH%environment variable. - GPU card with CUDA Compute Capability 3.0 or higher for building from source and 3.5 or higher for our binaries. See NVIDIA documentation for a list of supported GPU cards.
If you have a different version of one of the preceding packages, please change to the specified versions. In particular, the cuDNN version must match exactly: TensorFlow will not load if it cannot find cuDNN64_7.dll. To use a different version of cuDNN, you must build from source.
tensorflow有两个版本,一个是CPU的,一个是GPU的,其中GPU对显卡有要求,必须是NVIDIA
CUDA(Compute Unified Device Architecture),是显卡厂商NVIDIA推出的运算平台。 CUDA™是一种由NVIDIA推出的通用并行计算架构,该架构使GPU能够解决复杂的计算问题。
Determine how to install TensorFlow
You must pick the mechanism by which you install TensorFlow. The supported choices are as follows:
- "native" pip
- Anaconda
Native pip installs TensorFlow directly on your system without going through a virtual environment. Since a native pip installation is not walled-off in a separate container, the pip installation might interfere with other Python-based installations on your system. However, if you understand pip and your Python environment, a native pip installation often entails only a single command! Furthermore, if you install with native pip, users can run TensorFlow programs from any directory on the system.
In Anaconda, you may use conda to create a virtual environment. However, within Anaconda, we recommend installing TensorFlow with the pip install command, not with the conda install command.
NOTE: The conda package is community supported, not officially supported. That is, the TensorFlow team neither tests nor maintains this conda package. Use that package at your own risk.
anaconda2和anaconda3的区别也要注意。
使用anaconda:
接下来需要设置 Anaconda 仓库镜像,因为默认连接的是国外镜像地址,下载速度比较慢,我们把镜像地址改为清华大学开源软件镜像站,打开 Anaconda Prompt, 输入:
conda config --add channels https://mirrors.tuna.tsinghua.edu.cn/anaconda/pkgs/free/
conda config --set show_channel_urls yes
The Anaconda installation is community supported, not officially supported.
Take the following steps to install TensorFlow in an Anaconda environment:
-
Follow the instructions on the Anaconda download site to download and install Anaconda.
-
Create a conda environment named tensorflow by invoking the following command:
C:> conda create -n tensorflow pip python=3.5
-
Activate the conda environment by issuing the following command:
C:> activate tensorflow
 (tensorflow)C:>  # Your prompt should change
-
Issue the appropriate command to install TensorFlow inside your conda environment. To install the CPU-only version of TensorFlow, enter the following command:
(tensorflow)C:> pip install --ignore-installed --upgrade tensorflow
To install the GPU version of TensorFlow, enter the following command (on a single line):
(tensorflow)C:> pip install --ignore-installed --upgrade tensorflow-gpu
输入activate tensorflow可以看到 命令行行前面有个tensorflow,这个就是当前运行环境。
遇到的一个问题:
powshell中无法active TensorFlow,我输入命令:
PS C:\WINDOWS\system32> activate tensorflow
PS C:\WINDOWS\system32> python -V
Python 2.7.14 :: Anaconda, Inc.
如上图还是没有进入tensorflow环境。
看到一个回答在:另外在powershell中无法使用activate指令激活环境,需要进入到cmd中(https://www.zhihu.com/question/58573630 ,原因在于:
https://blog.csdn.net/yannanxiu/article/details/78703888
)
我输入cmd,然后:
PS C:\WINDOWS\system32> cmd
Microsoft Windows [版本 10.0.16299.371]
(c) 2017 Microsoft Corporation。保留所有权利。
C:\WINDOWS\system32>activate tensorflow
(tensorflow) C:\WINDOWS\system32>
可以看到进入tensorflow环境了。
运行 开始菜单 ->Anaconda3—>Anaconda Navigator,点击左侧的Environments,可以看到tensorflow的环境已经创建好了。
在Anaconda Prompt中启动tensorflow环境:
activate tensorflow
注:当不使用tensorflow时,关闭tensorflow环境,命令为:deactivate(返回默认的python 3.6环境)
运行pip install --ignore-installed --upgrade tensorflow
报错:
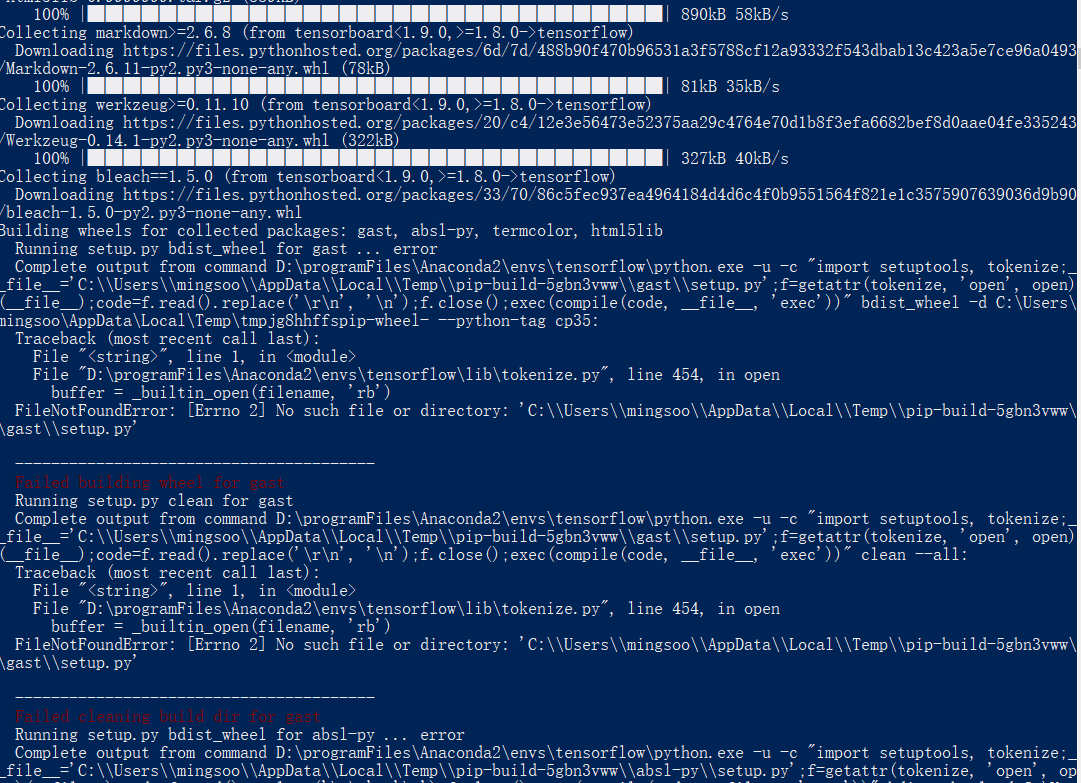
大量报:
FileNotFoundError: [Errno 2] No such file or directory: 'C:\\Users\\mingsoo\\AppData\\Local\\Temp\\pip-build-5gbn3vww\\gast\\setup.py'
----------------------------------------
Failed building wheel for gast
Running setup.py clean for gast
这种类似错误
运行命令:pip install --upgrade --ignore-installed setuptools
然后接着安装tensorflow就安装成功了。
Validate your installation
Start a terminal.
If you installed through Anaconda, activate your Anaconda environment.
Invoke python from your shell as follows:
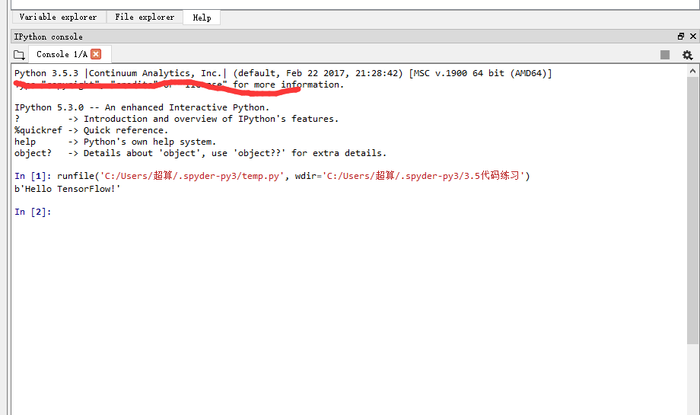
$ python
Enter the following short program inside the python interactive shell:
>>> import tensorflow as tf
>>> hello = tf.constant('Hello, TensorFlow!')
>>> sess = tf.Session()
>>> print(sess.run(hello))
If the system outputs the following, then you are ready to begin writing TensorFlow programs:
Hello, TensorFlow!
If the system outputs an error message instead of a greeting, see Common installation problems.
If you are new to machine learning, we recommend the following:
If you are experienced with machine learning but new to TensorFlow, see Getting Started with TensorFlow.
no moduled named tensorflow无此模块报错问题解决
在spyder里面和Ipython里面输入测试代码,会报错没有tensorflow这个模块。但是在spyder和ipython里测试代码,会提示没有tensorflow模块,
Import Error: No module named tensorflow.
解决方法就是在tensorflow里面也给其安装属于python3.5的spyder。
在开始菜单中搜索anaconda navigator,点击运行;
点击左侧的home,选择application on tensorflow(有一个下拉框)
会发现spyder属于右侧绿色install,这个时候点击install就可以在tensorflow里Python3.5环境里安装spyder,安装好之后,就如图所示,显示launch(已安装),

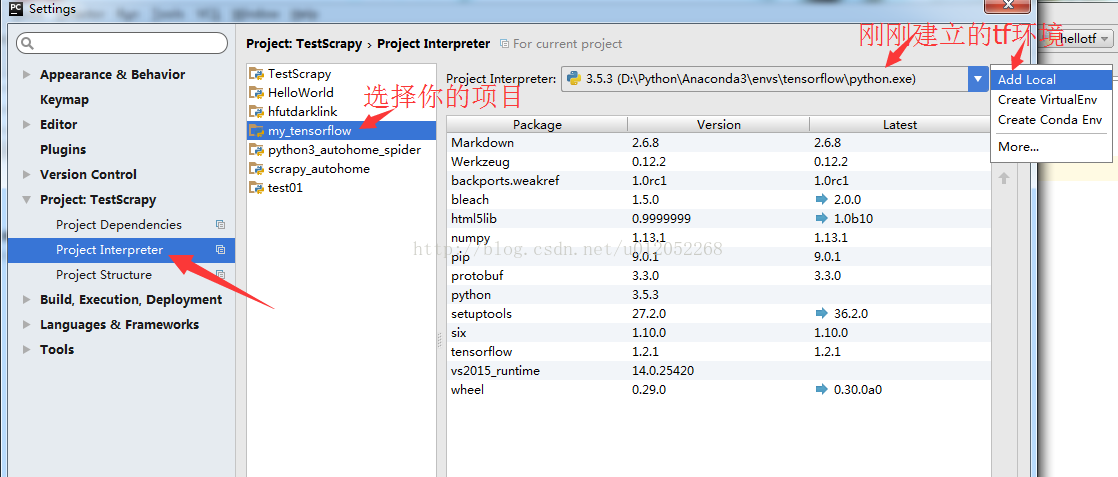
若要在pycharm中使用,则需选择
参考:
windows7 下Anaconda2与Anaconda3并存
https://blog.csdn.net/y1535766478/article/details/75097984
https://blog.csdn.net/sb19931201/article/details/53648615
https://www.cnblogs.com/W-Yentl/p/7783933.html
https://www.cnblogs.com/nosqlcoco/p/6923861.html
为了性能,别再用pip安装TensorFlow了
别再使用pip安装Tensorflow了! 使用conda来代替,如果你不知道conda是什么,它是一个运行跨平台的开源包和环境管理系统。它适用于Mac、Windows和Linux。如果你还没有使用conda,我建议你一开始就使用它,因为它使得管理数据科学工具变得更加有趣。
有两个非常重要的原因,为什么你应该使用conda而不是pip来安装Tensorflow。
更快的CPU性能
conda Tensorflow包利用了用于深度神经网络的Intel Math内核库,或者是从版本1.9.0开始的MKL-DNN。这个库极大地提高了性能。这张图表可以证明这一点!
可以看到,与pip安装相比,conda安装的性能可以提供8X以上的速度提升。对于仍然经常使用CPU进行训练和推断的人来说,这个非常好。使用CPU代码上进行训练,然后把它放到一个支持GPU的机器上,这种速度的增加将帮助我更快地迭代。当我可以的时候,我也会在CPU上做很多推断,所以这将有助于我的模型的性能。
MKL库不仅加快了Tensorflow包的速度,还加快了其他广泛使用的库的速度,如NumPy、NumpyExr、SciPy和Scikit-Learn!
GPU版本的简单安装
conda安装将自动安装GPU支持所需的CUDA和CuDNN库。pip的安装需要你手动完成。大家都喜欢一步到位,尤其是下载库的时候。
快速开始
所以我希望这两个原因足够好可以让你改用conda。如果你相信的话,现在就开始了。
pip uninstall tensorflow
如果还没有安装Anaconda或Miniconda。Miniconda只是安装conda和它的依赖性,而Anaconda会为你预先安装很多包。我更喜欢Miniconda。安装conda之后,请尝试以下操作。
conda install tensorflow
如果你想要用GPU的版本,请使用tensorflow-gpu替换tensorflow。
除了使用Tensorflow更快、更简单之外,conda还提供了其他工具集,使其更容易集成到你的工作流中。我最喜欢的是它们的虚拟环境特性。您可以在这里阅读更多关于conda和tensorflow的信息(https://www.anaconda.com/blog/developer-blog/tensorflowinanaconda/)。以及关于MKL优化的更多信息(https://docs.anaconda.com/mkl-optimizations/),希望这对你有所帮助。
tensorflow在linux平台和windows对python要求的版本不同。
tensorflow2.1在windows上面不能支持2.7环境
tensorflow所有版本列表:
https://pypi.org/project/tensorflow/#history
在pypi网站上可以看到所有的版本以及相关的python版本。
tensorflow对应的python版本查看:
https://tensorflow.google.cn/install/source_windows
tensorflow 1.x的版本我最开始想用1.4
conda install tensorflow=1.4
但是conda里面没有1.4,后面用来1.7版本

 浙公网安备 33010602011771号