
【原】日志处理-Spark
日志信息如下所示:
1.1.1.1 - - [21/Jul/2014:10:00:00 -0800] "GET /majihua/article/284234 HTTP/1.1" 200 1234
1.1.1.1 - - [21/Jul/2014:10:00:00 -0800] "GET /majihua/article/284234 HTTP/1.1" 200 2000
1.1.1.1 - - [21/Jul/2014:10:00:00 -0800] "GET /majihua/article/284234 HTTP/1.1" 401 100
从左到右,各字段分别表示的意思分别是Client请求IP地址、Client(这里为-)、用户名(这里为-)、请求时间、请求方式(这里是GET)、请求的资源、传输协议(这里是HTTP/1.1)、HTTP响应码(200表示正常响应)、响应内容的大小
Spark处理:
1.代码
类1:LogAnalyzer
import org.apache.spark.SparkConf;
import org.apache.spark.api.java.JavaRDD;
import org.apache.spark.api.java.JavaSparkContext;
import org.apache.spark.api.java.function.Function2;
import scala.Tuple2;
import java.io.Serializable;
import java.util.Comparator;
import java.util.List;
/**
 * Main Class
 */
public class LogAnalyzer {
    public static void main(String[] args) {
        //local D:/my.log
        if (args.length < 1) {
            System.out.println("必须输入程序运行模式名称和要处理的日志文件路径!");
            System.exit(-1);
        }

        // 通过SparkConf来创建Spark程序运行的上下文,一个SparkContext就相当于运行的一个APP
        // AppName是程序的名字,Master是运行模式,local为本地单线程模式,
        // Master最好不要写死到程序中,关于Spark部署模式,详见注解1
        SparkConf conf = new SparkConf().setAppName("Log Analyzer").setMaster(args[0]);
        JavaSparkContext sc = new JavaSparkContext(conf);

        //将日志文件读取到RDD中
        String logFile = args[1];
        JavaRDD<String> logLines = sc.textFile(logFile);

        //由于textFile是以行为最小单位进行操作的,所以这里是把每一行日志信息存储到一个ApacheAccessLog类中
        //ApacheAccessLog::parseFromLogLine是JDK8新增的类调用方法的新特性,感觉挺酷的
        //我们使用accessLogs RDD,主要用于(1)统计响应内容均值、最小值、最大值(2)响应码的种类及个数
        //(3)请求次数超过10次的Client IP地址(4)请求的资源Top10
        // 因为使用这个accessLogs RDD 4次,所以我们调用cache方法缓存到内存中
        JavaRDD<ApacheAccessLog> accessLogs =
                logLines.map(ApacheAccessLog::parseFromLogLine).cache();

        System.out.println("日志处理结果如下所示:");

        //(1)统计响应内容均值、最小值、最大值
        //对于每个类ApacheAccessLog调用getContentSize方法
        JavaRDD<Long> contentSizes =
                accessLogs.map(ApacheAccessLog::getContentSize).cache();
        System.out.println(String.format("(1)响应内容大小平均值: %s, 最小值: %s, 最大值: %s",
                contentSizes.reduce(SUM_REDUCER) / contentSizes.count(),
                contentSizes.min(Comparator.naturalOrder()),
                contentSizes.max(Comparator.naturalOrder())));

        // (2)响应码的种类及个数
        List<Tuple2<Integer, Long>> responseCodeToCount =
                accessLogs.mapToPair(log -> new Tuple2<>(log.getResponseCode(), 1L))
                        .reduceByKey(SUM_REDUCER)
                        .take(100);
        System.out.println(String.format("(2)响应码种类及个数: %s", responseCodeToCount));

        // (3)请求次数超过10次的Client IP地址
        List<String> ipAddresses =
                accessLogs.mapToPair(log -> new Tuple2<>(log.getIpAddress(), 1L))
                        .reduceByKey(SUM_REDUCER)
                        .filter(tuple -> tuple._2() > 10)
                        .map(Tuple2::_1)
                        .take(100);
        System.out.println(String.format("(3)请求次数超过10次的IP地址: %s", ipAddresses));

        // (4)请求的资源Top10
        List<Tuple2<String, Long>> topEndpoints = accessLogs
                .mapToPair(log -> new Tuple2<>(log.getEndpoint(), 1L))
                .reduceByKey(SUM_REDUCER)
                .top(10, new ValueComparator<>(Comparator.<Long>naturalOrder()));
        System.out.println(String.format("(4)请求的资源Top10: %s", topEndpoints));

        // 停止应用程序
        sc.stop();
    }


    //定义一个累加功能的函数
    private static Function2<Long, Long, Long> SUM_REDUCER = (a, b) -> a + b;
    //定义一个类比较器
    private static class ValueComparator<K, V>
            implements Comparator<Tuple2<K, V>>, Serializable {
        private Comparator<V> comparator;

        public ValueComparator(Comparator<V> comparator) {
            this.comparator = comparator;
        }

        @Override
        public int compare(Tuple2<K, V> o1, Tuple2<K, V> o2) {
            return comparator.compare(o1._2(), o2._2());
        }
    }
}
类2:ApacheAccessLog
/**
 * 每个类代表日志文件的每一行
 */
public class ApacheAccessLog implements Serializable {
  private static final Logger logger = Logger.getLogger("Access");

  private String ipAddress;
  private String clientIdentd;
  private String userID;
  private String dateTimeString;
  private String method;
  private String endpoint;
  private String protocol;
  private int responseCode;
  private long contentSize;

  private ApacheAccessLog(String ipAddress, String clientIdentd, String userID,
                          String dateTime, String method, String endpoint,
                          String protocol, String responseCode,
                          String contentSize) {
    this.ipAddress = ipAddress;
    this.clientIdentd = clientIdentd;
    this.userID = userID;
    this.dateTimeString = dateTime;
    this.method = method;
    this.endpoint = endpoint;
    this.protocol = protocol;
    this.responseCode = Integer.parseInt(responseCode);
    this.contentSize = Long.parseLong(contentSize);
  }

  public String getIpAddress() {
    return ipAddress;
  }

  public String getClientIdentd() {
    return clientIdentd;
  }

  public String getUserID() {
    return userID;
  }

  public String getDateTimeString() {
    return dateTimeString;
  }

  public String getMethod() {
    return method;
  }

  public String getEndpoint() {
    return endpoint;
  }

  public String getProtocol() {
    return protocol;
  }

  public int getResponseCode() {
    return responseCode;
  }

  public long getContentSize() {
    return contentSize;
  }

  public void setIpAddress(String ipAddress) {
    this.ipAddress = ipAddress;
  }

  public void setClientIdentd(String clientIdentd) {
    this.clientIdentd = clientIdentd;
  }

  public void setUserID(String userID) {
    this.userID = userID;
  }

  public void setDateTimeString(String dateTimeString) {
    this.dateTimeString = dateTimeString;
  }

  public void setMethod(String method) {
    this.method = method;
  }

  public void setEndpoint(String endpoint) {
    this.endpoint = endpoint;
  }

  public void setProtocol(String protocol) {
    this.protocol = protocol;
  }

  public void setResponseCode(int responseCode) {
    this.responseCode = responseCode;
  }

  public void setContentSize(long contentSize) {
    this.contentSize = contentSize;
  }

  // 日志文件示例:
  //   127.0.0.1 - - [21/Jul/2014:9:55:27 -0800] "GET /home.html HTTP/1.1" 200 2048
  private static final String LOG_ENTRY_PATTERN =
      // Client请求IP地址、Client(这里为-)、用户名(这里为-)、请求时间、请求方式(这里是GET)、请求的资源、传输协议(这里是HTTP/1.1)、HTTP响应码(200表示正常响应)、响应内容的大小
      "^(\\S+) (\\S+) (\\S+) \\[([\\w:/]+\\s[+\\-]\\d{4})\\] \"(\\S+) (\\S+) (\\S+)\" (\\d{3}) (\\d+)";
  private static final Pattern PATTERN = Pattern.compile(LOG_ENTRY_PATTERN);

  public static ApacheAccessLog parseFromLogLine(String logline) {
    Matcher m = PATTERN.matcher(logline);
    if (!m.find()) {
      logger.log(Level.ALL, "不能解析日志文件" + logline);
      throw new RuntimeException("解析日志文件出错");
    }

    return new ApacheAccessLog(m.group(1), m.group(2), m.group(3), m.group(4),
        m.group(5), m.group(6), m.group(7), m.group(8), m.group(9));
  }

  @Override public String toString() {
    return String.format("%s %s %s [%s] \"%s %s %s\" %s %s",
        ipAddress, clientIdentd, userID, dateTimeString, method, endpoint,
        protocol, responseCode, contentSize);
  }
}
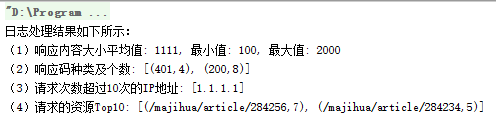
运行结果:
2.注解
注解1:Spark部署模式分为单机和集群模式
2.1单机模式,一般适用于本地调试程序
这个比较好理解,local代表一个线程运行该程序,local[n]代表n个线程运行该程序
使用方法I)在程序中通过.setMaster(“local”)直接写死II)jar运行时通过--master=local
2.2集群模式
根据Driver程序的位置,集群模式分为Client和Cluster两种,根据所使用的资源管理器集群模式又分为Standalone、YARN、Mesos、Amazon EC2
a)Standalone Spark自己实现的一个简单的集群运行模式
启动命令:./bin/spark-submit --master=spark://IP:PORT ...
b)YARN模式
Yarn-cluster启动命令:./bin/spark-submit --master yarn-cluster ...
Yarn-client启动命令:./bin/spark-submit --master yarn-client ...
c)Mesos模式
启动命令:./bin/spark-submit --master mesos://host:5050 ...
