ubuntu server 20.04 配置浏览器访问的方式(tightvncserver+novnc)
1. ubuntu server安装桌面环境
配置云主机的形式
sudo apt update
sudo apt-get upgrade
sudo apt install ubuntu-desktop
配置环境变量
调整最后一句为 tty -s && mesg n || true
root@tightvnc:~# cat .profile
# ~/.profile: executed by Bourne-compatible login shells.
if [ "$BASH" ]; then
if [ -f ~/.bashrc ]; then
. ~/.bashrc
fi
fi
#mesg n 2> /dev/null || true
tty -s && mesg n || true
重启
配置docker中的ubuntu容器需要xface
apt update
sudo apt install xfce4-goodies xfce4 tigervnc-standalone-server tigervnc-common
apt install xfce4 xfce4-goodies xorg dbus-x11 x11-xserver-utils
需要安装xrdp
apt-get install xrdp
重启dockers需要启动一下:
service gdm3 start
service dbus start
配置用户adduser
3. ubuntu 20.04默认的桌面环境是gdm3 查看桌面启动的状态
root@tightvnc:~# service gdm3 status
● gdm.service - GNOME Display Manager
Loaded: loaded (/lib/systemd/system/gdm.service; static; vendor preset: en>
Active: active (running) since Thu 2023-05-11 08:52:19 UTC; 14h ago
Main PID: 463 (gdm3)
Tasks: 3 (limit: 154185)
Memory: 2.6M
CGroup: /system.slice/gdm.service
└─463 /usr/sbin/gdm3
May 11 08:52:09 tightvnc systemd[1]: Starting GNOME Display Manager...
May 11 08:52:19 tightvnc systemd[1]: Started GNOME Display Manager.
4. 安装tightvncserver
sudo apt-get install tightvncserver
如果是gnome解决灰屏的问题,主要是配置的问题
sudo apt-get install gnome-panel gnome-settings-daemon metacity nautilus gnome-terminal
root@tightvnc:~# cat .vnc/xstartup
#!/bin/sh
unset SESSION_MANAGER
unset DBUS_SESSION_BUS_ADDRESS
export XKL_XMODMAP_DISABLE=1
export XDG_CURRENT_DESKTOP="GNOME-Flashback:GNOME"
export XDG_MENU_PREFIX="gnome-flashback-"
[ -x /etc/vnc/xstartup ] && exec /etc/vnc/xstartup
[ -r $HOME/.Xresources ] && xrdb $HOME/.Xresources
xsetroot -solid grey
vncconfig -iconic &
#gnome-terminal &
#nautilus &
gnome-session --session=gnome-flashback-metacity --disable-acceleration-check &
如果是xface解决灰屏问题
root@mission:~/.vnc# cat xstartup
#!/bin/bash
xrdb $HOME/.Xresources
startxfce4 &
授权问题
chmod 777 xstartup
chmod +x xstartup
启动vnc服务
root@tightvnc:~# vncserver :1
New 'X' desktop is tightvnc:1
用户异常
vncserver: The USER environment variable is not set.
root@mission:~# nano .bashrc
root@mission:~# source .bashrc
export USER=root
Starting applications specified in /root/.vnc/xstartup
Log file is /root/.vnc/tightvnc:1.log
默认启动的端口:
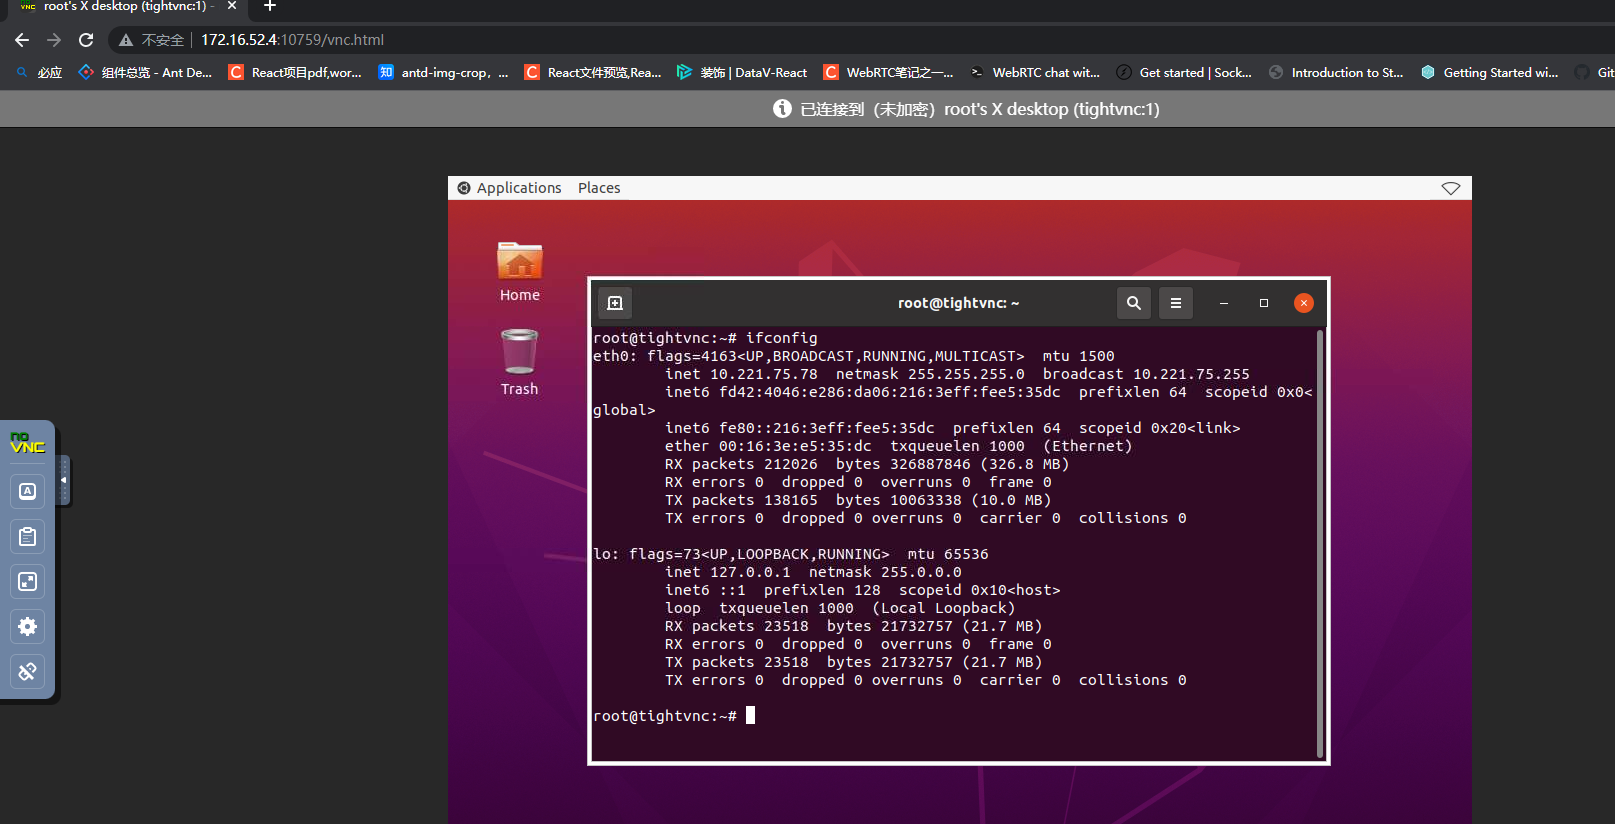
root@tightvnc:~# netstat -antp | grep 5901
tcp 0 0 0.0.0.0:5901 0.0.0.0:* LISTEN 4380/Xtightvnc
关闭vnc服务
root@tightvnc:~# vncserver -kill :1Killing Xtightvnc process ID 3725
root@tightvnc:~# vncserver -geometry 1440*720 :1
5. 下载novnc
官网git: https://github.com/novnc/noVNC.git
gitee : https://gitee.com/yangyizhao/noVNC.git
git clone https://github.com/novnc/noVNC.git
//配置证书
root@mission:~/noVNC/utils# openssl req -new -x509 -days 365 -nodes -out self.pem -keyout self.pem
Generating a RSA private key
.......................+++++
........................................................................................................................................................+++++
writing new private key to 'self.pem'
-----
You are about to be asked to enter information that will be incorporated
into your certificate request.
What you are about to enter is what is called a Distinguished Name or a DN.
There are quite a few fields but you can leave some blank
For some fields there will be a default value,
If you enter '.', the field will be left blank.
-----
Country Name (2 letter code) [AU]:
State or Province Name (full name) [Some-State]:
Locality Name (eg, city) []:
Organization Name (eg, company) [Internet Widgits Pty Ltd]:
Organizational Unit Name (eg, section) []:
Common Name (e.g. server FQDN or YOUR name) []:
Email Address []:
root@mission:~/noVNC/utils#
root@mission:~/noVNC/utils# ls
README.md convert.js novnc_proxy u2x11
b64-to-binary.pl genkeysymdef.js self.pem validate
//直接运行测试
//克隆websockfy地址
clone websockify https://gitee.com/yangyizhao/websockify.git
root@tightvnc:~# ./noVNC/utils/novnc_proxy --vnc 0.0.0.0:5901 --listen 0.0.0.0:6080
Using local websockify at /root/noVNC/utils/websockify/run
Starting webserver and WebSockets proxy on port 0.0.0.0:6080
/root/noVNC/utils/websockify/websockify/websocket.py:31: UserWarning: no 'numpy' module, HyBi protocol will be slower
warnings.warn("no 'numpy' module, HyBi protocol will be slower")
WebSocket server settings:
- Listen on 0.0.0.0:6080
- Web server. Web root: /root/noVNC
- SSL/TLS support
- proxying from 0.0.0.0:6080 to 0.0.0.0:5901
Navigate to this URL:
http://tightvnc:0.0.0.0:6080/vnc.html?host=tightvnc&port=0.0.0.0:6080
Press Ctrl-C to exit
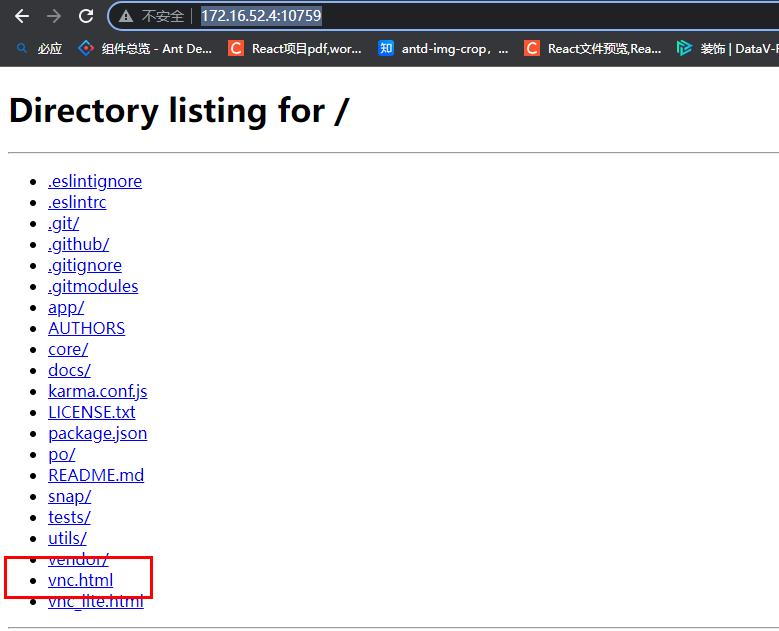
选择google 、 firefox浏览器输入网址:http://172.16.52.4:10759/ 选择vnc.html