【认证与授权】Spring Security系列之认证流程解析

上面我们一起开始了Spring Security的初体验,并通过简单的配置甚至零配置就可以完成一个简单的认证流程。可能我们都有很大的疑惑,这中间到底发生了什么,为什么简单的配置就可以完成一个认证流程啊,可我啥都没看见,没有写页面,没有写接口。这一篇我们将深入到源码层面一起来了解一下spring security到底是怎么工作的。

1|0准备工作

在开始源码理解前,我们先来做一项基本的准备工作,从日志中去发现线索,因为我们发现什么都没有配置的情况下,他也可以正常的工作,并给我们预置了一个临时的用户user。那么他肯定是在工程启动的时候做了什么事情,上一篇我们也提到了是如果生成user用户和密码的。这篇我们将仔细的去了解一下。

1、首先我们配置在applicaiton.yml中调整一下日志级别

logging: level: org.springframework.security: debug

我们将security相关的日志打印出来,一起来启动或者运行的时候到底发生了什么。

2、启动spring-security-basic 工程

!!!找到了

2|0日志过滤

(1) Eagerly initializing {org.springframework.boot.autoconfigure.security.servlet.WebSecurityEnablerConfiguration=org.springframework.boot.autoconfigure.security.servlet.WebSecurityEnablerConfiguration@52e04737} (2) Using default configure(HttpSecurity). If subclassed this will potentially override subclass configure(HttpSecurity). (3) Adding web access control expression 'authenticated', for any request (4) Validated configuration attributes

3|0逐个解析

3|11、WebSecurityEnablerConfiguration

告诉我们它初始化了一个配置类WebSecurityEnablerConfiguration 不管!找到源码再说

@Configuration( proxyBeanMethods = false ) @ConditionalOnBean({WebSecurityConfigurerAdapter.class}) @ConditionalOnMissingBean( name = {"springSecurityFilterChain"} ) @ConditionalOnWebApplication( type = Type.SERVLET ) @EnableWebSecurity public class WebSecurityEnablerConfiguration { public WebSecurityEnablerConfiguration() { } }

???怎么只有这么一点东西,这个类为什么会在初始化的时候启动?这里简单的指出来

首先找到spring-boot-autoconfigure-版本.jar下的META-INF/spring.factorites文件,其中有这样一段

org.springframework.boot.autoconfigure.security.servlet.SecurityAutoConfiguration,\ org.springframework.boot.autoconfigure.security.servlet.UserDetailsServiceAutoConfiguration,\ org.springframework.boot.autoconfigure.security.servlet.SecurityFilterAutoConfiguration,\

我们可以暂时不去深究这是什么意思,总之,在springboot启动的时候,会将这里配置走一遍(后期可能也会写一点关于springboot启动原理的文章...)我们一个一个来看一下

1.1 SecurityAutoConfiguration
@Configuration( proxyBeanMethods = false ) @ConditionalOnClass({DefaultAuthenticationEventPublisher.class}) @EnableConfigurationProperties({SecurityProperties.class}) @Import({SpringBootWebSecurityConfiguration.class, WebSecurityEnablerConfiguration.class, SecurityDataConfiguration.class}) public class SecurityAutoConfiguration { public SecurityAutoConfiguration() { } @Bean @ConditionalOnMissingBean({AuthenticationEventPublisher.class}) public DefaultAuthenticationEventPublisher authenticationEventPublisher(ApplicationEventPublisher publisher) { return new DefaultAuthenticationEventPublisher(publisher); } }

在这个类中我们重点关注

@EnableConfigurationProperties({SecurityProperties.class}) @Import({SpringBootWebSecurityConfiguration.class, WebSecurityEnablerConfiguration.class, SecurityDataConfiguration.class})

首先是SecurityProperties

@ConfigurationProperties( // A 前缀 prefix = "spring.security" ) public class SecurityProperties { // .. private SecurityProperties.User user = new SecurityProperties.User(); // ... public static class User { // 默认指定一个 private String name = "user"; // 默认随机密码 private String password = UUID.randomUUID().toString(); private List<String> roles = new ArrayList(); // 默认密码是系统生成的(重点关注一下) private boolean passwordGenerated = true; // ... public void setPassword(String password) { // 如果指定了自定义了密码,那就false 并覆盖password if (StringUtils.hasLength(password)) { this.passwordGenerated = false; this.password = password; } } //..... } // ..... }

篇幅问题这里我删除了很多代码。直接看里面的注释就好了,这也就是为什么我们不配置任何信息,也有一个默认的用户,以及我们用配置信息覆盖了默认用户的关键信息所在。

其次是@Import注解,这个其实就是xml配置方式中的标签 引入另外的配置,这里引入了SpringBootWebSecurityConfiguration WebSecurityEnablerConfiguration SecurityDataConfiguration

@Configuration( proxyBeanMethods = false ) @ConditionalOnClass({WebSecurityConfigurerAdapter.class}) @ConditionalOnMissingBean({WebSecurityConfigurerAdapter.class}) @ConditionalOnWebApplication( type = Type.SERVLET ) public class SpringBootWebSecurityConfiguration { public SpringBootWebSecurityConfiguration() { } @Configuration( proxyBeanMethods = false ) // 其实也没干啥,就是一个空的对象,什么也没覆盖 @Order(2147483642) static class DefaultConfigurerAdapter extends WebSecurityConfigurerAdapter { DefaultConfigurerAdapter() { } } }

他们指向了一个关键的配置@ConditionalOnBean({WebSecurityConfigurerAdapter.class}) 需要WebSecurityConfigurerAdapter才会进行加载,那这个关键的类是什么时候加载的呢?这就回到了我们在日志中发现的第一个加载的类信息WebSecurityEnablerConfiguration 上面有个一非常关键的注解@EnableWebSecurity

瞧瞧干了啥

@Retention(value = java.lang.annotation.RetentionPolicy.RUNTIME) @Target(value = { java.lang.annotation.ElementType.TYPE }) @Documented // 引入了配置类 WebSecurityConfiguration @Import({ WebSecurityConfiguration.class, SpringWebMvcImportSelector.class, OAuth2ImportSelector.class }) @EnableGlobalAuthentication @Configuration public @interface EnableWebSecurity { /** * Controls debugging support for Spring Security. Default is false. * @return if true, enables debug support with Spring Security */ boolean debug() default false; }
1.2 WebSecurityConfiguration

原来,首先他是个配置注解,也importWebSecurityConfiguration

@Configuration(proxyBeanMethods = false) public class WebSecurityConfiguration implements ImportAware, BeanClassLoaderAware { // 1、声明一个 webSecurity 一起来看一下他是什么时候初始化的 private WebSecurity webSecurity; // 2、是否为调试模式 private Boolean debugEnabled; private List<SecurityConfigurer<Filter, WebSecurity>> webSecurityConfigurers; private ClassLoader beanClassLoader; // 3、关键点,后置对象处理器,用来初始化对象 @Autowired(required = false) private ObjectPostProcessor<Object> objectObjectPostProcessor; @Bean(name = AbstractSecurityWebApplicationInitializer.DEFAULT_FILTER_NAME) public Filter springSecurityFilterChain() throws Exception { boolean hasConfigurers = webSecurityConfigurers != null && !webSecurityConfigurers.isEmpty(); // 6 、如果每没初始化,直接指定获取对象 WebSecurityConfigurerAdapter if (!hasConfigurers) { WebSecurityConfigurerAdapter adapter = objectObjectPostProcessor .postProcess(new WebSecurityConfigurerAdapter() { }); webSecurity.apply(adapter); } // 7、 开始构建对象 webSecurity return webSecurity.build(); } // 4、通过setter方式注入 webSecurityConfigurers @Autowired(required = false) public void setFilterChainProxySecurityConfigurer( ObjectPostProcessor<Object> objectPostProcessor, // 获取 0 步中获取到的对象信息 @Value("#{@autowiredWebSecurityConfigurersIgnoreParents.getWebSecurityConfigurers()}") List<SecurityConfigurer<Filter, WebSecurity>> webSecurityConfigurers) throws Exception { // 5、 这里通过后置对象处理器来进行 webSecurity 的初始化 webSecurity = objectPostProcessor.postProcess(new WebSecurity(objectPostProcessor)); if (debugEnabled != null) { webSecurity.debug(debugEnabled); } webSecurityConfigurers.sort(AnnotationAwareOrderComparator.INSTANCE); Integer previousOrder = null; Object previousConfig = null; for (SecurityConfigurer<Filter, WebSecurity> config : webSecurityConfigurers) { Integer order = AnnotationAwareOrderComparator.lookupOrder(config); if (previousOrder != null && previousOrder.equals(order)) { throw new IllegalStateException( "@Order on WebSecurityConfigurers must be unique. Order of " + order + " was already used on " + previousConfig + ", so it cannot be used on " + config + " too."); } previousOrder = order; previousConfig = config; } for (SecurityConfigurer<Filter, WebSecurity> webSecurityConfigurer : webSecurityConfigurers) { // 放入到 AbstractConfiguredSecurityBuilder 的配置集合中 webSecurity.apply(webSecurityConfigurer); } this.webSecurityConfigurers = webSecurityConfigurers; } // 0 先自动织入webSecurityConfigurers // 关键点就是获取 beanFactory.getBeansOfType(WebSecurityConfigurer.class); @Bean public static AutowiredWebSecurityConfigurersIgnoreParents autowiredWebSecurityConfigurersIgnoreParents( ConfigurableListableBeanFactory beanFactory) { return new AutowiredWebSecurityConfigurersIgnoreParents(beanFactory); } }

上面我们已经看到了步骤7,通常情况下都会去build

public abstract class AbstractSecurityBuilder<O> implements SecurityBuilder<O> { private AtomicBoolean building = new AtomicBoolean(); private O object; public final O build() throws Exception { if (this.building.compareAndSet(false, true)) { // 这里调用doBuild的最终方法 this.object = doBuild(); return this.object; } throw new AlreadyBuiltException("This object has already been built"); } public final O getObject() { if (!this.building.get()) { throw new IllegalStateException("This object has not been built"); } return this.object; } // 这里是抽象方法,直接找到其唯一的子类 AbstractConfiguredSecurityBuilder protected abstract O doBuild() throws Exception; }
@Override protected final O doBuild() throws Exception { synchronized (configurers) { buildState = BuildState.INITIALIZING; // 前置检查 beforeInit(); // 初始化 init(); buildState = BuildState.CONFIGURING; beforeConfigure(); configure(); buildState = BuildState.BUILDING; O result = performBuild(); buildState = BuildState.BUILT; return result; } }

不知不觉我们已经找到了spring中的关键方法init了,很多时候我们在定义接口是都会有一个init方法来定义注入时调用

前面我们知道 SpringBootWebSecurityConfiguration初始化了一个对象,同时也通过AutowiredWebSecurityConfigurersIgnoreParents拿到了WebSecurityConfigurerAdapter的子类 DefaultConfigurerAdapter,现在开始init(),其实就是开始WebSecurityConfigurerAdapterinit()方法。说了这里可能有的同学就会比较熟悉了,这就是关键配置的适配器类。

代码稍后贴出来,暂时先不看,到这里为止,我们才梳理了springboot自动配置中的SecurityAutoConfiguration

下面我们才开始第二个类

3|22、 UserDetailsServiceAutoConfiguration

@Configuration( proxyBeanMethods = false ) @ConditionalOnClass({AuthenticationManager.class}) @ConditionalOnBean({ObjectPostProcessor.class}) @ConditionalOnMissingBean( value = {AuthenticationManager.class, AuthenticationProvider.class, UserDetailsService.class}, type = {"org.springframework.security.oauth2.jwt.JwtDecoder", "org.springframework.security.oauth2.server.resource.introspection.OpaqueTokenIntrospector"} ) public class UserDetailsServiceAutoConfiguration { private static final String NOOP_PASSWORD_PREFIX = "{noop}"; private static final Pattern PASSWORD_ALGORITHM_PATTERN = Pattern.compile("^\\{.+}.*$"); private static final Log logger = LogFactory.getLog(UserDetailsServiceAutoConfiguration.class); public UserDetailsServiceAutoConfiguration() { } @Bean @ConditionalOnMissingBean( type = {"org.springframework.security.oauth2.client.registration.ClientRegistrationRepository"} ) // 这里加载了从配置文件或者默认生成的用户信息,以及加密方法 @Lazy public InMemoryUserDetailsManager inMemoryUserDetailsManager(SecurityProperties properties, ObjectProvider<PasswordEncoder> passwordEncoder) { User user = properties.getUser(); List<String> roles = user.getRoles(); return new InMemoryUserDetailsManager(new UserDetails[]{org.springframework.security.core.userdetails.User.withUsername(user.getName()).password(this.getOrDeducePassword(user, (PasswordEncoder)passwordEncoder.getIfAvailable())).roles(StringUtils.toStringArray(roles)).build()}); } private String getOrDeducePassword(User user, PasswordEncoder encoder) { String password = user.getPassword(); if (user.isPasswordGenerated()) { logger.info(String.format("%n%nUsing generated security password: %s%n", user.getPassword())); } return encoder == null && !PASSWORD_ALGORITHM_PATTERN.matcher(password).matches() ? "{noop}" + password : password; } }

这里也出现了一个info日志,当我们使用默认user用户时,密码会从这里打印在控制台

这个配置类的关键就是生成一个默认的InMemoryUserDetailsManager对象。

3|34、SecurityFilterAutoConfiguration

这个类就不详细介绍了,就是注册一些过滤器。


回到WebSecurityConfigurerAdapter 这个适配器类,我们关注基本的init()方法,其他的都是一些默认的配置

public void init(final WebSecurity web) throws Exception { final HttpSecurity http = getHttp(); web.addSecurityFilterChainBuilder(http).postBuildAction(() -> { FilterSecurityInterceptor securityInterceptor = http .getSharedObject(FilterSecurityInterceptor.class); web.securityInterceptor(securityInterceptor); }); }

这里有一个关键的方法getHttp()

protected final HttpSecurity getHttp() throws Exception { if (http != null) { return http; } DefaultAuthenticationEventPublisher eventPublisher = objectPostProcessor .postProcess(new DefaultAuthenticationEventPublisher()); localConfigureAuthenticationBldr.authenticationEventPublisher(eventPublisher); AuthenticationManager authenticationManager = authenticationManager(); authenticationBuilder.parentAuthenticationManager(authenticationManager); authenticationBuilder.authenticationEventPublisher(eventPublisher); // 获取创建共享的对象 Map<Class<?>, Object> sharedObjects = createSharedObjects(); http = new HttpSecurity(objectPostProcessor, authenticationBuilder, sharedObjects); if (!disableDefaults) { // @formatter:off http .csrf().and() .addFilter(new WebAsyncManagerIntegrationFilter()) .exceptionHandling().and() .headers().and() .sessionManagement().and() .securityContext().and() .requestCache().and() .anonymous().and() .servletApi().and() .apply(new DefaultLoginPageConfigurer<>()).and() .logout(); // @formatter:on ClassLoader classLoader = this.context.getClassLoader(); List<AbstractHttpConfigurer> defaultHttpConfigurers = SpringFactoriesLoader.loadFactories(AbstractHttpConfigurer.class, classLoader); for (AbstractHttpConfigurer configurer : defaultHttpConfigurers) { http.apply(configurer); } } // httpHttpSecurity 的表单配置 configure(http); return http; }

我们简单列举几个重要的方法

// 根据系统加载的AuthenticationManagerBuilder 在装配用户 protected UserDetailsService userDetailsService() { AuthenticationManagerBuilder globalAuthBuilder = context .getBean(AuthenticationManagerBuilder.class); return new UserDetailsServiceDelegator(Arrays.asList( localConfigureAuthenticationBldr, globalAuthBuilder)); }
protected void configure(HttpSecurity http) throws Exception { logger.debug("Using default configure(HttpSecurity). If subclassed this will potentially override subclass configure(HttpSecurity)."); // 资源保护 http .authorizeRequests() .anyRequest().authenticated() .and() // 认证页面 .formLogin().and() // HTTP Basic authentication. .httpBasic(); }

上面我们都是通过启动日志的信息来理解应用在启动时到底做了什么,加载了什么关键信息,接下来我们将通过运行时的日志看来看一下我们在认证过程中是如何进行用户名密码的校验的。

4|0登录流程

我们打开浏览器输入localhost:8080 由于我们没有进行登录,所以会被redirecting到登录页面。我们一起过滤一下控制台信息,抓取到关键的信息。

我们看到,这里加载了各种过滤器,当访问/时没发现并没有登录,则重定向到默认的/login页面,这也是spirng security的核心。今天重点讨论登录流程,我们先清空控制台,用正确的用户名和密码登录进去。

从控制台我们可以看到很多的过滤器,我们至关注认证流程的一部分,已上图为准。

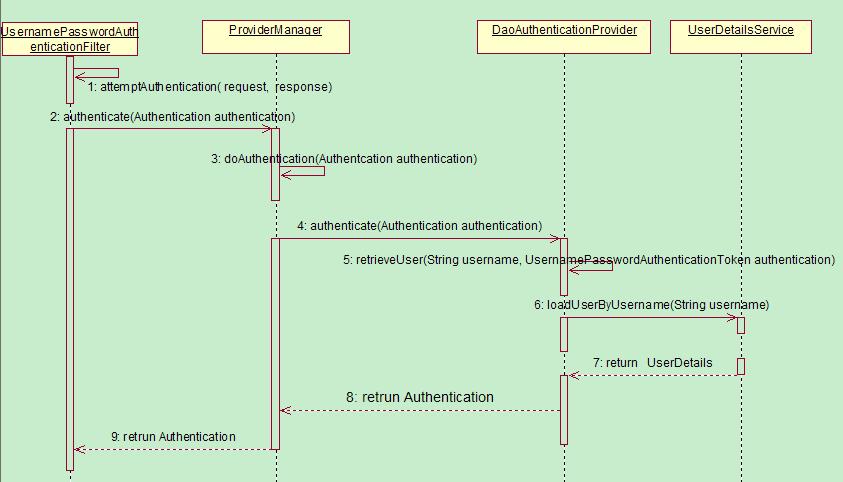
4|11、UsernamePasswordAuthenticationFilter

这理解这个过滤器前,我们先从他的父类AbstractAuthenticationProcessingFilter 入手,既然是过滤器,我们既要入doFilter入手, 这里是关键的流程,子类只是做具体的实现,我们稍后再看

public void doFilter(ServletRequest req, ServletResponse res, FilterChain chain) throws IOException, ServletException { // 请求的转化 HttpServletRequest request = (HttpServletRequest)req; HttpServletResponse response = (HttpServletResponse)res; if (!this.requiresAuthentication(request, response)) { chain.doFilter(request, response); } else { if (this.logger.isDebugEnabled()) { this.logger.debug("Request is to process authentication"); } Authentication authResult; try { // 关键的认证方法,交由子类来实现,我们到子类看 authResult = this.attemptAuthentication(request, response); if (authResult == null) { return; } this.sessionStrategy.onAuthentication(authResult, request, response); } catch (InternalAuthenticationServiceException var8) { this.logger.error("An internal error occurred while trying to authenticate the user.", var8); this.unsuccessfulAuthentication(request, response, var8); return; } catch (AuthenticationException var9) { this.unsuccessfulAuthentication(request, response, var9); return; } if (this.continueChainBeforeSuccessfulAuthentication) { chain.doFilter(request, response); } // 返回认证成功 this.successfulAuthentication(request, response, chain, authResult); } }

上面的关键方法attemptAuthentication(request, response);UsernamePasswordAuthenticationFilter

public Authentication attemptAuthentication(HttpServletRequest request, HttpServletResponse response) throws AuthenticationException { if (this.postOnly && !request.getMethod().equals("POST")) { throw new AuthenticationServiceException("Authentication method not supported: " + request.getMethod()); } else { // 通过“username”拿到用户名 String username = this.obtainUsername(request); // 通过"password" 拿到密码 String password = this.obtainPassword(request); if (username == null) { username = ""; } if (password == null) { password = ""; } username = username.trim(); // 传入UsernamePasswordAuthenticationToken构造方法,此类是Authentication的子类 // 此时还没有认证(false) UsernamePasswordAuthenticationToken authRequest = new UsernamePasswordAuthenticationToken(username, password); this.setDetails(request, authRequest); // 交由AuthenticationManager 去处理 return this.getAuthenticationManager().authenticate(authRequest); } }

UsernamePasswordAuthenticationFilter 的关键流程中,我们将请求的参数进行符合入参的封装,

4|22、AuthenticationManager

AuthenticationManager本身不包含认证逻辑,其核心是用来管理所有的 AuthenticationProvider,通过交由合适的 AuthenticationProvider 来实现认证。

4|33、AuthenticationProvider

Spring Security 支持多种认证逻辑,每一种认证逻辑的认证方式其实就是一种 AuthenticationProvider。通过 getProviders()方法就能获取所有的AuthenticationProvider,通过provider.supports()来判断 provider 是否支持当前的认证逻辑。

当选择好一个合适的AuthenticationProvider 后,通过 provider.authenticate(authentication) 来让 AuthenticationProvider进行认证。

public Authentication authenticate(Authentication authentication) throws AuthenticationException { Class<? extends Authentication> toTest = authentication.getClass(); AuthenticationException lastException = null; AuthenticationException parentException = null; Authentication result = null; Authentication parentResult = null; boolean debug = logger.isDebugEnabled(); for (AuthenticationProvider provider : getProviders()) { // 判断是否是其支持的provider if (!provider.supports(toTest)) { continue; } if (debug) { logger.debug("Authentication attempt using " + provider.getClass().getName()); } try { // 由具体的provider去进行处理 result = provider.authenticate(authentication); if (result != null) { copyDetails(authentication, result); break; } } catch (AccountStatusException | InternalAuthenticationServiceException e) { prepareException(e, authentication); // SEC-546: Avoid polling additional providers if auth failure is due to // invalid account status throw e; } catch (AuthenticationException e) { lastException = e; } } if (result == null && parent != null) { // Allow the parent to try. try { // 如果还是没有结果,交由父类在处理一次 result = parentResult = parent.authenticate(authentication); } catch (ProviderNotFoundException e) { // ignore as we will throw below if no other exception occurred prior to // calling parent and the parent // may throw ProviderNotFound even though a provider in the child already // handled the request } catch (AuthenticationException e) { lastException = parentException = e; } } if (result != null) { if (eraseCredentialsAfterAuthentication && (result instanceof CredentialsContainer)) { // Authentication is complete. Remove credentials and other secret data // from authentication ((CredentialsContainer) result).eraseCredentials(); } // If the parent AuthenticationManager was attempted and successful than it will publish an AuthenticationSuccessEvent // This check prevents a duplicate AuthenticationSuccessEvent if the parent AuthenticationManager already published it if (parentResult == null) { eventPublisher.publishAuthenticationSuccess(result); } return result; } // Parent was null, or didn't authenticate (or throw an exception). if (lastException == null) { lastException = new ProviderNotFoundException(messages.getMessage( "ProviderManager.providerNotFound", new Object[] { toTest.getName() }, "No AuthenticationProvider found for {0}")); } // If the parent AuthenticationManager was attempted and failed than it will publish an AbstractAuthenticationFailureEvent // This check prevents a duplicate AbstractAuthenticationFailureEvent if the parent AuthenticationManager already published it if (parentException == null) { prepareException(lastException, authentication); } throw lastException; }

4|44、AbstractUserDetailsAuthenticationProvider

表单登录的 AuthenticationProvider主要是由 AbstractUserDetailsAuthenticationProvider 来进行处理的,我们来看下它的 authenticate()方法。

public Authentication authenticate(Authentication authentication) throws AuthenticationException { Assert.isInstanceOf(UsernamePasswordAuthenticationToken.class, authentication, () -> messages.getMessage( "AbstractUserDetailsAuthenticationProvider.onlySupports", "Only UsernamePasswordAuthenticationToken is supported")); // Determine username String username = (authentication.getPrincipal() == null) ? "NONE_PROVIDED" : authentication.getName(); boolean cacheWasUsed = true; // 默认从缓存中去,如果没有则调用retrieveUser UserDetails user = this.userCache.getUserFromCache(username); if (user == null) { cacheWasUsed = false; try { user = retrieveUser(username, (UsernamePasswordAuthenticationToken) authentication); } catch (UsernameNotFoundException notFound) { logger.debug("User '" + username + "' not found"); if (hideUserNotFoundExceptions) { throw new BadCredentialsException(messages.getMessage( "AbstractUserDetailsAuthenticationProvider.badCredentials", "Bad credentials")); } else { throw notFound; } } Assert.notNull(user, "retrieveUser returned null - a violation of the interface contract"); } try { preAuthenticationChecks.check(user); additionalAuthenticationChecks(user, (UsernamePasswordAuthenticationToken) authentication); } catch (AuthenticationException exception) { if (cacheWasUsed) { // There was a problem, so try again after checking // we're using latest data (i.e. not from the cache) cacheWasUsed = false; user = retrieveUser(username, (UsernamePasswordAuthenticationToken) authentication); preAuthenticationChecks.check(user); additionalAuthenticationChecks(user, (UsernamePasswordAuthenticationToken) authentication); } else { throw exception; } } // 校验密码等信息 postAuthenticationChecks.check(user); // 放入缓存 if (!cacheWasUsed) { this.userCache.putUserInCache(user); } Object principalToReturn = user; if (forcePrincipalAsString) { principalToReturn = user.getUsername(); } // 认证成功后放入认证成功的信息,里面也是放入传入UsernamePasswordAuthenticationToken另一个构造方法 return createSuccessAuthentication(principalToReturn, authentication, user); }

那么关键的retrieveUser里面是什么样呢?

protected final UserDetails retrieveUser(String username, UsernamePasswordAuthenticationToken authentication) throws AuthenticationException { prepareTimingAttackProtection(); try { // 用具体的UserDetailSercvice去获取用户信息 UserDetails loadedUser = this.getUserDetailsService().loadUserByUsername(username); if (loadedUser == null) { throw new InternalAuthenticationServiceException( "UserDetailsService returned null, which is an interface contract violation"); } return loadedUser; } catch (UsernameNotFoundException ex) { mitigateAgainstTimingAttack(authentication); throw ex; } catch (InternalAuthenticationServiceException ex) { throw ex; } catch (Exception ex) { throw new InternalAuthenticationServiceException(ex.getMessage(), ex); } }

由于我们的用户信息是在UserDetailsServiceAutoConfiguration 的配置类中生成了 InMemoryUserDetailsManager,所以这里的loadUserByUsername的代码则是这样

public UserDetails loadUserByUsername(String username) throws UsernameNotFoundException { UserDetails user = users.get(username.toLowerCase()); if (user == null) { throw new UsernameNotFoundException(username); } return new User(user.getUsername(), user.getPassword(), user.isEnabled(), user.isAccountNonExpired(), user.isCredentialsNonExpired(), user.isAccountNonLocked(), user.getAuthorities()); }

在内存中维护的用户中去获取,那么如果是其他的用户存储则需要对应的获取方式,如果是保存在数据库那么就需要通过sql语句去获取了,感兴趣的可以直接点击JdbcUserDetailsManager查看相关代码。

其实真个认证的流程到这里也就结束了,至于成功或失败后的逻辑最后还是回到了UsernamePasswordAuthenticationFilter中的结果,如果是成功this.successfulAuthentication(request, response, chain, authResult);

protected void successfulAuthentication(HttpServletRequest request, HttpServletResponse response, FilterChain chain, Authentication authResult) throws IOException, ServletException { if (this.logger.isDebugEnabled()) { this.logger.debug("Authentication success. Updating SecurityContextHolder to contain: " + authResult); } // 将认证结果放入到上下文中 SecurityContextHolder.getContext().setAuthentication(authResult); this.rememberMeServices.loginSuccess(request, response, authResult); if (this.eventPublisher != null) { this.eventPublisher.publishEvent(new InteractiveAuthenticationSuccessEvent(authResult, this.getClass())); } // 后去的跳转等信息 this.successHandler.onAuthenticationSuccess(request, response, authResult); }

5|0总结

以上便是spring security的认证流程,没想到篇幅会这么长,断点追踪的方式很痛苦,大致方向应该是对的,基本的认证流程也应该浮出水面了。本篇主要是从自动配置的方式出发,后续将展示其他的配置方式甚至自定义认证流程,加油!!!

posted @ 2020-05-11 14:19  YoungDeng  阅读(1068)  评论(0编辑  收藏  举报