RabbitMQ学习系列(三): C# 如何使用 RabbitMQ
上一篇已经讲了Rabbitmq如何在Windows平台安装,还不了解如何安装的朋友,请看我前面几篇文章:RabbitMQ学习系列一:windows下安装RabbitMQ服务 , 今天就来聊聊 C# 实际开发的过程中,怎么调用 用RabbitMQ。
一、客户端
RabbitMQ.Client 是rabbitmq 官方提供的的客户端,net 版本地址 :http://www.rabbitmq.com/dotnet.html
EasyNetQ 是基于RabbitMQ.Client 基础上封装的开源客户端。使用非常方便。地址:http://easynetq.com/ 。 本篇所使用示例代码下载地址: demo示例下载 。
RabbitMQ 还有很多其他客户端API,都非常的好用。我们在一边,一直用的都是 EasyNetQ,所以这里的 demo 只介绍 EasyNetQ 客户端实现。其他的客户端,大家自己去研究吧。
二、项目结构

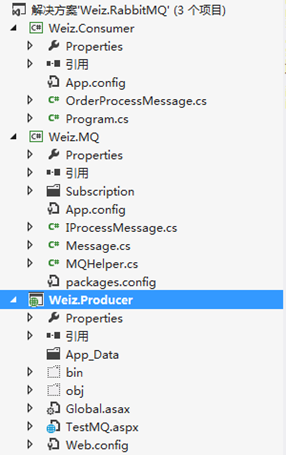
说明:前面我们提到过,RabbitMQ由 Producer(生成者) 和 Consumer(消费者) 两部分组成。Weiz.Consumer 就是Consumer(消费者),Weiz. Producer 为 Producer(生成者),Weiz.MQ 为消息队列的通用处理类库。
三、项目搭建
1. Weiz.MQ 项目,消息队列的通用处理类库,用于正在的订阅和发布消息。
1. 通过nuget安装项目EasyNetQ 相关组件, (略)
2. 增加BusBuilder.cs管道创建类,主要负责链接Rabbitmq。

using System;
using System.Configuration;
using EasyNetQ;

namespace Weiz.MQ
{
    /// <summary>
    /// 消息服务器连接器
    /// </summary>
    public class BusBuilder
    {
        public static IBus CreateMessageBus()
        {
            // 消息服务器连接字符串
            // var connectionString = ConfigurationManager.ConnectionStrings["RabbitMQ"];
            string connString = "host=192.168.98.107:5672;virtualHost=OrderQueue;username=zhangweizhong;password=weizhong1988";
            if (connString == null || connString == string.Empty)
            {
                throw new Exception("messageserver connection string is missing or empty");
            }

            return RabbitHutch.CreateBus(connString);
        }
    }
}
3. 增加IProcessMessage类,定义了一个消息方法,用于消息传递

using System;
using System.Collections.Generic;
using System.Linq;
using System.Text;

namespace Weiz.MQ
{
    public interface IProcessMessage
    {
        void ProcessMsg(Message msg);
    }
}
4. 增加Message类,定义了消息传递的实体属性字段等信息

using System;
using System.Collections.Generic;
using System.Linq;
using System.Text;

namespace Weiz.MQ
{
    public class Message
    {
        public string MessageID { get; set; }

        public string MessageTitle { get; set; }

        public string MessageBody { get; set; }

        public string MessageRouter { get; set; }
    }
}
5. 增加MQHelper类,用于正在的订阅和发布消息。

using System;
using System.Collections.Generic;
using System.Linq;
using System.Text;
using System.Configuration;

using EasyNetQ;

namespace Weiz.MQ
{
    public class MQHelper
    {
        /// <summary>
        /// 发送消息
        /// </summary>
        public static void Publish(Message msg)
        {
            //// 创建消息bus
            IBus bus = BusBuilder.CreateMessageBus();

            try
            {
                bus.Publish(msg, x => x.WithTopic(msg.MessageRouter));
            }
            catch (EasyNetQException ex)
            {
                //处理连接消息服务器异常
            }

            bus.Dispose();//与数据库connection类似,使用后记得销毁bus对象
        }

        /// <summary>
        /// 接收消息
        /// </summary>
        /// <param name="msg"></param>
        public static void Subscribe(Message msg, IProcessMessage ipro)
        {
            //// 创建消息bus
            IBus bus = BusBuilder.CreateMessageBus();

            try
            {
                bus.Subscribe<Message>(msg.MessageRouter, message => ipro.ProcessMsg(message), x => x.WithTopic(msg.MessageRouter));

            }
            catch (EasyNetQException ex)
            {
                //处理连接消息服务器异常
            }
        }
    }
}
2. RabbitMQ由 Producer(生成者)
1. 创建一个aspx 页面,增加如下代码

using System;
using System.Collections.Generic;
using System.Linq;
using System.Web;
using System.Web.UI;
using System.Web.UI.WebControls;

using Weiz.MQ;

namespace Weiz.Producer
{
    public partial class TestMQ : System.Web.UI.Page
    {
        protected void Page_Load(object sender, EventArgs e)
        {

        }

        protected void Button1_Click(object sender, EventArgs e)
        {
            Message msg = new Message();
            msg.MessageID = "1";
            msg.MessageBody = DateTime.Now.ToString();
            msg.MessageTitle = "1";
            msg.MessageRouter = "pcm.notice.zhangsan";
            MQHelper.Publish(msg);

        }
    }
}
3. Weiz.Consumer 就是Consumer(消费者)
1 . 新增OrderProcessMessage.cs

using System;
using System.Collections.Generic;
using System.Linq;
using System.Web;

namespace Weiz.Consumer
{
    public class OrderProcessMessage:MQ.IProcessMessage
    {
        public void ProcessMsg(MQ.Message msg)
        {
            Console.WriteLine(msg.MessageBody);
        }
    }
}
2. Program 增加如下代码

using System;
using System.Collections.Generic;
using System.Linq;
using System.Text;
using System.Threading.Tasks;

namespace Weiz.Consumer
{
    class Program
    {
        static void Main(string[] args)
        {
            OrderProcessMessage order = new OrderProcessMessage();
            MQ.Message msg = new MQ.Message();
            msg.MessageID = "1";
            msg.MessageRouter = "pcm.notice.zhangsan";

            MQ.MQHelper.Subscribe(msg, order);
        }
    }
}
四、运行
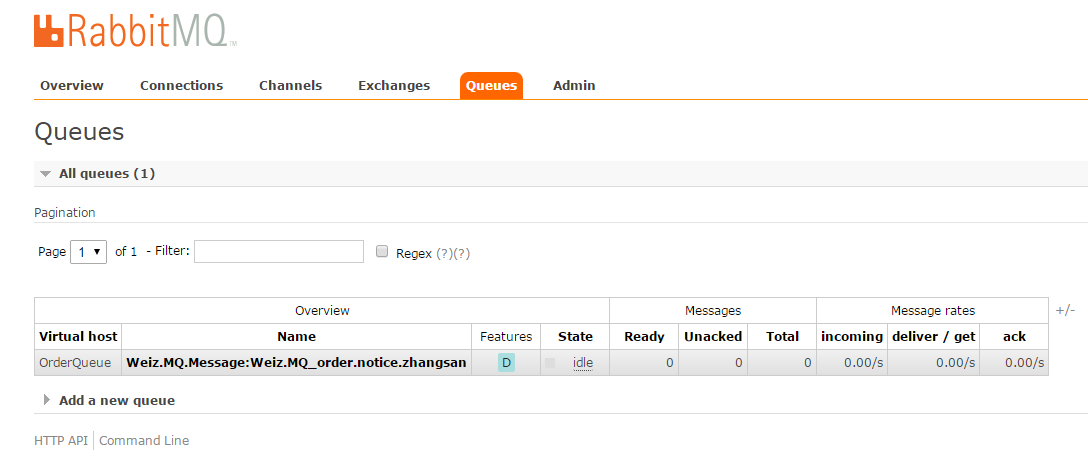
1. 启动 Weiz.Consumer (消费者),启动消费者,会自动在RabbitMQ 服务器上创建相关的exchange 和 queue 。

Consumer 消费者,使用的是Subscribe (订阅)的模式,所以,Weiz.Consumer客户端启动后,会自动创建connection,生成相关的exchange 和queue。
2. 启动Weiz. Producer 里的TestMQ.aspx 页面,往队列里面写一条消息。订阅的消费者立马就能拿到这条消息。

至此,C#向Rabbitmq消息队列发送消息已经简单完成。
查看RabbitMQ 系列其他文章,http://www.cnblogs.com/zhangweizhong/category/855479.html


