前言
kubernetes,源于希腊文,译为舵手或飞行员,是谷歌公司于2014年推出的生产级别的容器管理工具。
由于k和s之间存在8个字母,故kubernetes被简称为k8s。
k8s是一个可移植、可扩展的开源平台,用于管理容器化的工作负载和服务,可促进声明式配置和自动化。
具体可参照k8s官网说法:k8s官网
由于内容过于多了,我会在以后的文章中再逐次讲到,本文我们着重搭建一个k8s的基础集群。
环境
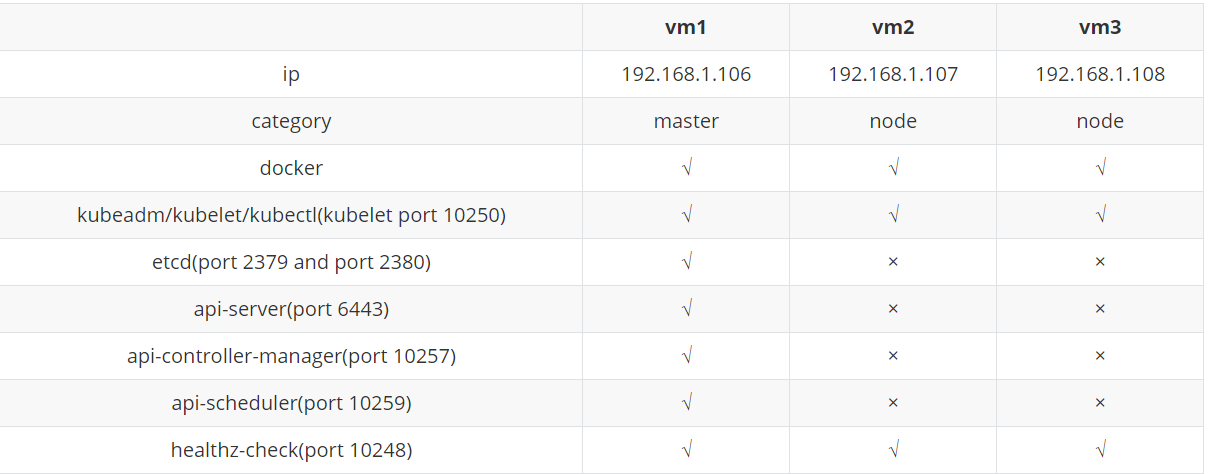
由于我们需要三台主机去搭建环境,故我们采用一主二从模式。
这三台机的信息可以参考下表(括号中添加的是服务的默认端口)

部署
根据上表所列的信息,我们可以这些服务分为两部分:
1. 三台机共有的服务
2. master节点独有的服务
下面我们开始部署:
1. 基础准备
1.1 安装docker(三台机)
yum install -y yum-utils device-mapper-persistent-data lvm2 lsof  #基础安装包
yum-config-manager --add-repo http://mirrors.aliyun.com/docker-ce/linux/centos/docker-ce.repo  #指定yum的默认源为阿里
yum install -y docker
systemctl enable --now docker
1.2 基础设置(三台机)
systemctl disable --now firewalld  #关闭防火墙
setenforce 0     #关闭selinux
sed -i 's/SELINUX=permissive/SELINUX=disabled/' /etc/sysconfig/selinux
sed -i "s/SELINUX=enforcing/SELINUX=disabled/g" /etc/selinux/config

swapoff -a     #关闭交换分区
sed -i 's/.*swap.*/#&/' /etc/fstab
cat <<EOF >  /etc/sysctl.d/k8s.conf  #打开内核设置
net.bridge.bridge-nf-call-ip6tables = 1
net.bridge.bridge-nf-call-iptables = 1
EOF
sysctl --system
1.3 安装kubeadm/kubelet/kubectl
cat <<EOF > /etc/yum.repos.d/kubernetes.repo  #指定k8s的安装源为阿里源
[kubernetes]
name=kubernetes
enabled=1
baseurl=https://mirrors.aliyun.com/kubernetes/yum/repos/kubernetes-el7-x86_64/
gpgcheck=1
gpgkey=https://mirrors.aliyun.com/kubernetes/yum/doc/yum-key.gpg
EOF

# 引入gpg key
wget https://mirrors.aliyun.com/kubernetes/yum/doc/rpm-package-key.gpg

rpm --import rpm-package-key.gpg

yum repolist  (更新本地源)

# 安装kubeadm、kubectl、kubelet,此处也可指定特定版本,如kubectl-1.16.0
yum install -y kubectl kubeadm kubelet
# 启动kubelet服务
systemctl enable --now kubelet
此时我们需要在master主机检查docker images的情况,看看k8s的各组件是否都存在,具体有:
[root@vm1 ~]# docker images
REPOSITORY                                                        TAG                 IMAGE ID            CREATED             SIZE
registry.aliyuncs.com/google_containers/kube-apiserver            v1.22.0             838d692cbe28        4 days ago          128 MB
registry.aliyuncs.com/google_containers/kube-controller-manager   v1.22.0             5344f96781f4        4 days ago          122 MB
registry.aliyuncs.com/google_containers/kube-scheduler            v1.22.0             3db3d153007f        4 days ago          52.7 MB
registry.aliyuncs.com/google_containers/kube-proxy                v1.22.0             bbad1636b30d        4 days ago          104 MB
registry.aliyuncs.com/google_containers/etcd                      3.5.0-0             004811815584        7 weeks ago         295 MB
registry.aliyuncs.com/google_containers/coredns                   v1.8.4              8d147537fb7d        2 months ago        47.6 MB
registry.aliyuncs.com/google_containers/pause                     3.5                 ed210e3e4a5b        4 months ago        683 kB
这些组件有相同的前缀registry.aliyuncs.com/google_containers, 只有凑齐这些组件之后,才能初始化k8s的master节点。否则在初始化时,会出现以下问题:
[root@vm1 ~]# kubeadm init --image-repository registry.aliyuncs.com/google_containers --kubernetes-version v1.22.0 --apiserver-advertise-address 192.168.1.106 --pod-network-cidr=10.244.0.0/16 --token-ttl 0
[init] Using Kubernetes version: v1.22.0
[preflight] Running pre-flight checks
[preflight] Pulling images required for setting up a Kubernetes cluster
[preflight] This might take a minute or two, depending on the speed of your internet connection
[preflight] You can also perform this action in beforehand using 'kubeadm config images pull'
error execution phase preflight: [preflight] Some fatal errors occurred:
        [ERROR ImagePull]: failed to pull image registry.aliyuncs.com/google_containers/coredns:v1.8.4: output: Trying to pull repository registry.aliyuncs.com/google_containers/coredns ...
Pulling repository registry.aliyuncs.com/google_containers/coredns
Error: image google_containers/coredns:v1.8.4 not found
, error: exit status 1
此问题是说,某个组件未在registry.aliyuncs.com/google_containers下找到,组件缺失无法初始化。原因你懂的。所以我们只需要去拉个相应的image下来,然后改个名字就可以。
[root@vm1 ~]# docker pull coredns/coredns:1.8.4
[root@vm1 ~]# docker tag coredns/coredns:1.8.4 registry.aliyuncs.com/google_containers/coredns:v1.8.4
[root@vm1 ~]# docker rmi coredns/coredns:1.8.4
这样就可以搞定这个问题了。
2. 初始化
2.1 初始化master主机
kubeadm init --image-repository registry.aliyuncs.com/google_containers --apiserver-advertise-address 192.168.1.106 --apiserver-bind-port 6443 --kubernetes-version 1.22.0 --pod-network-cidr 10.244.0.0/16 --token-ttl 0 #此处token-ttl=0表示此token永远有效。
然后等4分钟左右,完成之后就会出现以下信息:
Your Kubernetes control-plane has initialized successfully!

To start using your cluster, you need to run the following as a regular user:

  mkdir -p $HOME/.kube
  sudo cp -i /etc/kubernetes/admin.conf $HOME/.kube/config
  sudo chown $(id -u):$(id -g) $HOME/.kube/config

Alternatively, if you are the root user, you can run:

  export KUBECONFIG=/etc/kubernetes/admin.conf

You should now deploy a pod network to the cluster.
Run "kubectl apply -f [podnetwork].yaml" with one of the options listed at:
  https://kubernetes.io/docs/concepts/cluster-administration/addons/

Then you can join any number of worker nodes by running the following on each as root:

kubeadm join 192.168.1.106:6443 --token jx4yyr.r2cyxjfesfz43wwz \
        --discovery-token-ca-cert-hash sha256:ab78736522a383c49f7a4fc9c55fdd5ebde8a19fb71ec2ed3b9e5d3133f2b53e
出现上述信息说明master节点初始化成功,我们按照它的指引,使用相应的用户运行这三行命令:
  mkdir -p $HOME/.kube
  sudo cp -i /etc/kubernetes/admin.conf $HOME/.kube/config
  sudo chown $(id -u):$(id -g) $HOME/.kube/config
即可使用kubectl命令。
2.2 将node节点加入到集群中
在另外两台node节点上,运行kubeadm join命令,即可将node节点加入到集群中。kubeadm join 192.168.1.106:6443 --token jx4yyr.r2cyxjfesfz43wwz \
--discovery-token-ca-cert-hash sha256:ab78736522a383c49f7a4fc9c55fdd5ebde8a19fb71ec2ed3b9e5d3133f2b53e
需要注意的是,若不加--token-ttl参数,此token默认的有效期是24小时,过期后需要在master节点重新生成新的join命令。
生成的命令如下:
kubeadm token create -ttl 0
2.3 安装网络插件
虽然node节点已经被纳入集群,但是它们之间仍然无法通信,原因是尚未安装内网插件。 此处我们需要安装它,才可以使得集群内部正常通信。常用的网络插件有flannel、calico、 weave,本例使用calico,原因是比较方便。
我们首先下载一个配置文件模板calico.yaml,然后修改配置,将CALICO_IPV4POOL_CIDR的值修改为init时的CIDR值,作为内网的ip池, 最后启动它。
[root@vm1 ~]# wget https://docs.projectcalico.org/manifests/calico.yaml
            - name: CALICO_IPV4POOL_CIDR
              value: "10.244.0.0/16"
[root@vm1 ~]# kubectl apply -f calico.yaml #修改之后再启动
3. 查看状态
3.1 查看nodes节点状态
在node节点都加入集群,且启动calico之后,我们可以查看集群状态。[root@vm1 ~]# kubectl get nodes
NAME STATUS ROLES AGE VERSION
vm1 Ready control-plane,master 3h54m v1.22.0
vm2 Ready <none> 3h54m v1.22.0
vm3 Ready <none> 3h54m v1.22.0
三台机都是ready状态,说明搭建成功。
3.2 查看service状态
[root@vm1 ~]# kubectl get svc
NAME            TYPE        CLUSTER-IP      EXTERNAL-IP   PORT(S)        AGE
kubernetes      ClusterIP   10.96.0.1       <none>        443/TCP        3h55m
有kubernetes的服务,成功。
后记
这篇文章我想写很久了,今天也是将其完成,非常高兴。
由于k8s真的很复杂,调试过程也是各种痛苦,所以我省略了很多内容,以后有机会再跟大家讲。
最后说一句,Hyper-V是牛逼啊,我所有的操作居然都保留下来了,所以我可以查到非常久远的记录,也使得这篇文章相对详实不少。


【推荐】国内首个AI IDE,深度理解中文开发场景,立即下载体验Trae
【推荐】编程新体验,更懂你的AI,立即体验豆包MarsCode编程助手
【推荐】抖音旗下AI助手豆包,你的智能百科全书,全免费不限次数
【推荐】轻量又高性能的 SSH 工具 IShell:AI 加持,快人一步
· AI与.NET技术实操系列:向量存储与相似性搜索在 .NET 中的实现
· 基于Microsoft.Extensions.AI核心库实现RAG应用
· Linux系列:如何用heaptrack跟踪.NET程序的非托管内存泄露
· 开发者必知的日志记录最佳实践
· SQL Server 2025 AI相关能力初探
· 震惊!C++程序真的从main开始吗?99%的程序员都答错了
· 【硬核科普】Trae如何「偷看」你的代码?零基础破解AI编程运行原理
· 单元测试从入门到精通
· winform 绘制太阳,地球,月球 运作规律
· 上周热点回顾(3.3-3.9)