Spring Boot整合 WebSocket,实现向指定页面推送信息
前言
最近因为某个地方的评价系统做不了对接,提供不了接口供我们调用,只能自己写评价系统了。刚好买了本《Netty 实战》在看到目录上有如何使用 Netty 创建 WebSocket 客户端,但代码太多而且网上搜的大部分都是Ctrl C+Ctrl V 自己都没实现过的,就往上一发。所以就搜索 Spring Boot 整合 WebSocket ,并且看完了《Html5 WebSocket权威指南》,结果大部分是不全的代码。这里我将所有源码、部分原理以及部分使用说明好了。
2020-11-26 日补充
这个服务端的写法已经过时了,我已经看完 Netty 实战的服务端的创建,以及它的客户端代码在异步社区,在资源下载那里,不过我不建议用书上那个,我这个客户端也就是 JS 的代码还是值得信赖的。我在 Youtube 各个视频,以及 Spring 官网(💩一样的样例代码,还有 Kafka Stream 的,当然我不是说 Josh Long 垃圾)看了。https://www.youtube.com/watch?v=X2R_Iyga88E&t=101s 这个 15 年的视频对应我这个过时的写法。https://www.youtube.com/watch?v=nxakp15CACY&t=4605s 这个 16 年的,一般般,感觉还是有点老。仅供参考,基本的 WebSocket 的思想我已经写在下面了,除了示例代码外就是最基本的 WebSocket,没什么难的。
简要介绍
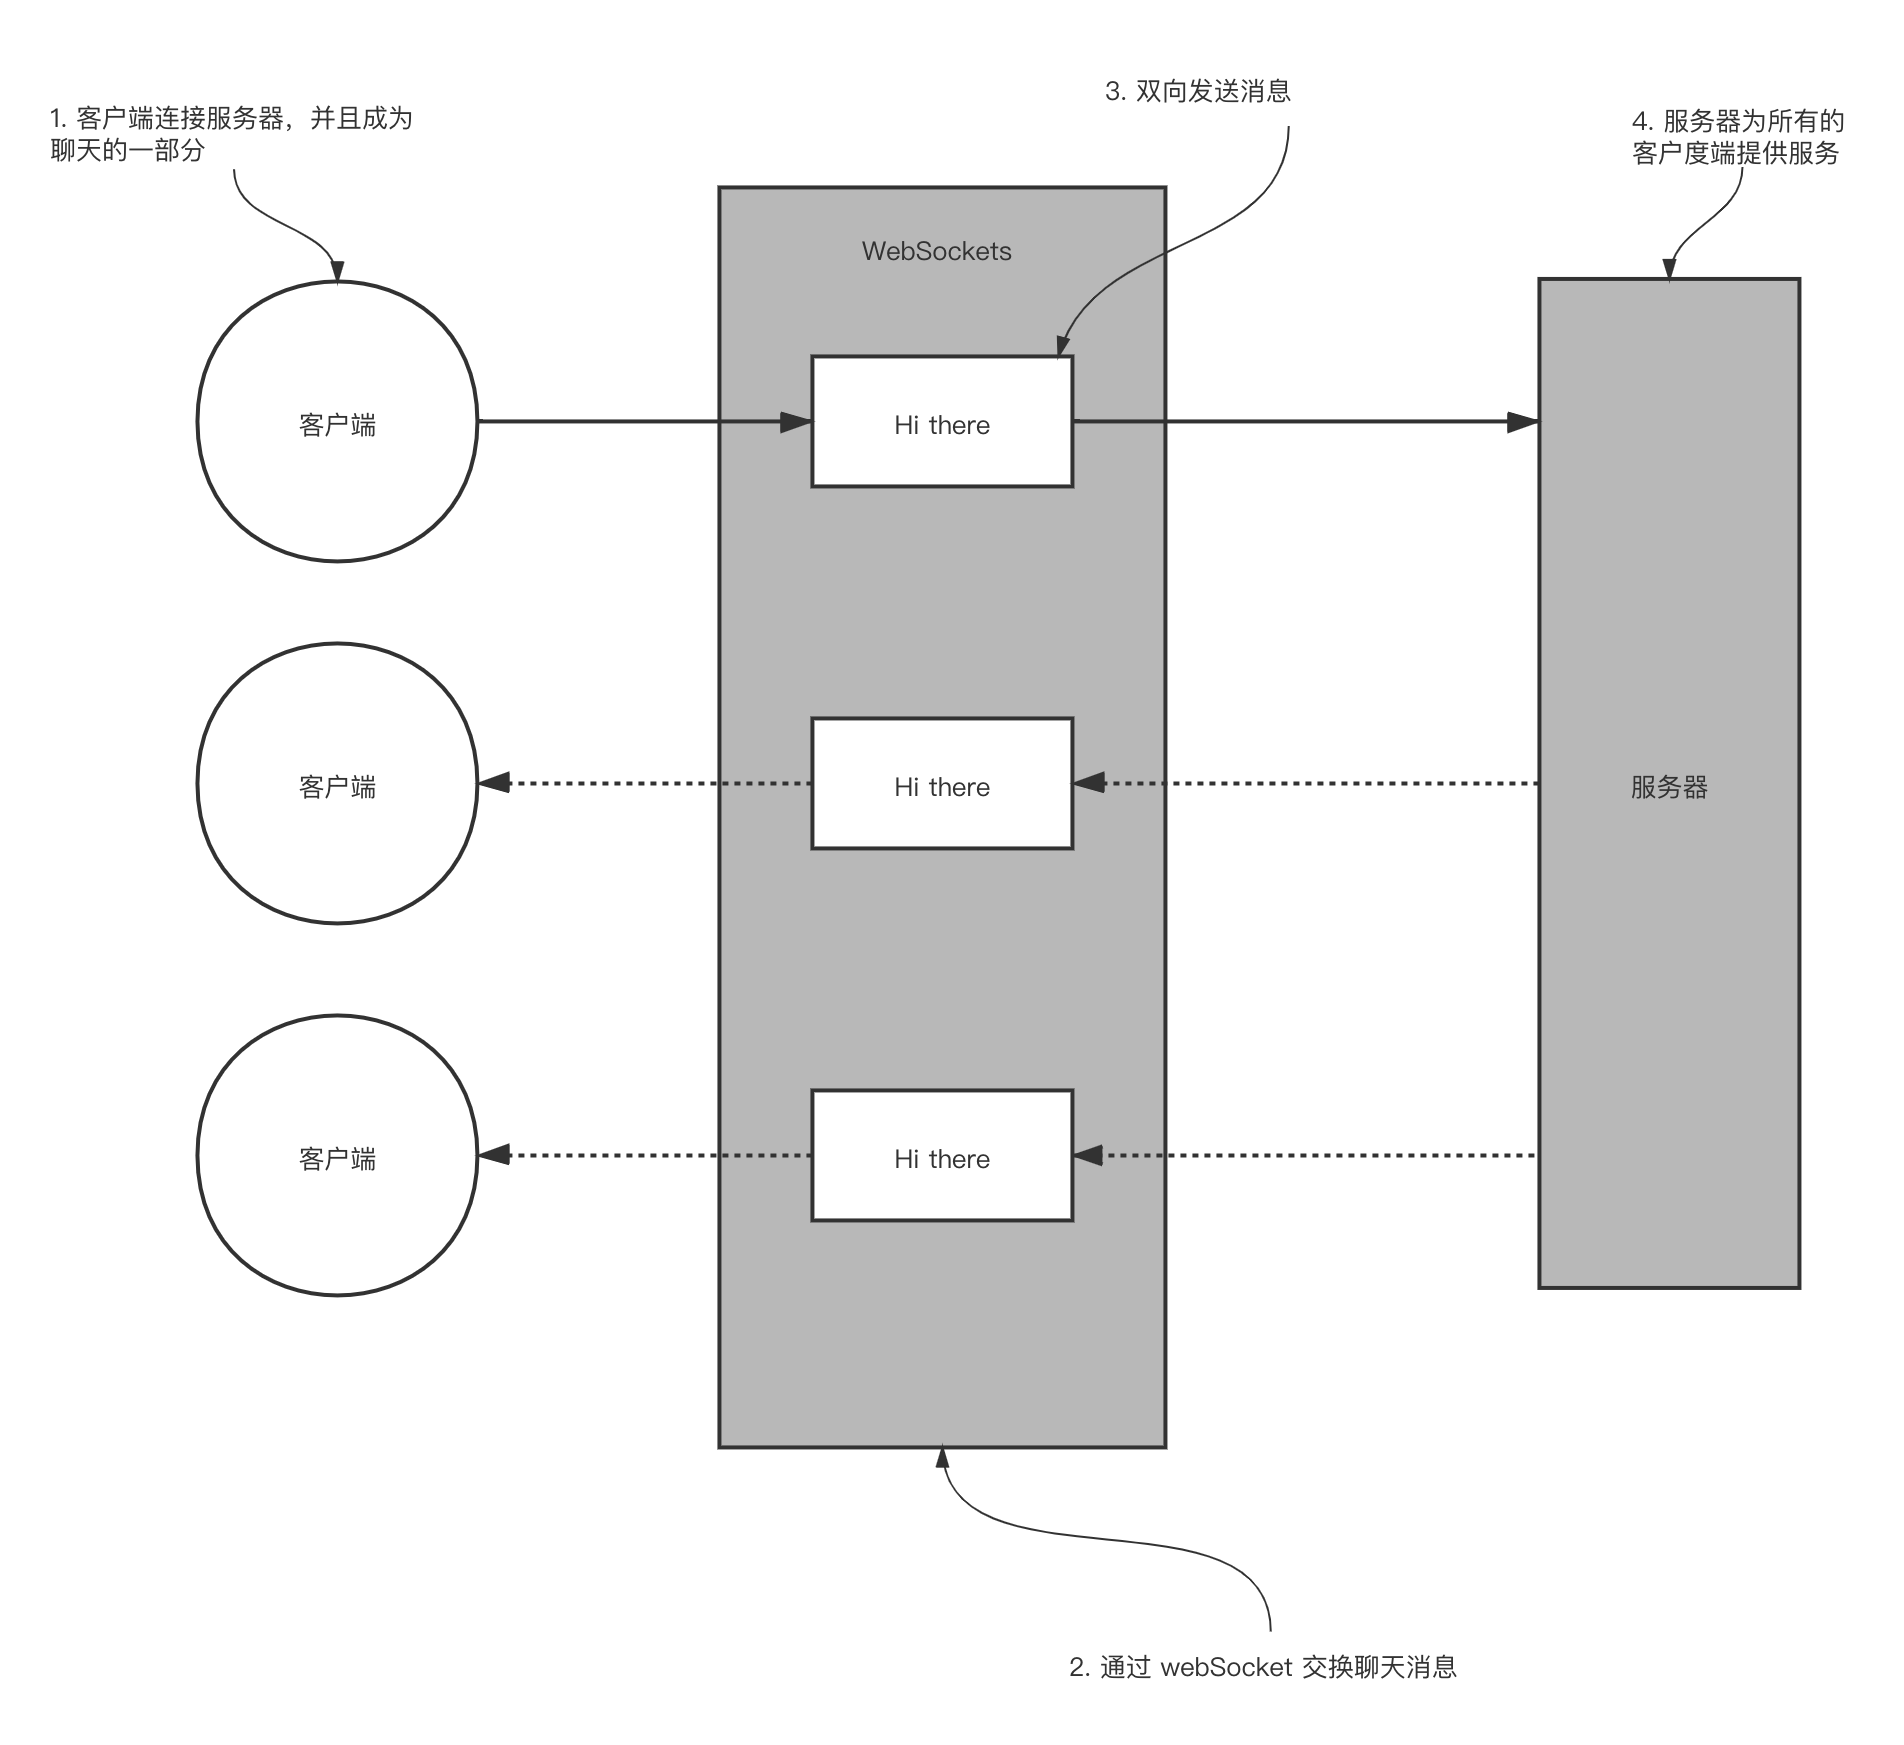
WebSocket 应用程序逻辑
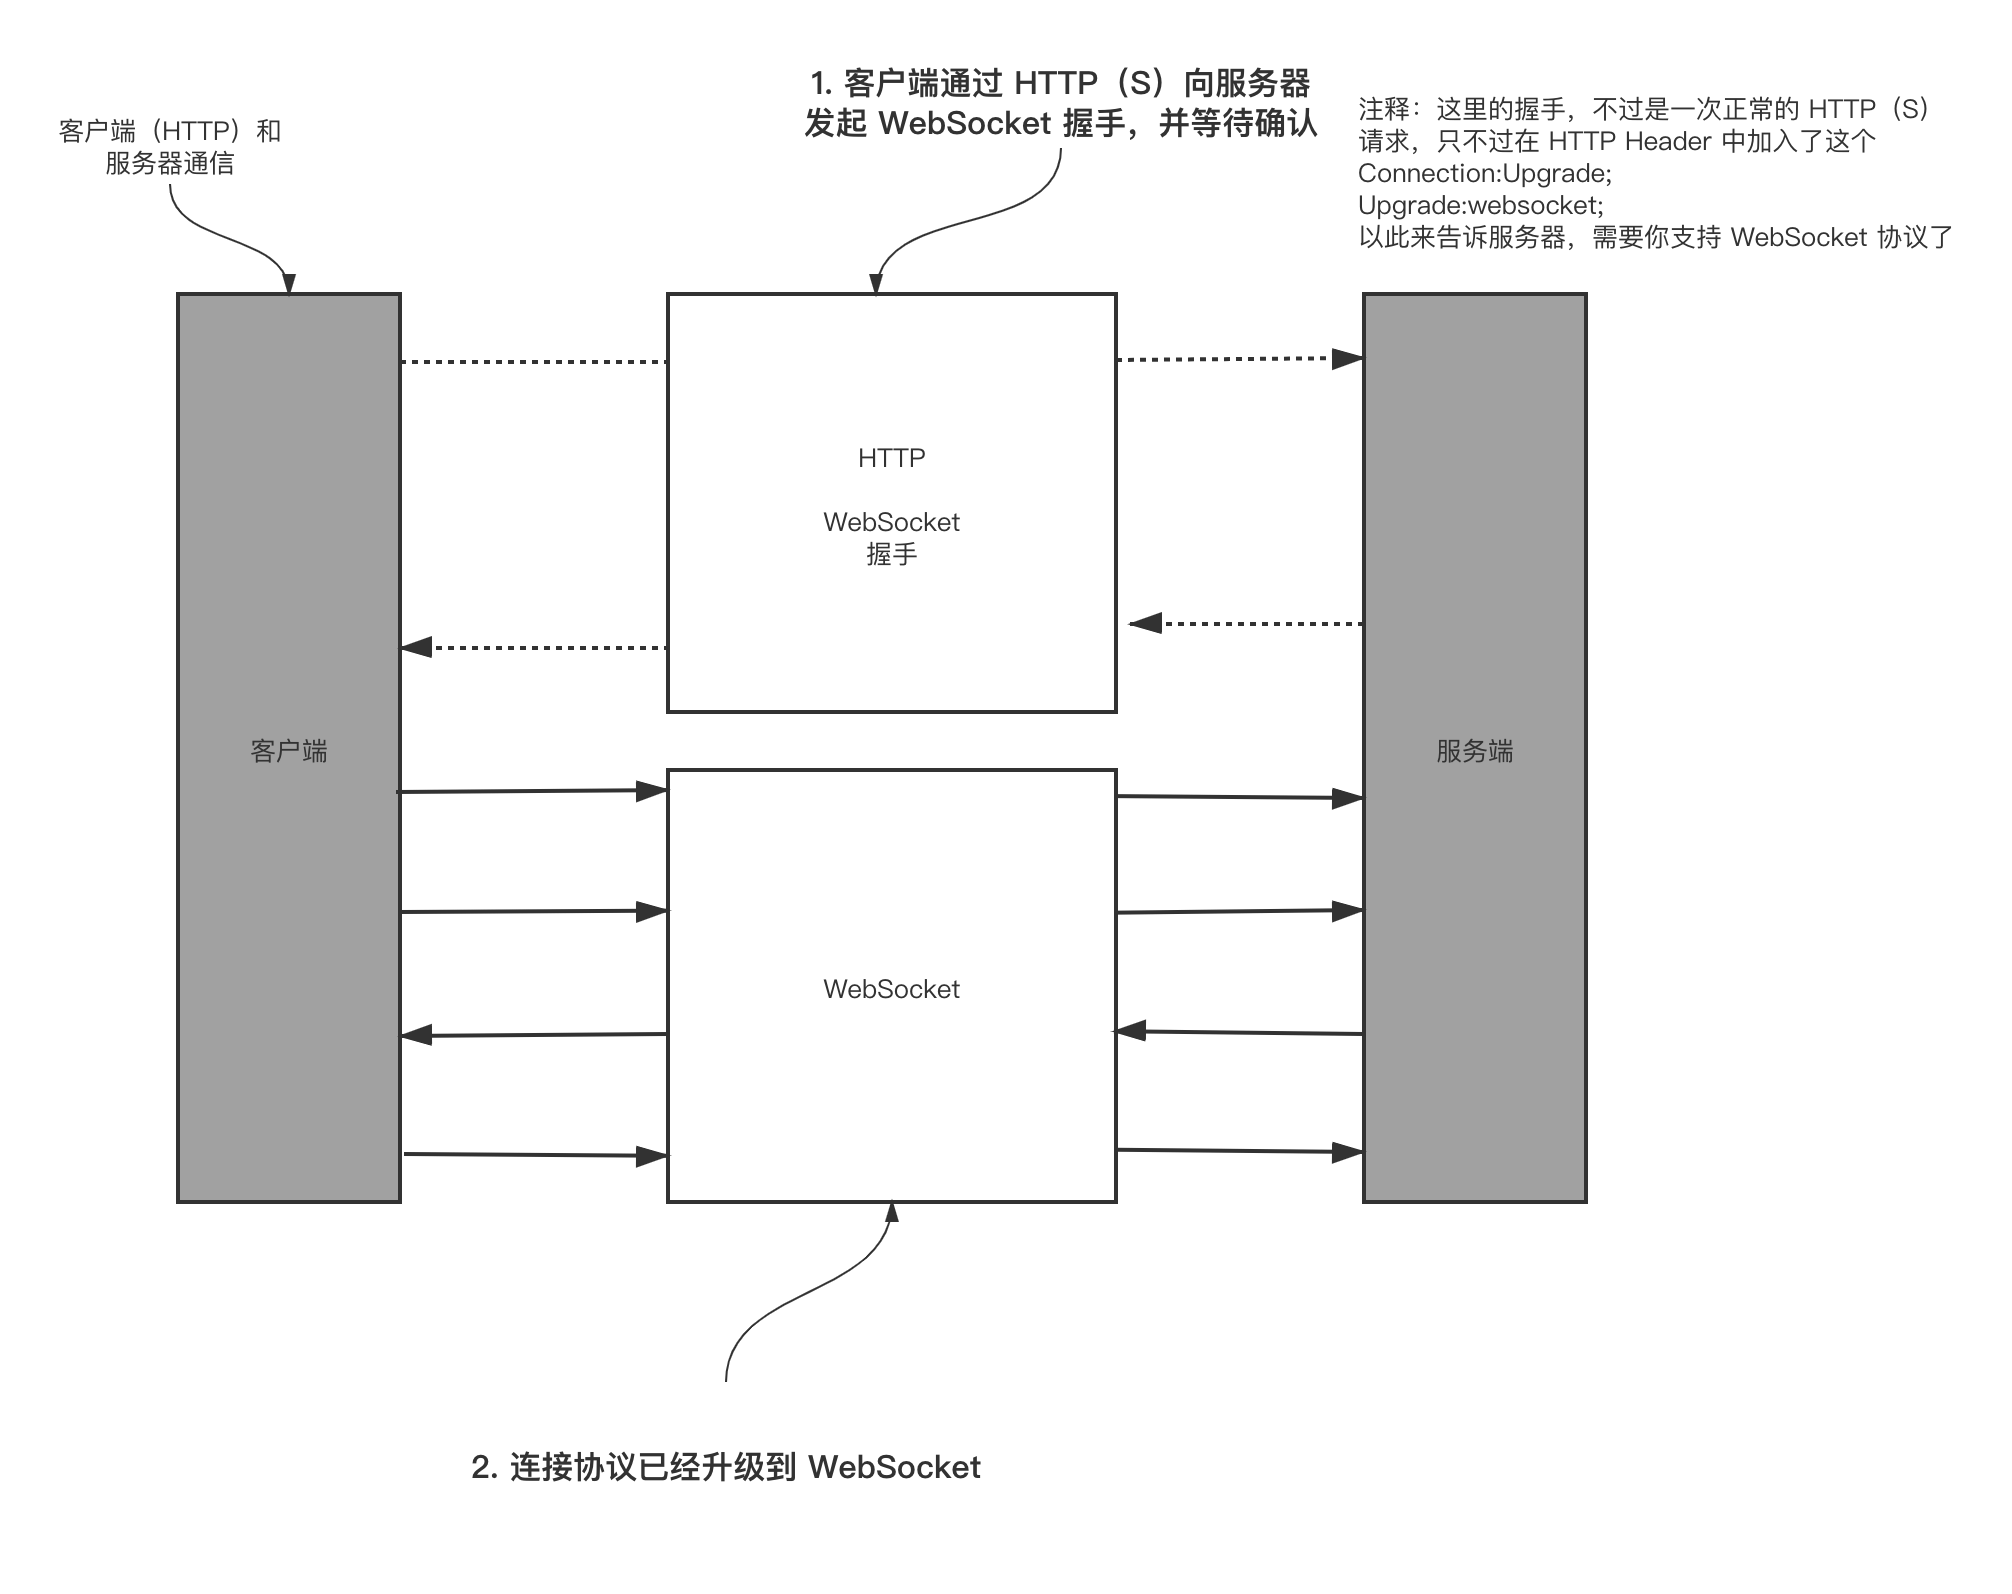
WebSocket 协议简要介绍
技术选型
Spring Boot + WebSocket + MyBatis + Enjoy(类似Jasper、FreeMarker 的模板引擎) + FastJson+ SpringBoot 默认的连接池 Hikari
由于懒的写样式,并且不想用 jQuery,直接用 Vue 加上 ElementUI 用作页面展示。
代码部分
先上代码
·EvaluationServer ·类,作为服务端类存储 Session 信息
@ServerEndpoint("/im/{winNum}")
@Component
@Slf4j
public class EvaluationServer {

    /**
     *  静态变量,用来记录当前在线连接数。应该把它设计成线程安全的。
     * @date 2019/7/3 9:25
    */
    private static int onlineCount = 0;
    /**
     * 与某个客户端的连接会话,需要通过它来给客户端发送数据
     * @date 2019/7/3 9:26
    */
    private Session session;
    /**
     * 使用map对象,便于根据winNum来获取对应的WebSocket
     * @date 2019/7/3 9:26
    */
    private static ConcurrentHashMap<String,EvaluationServer> websocketList = new ConcurrentHashMap<>();
    /**
     *  接收winNum
     * @date 2019/7/3 9:27
    */
    private String winNum="";
    /**
     * 连接建立成功调用的方法*/
    @OnOpen
    public void onOpen(Session session,@PathParam("winNum") String fromWinNum) throws IOException {
        this.session = session;
        if(StringUtils.isEmpty(fromWinNum)){
            log.error("请输入窗口号!!!!!!!!!!!!!!!!");
            return;
        }else{
            try {
                if(websocketList.get(fromWinNum) == null){
                    this.winNum = fromWinNum;
                    websocketList.put(fromWinNum,this);
                    addOnlineCount();           //在线数加1
                    log.info("有新窗口开始监听:{},当前窗口数为{}",fromWinNum,getOnlineCount());
                }else{
                    session.getBasicRemote().sendText("已有相同窗口,请重新输入不同窗口号");
                    CloseReason closeReason = new CloseReason(CloseReason.CloseCodes.NORMAL_CLOSURE,"相同窗口");
                    session.close(closeReason);
                }
            }catch (IOException e){
                e.printStackTrace();
            }
        }
        if(session.isOpen()){
            String jo = JSON.toJSONString(ApiReturnUtil.success());
            session.getBasicRemote().sendText(jo);
        }
    }

    /**
     * 连接关闭调用的方法
     */
    @OnClose
    public void onClose() {
        if(websocketList.get(this.winNum)!=null){
            websocketList.remove(this.winNum);
            subOnlineCount();           //在线数减1
            log.info("有一连接关闭!当前在线窗口为:{}",getOnlineCount());
        }
    }

    /**
     * 收到客户端消息后调用的方法
     *
     * @param message 客户端发送过来的消息*/
    @OnMessage
    public void onMessage(String message, Session session) {
        log.info("收到来自窗口{}的信息:{},会话ID:",winNum,message,session.getId());
        if(StringUtils.isNotBlank(message)){
            //解析发送的报文
            Map<String,Object> map = JSON.parseObject(message, Map.class);
        }
    }

    @OnError
    public void onError(Session session, Throwable error) {
        log.error("发生错误");
        error.printStackTrace();
    }

    /**
     * 服务器指定推送至某个客户端
     * @param message
     * @author 杨逸林
     * @date 2019/7/3 10:02
     * @return void
    */
    private void sendMessage(String message) throws IOException {
        this.session.getBasicRemote().sendText(message);
    }


    /**
     * 发送给指定 浏览器
     * @ param message
     * @param winNum
     * @return void
    */
    public static void sendInfo(String message,@PathParam("winNum") String winNum) throws IOException {
        if(websocketList.get(winNum) == null){
            log.error("没有窗口号!!!!!!!!!");
            return;
        }
        websocketList.forEach((k,v)->{
            try {
                //这里可以设定只推送给这个winNum的,为null则全部推送
                if(winNum==null) {
                    v.sendMessage(message);
                }else if(k.equals(winNum)){
                    log.info("推送消息到窗口:{},推送内容: {}",winNum,message);
                    v.sendMessage(message);
                }
            } catch (IOException e) {
                e.printStackTrace();
                log.info("找不到指定的 WebSocket 客户端:{}",winNum);
            }
        });
    }

    private synchronized int getOnlineCount() {
        return onlineCount;
    }

    private synchronized void addOnlineCount() {
        onlineCount++;
    }

    private synchronized void subOnlineCount() {
        onlineCount--;
    }

    public static synchronized ConcurrentHashMap<String,EvaluationServer> getWebSocketList(){
        return websocketList;
    }
}
IndexController 用于重定向至页面
@Controller
public class IndexController {

    @RequestMapping("/d")
    public ModelAndView index(String u){
        ModelAndView modelAndView = new ModelAndView();
        if(StringUtils.isBlank(u)){
            modelAndView.setViewName("error");
            return modelAndView;
        }
        modelAndView.addObject("winNum",u);
        modelAndView.setViewName("index");
        return modelAndView;
    }
}
GlobalConfig Springboot 配置类
@Configuration
public class GlobalConfig {

    @Value("${server.port}")
    private String port;

    /**
     * 添加Enjoy模版引擎
     * @date 2019-07-10 8:43
     * @return com.jfinal.template.ext.spring.JFinalViewResolver
    */
    @Bean(name = "jfinalViewResolver")
    public JFinalViewResolver getJFinalViewResolver() throws UnknownHostException {
        //获取本地ip,和端口,并将信息拼接设置成context
        String ip = InetAddress.getLocalHost().getHostAddress();
        String localIp = ip+":"+port;
        JFinalViewResolver jfr = new JFinalViewResolver();
        // setDevMode 配置放在最前面
        jfr.setDevMode(true);
        // 使用 ClassPathSourceFactory 从 class path 与 jar 包中加载模板文件
        jfr.setSourceFactory(new ClassPathSourceFactory());
        // 在使用 ClassPathSourceFactory 时要使用 setBaseTemplatePath
        JFinalViewResolver.engine.setBaseTemplatePath("/templates/");
        JFinalViewResolver.engine.addSharedObject("context",localIp);
        jfr.setSuffix(".html");
        jfr.setContentType("text/html;charset=UTF-8");
        jfr.setOrder(0);
        return jfr;
    }

    /**
     * 添加 WebSocket 支持
     * @date 2019/7/3 9:20
     * @return org.springframework.web.socket.server.standard.ServerEndpointExporter
    */
    @Bean
    public ServerEndpointExporter serverEndpointExporter() {
        return new ServerEndpointExporter();
    }

    /**
     * 添加 FastJson 支持
     * @date 2019/7/3 11:16
     * @return org.springframework.boot.autoconfigure.http.HttpMessageConverters
    */
    @Bean
    public HttpMessageConverters fastJsonHttpMessageConverters(){
        //1. 需要定义一个converter转换消息的对象
        FastJsonHttpMessageConverter fasHttpMessageConverter = new FastJsonHttpMessageConverter();

        //2. 添加fastjson的配置信息,比如:是否需要格式化返回的json的数据
        FastJsonConfig fastJsonConfig = new FastJsonConfig();
        fastJsonConfig.setSerializerFeatures(SerializerFeature.PrettyFormat);

        //3. 在converter中添加配置信息
        fasHttpMessageConverter.setFastJsonConfig(fastJsonConfig);
        HttpMessageConverter<?> converter = fasHttpMessageConverter;
        return new HttpMessageConverters(converter);
    }
}
CallEvaluationController 调用的接口类
/**
 *  用于 API 调用
 * 调用评价器的 API 接口
 * @version 1.0
 * @date 2019/7/3 9:34
 **/
@RestController
@RequestMapping("/api")
@Slf4j
public class CallEvaluationController {

    @Autowired
    private UserService userService;

    /**
     * 开始评价接口
     * @param winNum
     * @param userId
     * @return cn.luckyray.evaluation.entity.ApiReturnObject
    */
    @RequestMapping("/startEvaluate")
    public String startEvaluate(String winNum){
        // 验证窗口是否为空
        ConcurrentHashMap<String, EvaluationServer> map = EvaluationServer.getWebSocketList();
        if(map.get(winNum) == null){ return "窗口不存在"}
        String message = "message";
        try {
            EvaluationServer.sendInfo(message,winNum);
        } catch (IOException e) {
            e.printStackTrace();
            log.error("{}窗口不存在,或者客户端已断开",winNum);
            return "窗口不存在或者已经断开连接";
        }
        return "success";
    }
}
Maven配置
<?xml version="1.0" encoding="UTF-8"?>
<project xmlns="http://maven.apache.org/POM/4.0.0" xmlns:xsi="http://www.w3.org/2001/XMLSchema-instance"
	xsi:schemaLocation="http://maven.apache.org/POM/4.0.0 http://maven.apache.org/xsd/maven-4.0.0.xsd">
	<modelVersion>4.0.0</modelVersion>
	<parent>
		<groupId>org.springframework.boot</groupId>
		<artifactId>spring-boot-starter-parent</artifactId>
		<version>2.1.6.RELEASE</version>
		<relativePath/> <!-- lookup parent from repository -->
	</parent>
	<groupId>cn.luckyray</groupId>
	<artifactId>evaluation</artifactId>
	<version>0.0.1-SNAPSHOT</version>
	<packaging>jar</packaging>
	<name>evaluation</name>
	<description>评价功能模块</description>

	<properties>
		<java.version>1.8</java.version>
	</properties>

	<dependencies>
		<dependency>
			<groupId>org.springframework.boot</groupId>
			<artifactId>spring-boot-starter-data-jpa</artifactId>
		</dependency>
		<dependency>
			<groupId>org.springframework.boot</groupId>
			<artifactId>spring-boot-starter-web</artifactId>
		</dependency>

		<dependency>
			<groupId>org.springframework.boot</groupId>
			<artifactId>spring-boot-starter-test</artifactId>
			<scope>test</scope>
		</dependency>
		<dependency>
			<groupId>org.springframework.boot</groupId>
			<artifactId>spring-boot-starter-websocket</artifactId>
		</dependency>
		<dependency>
			<groupId>org.projectlombok</groupId>
			<artifactId>lombok</artifactId>
			<scope>provided</scope>
		</dependency>
        <dependency>
            <groupId>org.apache.commons</groupId>
            <artifactId>commons-lang3</artifactId>
        </dependency>

		<!-- 添加阿里 FastJson 依赖 -->
		<dependency>
			<groupId>com.alibaba</groupId>
			<artifactId>fastjson</artifactId>
			<version>1.2.41</version>
		</dependency>
		<!-- enjoy模板引擎 begin -->
		<dependency>
			<groupId>com.jfinal</groupId>
			<artifactId>enjoy</artifactId>
			<version>3.3</version>
		</dependency>
		<!-- enjoy模板引擎 end -->
		<dependency>
			<groupId>org.mybatis.spring.boot</groupId>
			<artifactId>mybatis-spring-boot-starter</artifactId>
			<version>1.3.2</version>
		</dependency>
		<dependency>
			<groupId>mysql</groupId>
			<artifactId>mysql-connector-java</artifactId>
			<scope>runtime</scope>
		</dependency>
		<!-- spring-boot-devtools热启动依赖包 start-->
		<dependency>
			<groupId>org.springframework.boot</groupId>
			<artifactId>spring-boot-devtools</artifactId>
			<optional>true</optional>
		</dependency>
		<!-- spring-boot-devtools热启动依赖包 end-->

	</dependencies>

	<build>
		<plugins>
			<plugin>
				<groupId>org.springframework.boot</groupId>
				<artifactId>spring-boot-maven-plugin</artifactId>
				<configuration>
					<mainClass>cn.luckyray.evaluation.EvaluationApplication</mainClass>
				</configuration>
			</plugin>
		</plugins>
	</build>

</project>
index.html页面,这里采用了可重连的WebSocket,防止客户端中途断网导致需要刷新页面才能重新连接。(这里的#()里面的内容为Enjoy模板引擎渲染内容)
<!DOCTYPE html>
<html>

<head>
    <meta charset='utf-8'>
    <meta http-equiv='X-UA-Compatible' content='IE=edge'>
    <title>评价页面</title>
    <meta name='viewport' content='width=device-width, initial-scale=1'>
    <!-- element-ui.css -->
    <link rel="stylesheet" href="../css/index.css">

</head>

<body>
    <div id="app">
        <el-row>
            <el-button v-on:click="click(1)" type="success" style="font-size:50px;font-family:微软雅黑;height: 570px;width: 410px" disabled>满意</el-button>
            <el-button v-on:click="click(2)" type="primary" style="font-size:50px;font-family:微软雅黑;height: 570px;width: 410px" disabled>一般</el-button>
            <el-button v-on:click="click(3)" type="danger" style="font-size:50px;font-family:微软雅黑;height: 570px;width: 410px" disabled>不满意</el-button>
        </el-row>
    </div>
</body>

<script src="../js/reconnecting-websocket.min.js"></script>
<script src="../js/vue.js"></script>
<!-- element-ui.js -->
<script src="../js/index.js"></script>
<script>
    var socket;
    if (typeof(WebSocket) == "undefined") {
        console.log("您的浏览器不支持WebSocket");
    } else {
        //实现化WebSocket对象,指定要连接的服务器地址与端口  建立连接
        let socketUrl = "ws://#(context)/im/#(winNum)";
        socket = new ReconnectingWebSocket(socketUrl, null, {
            debug: false,
            reconnectInterval: 3000
        });
        console.log("创建websocket");
        //打开事件
        socket.onopen = function() {
            console.log("websocket客户端已打开");
        };
        //获得消息事件
        socket.onmessage = function(msg) {
            if(msg.data != undefined && msg.data.indexOf("已有相同窗口") != -1){
                alert("已有相同窗口,请重新输入正确窗口号");
                socket.close();
                window.history.back(-1);
                return;
            }
            try{
                let data = JSON.parse(msg.data);
                console.log(data);
                if (data.code == "0" && data.data != undefined && data.data.active == "startEvaluate") {
                    userId = data.data.userId;
                    serialNum = data.data.serialNum;
                    speak();
                    app.allowClick();
                    setTimeout(app.allDisabled,10000);
                }
            }catch (e) {
                console.log(e);
            }

            //发现消息进入开始处理前端触发逻辑
        };
        //关闭事件
        socket.onclose = function() {
            //console.log("websocket已关闭,正在尝试重新连接");
        };
        //发生了错误事件
        socket.onerror = function() {
            //console.log("websocket已关闭,正在尝试重新连接");
        }
        //监听窗口关闭事件,当窗口关闭时,主动去关闭websocket连接,防止连接还没断开就关闭窗口,server端会抛异常。
        window.onbeforeunload = function() {
            socket.close();
        }
    }
    //fullScreen()和exitScreen()有多种实现方式,此处只使用了其中一种
    //全屏
    function fullScreen() {
        var docElm = document.documentElement;
        docElm.webkitRequestFullScreen( Element.ALLOW_KEYBOARD_INPUT );
    }
    var app = new Vue({
        el: '#app',
        data: function() {

        },
        methods: {
            click: function(evaluation) {
                console.log(evaluation);
                let data = {
                    evaluation : evaluation,
                }
                let jsonData = JSON.stringify(data);
                console.log(jsonData);
                socket.send(jsonData);
                let childrens = app.$children[0].$children;
                for (let children of childrens) {
                    children.disabled = true;
                }
            },
            allowClick: function() {
                let childrens = app.$children[0].$children;
                for (let children of childrens) {
                    children.disabled = false;
                }
            },
            allDisabled:function () {
                let childrens = app.$children[0].$children;
                for (let children of childrens) {
                    children.disabled = true;
                }
            }
        },
    });
</script>
</html>
具体代码
下载完代码,启动项目,输入 8080 端口,你就知道这个怎么操作了。以及接口调用,稍微看看代码就 OK 了。
最主要的东西就是这些,尤其是 index.html 上的内容。《Netty实战》中只说了如何建立服务端,并没有说明客户端如何建立。
下面代码才是重点,WebSocket 采用 ws 协议,其实是第一次发送 http 请求,在 http 请求头部中 为Connection:Upgrade,Upgrade:websocket 通知服务器将 http 请求升级为 ws/wss 协议。下面的也可以改成 socket = new WebSocket(url,protocols)。其中 url 必填,protocols 可选参数,参数为 string | string[] ,其中 string 为可使用的协议,包括 SMPP,SOAP 或者自定义的协议。
有关 ws 与 wss 其实是与 http 与 https 关系类似,只是在 TCP 协议内,ws 协议外套了一层 TLS 协议,进行了加密处理。
// 这里的 #(context) 属于模版引擎渲染内容
let socketUrl = "ws://#(context)/im/#(winNum)";
socket = new ReconnectingWebSocket(socketUrl, null, {
            debug: false,
            reconnectInterval: 3000
        });
WebSocket的四个事件、两个方法、两个属性
四个事件
- open
- message
- error
- close
下面为对应的 ts 文件
可以看到有四个方法需要我们实现,对应着四个事件。下面详细介绍
onclose
onerror
onmessage
onopen
interface WebSocket extends EventTarget {
    binaryType: BinaryType;
    readonly bufferedAmount: number;
    readonly extensions: string;
    onclose: ((this: WebSocket, ev: CloseEvent) => any) | null;
    onerror: ((this: WebSocket, ev: Event) => any) | null;
    onmessage: ((this: WebSocket, ev: MessageEvent) => any) | null;
    onopen: ((this: WebSocket, ev: Event) => any) | null;
    readonly protocol: string;
    readonly readyState: number;
    readonly url: string;
    close(code?: number, reason?: string): void;
    send(data: string | ArrayBuffer | Blob | ArrayBufferView): void;
    readonly CLOSED: number;
    readonly CLOSING: number;
    readonly CONNECTING: number;
    readonly OPEN: number;
    addEventListener<K extends keyof WebSocketEventMap>(type: K, listener: (this: WebSocket, ev: WebSocketEventMap[K]) => any, options?: boolean | AddEventListenerOptions): void;
    addEventListener(type: string, listener: EventListenerOrEventListenerObject, options?: boolean | AddEventListenerOptions): void;
    removeEventListener<K extends keyof WebSocketEventMap>(type: K, listener: (this: WebSocket, ev: WebSocketEventMap[K]) => any, options?: boolean | EventListenerOptions): void;
    removeEventListener(type: string, listener: EventListenerOrEventListenerObject, options?: boolean | EventListenerOptions): void;
}
open
一旦服务器响应了 WebSocket 连接请求,open 事件触发并建立一个连接。open 事件对应的回调函数称作 onopen
message
message 事件在接收到消息时触发,对应该事件的回调函数为 onmessage。除了文本,WebSocket还可以处理二进制数据,这种数据作为 Blob 消息或者 ArrayBuffer 消息处理。必须在读取数据之前决定用于客户端二进制输入数据的类型。其中返回的 e ,e.data 为服务端返回的消息,其余属性为 websocket 返回的附带信息。
ws.binaryType="Blob";
ws.onmessage = function(e){
    if(e.data instanceof Blob){
        var blob = new Blob(e.data);
    }
}
error
在响应意外故障的时候触发,最错误还会导致 WebSocket 关闭,一般伴随的是 close 事件。error 事件处理程序是调用服务器重连逻辑以及处理来自 WebSocket 对象的异常的最佳场所。
close
close 事件在 WebSocket 连接关闭时触发。一旦连接关闭,双端皆无法通信。
两个属性
1. readyState
ws.readyState === 0;// 就绪
ws.readyState === 1;// 已连接
ws.readyState === 2;// 正在关闭
ws.readyState === 3;// 已关闭
2. bufferAmount
该属性的缘由是因为 WebSocket 向服务端传递信息时,是有一个缓冲队列的,该参数可以限制客户端向服务端发送数据的速率,从而避免网络饱和。具体代码如下
// 10k max buffer size.
const THRESHOLD = 10240;

// Create a New WebSocket connection
let ws = new WebSocket("ws://w3mentor.com");

// Listen for the opening event
ws.onopen = function () {
   // Attempt to send update every second.
   setInterval( function() {
      // Send only if the buffer is not full
      if (ws.bufferedAmount < THRESHOLD) {
         ws.send(getApplicationState());
      }
   }, 1000);
};
两个方法
send
必须要在 open 事件触发之后才可以发送消息。除了文本消息之外,还允许发送二进制数据。代码如下。
文本
let data = "data";
if(ws.readyState == WebSocket.OPEN){
    ws.send(data);
}
二进制数据
let blob = new Blob("blob");
ws.send(blob);
let a = new Unit8Array([1,2,3,4,5,6]);
ws.send(a.buffer);
close
关闭连接用,可以加两个参数 close(code,reason),与客户端对应,code为状态码,1000 这种,reason 为字符串 “关闭连接原因”
具体的使用,在 github 直接下载下来就可以用了。
再发一遍地址
具体代码
希望我的文章能帮你稍微了解 WebSocket 的原理,如果要深入掌握,建议看书(我这就是看完了《HTML 5 WebSocket 权威指南》来写的)以及视频。其实和 Socket 有点像而已,知道 Socket 理解 WebSocket 是比较轻松的。

 浙公网安备 33010602011771号