IIS7.5 Tomcat6集成jk
注意要点:
1)将系统IUSR用户能够对jk工作目录拥有完全权限。
2)调试过程中,要反复启动 IIS服务,IIS对jk似乎并不能做到不启动就支持。
3)要想使ISAPI中配置的绿色箭头变绿,必须配置好,用浏览器访问下站点,否则不会绿,这一点,设置时不要急躁.
4)IIS 下不同虚拟主机网站如果都支持jk的话,要为每个虚拟主机建立同名的jk虚拟目录.这样这些jk公用一个目录,一个workers.properties 和一个urlmapping.properties.在urlmapping.properties里针对每个virtual sites可以这样写,做到为每个sites分配不同的AJP.
/www.site1.com/*.jsp tomcat1
/www.site2.com/*.jsp tomcat2
/www.site3.com/*.jsp tomcat3
这样,jk实例tomcat1,tomcat2,tomcat3不是在作load balance,只是简单地dispatch.
完整设置文件的下载压缩包: iis7.5-jk.zip
----------
How to Configure IIS 7 and Tomcat Redirection on Windows Server 2008 (64 Bit)
Posted by Ashraf on September 20, 2010
Objective: To provide a Secure Server Environment and Running non IIS compatible extensions like jsp in IIS Web server.
Check Before you Start:
JDK 1.6
IIS 7.5
Tomcat 6.0.18
Isapi_redirect.dll (64bit) version 1.2.28
Steps to follow:
Install Jdk 6
Download and install JDK 6 with its default setup options.
Now, go to Computer>Properties>Advanced System Settings>Advanced Tab>Environment Variables
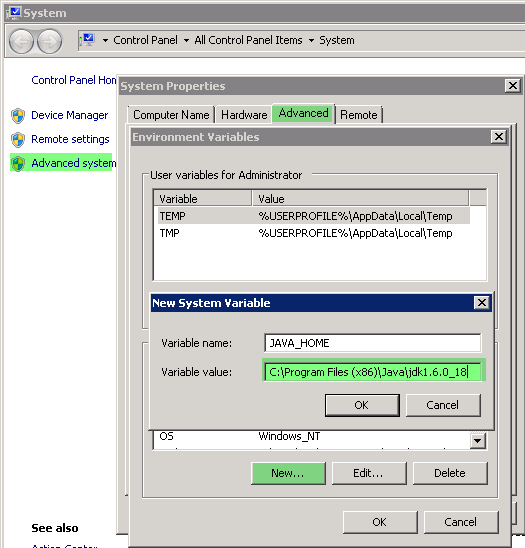
Set System Variables (JAVA_HOME and CATALINA_HOME)
Click New, enter name as JAVA_HOME and your jdk installation path as variable value; click OK.
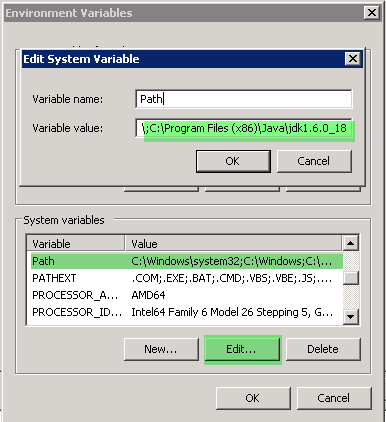
Select PATH and click Edit. Add the java installation path after the current value with a semicolon (;). Click OK, when done.
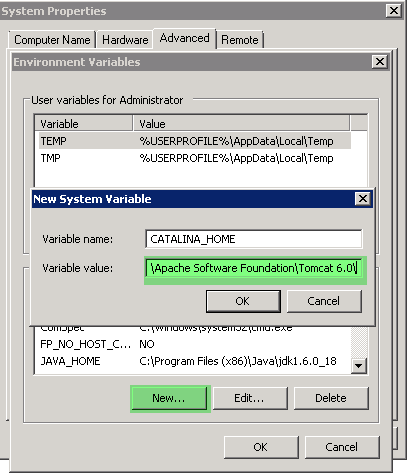
Click New, enter name as CATALINA_HOME and your Tomcat installation path as variable value; click OK.
Install Tomcat 6.0.18
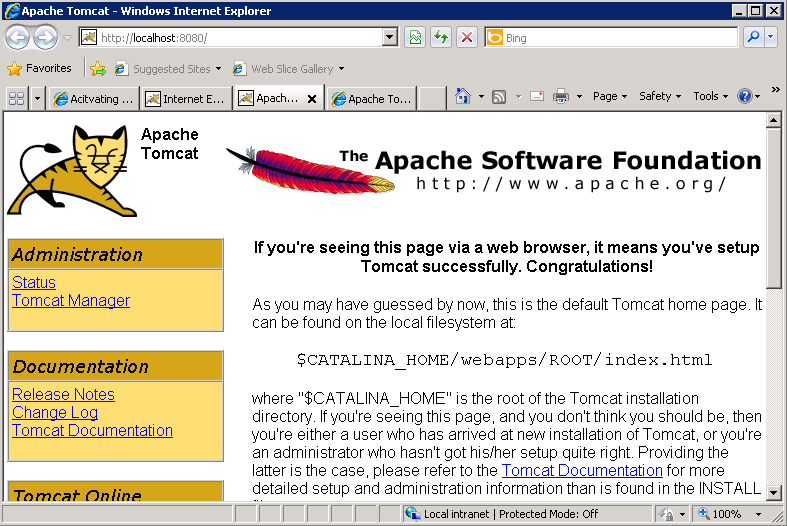
Install Tomcat with default settings and test running the URL as http://localhost:8080
Tomcat setup is working on port 8080.
Setting up Registry value
1. Download the isapi_redirect.dll from the Tomcat site for Windows Server 2008 R2 64 bit from the following URL.
http://www.apache.org/dist/tomcat/tomcat-connectors/jk/binaries/win64/jk-1.2.28/amd64/
2. Rename the isapi_redirect-1.2.28.dll to isapi_redirect.dll
3. Copy the isapi_redirect.dll to C:\Program Files (x86)\Apache Software Foundation\Tomcat 6.0\bin\
4. Run Regedit as Administrator
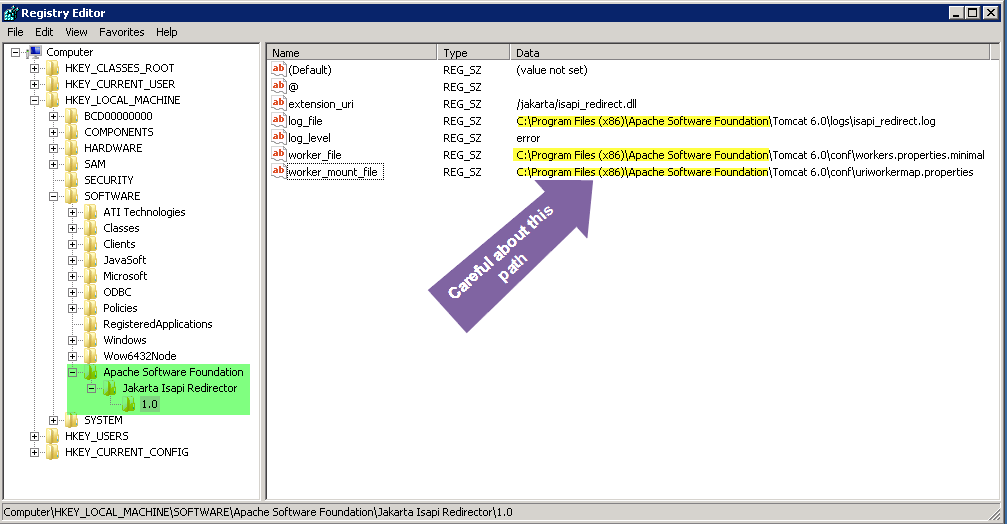
Find the key [HKEY_LOCAL_MACHINE\SOFTWARE\Apache Software Foundation\
Make one new key entry as “Jakarta Isapi Redirector” then another new
key entry name “1.0” then under that make 6 new string values.
NOTE: If “Apache Software
Foundation” folder does not exist in the hierarchy mention here then
create the path manually. So, the hierarchy will resemble the
following.
[HKEY_LOCAL_MACHINE\SOFTWARE\Apache Software Foundation\Jakarta Isapi Redirector\1.0]
Registry Key and Value
@=
extension_uri = /jakarta/isapi_redirect.dll
log_file = C:\Program Files (x86)\Apache Software Foundation\Tomcat 6.0\logs\isapi_redirect.log
log_level = error
worker_file = C:\Program Files (x86)\Apache Software Foundation\Tomcat 6.0\conf\workers.properties.minimal
worker_mount_file = C:\Program Files (x86)\Apache Software Foundation\Tomcat 6.0\conf\uriworkermap.properties
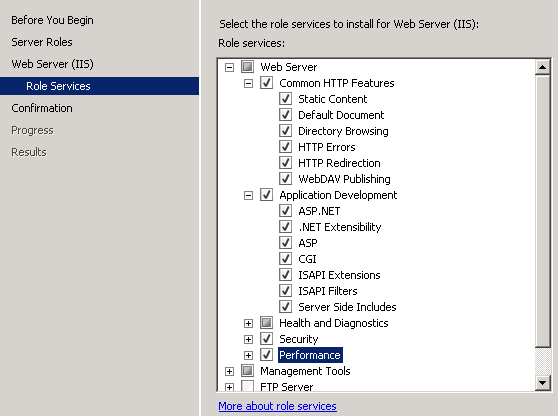
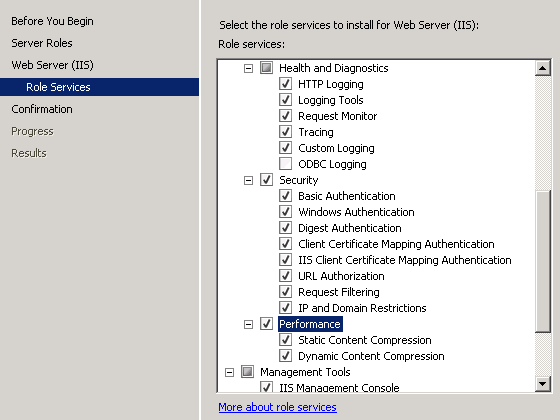
Install and Configure IIS Role
1. Add iis role
Click Next and Finish the installation.
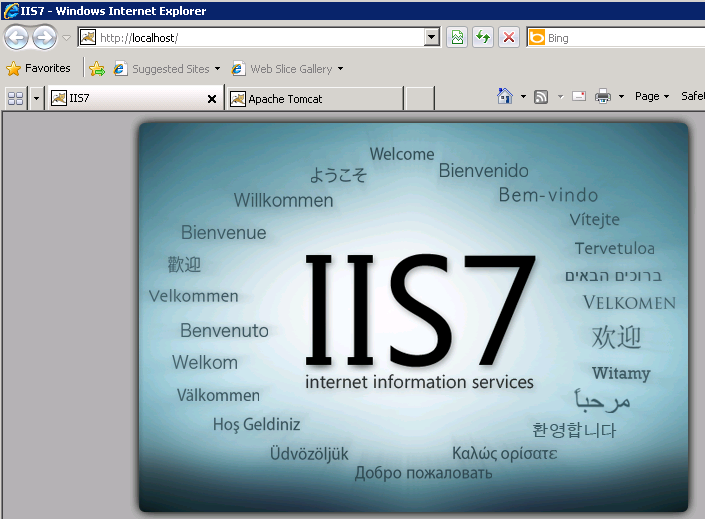
You can check wheter the iis works or not by addressing your browser to http://localhost.
Now the IIS works fine, we will go to the next steps.
2. Setup isapi & cgi restriction at iis server
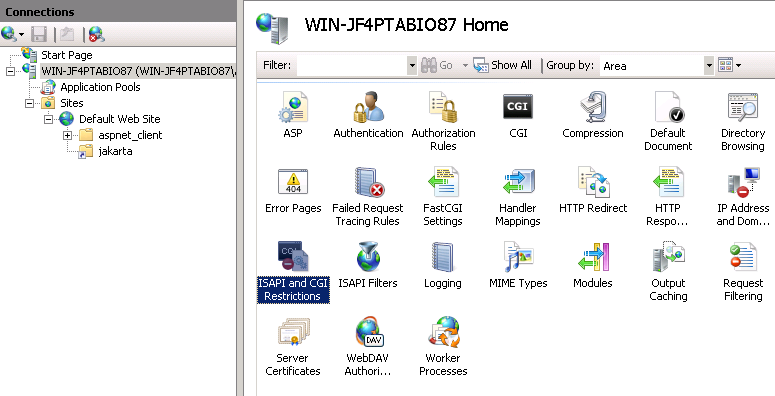
A. Open IIS Manager and Select Your Server
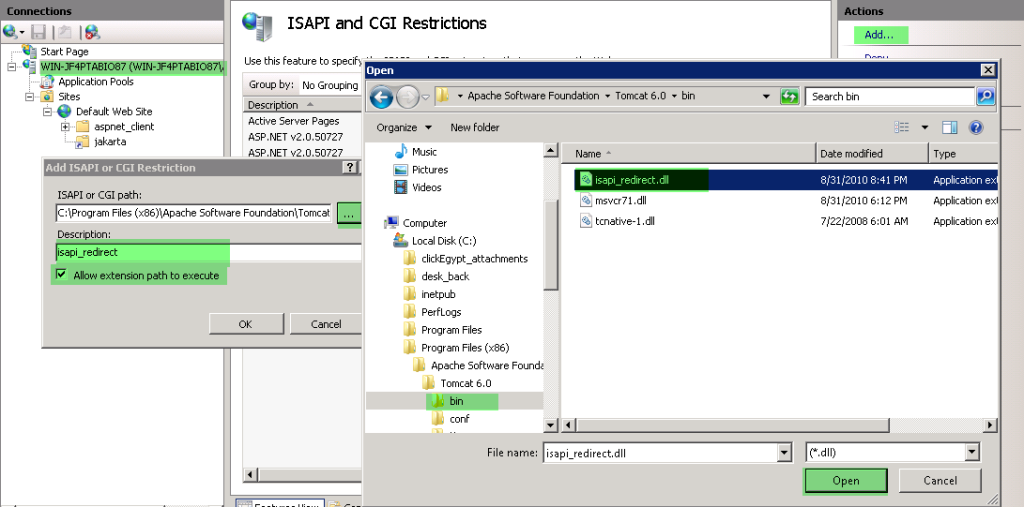
B. From the features view open ISAPI and CGI Restrictions, Click Add from the Actions bar
C. For ISAPI or CGI Path click the … Button and choose your isapi_redirect.dll file at your tomcat installation folder (C:\Program Files (x86)\Apache Software Foundation\Tomcat 6.0\bin\).
D. In the Description Field write “isapi_redirect”
E. Tick the Allow extension path to execute and click OK.
3. Enable isapi filters at iis default website
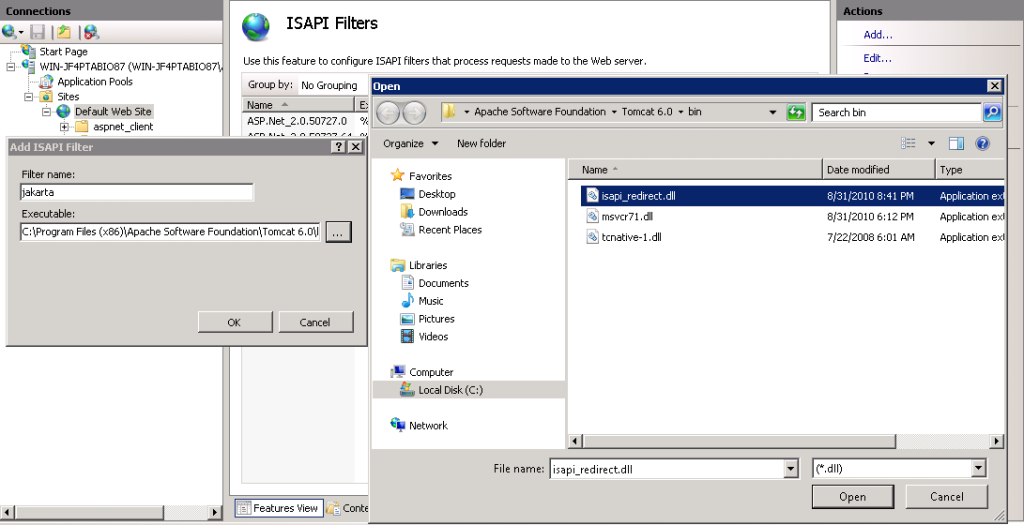
F. Select Default Website and double click ISAPI Filters to open it. Click Add
G. Enter “jakarta” in the filter name And click …Button to to select the isapi_redirect.dll.
H. Click open to select the dll and Ok to close the window when done.
4. Creating Virtual directory and handler mappings
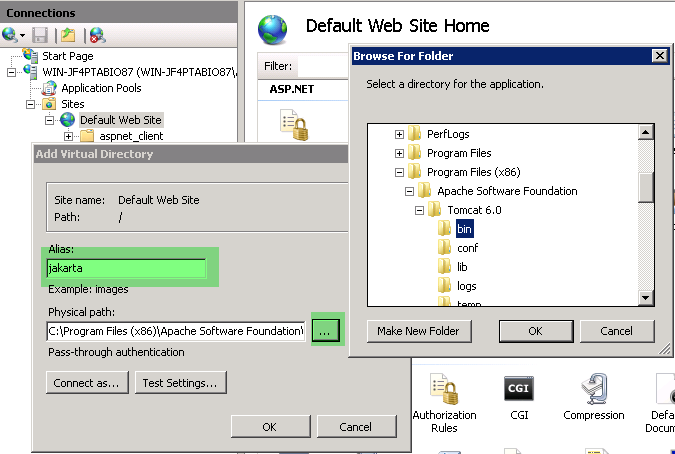
I. Right click to the Default website and choose Add Virtual Directory…
J. Enter “jakarta” in the Alias field and choose the path of the “isapi_redirect.dll” file (C:\Program Files (x86)\Apache Software Foundation\Tomcat 6.0\bin\) as Physical path.
K. Click ok when done.
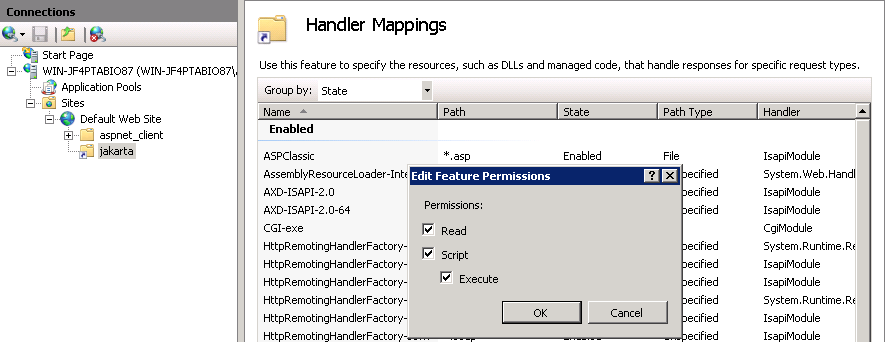
L. Now, Open Handler mappings by selecting the virtual directory “Jakarta”.
M. Select Edit Feature Permission from the Actions bar and Check All (Read, Script, and Execute) and click OK.
Creating properties file
Now create two properties FILE AS follows:
1. Create a file named “workers.properties.minimal” in the “conf”
folder which you can find in the tomcat installation folder.
2. Insert the following lines into this file:
worker.list = worker1
worker.worker1.host=localhost
worker.worker1.port=8009
worker.worker1.type=ajp13
3. Create another file named “uriworkermap.properties” in the same directory. Insert this line and save.
/*=worker1
Test and Run
4. Restart the Tomcat Service and the IIS Web-Server
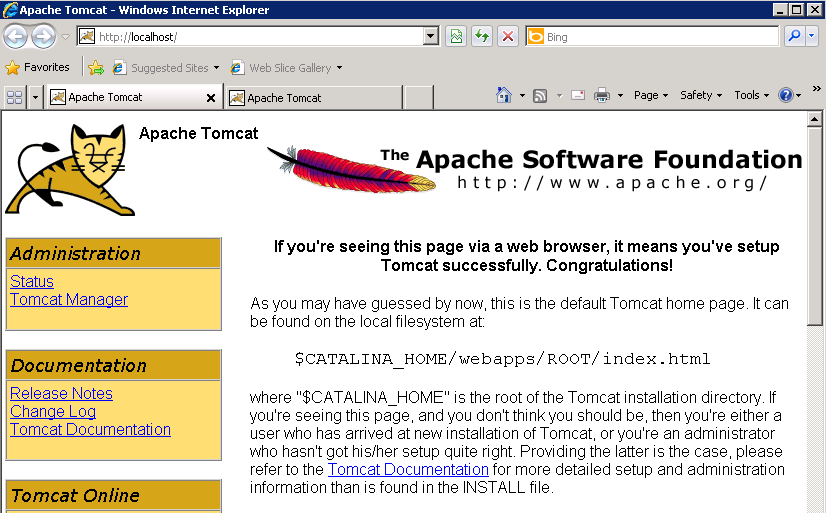
5. Test the configuration by trying to access the iis site(http://localhost), if you get Tomcat site then you are done successfully.


