02 . 前端之CSS
CSS简介
CSS是Cascading Style Sheets(级联样式表)的缩写,也叫层叠样式表。定义如何显示HTML元素。
CSS是一种样式表语言,用于为HTML文档定义布局。例如,CSS涉及字体、颜色、边距、高度、宽度、背景图像、高级定位等方面。当浏览器读到一个样式表,他就会按照这个样式表来进行文档如何进行格式化(渲染)。
CSS语法
CSS实例
每个CSS样式由两个组成部分:选择器和声明。声明又包括属性和属性值。每个声明之后用分号结束。

CSS注释
/*这是注释*/
# 注释是代码之母
CSS的几种引入方式
行内样式
行内式是在标记的style属性中设定CSS样式,不推荐大规模使用.
<p styple="color: red">Hello world.</p>
内部样式
<!-- 嵌入式是将CSS样式集中写在网页的标签对的标签对中。格式如下.   -->
<!DOCTYPE html>
<html lang="en">
<head>
    <meta charset="UTF-8">
    <title>Title</title>
    <style>
        #i1 {
            background-color: #007fff;
            height: 46px;
        }
    </style>
</head>
<body>
<div id="i1">2</div>
<div>3</div>
</body>
</html>
外部样式
外部样式就是讲css写在一个单独的文件中,一般以.css结尾,就叫css文件,然后在html页面进行引入即可,推荐使用此方式:
<link href="mystyle.css" rel="stylesheet" type="textcss"/>
Example
/* commons.css */
.c1 {
background: red;
color: white;
}
.c2 {
 font-size: 40px;
 color: black;
}
stylesheet,href引入该css文件
<!DOCTYPE html>
<html lang="en">
<head>
    <meta charset="UTF-8">
    <title>Title</title>
    <link rel="stylesheet" href="commons.css">
</head>
<body>
<div class="c1 c2" style="color: pink;">youmen</div>
</body>
</html>
CSS选择器
# css指层叠样式表
# css样式表极大地提高了工作效率
ID选择器
id选择器可以为标有id的HTML元素指定特定的样式.
id选择器以"#" 来定义
目前比较常用的方式是id选择器常常用于建立派生选择器
<!DOCTYPE html>
<html lang="en">
<head>
    <meta charset="UTF-8">
    <title>Title</title>
    <style>
        #divid {
            background-color: #2459a2;
            height: 48px;
        }

        #pid a {
            /*  只给i1下的a标签设置指定样式  */
            background-color: lavender;
        }
    </style>
</head>
<body>
<p id="pid">hello css<a href="http://www.baidu.com">百度一下</a></p>

<div id="divid">这是一个div</div>
</body>
</html>
Class选择器
类选择器以一个点显示
类选择器也可作派生选择器
Example1
<!DOCTYPE html>
<html lang="en">
<head>
    <meta charset="UTF-8">
    <title>Title</title>
    <style>
        .pclass a {
            color: red;
        }

        .divclass {
            color: deepskyblue;
        }
    </style>
</head>
<body>
<p class="pclass">这是一个class选择器<a href="http://www.baidu.com">百度一下</a></p>

<div class="divclass">这是第二个class选择器</div>
</body>
</html>

.名称{
...
}
<标签 class=‘名称’></标签>
Example2
<!DOCTYPE html>
<html lang="en">
<head>
    <meta charset="UTF-8">
    <title>Title</title>
    <style>
        span div {
            background-color: black;
            color: white;
        }
    </style>
</head>
<body>
<span class="c1">32143214
 <div id="c2">dafadsf</div>
 </span>
</body>
</html>
<!-- 让span只用span里面的样式.   -->
伪类选择器
<!DOCTYPE html>
<html lang="en">
<head>
    <meta charset="UTF-8">
    <title>Title</title>
    <style>
        <!--
        来访问链接

        -->
        a:link {
            color: green;
        }

        /* 已访问链接 */
        a:visited {
            color: yellow;
        }

        /*    鼠标悬浮*/
        a:hover {
            color: #7fb8f7;
        }

        /* 点击a标签颜色   */
        a:active {
            color: aqua;
        }

        div {
            background-color: red;
            height: 100px;
            width: 100px;
        }

        /* 鼠标悬浮在div标签上的颜色 */
        div:hover {
            background-color: darkorchid;
        }

        /*  input输入框获取聚焦点样式  */
        input:focus {
            background-color: #eee;
        }
    </style>
</head>
<body>
<a href="https://www.baidu.com">京东</a>
<div>YouMen</div>
<input type="text">
</body>
</html>
标签选择器
div {
	...
}
<!-- 所有div设置上此样式 -->
层级选择器
.c1 .c2 div {

}
组合选择器
<!DOCTYPE html>
<html lang="en">
<head>
    <meta charset="UTF-8">
    <title>Title</title>
    <style>
        .i1, .i2, .i3 {
            background: red;
            color: black;
        }
    </style>
</head>
<body>
<div class="i1">1</div>
<div class="i2">2</div>
<div class="i3">3</div>
</body>
</html>
属性选择器
在IE6及更低版本不支持
对带有指定属性的HTML元素设置样式
根据具体属性值选择,除了选择拥有某些的元素,还可以进一步缩小选择范围,只选择特定属性值的元素.
属性和属性值必须完全匹配
根据部分属性值选择
<!DOCTYPE html>
<html lang="en">
<head>
    <meta charset="UTF-8">
    <title>Title</title>
    <style>
        [title] {
            color: deepskyblue;
        }

        [title=te] {
            color: red;
        }
    </style>
</head>
<body>
<p title="t">属性选择器</p>
<p title="te">属性选择器二</p>
</body>
</html>
<!DOCTYPE html>
<html lang="en">
<head>
    <meta charset="UTF-8">
    <title>Title</title>
    <style>
        input[type="text"] {
            width: 100px;
            height: 200px;
        }
    </style>
</head>
<body>
<input type="text">
<input type="password">
</body>
</html>
伪元素选择器
<!DOCTYPE html>
<html lang="en">
<head>
    <meta charset="UTF-8">
    <title>Title</title>
    <style>
        <!--
        首字母大写-- >
        div:first-letter {
            color: red;
            font-size: 20px;
        }

        /*content里面内容无法选中*/
        p:before {
            content: '?';
            color: green;
            font-size: 150px;
        }

        p:after {
            content: '大傻逼';
            color: pink;
        }
    </style>
</head>
<body>
<div>我是YouMen</div>
<p>ZHOU</p>
</body>
</html>
选择器优先级
# 标签上style优先,编写顺序,就近原则.
# 选择器之间的优先级
id > 属性 > 类 > 标签
# 但是可以使用limportant指定某一类优先级最高
# 相同类型的优先级: 就近原则,即谁在最后谁生效
类选择器和ID选择器区别
# ID选择器只能在文档中使用一次,而类可以多次使用
# ID选择器不能结合使用
# 当使用js时候,需要用到id
css的继承
css重用
<style>
 .c1{
 共有
 }
 .c2{
 独有
 }
 .c3{
 独有
 }
</style>
<div class='c1 c2'></div>
自适应/改变大小变形
CSS属性
背景色
<!DOCTYPE html>
<html lang="en">
<head>
    <meta charset="UTF-8">
    <title>Title</title>
    <style>
        body {
            background: darkgray;
        }

        p {
            width: 150px;
            height: 150px;
            background-color: #eeeeee;
        }
    </style>
</head>
<body>
<div class="backcolor">1234</div>
<p class="p">YouMen</p>

</body>
</html>
背景图片
<!DOCTYPE html>
<html lang="en">
<head>
    <meta charset="UTF-8">
    <title>Title</title>
    <style>
        body {
            background-image: url("1.jpg");
            background-repeat: no-repeat;
            height: 200px;
            width: 200px;
            /*   不允许图片重复*/

            /* 图片居中,从上到下显示图片 */
            background-position: center top;
        }

        p{
            background-image: url("1.jpg");
            height: 200px;
            background-attachment: fixed;
            /* 就是这个属性,让你的背景图片固定住的意思,attachment是附属、依附的意思 */
        }

    </style>
</head>
<body>
<p>测试一下背景是否可以继承</p>
</body>

<!--
 背景重复
 repeat(默认):背景图片沿着x轴和y轴重复平铺,铺满整个包裹它的标签
 repeat-x:背景图片只在水平方向上平铺
 repeat-y:背景图片只在垂直方向上平铺
 no-repeat:背景图片不平铺
-->

</html>
文本颜色和文本对齐
<!DOCTYPE html>
<html lang="en">
<head>
    <meta charset="UTF-8">
    <title>Title</title>
    <style>
        body {
            color: aqua;
        }

        /*p{*/
        /*    color: red;*/
        /*    text-align: center;*/
        /*    !* 居中,right靠右 *!*/
        /*}*/


        /*缩进,也可以按百分比缩进*/
        h1 {
            text-indent: -2em;
            padding-left: 2em;
        }

        p {
            padding-left: 1em;
        }
    </style>
</head>
<body>
<!--    <p>查看颜色</p>-->
<!--    <h1>标题查看颜色</h1>-->
<!--    <p>hello </p>-->

<div>
    <h1>静夜思</h1>
    <p>窗前明月光,</p>
    <p>疑是地上霜.</p>
    <p>举头望明月,</p>
    <p>低头思故乡.</p>
</div>
</body>
</html>
文本对齐
text-align 属性规定元素中的文本的水平对齐方式。(letter-spacing)
| 值 | 描述 |
|---|---|
| left | 左边对齐 默认值 |
| right | 右对齐 |
| center | 居中对齐 |
| justify | 两端对齐 |
文字装饰
text-decoration 属性用来给文字添加特殊效果
| 值 | 描述 |
|---|---|
| none | 默认。定义标准的文本。 |
| underline | 定义文本下的一条线。 |
| overline | 定义文本上的一条线。 |
| line-through | 定义穿过文本下的一条线。 |
| inherit | 继承父元素的text-decoration属性的值。 |
文本字母大小写转换和阴影、换行
<!DOCTYPE html>
<html lang="en">
<head>
    <meta charset="UTF-8">
    <title>Title</title>
    <style>
        .p1 {
            text-transform: capitalize;
            /* 单词首字母大写 */
        }

        .p2 {
            text-transform: lowercase;
            /* 将字母全部变成小写 */
        }

        .p3 {
            text-transform: uppercase;
            /* 将字母变成大写 */
        }

        p {
            text-shadow: 5px 100px 2px #7e55ff;
            /* 字体背影,第一个值: 因为有前景,背景,背景距左的一个距离 */
            /* 第二个值: 距离上方的距离 */
            /* 第三个值: 清晰度 */
            /* 第四个值: 背景颜色 */

            text-wrap: normal;
            /*width: 50px;*/
            /* 换行规则,如果是英文可能为了单词不被拆开可能多一点点少一点点 */
        }
    </style>
</head>
<body>
<p class="p1">this IS my WEB paGe</p>
<p class="p2">this IS my WEB paGe</p>
<p class="p3">this IS my WEB paGe</p>
<p>sdaffffffaddddddddddddddddddsdfaassffffffdssssssssssss</p>
</body>
</html>
字体
CSS字体属性定义文本的字体系列、大小、加粗、风格和变形
| 属性 | 描述 |
|---|---|
| font-family | 设置字体系列 |
| font-size | 设置字体尺寸 |
| font-style | 设置字体风格 |
| font-variant | 以小型大写字体或正常字体显示文本 |
| font-weight | 设置字体的粗细 |
<!DOCTYPE html>
<html lang="en">
<head>
    <meta charset="UTF-8">
    <title>Title</title>
    <style>
        p {
            font-size: 40px;
            font-family: fantasy;
        }

        /*@font-face {*/
        /*    font-family: fantasy;*/
        /*    src: url("");*/
        /*} 此种方式可以让用户使用你页面自动下载此url字体,不用担心用户电脑没有此字体   */
    </style>
</head>
<body>
<p>标题</p>
</body>
</html>
css链接
| 属性 | 描述 |
|---|---|
| link | 普通的、未被访问的链接 |
| visited | 用户已访问的链接 |
| hover | 鼠标指针位于链接的上方 |
| active | 链接被点击的片刻 |
| text-decoration | 去掉a标签链接中的下划线 |
| background-color | 设置a标签链接背景颜色 |
<!DOCTYPE html>
<html lang="en">
<head>
    <meta charset="UTF-8">
    <title>Title</title>
    <style>
        a:link {
            color: #FF0000;
            /* 未被点击的链接 */
            text-decoration: none;

            background: violet;
            /* a标签的背景颜色 */
        }

        a:visited {
            color: #00FF00;
            /* 用户已访问的链接 */

            text-decoration: none;
            /* a标签下面的下划线如果不需要可以加上上面那条属性 */
        }

        a:hover {
            color: #0000FF;
            /* 鼠标位于链接上方的颜色 */
        }

        a:active {
            color: #7e55ff;
            /* 连接被点击片刻的颜色 */
        }
    </style>
</head>
<body>
<a href="http://www.baidu.com">百度一下</a>
</body>
</html>
css列表
| 属性 | 描述 |
|---|---|
| list-style | 简写列表项 |
| list-style-image | 列表项图像 |
| list-style-position | 列表标志位置 |
| list-style-type | 列表类型 |
<!DOCTYPE html>
<html lang="en">
<head>
    <meta charset="UTF-8">
    <title>Title</title>
    <style>
        /*ul li{*/
        /*list-style-type: decimal;*/
        /* 设置列表前缀为数字,默认为黑圆心,也可以设置为图片*/
        /*}*/

        /*ul li{*/
        /*    list-style-image: url("1.jpg");*/
        /*}*/

        ul.ul1 {
            list-style-position: inside;
            /* 输出结果往界面中间更靠近一点 */
        }

        ul.ul2 {
            list-style-position: outside;
            /* 输出结果往界面外边更靠近一点 */
        }
    </style>
</head>
<body>
<p>看一下效果</p>
<ul class="ul1">
    <li>苹果</li>
    <li>苹果</li>
</ul>

<p>看一下效果</p>
<ul class="ul2">
    <li>苹果</li>
    <li>苹果</li>
</ul>
</body>
</html>
css之表格
<!DOCTYPE html>
<html lang="en">
<head>
    <meta charset="UTF-8">
    <title>Title</title>
    <style>
        .tb {
            border-collapse: collapse;
            /* 折叠边框 */
            width: 200px;
            height: 200px;
        }

        .tb, tr, th, td {
            border: 1px solid bisque;
            /* 外边框设置为1像素并设置颜色 */
            padding: 5px;
            /* 内边距 */
        }

        .tb th {
            text-align: right;
            /* 表格居左 */
            background-color: aqua;
            color: #FFFFFF;
        }

        .tb tr.alt td {
            color: black;
            background-color: aquamarine;
        }
    </style>
</head>
<body>
<table class="tb">
    <thead>
    <tr>
        <th>姓名</th>
        <th>年龄</th>
        <th>性别</th>
    </tr>
    </thead>

    <tbody>
    <tr>
        <td>小周</td>
        <td>20</td>
        <td>男</td>
    </tr>

    <tr class="alt">
        <td>小兰</td>
        <td>18</td>
        <td>女</td>
    </tr>

    <tr>
        <td>小萌</td>
        <td>18</td>
        <td>女</td>
    </tr>

    <tr class="alt">
        <td>小萌</td>
        <td>18</td>
        <td>女</td>
    </tr>
    </tbody>
</table>

</body>
</html>
CSS轮廓
用来突出一些元素的作用,比如说一个元素需要一些强烈的视觉效果让用户去注意他.例如下面代码就是为了突出文字重点.
| 属性 | 描述 |
|---|---|
| outline | 设置轮廓属性 |
| outline-color | 设置轮廓的颜色 |
| outline-style | 设置轮廓的样式 |
| outline-width | 设置轮廓的宽度 |
<!DOCTYPE html>
<html lang="en">
<head>
    <meta charset="UTF-8">
    <title>Title</title>
    <style>
        p {
            outline: groove;
            /* 双实线 */

            outline-color: #7e55ff;
            /* 实线颜色 */

            outline-style: dotted;
            /* 虚线 */
        }
    </style>
</head>
<body>
<p>突出效果文字</p>
</body>
</html>
自适应/改变大小
# 左右滚动条的出现
# 宽度,百分比
# 页面最外层: 像素的宽度=>最外层设置绝对宽度,里面设置百分比.

# 自适应
# media
默认img的标签,有一个1px的边框
img{
 border: 0;
}
css盒子模型
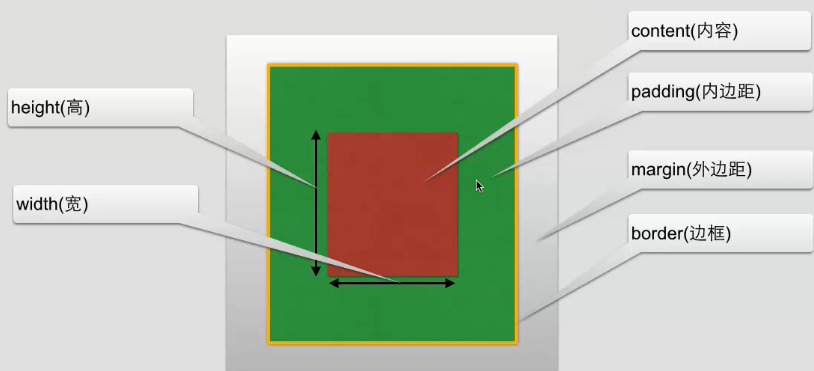
盒子模型内容范围包括margin、border、padding、content组成
下图就是个盒子模型

CSS内边距
# 内边距在centent外,边框内
# 内边距属性
| 属性 | 描述 |
|---|---|
| padding | 设置所有边距 |
| padding-bottom | 设置底边距 |
| padding-left | 设置左边距 |
| padding-right | 设置右边距 |
| padding-top | 设置上边距 |
<!DOCTYPE html>
<html lang="en">
<head>
    <meta charset="UTF-8">
    <title>Title</title>
</head>
    <style>
        td{
            padding: 100px;
            padding-left: 100px;
            padding-right: 200px;
            padding-bottom: 100px;
        }
    </style>
<body>
    <table border="1">
        <tr>
            <td>内边距</td>
        </tr>
    </table>
</body>
</html>
css外边距
围绕在内容边框的区域就是外边距,外边距默认为透明区域.
外边距: 围绕在内容边框的区域就是外边距,外边距默认为透明区域,外边距接受任何长度单位, 百分数值
| 属性 | 描述 |
|---|---|
| margin | 设置所有边距 |
| margin-bottom | 设置底边距 |
| margin-left | 设置左边距 |
| margin-right | 设置右边距 |
| margin-top | 设置上边距 |
Example
<!DOCTYPE html>
<html lang="en">
<head>
    <meta charset="UTF-8">
    <title>Title</title>
    <style>
        body {
            margin: auto;
        }

        .boxmode1 {
            margin: 100px;
        }

        .hd {
            border-style: dashed;
        }

        .pd {
            padding: 10px;
        }

        .content {
            background-color: bisque;
        }
    </style>
</head>
<body>
<div class="boxmode1"> 外边距
    <div class="hd"> 边框样式
        <div class="pd"> 内边距
            <div class="content">BoxModel_Demo</div>
        </div>

    </div>

</div>
</body>
</html>
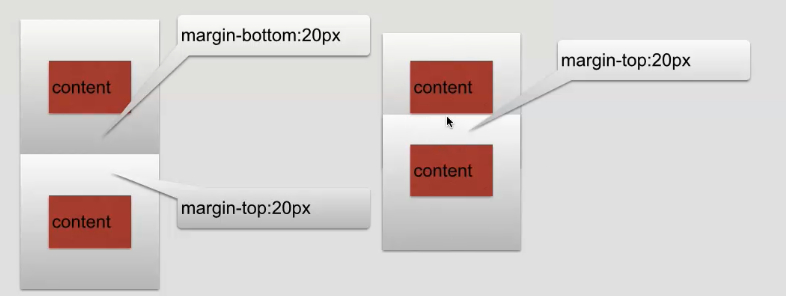
注意
# 垂直方向如果上下两个标签都设置了margin外边距,那么取两者的最大的值
# 水平方法, 两个标签都设外边距,取两者的边距之和.
CSS边框
我们可以创建效果出色的边框,并且可以应用于任何元素.
边框的样式: border-style: 定义了10个不同的非继承样式,包括none.
边框的单边样式
边框样式
| 值 | 描述 |
|---|---|
| none | 无边框。 |
| dotted | 点状虚线边框。 |
| dashed | 矩形虚线边框。 |
| solid | 实线边框。 |
Example1
<!DOCTYPE html>
<html lang="en">
<head>
    <meta charset="UTF-8">
    <title>Title</title>
    <style>
        p {
            width: 100px;
            height: 30px;

            /* 实线边框 */
            border-style: solid;

            /* 边框宽度 */
            border-width: 5px;

            /* 设置单边框宽度 */
            border-top-width: 10px;

            /* 设置边框颜色 */
            border-color: aquamarine;

            /* 圆角边框 */
            border-radius: 10px;

            /* 设置边框底色 */
            background-color: greenyellow;

            /* 设置边框文字居中 */
            text-align: center;
        }

        .cssid {
            background-color: darkorange;
            width: 100px;
            height: 100px;
            text-align: center;
            box-shadow: 10px 10px 5px darkorange;
            /* 向右向下移动了10个像素,透明度5px以及颜色*/
            /* 还可以设置边框图片border-img */
        }
    </style>
</head>
<body>
<p>CSS边框样式</p>
<div class="cssid">css阴影效果</div>
</body>
</html>
Example2
<!DOCTYPE html>
<html lang="en">
<head>
    <meta charset="UTF-8">
    <title>Title</title>
</head>
<body>
<div style="height: 48px;   /* height: 48px 内容高度 */
 width: 80%;                 /* 让此内容只占据80% */
 border: 3px solid #7e55ff;  /* 加上一个像素为1px的边框,并且为实体 */
 font-size: 16px;            /* 字体大小 */
 text-align: center;         /* text-align: center 水平居中 */
 line-height: 48px;          /* 根据标签高度自适应垂直居中 */
 font-weight: bolder;        /* 字体加粗 */
">YouMen
</div>
</body>
</html>
display属性
用于控制HTML元素的显示效果
| 值 | 意义 |
|---|---|
| display:"none" | HTML文档中元素存在,但是在浏览器中不显示。一般用于配合JavaScript代码使用。 |
| display:"block" | 默认占满整个页面宽度,如果设置了指定宽度,则会用margin填充剩下的部分。 |
| display:"inline" | 按行内元素显示,此时再设置元素的width、height、margin-top、margin-bottom和float属性都不会有什么影响。 |
| display:"inline-block" | 使元素同时具有行内元素和块级元素的特点。 |
display:"none"与visibility:hidden的区别
visibility:hidden: 可以隐藏某个元素,但隐藏的元素仍需占用与未隐藏之前一样的空间。也就是说,该元素虽然被隐藏了,但仍然会影响布局。
display:none: 可以隐藏某个元素,且隐藏的元素不会占用任何空间。也就是说,该元素不但被隐藏了,而且该元素原本占用的空间也会从页面布局中消失。
Example1
<!DOCTYPE html>
<html lang="en">
<head>
    <meta charset="UTF-8">
    <title>Title</title>
    <style>
        .c1 {
            height: 100px;
            width: 100px;
            background-color: red;
            border: 1px solid black;
            /*display: none;*/
            /*display: inline-block;*/
            display: block;
        }
    </style>
</head>
<body>
<div class="c1">1</div>
<div class="c1">2</div>
<div class="c1">3</div>
<div class="c1" style="display: none"></div>

<!--  hidden标签看不到,但是位置还在  -->
<div class="c1" style="visibility: hidden"></div>
</body>
</html>
CSS之Float
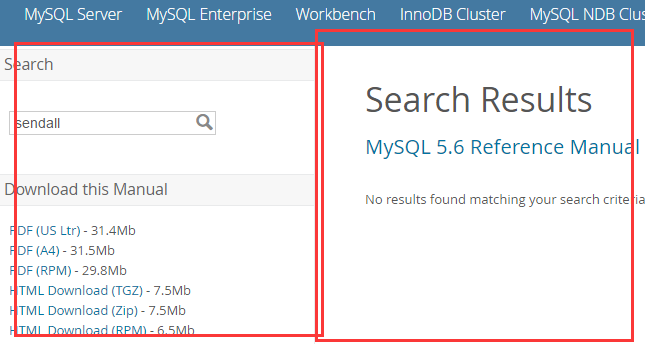
在 CSS 中,任何元素都可以浮动。最开始出现浮动这个东西是为了什么呢,记不记得一个word文档里面,插入图片的时候,有一个文字环绕的效果啊
最开始浮动这个东西是想要做上面这种效果用的,现在多数用来做网页布局的。你记不记得很多的网站都是左边一个菜单栏,右边一堆的其他内容啊

Example1
<!DOCTYPE html>
<html lang="en">
<head>
    <meta charset="UTF-8">
    <title>Title</title>
    <style>
        .c1 {
            background-color: aqua;
            height: 100px;
            width: 100px;
            float: left;
        }

        .c2 {
            background-color: #eeeeee;
            height: 100px;
            width: 100px;
            float: right;
        }

        .c3 {
            background-color: pink;
            height: 300px;
            width: 300px;

            /*清除浮动*/
            /*clear: both;*/
        }

        .cc {
            height: 100px;
        }
    </style>
</head>
<body>
<div class="cc">
    <div class="c1"></div>
    <div class="c2"></div>
</div>
<div class="c3"></div>
</body>
</html>
浮动有一个副作用,容易造成父级标签塌陷,影响页面整体布局.
# 解决方法
	# 1. 给父级标签设置高度
    # 2. 给父级标签加上 clear: both
    		/*清除浮动*/
            clear: both;
	# 3. 伪元素选择器清除浮动,给父级标签加上下面这个类值
            .clearfix:after {
            content: '';
            display: block;
            clear: both;
        }
clear属性
clear属性规定元素的哪一侧不允许其他浮动元素
| 值 | 描述 |
|---|---|
| left | 在左侧不允许浮动元素。 |
| right | 在右侧不允许浮动元素。 |
| both | 在左右两侧均不允许浮动元素。 |
| none | 默认值。允许浮动元素出现在两侧。 |
| inherit | 规定应该从父元素继承 clear 属性的值。 |
overflow溢出属性
我们在一个标签里面写了一堆的文字,然后把标签的高度和宽度设置的比较小的时候,文字就溢出了:
<!DOCTYPE html>
<html lang="en">
<head>
    <meta charset="UTF-8">
    <title>Title</title>
    <style>
        .c1 {
            width: 70px;
            height: 70px;
            border: 4px solid chartreuse;
			/* 可以让多出来的文字不会跑到标签外,会出现滚动条 */
            overflow: auto;
        }
    </style>
</head>
<body>
<div class="c1">讨厌自己明明不甘平凡,却又不好好努力</div>
</body>
</html>
| 值 | 描述 |
|---|---|
| visible | 默认值。内容不会被修剪,会呈现在元素框之外。 |
| hidden | 内容会被修剪,并且其余内容是不可见的。 |
| scroll | 内容会被修剪,但是浏览器会显示滚动条以便查看其余的内容。 |
| auto | 如果内容被修剪,则浏览器会显示滚动条以便查看其余的内容。 |
| inherit | 规定应该从父元素继承 overflow 属性的值。 |
# overflow(水平和垂直均设置)

# overflow-x(设置水平方向,只出现x轴的滚动条)

# overflow-y(设置垂直方向,只出现y轴的滚动条)
圆形图像示例
<!DOCTYPE html>
<html lang="en">
<head>
    <meta charset="UTF-8">
    <title>Title</title>
    <style>
        * {
            margin: 0;
            padding: 0;
            background-color: #eeeeee;
        }

        .header-img {
            /* 如果这个高度和宽度比图片的像素小怎么办,图片显示不全啊,
            因为用户上传的头像没准多大像素的,就需要设置下面哈格.header-mg>img,
            里面写上max-width:100%了 */
            width: 150px;
            height: 150px;
            border: 3px solid white;

            /* 圆形的边框 */
            border-radius: 50%;

            /* 溢出的内容隐藏 */
            overflow: hidden;
        }

        /*相当于将图片的大小设置为父级标签的大小来显示了,因为用户上传的头像的像素我们是不知道的,
        就让它按照父级标签的大小来,就能放下整个头像了,就不会出现头像显示不全的问题了

        直接写width:100%就行,上面写max-width的意思是如果图片大于咱们设置的标签高宽的时候,
        就按照父级标签的大小来,比父级标签的高宽小的时候,就不需要按照父级标签的大小来了,了解一下就行了*/
        .header-img > img {
            max-width: 100%;
        }
    </style>
</head>
<body>
<div class="header-img">
    <img src="1.jpg">
</div>
</body>
</html>
CSS之定位
static(无定位,咱就不说了,主要看相对和绝对定位)
static 默认值,无定位,不能当作绝对定位的参照物,并且设置标签对象的left、top等值是不起作用的的。
1.relative(相对定位)
相对定位是相对于该元素在文档流中的原始位置,即以自己原始位置左上角为参照物。有趣的是,即使设定了元素的相对定位以及偏移值,元素还占有着原来的位置,即占据文档流空间。对象遵循正常文档流,所以不会出现像浮动那种父级标签塌陷的副作用,但将依据top,right,bottom,left等属性在正常文档流中偏移位置。而其层叠通过z-index属性定义。往上移动🔝-100px(注意是负值)或者bottom:-100px(负值),往左移动:left:-100px(也是负值)或者right:-100px,往下移动:bottom:100px(正值)或者top:100px(正值),往右移动:right:100px(正值)或者left:100px。大家记住一点昂,凡是标签要进行移动,不管是float还是relative还是线面的absolute,都是按照元素自己的左上角进行计算的
注意:position:relative的一个主要用法:方便下面要学的绝对定位元素找到参照物。可以将元素设置成relative,不设置任何的top、left、right、bottom等,它还是它原来的位置
2 . absolute(绝对定位)
定义:设置为绝对定位的元素框从文档流完全删除,也会有父级标签塌陷的问题,并相对于最近的已定位祖先元素定位,如果元素没有已定位的祖先元素,那么它的位置相对于最初的包含块(即body元素)。元素原先在正常文档流中所占的空间会关闭,就好像该元素原来不存在一样。元素定位后生成一个块级框,而不论原来它在正常流中生成何种类型的框。
重点:如果父级设置了position属性,例如position:relative;,那么子元素就会以父级的左上角为原始点进行定位。这样能很好的解决自适应网站的标签偏离问题,即父级为自适应的,那我子元素就设置position:absolute;父元素设置position:relative;,然后Top、Right、Bottom、Left用百分比宽度表示。
另外,对象脱离正常文档流,使用top,right,bottom,left等属性进行绝对定位。而其层叠通过z-index属性定义。
3 . fixed(固定)不管页面怎么动,都在整个屏幕的某个位置
fixed:对象脱离正常文档流,使用top,right,bottom,left等属性以窗口为参考点进行定位,当出现滚动条时,对象不会随着滚动。而其层叠通过z-index属性 定义。 注意点: 一个元素若设置了 position:absolute | fixed; 则该元素就不能设置float。这 是一个常识性的知识点,因为这是两个不同的流,一个是浮动流,另一个是“定位流”。但是 relative 却可以。因为它原本所占的空间仍然占据文档流。
在理论上,被设置为fixed的元素会被定位于浏览器窗口的一个指定坐标,不论窗口是否滚动,它都会固定在这个位置。
CSS定位属性
| 属性 | 描述 |
|---|---|
| position | 把元素放在一个静态的,相对的.绝对的.或固定的位置上 |
| top | 元素向上的偏移量 |
| left | 元素向左的偏移量 |
| right | 元素向右的偏移量 |
| bottom | 元素向下的偏移量 |
| overflow | 设置元素溢出其区域发生的事情 |
| clip | 设置元素显示的形状 |
| vertical-align | 设置元素垂直对齐方式 |
| z-index | 设置元素的堆叠顺序,值越大离用户越近 |
Example1
<!DOCTYPE html>
<html lang="en">
<head>
    <meta charset="UTF-8">
    <title>Title</title>
    <style>
        .c1 {
            background-color: aqua;
            height: 100px;
            width: 100px;
        }

        .c2 {
            background-color: #eeeeee;
            height: 100px;
            width: 100px;

            /* 相对定位,距离父级标签相对定位向左100px, 向下100px*/
            /*position: relative;*/
            /*left: 100px;*/
            /*top: 100px;*/

            /*绝对定位,不保留自己原来的位置,按照父级标签或者祖先级标签设置了,position为relative的标签位置进行移动,
             如果一直找不到设置了这个属性的标签,按照body标签来移动*/
            position: absolute;
            bottom: 5px;
        }

        .c3 {
            background-color: pink;
            height: 100px;
            width: 100px;
        }

        .cc{
            position: relative;
        }
    </style>
</head>
<body>
<div class="cc">
    <div class="c1"></div>
    <div class="c2"></div>
    <div class="c3"></div>
</div>

</body>
</html>
Example2 fixed
<!DOCTYPE html>
<html lang="en">
<head>
    <meta charset="UTF-8">
    <title>Title</title>
    <style>
        .c1 {
            background-color: aqua;
            height: 500px;
            width: 200px;
        }

        .c2 {
            background-color: greenyellow;
            height: 500px;
            width: 200px;
        }

        .s1 {
            /* 固定定位,位置是根据浏览器窗口定位的 */
            position: fixed;
            left: 20px;
            bottom: 20px;
            background-color: bisque;
            height: 40px;
            width: 80px;
            text-align: center;

            /* 和标签高度一致,标签内容就垂直居中 */
            line-height: 40px;
        }

        .s1 a {
            color: darkgray;
            text-decoration: none;
        }
    </style>
</head>
<body>
<dvi id="top">这是顶部</dvi>

<div class="c1"></div>
<div class="c2"></div>

<span class="s1">
<!--     触发锚点   -->
        <a href="#top">回到顶部</a>
    </span>
</body>
</html>
z-index属性
1 . z-index 值表示谁压着谁,数值大的压盖住数值小的,
2 . 只有定位了的元素,才能有z-index,也就是说,不管相对定位,绝对定位,固定定位,都可以使用z-index,而浮动元素float不能使用z-index
3 . z-index值没有单位,就是一个正整数,默认的z-index值为0如果大家都没有z-index值,或者z-index值一样,那么谁写在HTML后面,谁在上面压着别人,定位了元素,永远压住没有定位的元素。
4 . 从父现象:父亲怂了,儿子再牛逼也没用
Example模态框
<!DOCTYPE html>
<html lang="en">
<head>
    <meta charset="UTF-8">
    <title>Title</title>
    <style>
        .shadwn {
            position: fixed;
            top: 0;
            bottom: 0;
            left: 0;
            right: 0;
            background-color: rgba(0, 0, 0, 0.5);
            z-index: 99;
        }

        .mode {
            position: fixed;
            height: 350px;
            width: 300px;
            background-color: white;
            z-index: 100;
            left: 50%;
            top: 50%;
            margin-left: -150px;
            margin-top: -200px;
        }
    </style>
</head>
<body>
<div>
    <h1>
        YouMen
    </h1>
</div>
<div class="mode">

</div>

<div class="shadwn"></div>
</body>
</html>
opcity属性
用来定义透明效果,取值范围是0-1,0是完全透明,1是完全不透明
和rgba区别
# rgba是针对背景颜色或者字体颜色单独的透明度

# opacity是针对整个标签透明度
Example1
<!DOCTYPE html>
<html lang="en">
<head>
    <meta charset="UTF-8">
    <title>Title</title>
    <style>
        .c1 {
            background-color: rgba(255, 0, 0, 0.3);
            height: 100px;
            width: 100px;
        }

        .c2 {
            background-color: rgb(255, 0, 0);
            height: 100px;
            width: 100px;
            opacity: 0.3;
        }
    </style>
</head>
<body>
<div class="c1">YouMen</div>
<div class="c2">YouMen</div>
</body>
</html>
导航栏
垂直导航栏
<!DOCTYPE html>
<html lang="en">
<head>
    <meta charset="UTF-8">
    <title>Title</title>
    <style>
        ul {
            list-style-type: none;;
            margin: 0px;
            padding: 0px;
        }

        a:link, a:visited {
            text-decoration: none;
            display: block;
            background-color: burlywood;
            color: aliceblue;
            width: 100px;
            height: 40px;
            text-align: center;
        }

        a:active, a:hover {
            background-color: #7e55ff;
        }
    </style>
</head>
<body>
<ul>
    <li><a href="a">导航1</a></li>
    <li><a href="a">导航1</a></li>
    <li><a href="a">导航1</a></li>
    <li><a href="a">导航1</a></li>
</ul>
</body>
</html>
水平导航栏
<!DOCTYPE html>
<html lang="en">
<head>
    <meta charset="UTF-8">
    <title>Title</title>
    <style>
        ul {
            list-style-type: none;
            margin: 0px;
            padding: 0px;
            background-color: burlywood;
            width: 500px;
            text-align: center;
        }

        a:link, a:visited {
            font-weight: bold;
            text-decoration: none;
            background-color: burlywood;
            color: aliceblue;
            width: 50px;
            text-align: center;
        }

        a:active, a:hover {
            background-color: #7e55ff;
        }

        li {
            display: inline;
            padding: 5px;
            padding-left: 5px;
            padding-right: 5px;
        }
    </style>
</head>
<body>
<li><a href="a">导航1</a></li>
<li><a href="a">导航1</a></li>
<li><a href="a">导航1</a></li>
<li><a href="a">导航1</a></li>
</body>
</html>
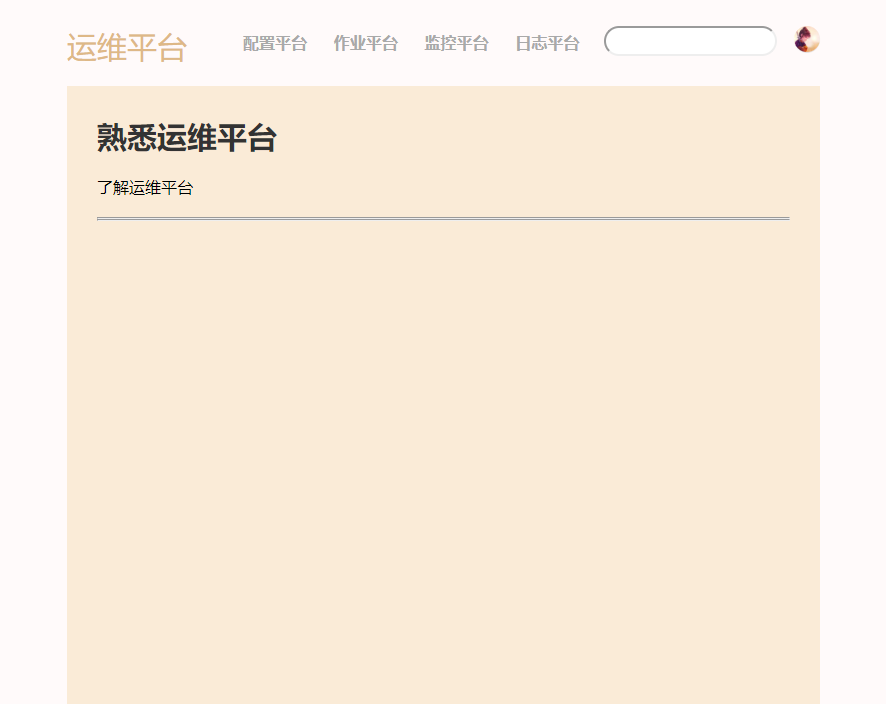
HTML与CSS的结合使用案例
html_css_demo.css
*{
    margin: 0px;
    padding: 0px;
}
body{
    background-color: snow;
}
.wrapper{
    width: 80%;
    height: 1000px;
    background-color: antiquewhite;
    margin: 0px auto;
}
.heading{
    width: 100%;
    height: 90px;
    background-color: snow;
    margin: 0px auto;
}
.heading_title{
    float: left;
    font-family: Arial, Helvetica, sans-serif;
    font-size: 30px;
    color: burlywood;
}
.heading_nav{
    padding-bottom: 30px;
    padding-top: 30px;
    width: 100%;
    height: 30px;
    position: relative;
}
ul{
    margin-left: 40px;
    float: left;
    list-style-type: none;
    padding-top: 6px;
    padding-bottom: 6px;
}
li{
   padding-left: 10px;
   display: inline;
}
a:link,a:visited{
    font-weight: bold;
    color: darkgray;
    text-align: center;
    padding: 6px;
    text-decoration: none;
}
a:hover,a:active{
    color: dimgray;
}
.heading_img img{
    border-radius: 30px;
    display: inline;
    width: 26px;
    height: 26px;
    box-shadow: 0 1px 1px rgba(0,0,0,0.2);
    float:  right;
}
.heading_soptlight form{
    float: right;
    width: 70px;
    height: 26px;
    position: relative;
    margin-right: 120px;
}
form input{
    height: 26px;
    border-radius: 30px;
}
.body{
    padding: 30px;
    height: auto;
    width: auto;
}
.body_title h3{
    font-size: 30px;
    font-family: Arial, Helvetica, sans-serif;
    color: #333333;
}
.body_title p{
    margin-top: 20px;
    margin-bottom: 20px;
}

.footing{
    padding-top: 20px;
    text-align: center;
    font-size: 10px;
    color: darkgray;
}
html_demo1.html
<html>
<head lang="en">
    <meta charset="UTF-8">
    <title>运维平台</title>
    <link href="html_css_demo.css" type="text/css" rel="stylesheet">
</head>
<body>
    <div class="container">
        <div class="wrapper">
            <div class="heading">
                <div class="heading_nav">
                    <div class="heading_title">
                        运维平台
                    </div>
                    <div class="heading_navbar">
                        <ul>
                            <li><a href="#">配置平台</a></li>
                            <li><a href="#">作业平台</a></li>
                            <li><a href="#">监控平台</a></li>
                            <li><a href="#">日志平台</a></li>
                        </ul>
                    </div>
                    <div class="heading_img">
                        <img src="1.jpg">
                    </div>
                    <div class="heading_soptlight">
                        <form>
                            <input type="text">
                        </form>
                    </div>
                </div>
            </div>
            <div class="body">
                <div class="body_title">
                    <h3>熟悉运维平台</h3>
                    <p>了解运维平台</p>
                </div>
                <hr/>
                <hr/>
            </div>
        </div>
        <div class="footing">
            @运维平台
        </div>
    </div>
</body>
</html>


