Typora: 设置Typora自动上传图片到Github
1. 修改图像上传设定
依次点击 文件->偏好设置->图像, 将上传服务修改为PicGo-Core, 勾选下图的三个复选框。

2. 点击下载或更新 按钮, 得到配置文件
配置文件如下:
{
  "picBed": {
    "github": {
      "repo": "${github-repo}",
      "token": "${github-token}",
      "path": "img/",
      "customUrl": "",
      "branch": "master"
    },
    "current": "github",
    "uploader": "github"
  },
  "picgoPlugins": {}
}
这里主要是需要修改 repo 和 token的值,。
接下来打开github, 通过修改和设定得到 repo 和 token。
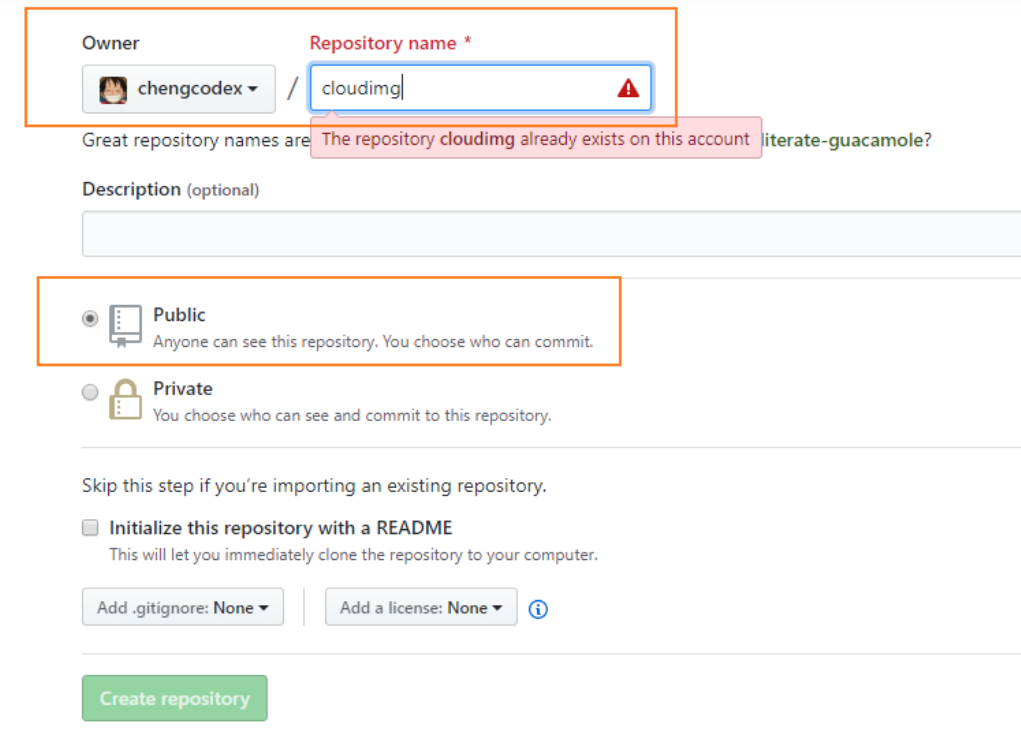
3. 建立一个新的仓库,用作图片上传的图床
此时新建仓库的 repo 名为:chengcodeX/cloudimg
4. 获取Token
点击用户名,在弹出的下列列表中选择”Settings“:

在左侧的菜单栏中选择Develop settings, Develop settings 在左侧菜单靠下的位置。

选择"Personal access tokens", 点击"Generate new token"

勾选"repo" 复选框, 选择 "Expiration" 过期时间。

点击最下方的 "Generate token" 按钮生成一个新的token:

复制得到的token:

此时得到的token为: "token": "2bda0144223a0762be559843510e26de71ac5d59"
5. 修改配置文件
这里主要修改repo 和 token 两项, 将刚才得到的repo 和 token 的值填入对应的位置。
{
  "picBed": {
    "github": {
      "repo": "chengcodeX/cloudimg",
      "token": "2bda0144223a0762be559843510e26de71ac5d59",
      "path": "img/",
      "customUrl": "",
      "branch": "master"
    },
    "current": "github",
    "uploader": "github"
  },
  "picgoPlugins": {}
}
6. 验证图片是否能够正常上传
点击验证图片上传选项按钮,验证图片是否能够正常上传,


出现上图提示代表设置成功。
参考链接
如果您觉得阅读本文对您有帮助,请点一下“推荐”按钮,您的“推荐”将是我最大的写作动力!欢迎各位转载,但是未经作者本人同意,转载文章之后必须在文章页面明显位置给出作者和原文连接,否则保留追究法律责任的权利。


【推荐】国内首个AI IDE,深度理解中文开发场景,立即下载体验Trae
【推荐】编程新体验,更懂你的AI,立即体验豆包MarsCode编程助手
【推荐】抖音旗下AI助手豆包,你的智能百科全书,全免费不限次数
【推荐】轻量又高性能的 SSH 工具 IShell:AI 加持,快人一步
· 物流快递公司核心技术能力-地址解析分单基础技术分享
· 单线程的Redis速度为什么快?
· 展开说说关于C#中ORM框架的用法!
· Pantheons:用 TypeScript 打造主流大模型对话的一站式集成库
· SQL Server 2025 AI相关能力初探
2019-05-23 Java设计模式: 单例模式
2018-05-23 %02x和%2x区别