Django博客开发教程:实现网站首页
实现首页模板前,我们先把共公的页面模板base.html调用好。首先我们先看导航部分,除开首页和关于博主之外,其它的其实是我们的文章分类名。如图:

我们只需要在首页视图函数里,查询出所有的文章分类名称,然后在模板页面上展示就行。
blog/views.py

from .models import Category
#从models里导入Category类
def index(request):
    allcategory = Category.objects.all()#通过Category表查出所有分类
    #把查询出来的分类封装到上下文里
    context = {
            'allcategory': allcategory,
        }
    return render(request, 'index.html', context)#把上下文传到index.html页面
打开base.html页面,我们找到导航代码:
templates/base.html

<nav class="nav fl">
    <ul id="fix-list" class="fix-list clearfix">
        <li id="menu-item-24086" class="menu-item"><a href="/">首页</a></li>
        <li id="menu-item-117720" class="menu-item">
            <a href="/list-1.html">Django</a></li>
        <li id="menu-item-117720" class="menu-item">
            <a href="/list-2.html">Python</a></li>
        <li id="menu-item-117720" class="menu-item">
            <a href="/list-3.html">Linux</a></li>
        <li id="menu-item-117720" class="menu-item">
            <a href="/list-4.html">Mysql</a></li>
        <li id="menu-item-117720" class="menu-item">
            <a href="/list-5.html">运维知识</a></li>
        <li id="menu-item-117720" class="menu-item">
            <a href="/list-6.html">我的日记</a></li>
        <li id="menu-item-24086" class="menu-item"><a href="/about/">关于博主</a></li>
    </ul>
</nav>
里面的<li></li>标签只留下首页和关于博主的:
<nav class="nav fl">
    <ul id="fix-list" class="fix-list clearfix">
        <li id="menu-item-117720" class="menu-item"><a href="/">首页</a></li>

        <li id="menu-item-117720" class="menu-item"><a href="/about/">关于博主</a></li>
    </ul>
</nav>
然后中间部分加入如下代码:
{% for category in allcategory %}
<li id="menu-item-117720" class="menu-item">
 <a href="{% url 'index' %}list-{{ category.id }}.html">{{ category.name }}</a>
 </li>
{% endfor %}
最终代码:
templates/base.html

<nav class="nav fl">
    <ul id="fix-list" class="fix-list clearfix">
        <li id="menu-item-117720" class="menu-item"><a href="/">首页</a></li>

        {% for category in allcategory %}
         <li id="menu-item-117720" class="menu-item">
         <a href="{% url 'index' %}list-{{ category.id }}.html">{{ category.name }}</a>
         </li>
        {% endfor %}

        <li id="menu-item-117720" class="menu-item"><a href="/about/">关于博主</a></li>
    </ul>
</nav>
代码里面我们通过下面的代码遍历输出变量的内容:
{% for category in allcategory %}
文章分类名我们通过下面的代码可得到:
{{ category.name }}
点击文章分类名,就是进入到各个文章分类的列表页面,结合myblog/urls.py里的列表页面URL list-<int:lid>.html是由list-和分类ID组成,所以完整的URL是:
网站首页(网站域名)/list-分类ID.html
在模板页面调用url别名的代码是:
{% url 'xxx' %} #xxx为别名 网站首页就是{% url 'index' %}
分类ID通过下面的代码可得到:
{{ category.id }}
为什么可以通过这样的方式可以查到分类ID,之前的文章有提到:体验数据查询
最后得到完整的列表URL代码如下:
{% url 'index' %}list-{{ category.id }}.html
弄好之后,然后我们刷新页面就能看到效果。
首页幻灯图的实现
实现前,要先添加一些数据。然后在首页视图函数里查询出所有的幻灯图的数据:
blog/views.py

from blog.models import Category, Banner
#把Banner表导入
def index(request):
    allcategory = Category.objects.all()
    banner = Banner.objects.filter(is_active=True)[0:4]#查询所有幻灯图数据,并进行切片
    context = {
                'allcategory': allcategory,
                'banner':banner, #把查询到的幻灯图数据封装到上下文
        }
    return render(request, 'index.html', context)
提示:我们通过filrter查询出所有激活的is_active幻灯图数据,并进行切片,只显示4条数据。
首页index.html文件里,找到幻灯图代码,里面的<li></li>标签只保留一个,然后修改成如下代码“
templates/index.html

{% for b in banner %}
<li class="slide fix-width">
    <a href="{{ b.link_url }}" title="{{ b.text_info }}">
    <img src="{% url 'index' %}media/{{ b.img }}" srcset="{% url 'index' %}media/{{ b.img }}" alt="{{ b.text_info }}"
                 class="wp-post-image" width="370" height="290"/></a>
        <span class="text ani-left"><strong>{{ b.text_info }}</strong></span>
    </li>
{% endfor %}
其中{{ b.link_url }}表示图片链接的URL,{{ b.text_info }}为图片的标题描述,{{ b.img }}为上传的图片名,完整的图片路径由{% url 'index' %}media/{{ b.img }}组成。media/就是我们之前设置的图片上传的目录。
首页推荐阅读实现
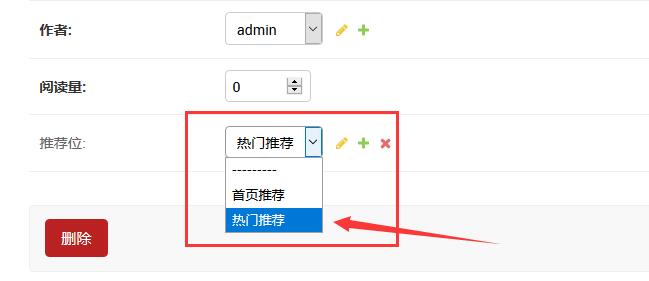
我们在发布文章的时候,要先在推荐位里选择好要推荐的文章,然后再进行查询展现。
首页视图函数里:
blog/views.py
from blog.models import Category,Banner, Article
#我们查询的是进行推荐的文章,所以要导入文章Article表
def index(request):
    ....
    tui = Article.objects.filter(tui__id=1)[:3]#查询推荐位ID为1的文章
    context = {
            ...
            'tui':tui,
        }
    return render(request, 'index.html', context)
提示:filter查询条件里的tui__id=1,表示为通过文章里的外键推荐位进行筛选。
首页index.html页面,找到推荐阅读里面三个结构相同的代码,保留一个,然后修改成:
templates/index.html

{% for t in tui %}
<div class="caption">
    <h4><a href="{% url 'index' %}show-{{ t.id }}.html" title="{{ t.title }}"
               rel="bookmark">{{ t.title }}</a></h4>
    <p>{{ t.excerpt|truncatechars:"80" }}</p>
    </div>
{% endfor %}
里面要留意的是文章的URL的构成,这和列表URL一样,这里不重复,{{ t.excerpt|truncatechars:"80" }}这个代码表示截取文章摘要的80个字符。
首页最新文章实现
首页最新文章,调用的是所有分类里的最新文章,这里只调用10篇:
blog/views.py

def index(request):
    ...
    allarticle = Article.objects.all().order_by('-id')[0:10]
    context = {
        ...
        'allarticle': allarticle,
        }
    return render(request, 'index.html', context)
里面的.order_by('-id')为数据排序方式,[0:10]为只获取10索引切片,只获取最新的10篇文章。
首页最新文章的,只保留一个文章展示代码,然后修改为:
templates/index.html

{% for a in allarticle %}
    <div class="article-box clearfix excerpt-1">
        <div class="col-md-4">
            <div class="thumbnail">
                <a href="{% url 'index' %}show-{{ a.id }}.html" title="{{ a.title }}">
                    <img src="media/{{ a.img }}"
                         srcset="media/{{ a.img }}"
                         alt="{{ a.title }}" class="wp-post-image" width="240" height="160"/></a>
            </div>
        </div>
        <div class="col-md-8">
            <h2><a href="{% url 'index' %}show-{{ a.id }}.html" target="_blank"
                   title="{{ a.title }}">{{ a.title }}</a></h2>
            <p class="txtcont hidden-xs"><a href="{% url 'index' %}show-{{ a.id }}.html" target="_blank"
                                            title="{{ a.title }}">{{ a.excerpt }}</a></p>
            <div class="meta"><span class="label label-info"><a
                    href="{% url 'index' %}list-{{ a.category.id }}.html">{{ a.category.name }}</a></span>
                <time class="item"><i class="fa fa-clock-o"></i>{{ a.created_time|date:"Y年m月d日" }}
                </time>
            </div>
        </div>
    </div>
{% endfor %}
提示:里面分类名和分类ID是文章里的外键字段,所以我们是通过代码{{ a.category.name }}和{{ a.category.id}}这样的方式进行调用的。时间字段我们进行格式化,然后通过年月日的形式展现,{{ a.created_time|date:"Y年m月d日" }}。
热门文章排行实现
热门文章的实现有多种方式,如果你想要在上面展示自己指定的文章,你可以在后台通过再添加一个推荐位来实现,也可以查询所有文章,通过文章浏览数进行倒序展示,也可以查询数据库通过随机的方式展示。代码分别如下:
blog/views.py

def index(request):
    ...
    #hot = Article.objects.all().order_by('?')[:10]#随机推荐
    #hot = Article.objects.filter(tui__id=3)[:10]   #通过推荐进行查询,以推荐ID是3为例
    hot = Article.objects.all().order_by('views')[:10]#通过浏览数进行排序
    context = {
               ...
          'hot':hot,
        }
    return render(request, 'index.html', context)
热门文章推荐代码里,<ol></ol>标志对里,找到<li></li>标签,只保留一个,然后修改成如下代码:
templates/index.html

{% for h in hot %}
<li><a href="{% url 'index' %}show-{{ h.id }}.html" title="{{ h.title }}">{{ h.title }}</a></li>
{% endfor %}
右侧热门推荐实现
打侧的热门推荐代码在right.html里,所以我们需要修改right.html页面,这个地方我们是通过后台的推荐位ID为2实现的,我们在发文章的时候,进行推荐就可以了。查询代码:
blog/views.py

def index(request):
    ...
    remen = Article.objects.filter(tui__id=2)[:6]
    context = {
            ...
            'remen':remen,
        }
    return render(request, 'index.html', context)
打开right.html页面,修改对应代码:
templates/right.html

<ul class="post-hot clearfix">
{% for k in remen %}
    <li>
        <div class="img">
        <a href="{% url 'index' %}show-{{ k.id }}.html" title="{{ k.title }}">
        <img src="{% url 'index' %}media/{{ k.img }}"
         srcset="{% url 'index' %}media/{{ k.img }}" alt="{{ k.title }}"
            class="wp-post-image" width="120" height="80"/>
        </a>
        </div>
        <div class="text">
        <a href="{% url 'index' %}show-{{ k.id }}.html" title="{{ k.title }}"
                   target="_blank">{{ k.title }}</a>
        </div>
       </li>
{% endfor %}
</ul>
右侧所有标签实现
blog/views.py

from blog.models import Category,Banner, Article, Tag
#导入标签表
def index(request):
    ...
    tags = Tag.objects.all()
    context = {
            ...
            'tags':tags,
        }
    return render(request, 'index.html', context)
找到标签代码,修改为:
templates/right.html

<div class="tags">
    {% for tag in tags %}
        <a href="{% url 'index' %}tag/{{ tag.name }}">{{ tag.name }}</a>
    {% endfor %}
</div>
右侧的二维码图片就简单了,我们修改一下路径就行。留意,加之前我们要在right.html头部加入{% load staticfiles %}:
templates/right.html

{% load staticfiles %}
#上面的代码要加在第一行

<img src="static/picture/weixinqr.jpg" alt="微信二维码" width="160" height="160">
修改为:
<img src="{% static "picture/weixinqr.jpg" %}" alt="微信二维码" width="160" height="160">
尾部的友情链接实现:
blog/views.py
from blog.models import Category,Banner, Article, Tag, Link
#导入友情链接表Link

def index(request):
    ...
    link = Link.objects.all()
    context = {
            ...
            'link':link,
        }
    return render(request, 'index.html', context)
找到友情链接代码,修改为:
templates/index.html

<ul class="clears">
    {% for l in link %}
        <li><a href="{{ l.linkurl }}" target="_blank">{{ l.name }}</a></li>
    {% endfor %}
</ul>
全部修改好之后,刷新页面,就能看到效果

 浙公网安备 33010602011771号