Django之视图层
一 视图函数
视图函数,简称视图,属于django的视图层,默认定义在views.py文件中,是用来处理web请求信息以及返回响应信息的函数,所以研究视图函数只需要熟练掌握两个对象即可:请求对象(HttpRequest)和响应对象(HttpResponse)。
二 请求对象(HttpRequest)
django将http协议请求报文中的请求行,首部信息,内容主体封装到了HttpRequest对象中(类似于我们自定义框架的environ参数)。django会将HttpRequest对象当做参数传给视图函数的第一个参数request,在视图函数中,通过访问该对象的属性便可以提取http协议的请求数据
2.1 HttpRequest对象常用属性part1
一. HttpRequest.method

  获取请求使用的方法(值为纯大写的字符串格式)。例如:“GET”,"POST"

       应该通过该属性的值来判断请求方法

二. HttpRequest.GET

  值为一个类似于字典的QueryDict对象,封装了GET请求的所有参数,可通过HttpRequest.GET.get('键')获取相应的值

三. HttpRequest.POST

  值为一个类似于字典的QueryDict对象,封装了POST请求所包含的表单数据,可通过HttpRequest.POST.get('键')获取相对应的值

  针对表单中checkbox类型的input标签,select标签提交的数据,键对象的值为多个,需要用:HttpRequest.POST.getlist("student")获取存在多个值的列表,同理也有HttpRequest.GET.getlist(“键”)
示例:
urls.py文件:
from django.contrib import admin
from django.urls import include,path,re_path
from app01 import views

urlpatterns = [
    path('admin/', admin.site.urls),
    re_path(r'^login/$', views.login),
]
views.py文件:
from django.shortcuts import render
from django.http import HttpResponse
from django.shortcuts import reverse
from django.shortcuts import redirect
import datetime
# Create your views here.

def login(request):
    if request.method == 'GET':
        #url:http://127.0.0.1:8001/login/?user_id=111&request_id=222&image=a&image=b&image=c
        #请求方法是GET,?之后的请求都存放在request.GET中
    print(request.GET)
        # < QueryDict: {'image': ['a', 'b', 'c'], 'user_id': ['111'], 'request_id': ['222']} >

    #获取到参数
        user_id=request.GET.get('user_id') #111
        request_id=request.GET.get('request_id') #222
        images=request.GET.getlist('image') #['a', 'b', 'c']

        return render(request,'login.html')
    elif request.method == 'POST':
    #请求方法为POST,表单内的数据都回存放于request.POST中
        print(request.POST)

        #获取到表单的数据方式为:
        name=request.POST.get('name')
        age=request.POST.get('age')
        hobbies=request.POST.getlist('hobbies')

        return HttpResponse('submit success')
login.html
<!DOCTYPE html>
<html lang="en">
<head>
    <meta charset="UTF-8">
    <title>login page</title>
</head>
<body>

<form action="http://127.0.0.1:8001/login/" method="post">  <!--反向解析到/article/page-2/-->
    {% csrf_token %}
    <p>username: <input type="text" name="name"></p>
    <p>age: <input type="text" name="age"></p>
    <p>
        hobbies:
        <input type="checkbox" name="hobbies" value="musice">music
        <input type="checkbox" name="hobbies" value="readd">read
        <input type="checkbox" name="hobbies" value="dancing">dancing
    </p>
    <p><input type="submit" value="submit"></p>
</form>
</body>
</html>
2.2 HttpRequest对象的常用属性part2
1.HttpRequest.body
    当浏览器基于http协议的POST方法提交数据的时候,数据会被放到请求体中发送给django,django会将接受到的请求体数据存放于HttpRequest.body属性中,
因为该属性的值为Bytes类型,所以通常情况下直接处理Bytes,并从中提取有用数据的操作是复杂而繁琐的,好在django会对它进行处理与封装,以便我们方便的提取数据
    对于form表单来说,提交数据的方式常用方法为GET和POST
    1.1 如果表单属性method='GET',那么在提交表单的时候,表单内数据不会存放于请求体中,而是会将表单数据按照k1=v1&k2=v2&k3=v3的格式放到
url中,然后发送给django,django会将这些数据封装到request.GET中,注意此时的request.body为空,无用
    1.2 如果表单属性method='POST',那么在提交表单的时候,表单内的数据会存放在请求体中,在发送给django后会封装到request.body里,此时的
django为了方便我们提取数据,会对request.body的数据进行进一步的处理,处理方式如下:
    from表单对提交的表单数据有两种常用的编码格式,可以通过属性enctype进行设置,如下:
    1.2.1:编码格式1(默认):enctype="application/x-www-form=urlencoded"
    如果form表单提交数据时候是按照格式1,那么request.body 中数据的格式类似于GET方式的数据格式,如k1=v1&k2=v2,此时django会将request.body
中的数据提取出来封装到request.POST 中,让我们提取

    1.2.2:编码格式2(使用form表单上传文件时只能用该编码):enctype="multipart/form-data"
    如果form表单提交数据时候是按照格式2,(那么               ) ,此时django会将request.body中的数据提取出来封装到request.POST中,
将上传的文件数据专门提取出来封装到request.FILES属性中

    区别:编码2的数据量要大于编码1的数据量,如果不需要上传文件,推荐使用更为精简的编码1

    1.2.3:我们还可以采用ajax技术,提交数据,当ajax采用POST方法提交json格式的数据的时候,django会将接受到的数据存在HttpRequest.body,此时需要我们自己对HttpRequest.body属性值做反序列化处理
form表单上传文件:
urls.py
from django.contrib import admin
from django.urls import include,path,re_path,register_converter
from app01 import views

urlpatterns = [
    re_path(r'^upload/$', views.upload),
]
views.py
from django.shortcuts import render,HttpResponse
from django.shortcuts import reverse
from django.shortcuts import redirect
import datetime
# Create your views here.

def upload(request):
    if request.method == 'GET':
        return render(request,'upload.html')
    elif request.method == 'POST':

        #从request.POST中获取用户名
        name=request.POST.get('name')
    #从request.FILES获取文件对象
        file_obj=request.FILES.get('header_img')
        #上传的文件放在templates文件夹下
        with open('templates/header.png','wb') as f:
            for line in file_obj:
                f.write(line)
        return HttpResponse('upload success')
upload.html
<!DOCTYPE html>
<html lang="en">
<head>
    <meta charset="UTF-8">
    <title>register page</title>
</head>
<body>

<form action="" method="POST" enctype="multipart/form-data" >
    {% csrf_token %}
    <p>username: <input type="text" name="name"></p>
    <p>head img<input type="file" name="header_img"> </p>
    <p><input type="submit" value="submit"></p>
</form>
</body>
</html>
2.3 HttpRequest对象常用属性part3
1.HttpRequest.path:获取url地址的路径部分,只包含路径部分

2.HttpRequest.get_full_path():获取url地址的完整path,既包含路径又包含参数部分

如果请求地址是:http://127.0.0.1:8001/ylqh/?name=zzl&age=18
则HttpRequest.path的值为:/ylqh/
HttpRequest.get_full_path()的值为/ylqh/?name=zzl&age=18
urls.py
from django.contrib import admin
from django.urls import include,path,re_path,register_converter
from app01 import views

urlpatterns = [
     re_path(r'^ylqh',views.ylqh),
]
view.py
from django.contrib import admin
from django.urls import include,path,re_path,register_converter
from app01 import views

urlpatterns = [
     re_path(r'^ylqh',views.ylqh),
]
2.4 part4
2.4.1HttpRequest.META的值包含了HTTP协议的请求头数据的Python字典,字典中的key以及对应的值如下例子:
urls.py 文件
from django.contrib import admin
from django.urls import include,path,re_path,register_converter
from app01 import views


urlpatterns = [
     re_path(r'^ylqh',views.ylqh),
]
views.py文件
from django.shortcuts import render,HttpResponse
from django.shortcuts import reverse
from django.shortcuts import redirect
import datetime
# Create your views here.

def ylqh(request):
    cl = request.META.get('CONTENT_LENGTH', 'unknown')
    ct = request.META.get('CONTENT_TYPE', 'unknown')
    hc = request.META.get('HTTP_ACCEPT', 'unknown')
    hae = request.META.get('HTTP_ACCEPT_ENCODING','unknown')
    hal = request.META.get('HTTP_ACCEPT_LANGUAGE','unknown')
    hh = request.META.get('HTTP_HOST','unknown')
    hr = request.META.get('HTTP_REFERER','unknown')
    hua = request.META.get('HTTP_USER_AGENT','unknown')
    qs = request.META.get('QUERY_STRING','unknown')
    ra = request.META.get('REMOTE_ADDR','unknown')
    rh = request.META.get('REMOTE_HOST','unknown')
    ru = request.META.get('REMOTE_USER','unknown')
    rm = request.META.get('REQUEST_METNOD','unknown')
    sn = request.META.get('SERVER_NAME','unknown')
    sp = request.META.get('SERVER_PORT','unknown')
    return HttpResponse('This CONTENT_LENGTH is %s\n , This CONTENT_TYPE is %s \n,'
                        'This HTTP_ACCEPT is %s \n, This HTTP_ACCEPT_ENCODING is %s\n'
                        'This HTTP_ACCEPT_LANGUAGE is %s \n, This HTTP_HOST is %s \n'
                        'This HTTP_REFERER is %s \n, This HTTP_USER_AGENT is %s \n,'
                        'This QUERY_STRING is %s \n, This REMOTE_ADDR is %s \n,'
                        'This REMOTE_HOST is %s \n, This REMOTE_USER is %s \n,'
                        'This REQUEST_METNOD is %s \n, This SERVER_NAME is %s \n,'
                        'This SERVER_PORT is %s \n'
                         %(cl,ct,hc,hae,hal,hh,hr,hua,qs,ra,rh,ru,rm,sn,sp))


输出解释:
This CONTENT_LENGTH is , (请求的正文的长度(是一个字符串))
This CONTENT_TYPE is text/plain ,(请求正文的MIME类型)
This HTTP_ACCEPT is text/html,application/xhtml+xml,application/xml;q=0.9,image/webp,image/apng,*/*;q=0.8,application/signed-exchange;v=b3 , (响应可接收的Content-Type)
This HTTP_ACCEPT_ENCODING is gzip, deflate (可接收的编码方式)
This HTTP_ACCEPT_LANGUAGE is zh-CN,zh;q=0.9 , (可接收的语言)
This HTTP_HOST is 172.16.0.69:8001 (目标主机与端口)
This HTTP_REFERER is unknown , (referring页面)
This HTTP_USER_AGENT is Mozilla/5.0 (Windows NT 10.0; WOW64) AppleWebKit/537.36 (KHTML, like Gecko) Chrome/76.0.3809.132 Safari/537.36 ,(客户端使用的软件版本信息)
This QUERY_STRING is , (单个字符串形式的查询字符串(未解析过的形式))
This REMOTE_ADDR is 172.16.0.114 ,(客户端的ip地址)
This REMOTE_HOST is ,(客户端的主机名)
This REMOTE_USER is unknown ,(服务器认证后的用户)
This REQUEST_METNOD is unknown , (一个字符串,例如:'GET'或者'POST')
This SERVER_NAME is localhost ,(服务器的主机名)
This SERVER_PORT is 8001(服务器的端口)
2.4.2 HttpRequest.COOKIES,HttpRequest.session, HttpRequest.user,HttpRequest.is_ajax后续详细介绍
三.响应对象(HttpResponse)
响应对象可以是多种形式的,html,重定向,404等,但是,无论视图本身包含什么逻辑,都要返回响应,具体的说,响应对象主要有三种方式,如:HttpResponse,render,redirect
3.1 HttpResponse()
括号内直接跟一个具体的字符串作为响应体
如:2.4.1的例子
3.2 render()
reder()
render(request,template_name[,context])
参数介绍:
    1.request:用于生成响应的请求对象,固定必须传入的第一个参数
    2.template_name: 要使用的模板的完整名称,必须传入,render默认会去templates目录下查找模板文件
    3.context:可选参数,可以传入一个字典用来替换模板文件中的变量

    总结:根据给定的字典渲染模板文件,并返回一个渲染后的HttpResponse对象
如:2.2的例子中有使用
3.3 redirect() 重定向
urls.py
from django.contrib import admin
from django.urls import include,path,re_path,register_converter
from app01 import views

urlpatterns = [
     re_path(r'^login',views.login),
     re_path(r'^register',views.register),
    re_path(r'^url',views.url),
]
views.py
from django.shortcuts import render,HttpResponse
from django.shortcuts import reverse
from django.shortcuts import redirect
import datetime
# Create your views here.
#返回重定向信息
def register(request):
    return  redirect('/login/')
#重定向到一个url
def url(request):
    return  redirect('http://www.baidu.com')

def login(request):
    return HttpResponse('login success')
扩展:
一 301和302的异同
    1.相同:301和302都是重定向,具体说就是浏览器在拿到服务器返回的这个状态码后会自动跳转到一个新的URL地址(浏览器会从响应头Location中获取新地址),用户看到的效果都是输入地址A瞬间跳转到另一个地址B
    2.不同:
    301表示旧地址A的资源已经被永久的移除了,即这个资源不可访问了,搜索引擎在抓取新内容的同时也将旧的网址转换未重定向之后的地址;
    302表示旧地址A的资源还在,即这个资源任然可以访问,这个重定向只是临时的从旧地址A跳转到地址B了,搜索引擎会抓取新的内容,兵器会保存旧的网址,从SEO层面考虑,302要号于301

二 什么场景重定向
    1. 网站调整
    2.网页被移动到一个新地址
    3.网页扩展名改变
四 JsonResponse
向前端返回一个json格式的字符串的两种方式
urls.py
from django.contrib import admin
from django.urls import include,path,re_path,register_converter
from app01 import views


urlpatterns = [
     re_path(r'^ylqh',views.ylqh),
     re_path(r'^zzl',views.zzl),
]
views.py
from django.shortcuts import render,HttpResponse
from django.shortcuts import reverse
from django.shortcuts import redirect
import datetime
# Create your views here.

import json
def ylqh(request):
    data=['salary','35000']
    return  HttpResponse(json.dumps(data) )

from django.http import JsonResponse
def zzl(request):
    data=['salary','500000']
    return JsonResponse(data,safe=False)
#默认safe=True代表只能序列化字典对象,safe=False代表可以序列化字典以外的对象
访问测试:


五.FBV和CBV
1.FBV是指基于函数的视图(Function base view),再次之前都是FBV
2.CBV是基于类的视图(Class base view)
案例:
urls.py
from django.contrib import admin
from django.urls import include,path,re_path,register_converter
from app01 import views


urlpatterns = [
    re_path(r'login/',views.LoginView.as_view()) #必须调用类下面的方法 as_view
]
view.py
from django.shortcuts import render,HttpResponse
from django.shortcuts import reverse
from django.shortcuts import redirect
import datetime
# Create your views here.
from django.views import View

class LoginView(View):
    def dispatch(self, request, *args, **kwargs):#可以在这个方法内做一些预处理
    #当请求url为http://127.0.0.1:8001/login会先触发dispatch的执行
    #如果http协议的是get调用get方法,post调用post方法

        obj = super().dispatch(request,*args,**kwargs)#必须继承父类的dispatch功能
        return obj #必须返回obj

    def get(self,request):
        return render(request,'login.html')

    def post(self,request):
        name=request.POST.get('name')
        pwd=request.POST.get('pwd')
        if name == 'zzl' and pwd == '123':
            res='login success'
        else:
            res='username or passwd is error'
        return HttpResponse(res)
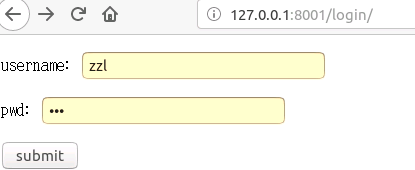
测试:

点击submit,跳转到如下界面


 浙公网安备 33010602011771号