1.Jmeter脚本
录制/编写Jmeter脚本(不做描述)
2.Maven项目配置
1、创建一个Maven工程
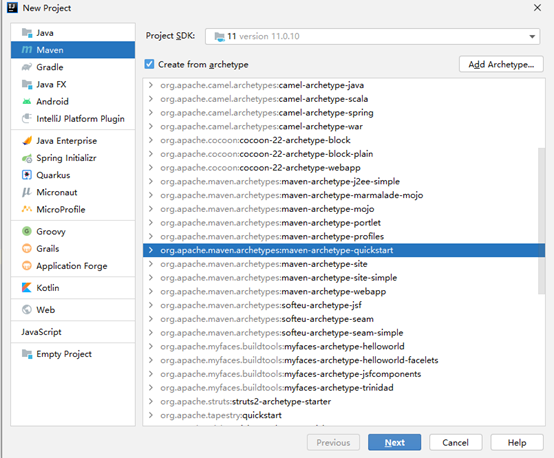
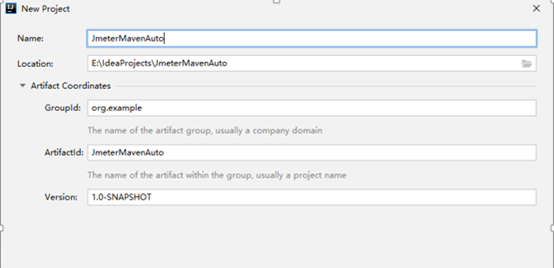
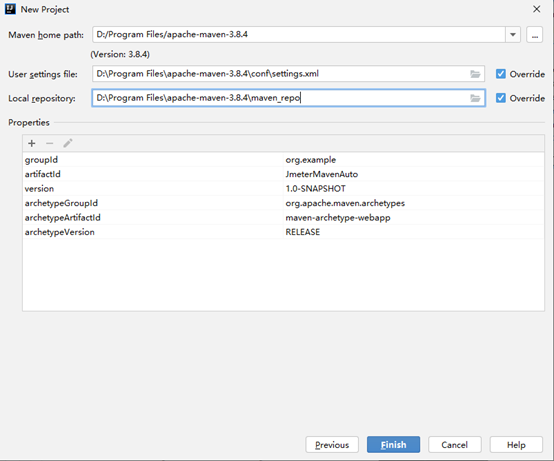
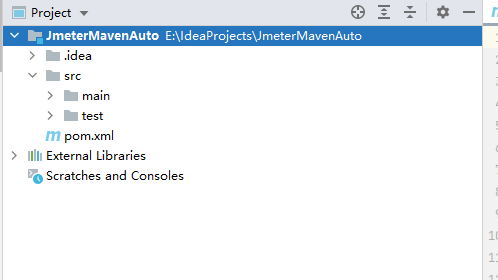
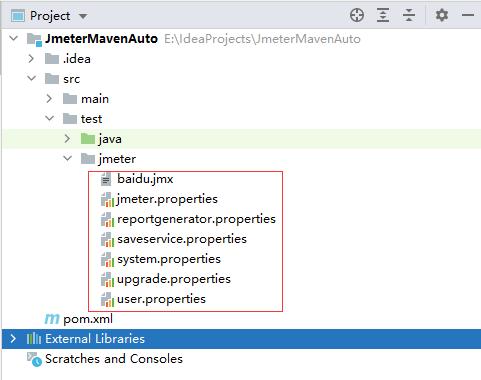
2、在src/test目录下新建一个jmeter的目录,用来存放jmeter脚本、配置文件、参数化文件;
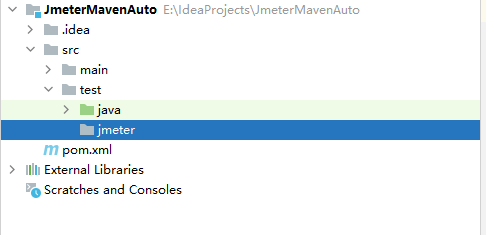
3、将需要运行的jmx文件放置在src/test/jmeter目录下,将jmeter bin目录下的配置文件拷贝到src/test/jmeter目录下;
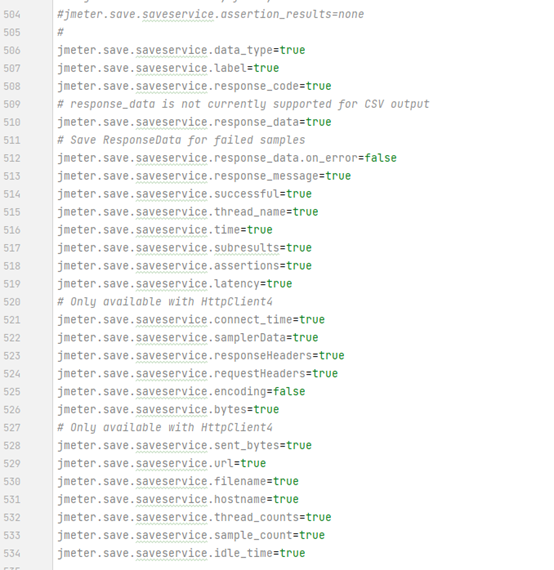
4、修改jmeter.properties文件中的属性值;

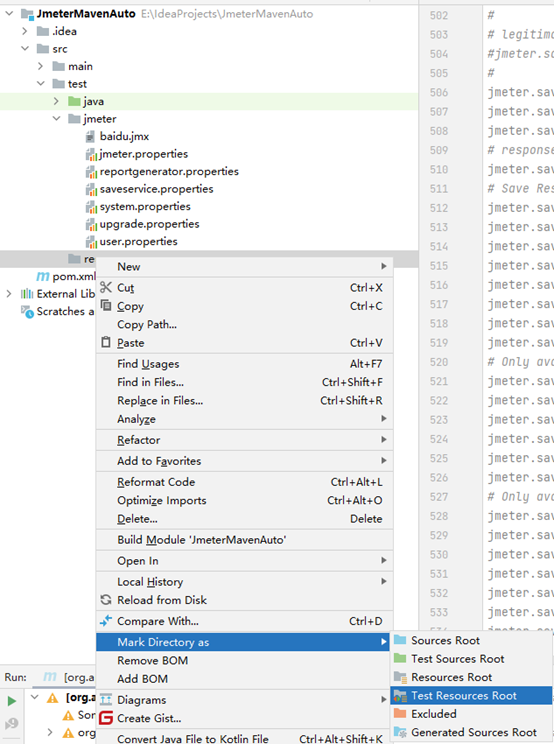
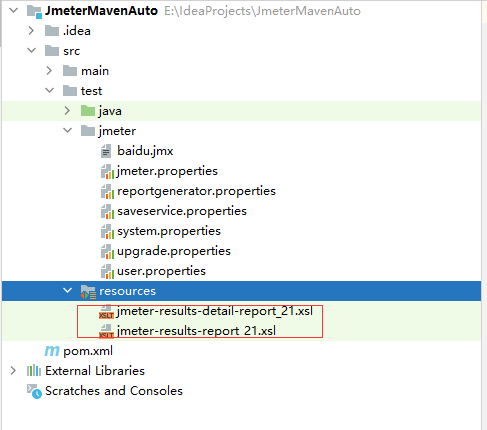
5、在src/test目录下新建一个resources的目录,并将它在项目属性中设置为Test resource用来存放资源文件;
6、修改pom.xml文件中的配置,该文件是maven的引入jar包、插件的重要配置文件;
<?xml version="1.0" encoding="UTF-8"?>

<project xmlns="http://maven.apache.org/POM/4.0.0" xmlns:xsi="http://www.w3.org/2001/XMLSchema-instance"

       xsi:schemaLocation="http://maven.apache.org/POM/4.0.0 http://maven.apache.org/xsd/maven-4.0.0.xsd">

   <modelVersion>4.0.0</modelVersion>


   <groupId>org.example</groupId>

   <artifactId>JmeterMavenAuto</artifactId>

   <version>1.0-SNAPSHOT</version>


   <name>JmeterMavenAuto</name>

   <!-- FIXME change it to the project's website -->

   <url>http://www.example.com</url>


   <properties>

      <project.build.sourceEncoding>UTF-8</project.build.sourceEncoding>

      <maven.compiler.source>1.7</maven.compiler.source>

      <maven.compiler.target>1.7</maven.compiler.target>

      <jmeter.result.jtl.dir>${project.build.directory}jmeteresults</jmeter.result.jtl.dir>

      <jmeter.result.html.dir>${project.build.directory}jmeterhtml</jmeter.result.html.dir>

   </properties>


   <dependencies>

      <dependency>

         <groupId>junit</groupId>

         <artifactId>junit</artifactId>

         <version>4.11</version>

         <scope>test</scope>

      </dependency>

   </dependencies>


   <build>

      <plugins>

         <plugin>

            <!-- 核心插件,用来执行jmx脚本,版本号对应的jmeter版本可在此地址查询 https://github.com/jmeter-maven-plugin/jmeter-maven-plugin/blob/master/CHANGELOG.md-->

            <groupId>com.lazerycode.jmeter</groupId>

            <artifactId>jmeter-maven-plugin</artifactId>

            <version>3.5.0</version>

            <configuration>


               <!-- 设置jmeter生成结果文件格式-->

               <resultsFileFormat>xml</resultsFileFormat>

               <!-- 设置忽略失败是否停止运行-->

               <ignoreResultFailures>true</ignoreResultFailures>

               <!--设置结果是否有时间戳-->

               <testResultsTimestamp>false</testResultsTimestamp>

               <testFilesIncluded>

                  <!-- //指定运行的jmeter脚本 -->

                  <jMeterTestFile>baidu.jmx</jMeterTestFile>

               </testFilesIncluded>

               <!-- 指定jtl生成目录 -->

               <resultsDirectory>${jmeter.result.jtl.dir}</resultsDirectory>

            </configuration>

            <executions>

               <execution>

                  <id>jmeter-tests</id>

                  <phase>verify</phase>

                  <!--脚本所在的文件夹 -->

                  <goals>

                     <goal>jmeter</goal>

                  </goals>

               </execution>

               <execution>

                  <id>configuration</id>

                  <goals>

                     <goal>configure</goal>

                  </goals>

               </execution>

            </executions>

         </plugin>

         <plugin>

            <!--根据xsl模版把jtl文件转换成html-->

            <groupId>org.codehaus.mojo</groupId>

            <artifactId>xml-maven-plugin</artifactId>

            <version>1.0-beta-3</version>

            <executions>

               <execution>

                  <phase>verify</phase>

                  <goals>

                     <goal>transform</goal>

                  </goals>

               </execution>

            </executions>

            <configuration>

               <transformationSets>

                  <transformationSet>

                     <dir>${jmeter.result.jtl.dir}</dir>

                     <stylesheet>src\test\resources\jmeter-results-detail-report_21.xsl</stylesheet>

                     <outputDir>${jmeter.result.html.dir}</outputDir>

                     <!-- 把jtl格式转传承html -->

                     <fileMappers>

                        <fileMapper

                              implementation="org.codehaus.plexus.components.io.filemappers.FileExtensionMapper">

                           <targetExtension>html</targetExtension>

                        </fileMapper>

                     </fileMappers>

                  </transformationSet>

               </transformationSets>

            </configuration>

            <!-- using XSLT 2.0 -->

            <dependencies>

               <dependency>

                  <groupId>net.sf.saxon</groupId>

                  <artifactId>saxon</artifactId>

                  <version>8.7</version>

               </dependency>

            </dependencies>

         </plugin>

      </plugins>

   </build>

</project>
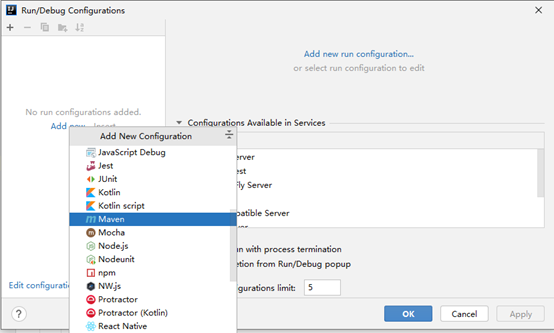
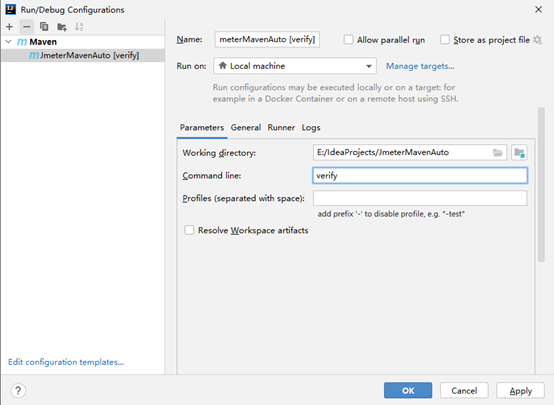
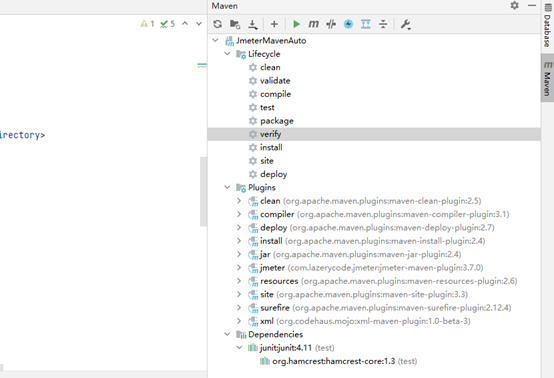
7、Run->Edit Configurations ,Goals里填入verify;
3.Maven项目运行
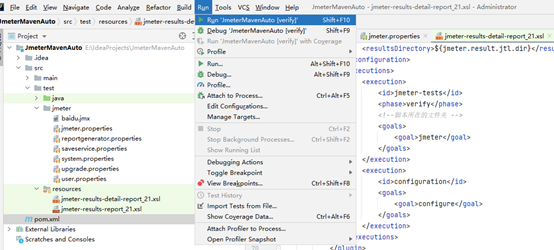
1、运行工程,点击Run或者Maven-verify
2、执行结果如下表示执行成功,生产相应target文件夹;
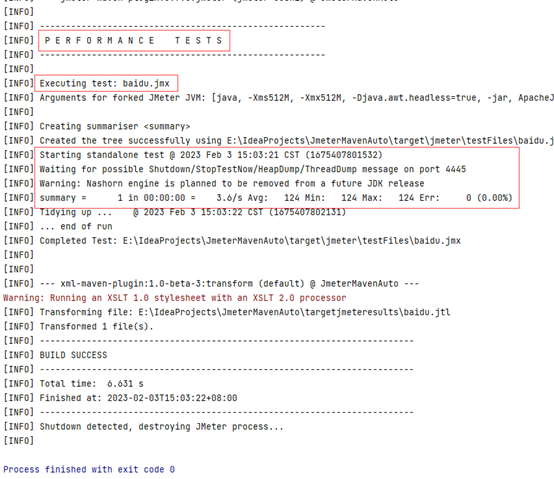
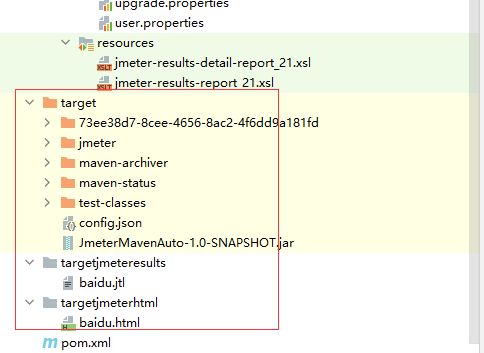
忽略警告,Warning: Running an XSLT 1.0 stylesheet with an XSLT 2.0 processor,因为和提供的XSL样式表文件版本有关系。
3、打开本地项目路径,\JmeterMavenAuto\targetjmeterhtml\baidu.html,用浏览器打开html文件;

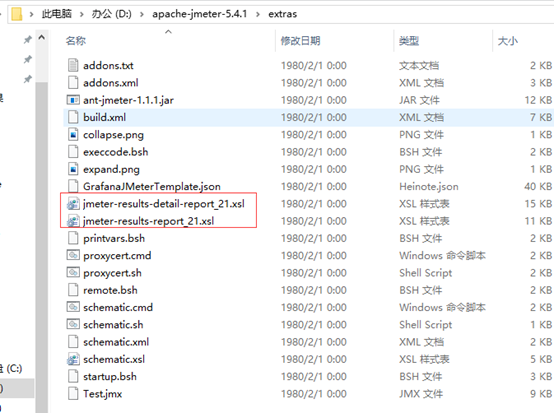
4、html文件图片未加载成功,到jmeter安装目录的extras文件夹中,找到collapse.png、expand.png文件,复制到targetjmeterhtml文件夹中,然后刷新html报表;

5、报告优化,添加90%Line和QPS
1)添加90%line模板
<xsl:template name="max">
   <xsl:param name="nodes" select="/.." />
   <xsl:choose>
      <xsl:when test="not($nodes)">NaN</xsl:when>
      <xsl:otherwise>
         <xsl:for-each select="$nodes">
            <xsl:sort data-type="number" order="descending" />
            <xsl:if test="position() = 1">
               <xsl:value-of select="number(.)" />
            </xsl:if>
         </xsl:for-each>
      </xsl:otherwise>
   </xsl:choose>
</xsl:template>

<!-- 90% line time -->
<xsl:template name="lineTime">
   <xsl:param name="nodes" select="/.." />
   <xsl:choose>
      <xsl:when test="not($nodes)">NaN</xsl:when>
      <xsl:otherwise>
         <xsl:for-each select="$nodes">
            <xsl:sort data-type="number" />
            <!-- last()返回当前上下文中的最后一个节点位置数-->
            <!--ceiling(number)返回大于number的最小整数-->
            <!--floor(number)返回不大于number的最大整数-->
            <!--position()返回当前节点位置的数字-->
            <!--number(object)使对象转换成数字-->
            <xsl:choose>
               <!-- 当只有一个节点时,向上取整 -->
               <xsl:when test="last() =1">
                  <xsl:if test="position() = ceiling(last()*0.9)">
                     <xsl:value-of select="number(.)" />
                  </xsl:if>
               </xsl:when>
               <xsl:otherwise>
                  <xsl:if test="position() = floor(last()*0.9)">
                     <xsl:value-of select="number(.)" />
                  </xsl:if>
               </xsl:otherwise>
            </xsl:choose>
         </xsl:for-each>
      </xsl:otherwise>
   </xsl:choose>
</xsl:template>
2)在Summary中添加标题
<tr valign="top">
   <th># Samples</th>
   <th>Failures</th>
   <th>Success Rate</th>
   <th>Average Time</th>
   <th>Min Time</th>
   <th>Max Time</th>
   <th>90% Line</th>
   <th>TPS</th>
</tr>
3)在Summary中添加allLineTime和QPS变量
<xsl:variable name="allMaxTime">
   <xsl:call-template name="max">
      <xsl:with-param name="nodes" select="/testResults/*/@t" />
   </xsl:call-template>
</xsl:variable>

<!--New add 90% line-->
<xsl:variable name="allLineTime">
   <xsl:call-template name="lineTime">
      <xsl:with-param name="nodes" select="/testResults/*/@t" />
   </xsl:call-template>
</xsl:variable>
<!--将毫秒转换成秒-->
<xsl:variable name="qps" select="$allCount*1000 div $allTotalTime" />
4)Summary中调用allLineTime和QPS
<td align="center">
   <xsl:call-template name="display-time">
      <xsl:with-param name="value" select="$allMaxTime" />
   </xsl:call-template>
</td>

         <!--调用allLineTime和qps-->
<td align="center">
   <xsl:call-template name="display-time">
      <xsl:with-param name="value" select="$allLineTime" />
   </xsl:call-template>
</td>
<td align="center">
   <xsl:call-template name="display-time">
      <xsl:with-param name="value" select="$qps" />
      </xsl:call-template>
</td>
5)在pagelist中添加标题
<table align="center" class="details" border="0" cellpadding="5" cellspacing="2" width="95%">
   <tr valign="top">
      <th>URL</th>
      <th># Samples</th>
      <th>Failures</th>
      <th>Success Rate</th>
      <th>Average Time</th>
      <th>Min Time</th>
      <th>Max Time</th>
      <th>90% Line</th>
      <th>TPS</th>
      <th></th>
   </tr>
6)在pagelist中添加allLineTime和QPS变量
<xsl:variable name="maxTime">
   <xsl:call-template name="max">
      <xsl:with-param name="nodes" select="../*[@lb = current()/@lb]/@t" />
   </xsl:call-template>
</xsl:variable>

<!--new add 90% line time-->
<xsl:variable name="nintyTime">
   <xsl:call-template name="lineTime">
      <xsl:with-param name="nodes" select="../*[@lb=current()/@lb]/@t" />
   </xsl:call-template>
</xsl:variable>
<xsl:variable name="qpsTime" select="$count*1000 div $totalTime" />
7)在pagelist中调用allLineTime和QPS变量
<td align="right">
   <xsl:call-template name="display-time">
      <xsl:with-param name="value" select="$maxTime" />
   </xsl:call-template>
</td>

<!--Page页面添加90% LineTime-->
<td align="center">
   <xsl:call-template name="display-time">
      <xsl:with-param name="value" select="$nintyTime" />
   </xsl:call-template>
</td>
<td align="center">
   <xsl:call-template name="display-time">
      <xsl:with-param name="value" select="$qpsTime" />

   </xsl:call-template>
</td>
8)最终效果

4.其他说明
1、Jmeter属性设置的3中方式:
第一种:将jmeter.properties、saveservice.properties、system.properties、upgrade.properties、user.properties复制到项目中,进行修改;
第二种:直接在pom.xml文件中进行配置,放在<configuration>节点下;
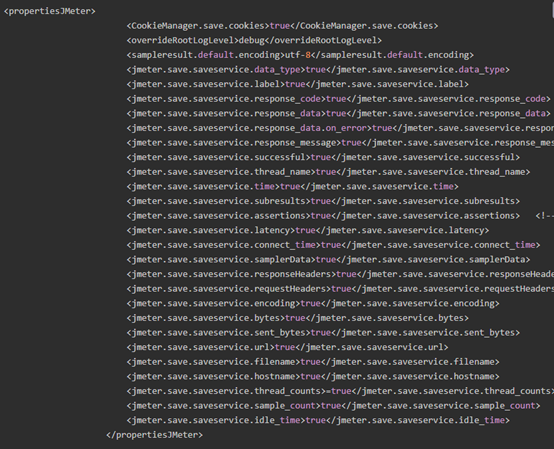
第三种:混合配置。
2、如果需要删除不必要的脚本,因为maven项目是会把src/test/jmeter下的测试脚本复制到target/jmeter/testFiles路径下,这两个路径下的脚本都要删除。(若只删除了src下的,则在运行前进行一次clean)
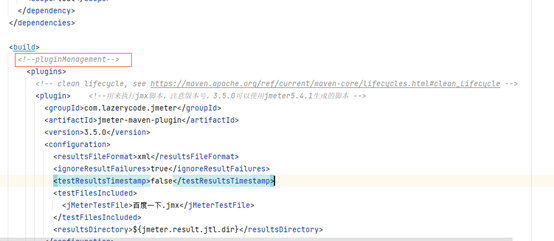
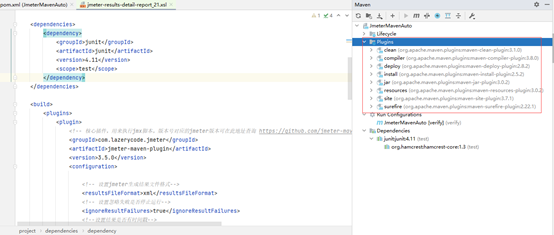
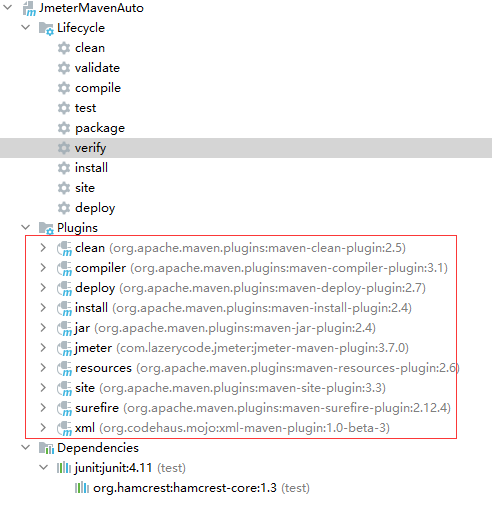
3、在运行maven后发现未生成html文件夹,查看maven-plugins未引入jmeter插件,引入成功后再次运行结果正确。(重新编辑pom.xml文件保存后引入成功)
maven-plugins未引入jmeter插件一般情况是我们在创建maven项目的时候 默认存在的那个plugins标签是在pluginManagement标签下的,而pluginManagement标签只是对插件的一种声明 而不会对插件进行加载,所以解决办法是我们要在build标签下再写一个plugins标签,然后再把plugin标签放进去。
